Search the Community
Showing results for 'capacity slots'.
-
As per the design documents, Bandits has always had problems with the identity of their cards and splash redundancy. Skyfire Drake is to Windhunter, Gunner to Ashbone Pyro, Frenetic Assault to Amok and further. Banditos faces the largest redundancies in the lineup as a S->S type, which even T1 unit cards are outperforming. This post is made as a long standing Bandit's player, and isn't meant to be any sole verdict on the state of cards within Battleforge, nor any effort to change the game beyond Banditos themselves*. First let us look at the card itself: Banditos are a swarm/anti swarm unit through their passive, Alliance. Swarms being within the Bandit archetype. Banditos have a Complexity Calculation of 2, having only passives, with Alliance containing external dependencies (sum of surrounding enemy/ally units). While Alliance stacks multiple times with itself, the function of the passive remains consistent and straightforward (though it may be interpreted as more complex or multi-stage, Alliance requires no further game knowledge). Banditos lack synergy with other Bandits cards, which is contrasted by other Bandits cards granting them a factional synergy. Banditos has the highest health value among Bandit unit cards in T2 at 840 HP (beating Bandit Spearmen by 30 HP). Banditos has a low attack power for a T2 melee unit at 660 ATK, which rises with 3 surrounding units up to 990 ATK, and a maximum potential of 1650 ATK at 9 surrounding units (comparable with Nightcrawler's Frenzied 1630 ATK). Banditos can be summoned four at a time by the T3 Corsair (Nature) for 120 power, a design choice seemingly made for Gifted Alliance to be active without needing the Corsair itself nearby, or for Motivate/Blood Healing to be more easily used underneath a supporting Corsair. Within PvE, Banditos can grant a significant advantage when swarming, but in practice suffers from a lack of support options such as Nature's healing spells. Earth Crystal and Ice Crystal appear to be heavily encouraged within Bandits, as many cards have a Nature or Frost affinity available, but these neutral buildings just help an already ahead player get further ahead. Banditos require a large power pool to make a difference, and only when they're not being knocked down or facing area damage. For PvP, Banditos face significant use-case issues: Army deterioration near immediately disables Alliance. Bandit's limited sustainability and high offense exasperates Banditos' lackluster statistics, especially when contrasted with Bandit Spearmen (who do not rely upon a conditional effect) having nearly the same statistics of a Banditos with Alliance active (without factoring in Bandit Spearmen's weapon change ability). Banditos (Nature) requires a significant lead to utilize fully, and in the situations 7-10 units can be massed up (and not lost to spells) the match has likely been decided first by other cards. Banditos (Frost) is a counter to swarms (without any ability to intercept said swarms). Banditos (Frost) are not useful against any swarm cards. Banditos do not counter Sunken Temple and its Pest Creepers, nor Undead Army or Harvester, while Thugs will always beat an equal power's worth of Banditos if Gang Up is active alongside proper targeting. Fire/Shadow has other S->S counter units, which Banditos offers no play advantages over. Thugs are more durable when swarming in T1 saving you a deck slot, Rippers will bounce back from spells and counter corpse use, while Dark Elf Assassins are already one of the most power-effective S->S units; and happen to be ranged. The primary issue with balancing Banditos is that they are produced by Corsair (Nature) for 30 power each, without binding power. While I personally believe the impact of buffing Corsair (Nature)'s Banditos will not shake PvE's balance, there may be significant problems in PvP if Banditos' are over tweaked. Corsair drops (especially Banditos) are currently in an okay spot balance wise for T3 PvP, but this is about the T2 unit, Banditos, not Corsair! So what can be done? Tweaking the units combat statistics to better compete with other cards in Fire/Shadow which are S->S unit counters. Again, this could be an issue with Corsair, but Banditos are not winning games outside of being the ability of another card. Raising Banditos' complexity, since the unit has a budget as an uncommon card for new effects. Maybe something which will support a swarm playstyle earlier for Bandits than T3 (as admitted to be the case by the Bandit Design documents). Perhaps a controversial take, but lowering Banditos power cost (maybe below 50 even) may grant the card some space in a deck without altering Corsair's functionality. Thugs are already outperforming Banditos with their Gang Up ability, but its questionable whether this approach would actually enable swarms, instead encouraging smaller trades over and over. Another route (which may be better as its own card) may be for Banditos to include a rapid constructing building, and over time it resummons these Banditos or has an ability which you can spawn another for a price. Again this isn't an effort to change the game beyond Banditos themselves, with Corsair it's a tricky subject to approach. The state of play for Banditos is defined by other cards in a deck of limited slots, and currently Banditos don't have a role alongside other Fire/Shadow cards.
-
I agree, that Frost is at an advantage in the matchup against pure Shadow right now. A few considerations for the matchup: - Nightguard is still very good against War Eagle. She will neutralize a lot of the pressure a Frost player can throw at you. Assuming you can make good use of Netherwarp to get your hands on some of the unbound eagles, it might open up a direct win condition too. - The main reason I mentioned Nox Carrier is the value that comes from stacking unbound unit counts over time against the low dps of Frost on T3. This is a different playstyle from building a lead through kicking powerwells, which can be tough due to Amii Ritual. In order to execute the strategy you prioritize getting a lot of rippers and keep them alive for some time so you can launch a major attack once void returned to your power pool. There will be a few buffs to some of the cards pure Shadow wants to use on T3 next patch, Nox Carrier is one of them. - A possible move to cheese Frost or hyperscaling players in general is to handshake a lot of bonus wells in the early game (ideally you want 8 or more). This opens up an economy which not only allows a fast T3, but also makes T4 an actually realistic move. Frost does not really get map control, so by contesting the center in the early game you can secure the orb spots for such a strategy. Pure Shadow has quite a few flex slots, so there is space to prepare for this without really sacrificing too much early game strength.
-
Most people play rpve not for beating a challenge but for simply farming gold and bfp. And why bother with spending way more time and effort on beating lost souls when you can simply restart? Same with incredible Mo and global warming. Why waste deck slots for a potential encounter when you can simply restart with an additional deck slot? And even if you don't have that mentality, when you play with randoms, it's almost guaranteed that at least one of them will either quit immediately or isn't experienced enough to beat the map. But the root of the problem is that Lost Souls is simply stronger than the other factions.
-
 I like to request decks from other players after a game to copy and also play it later. If I am missing cards, those slots will be emtpy after copyingthe deck. That is understandable - but very sad because then the deck is basically useless. My suggestion (coming from Factorio): When I am missing cards, please let me still copy and save the entire deck - add missing cards in a kind of "ghost" mode with quantity 0. As QoL, add a reminder when trying to start a game with "ghost" cards in the deck.
 -
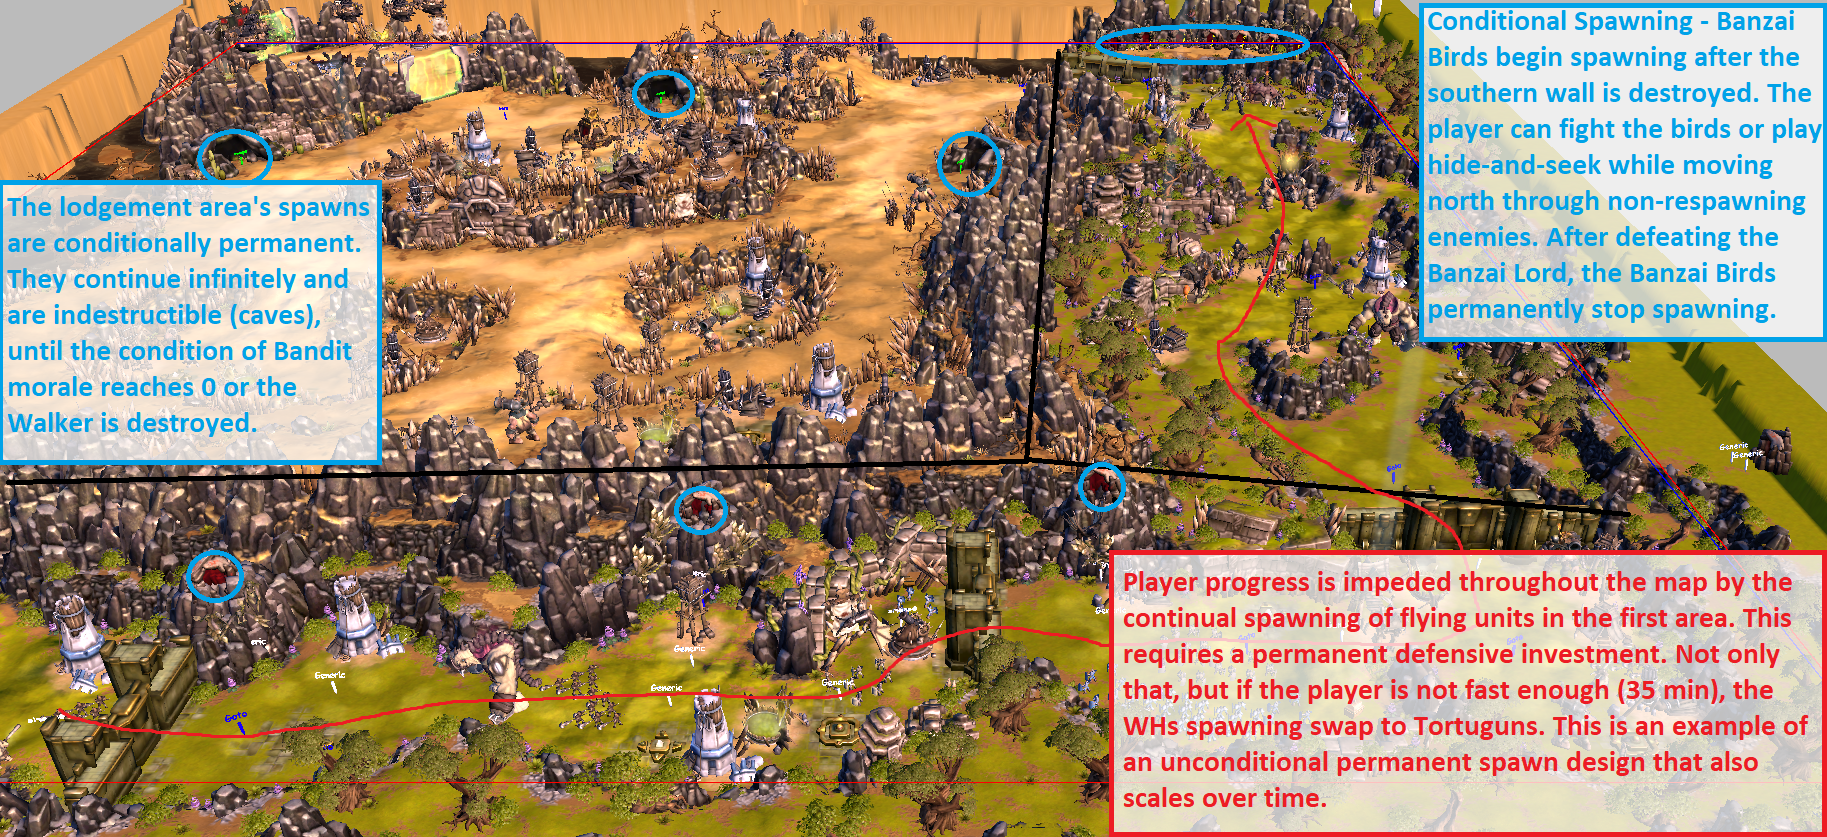
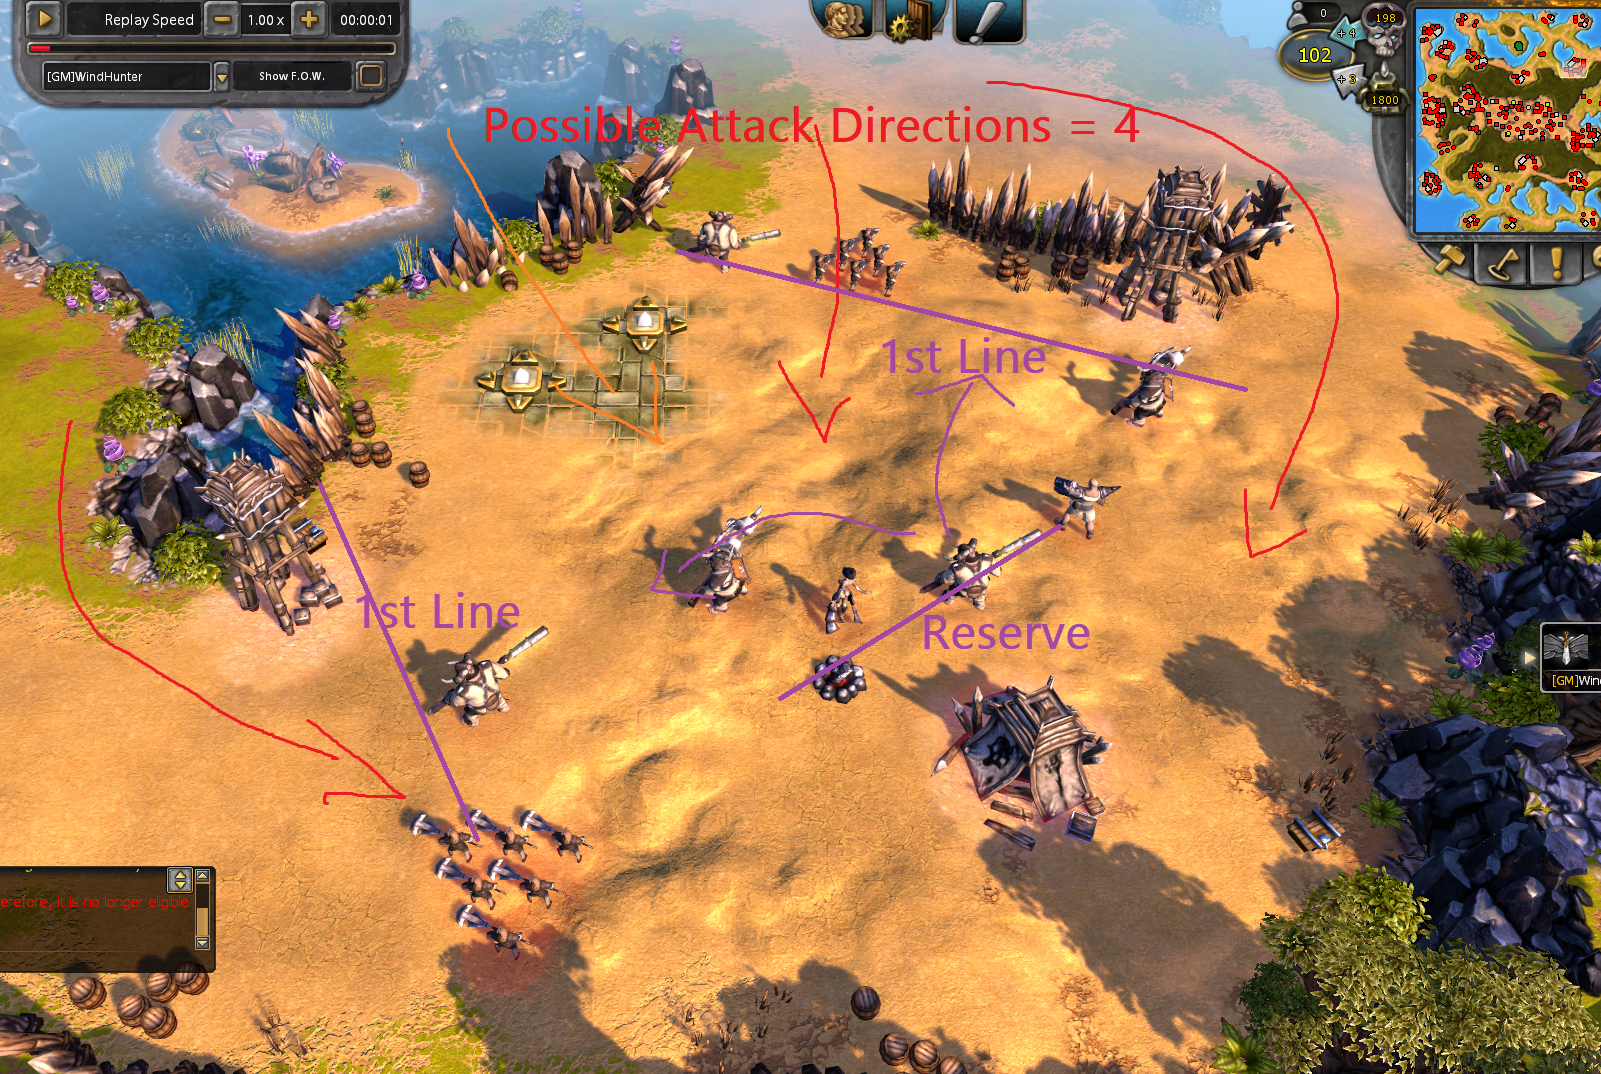
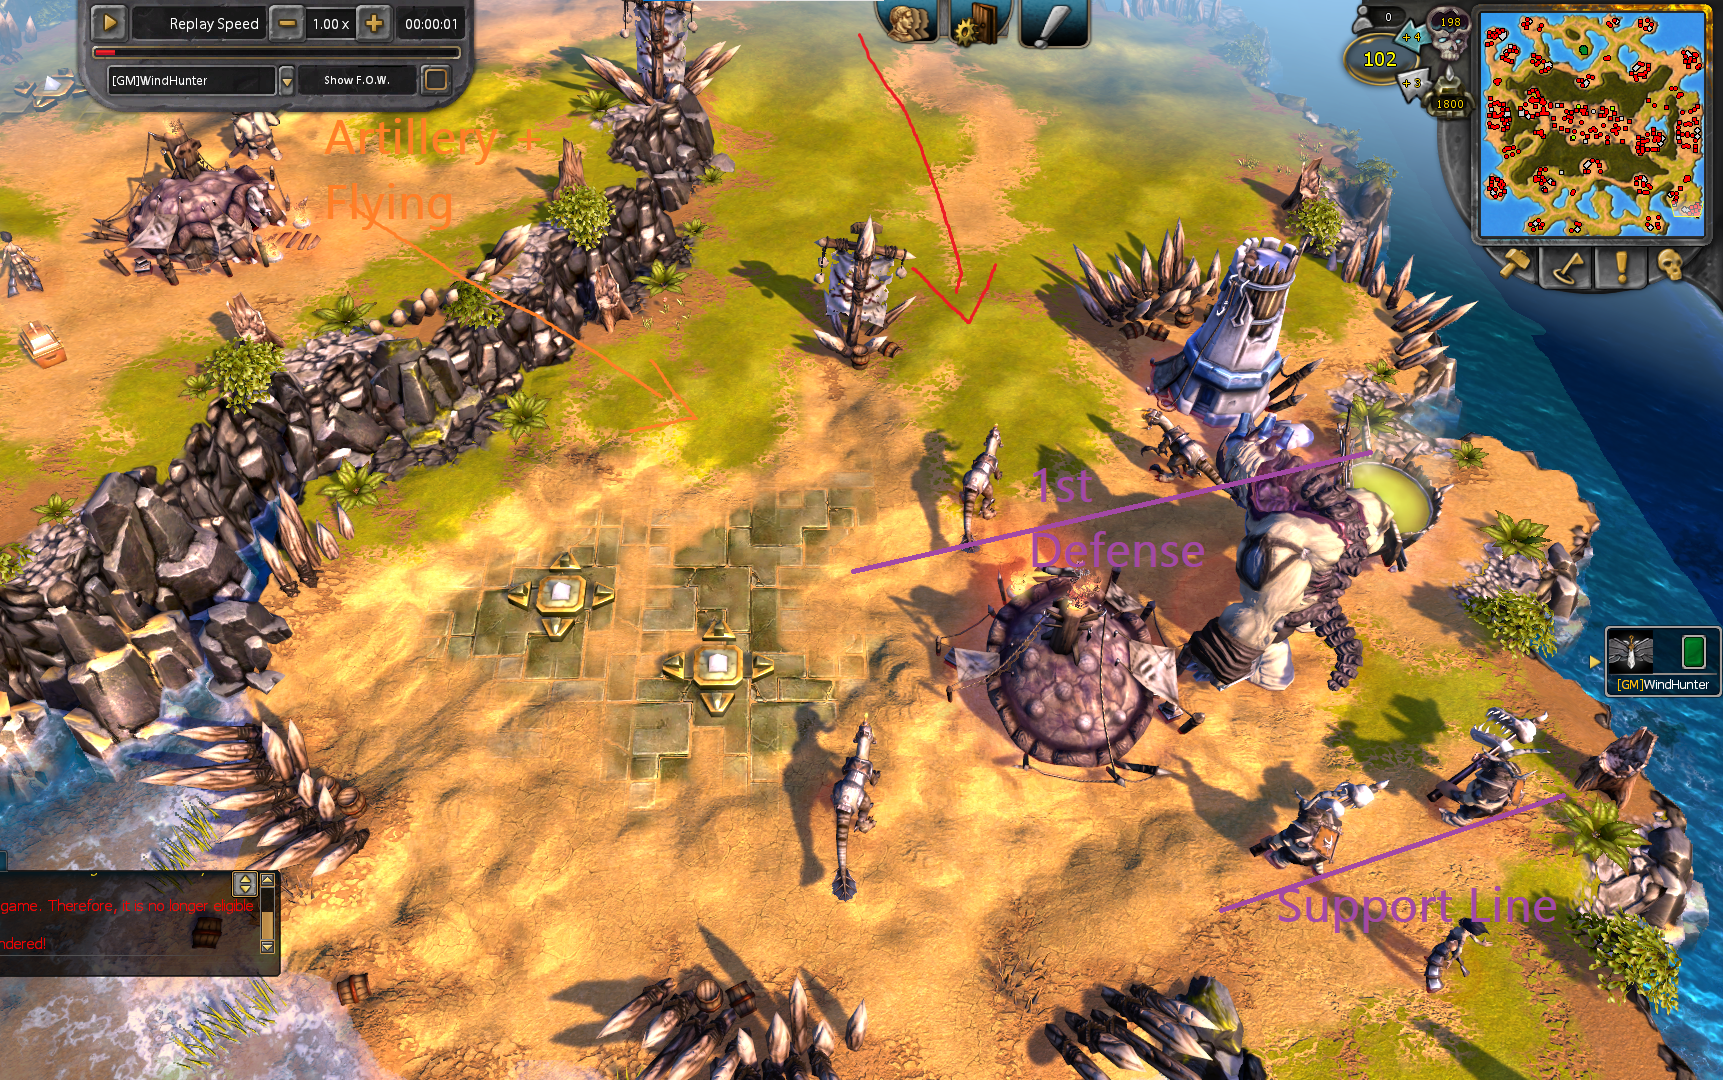
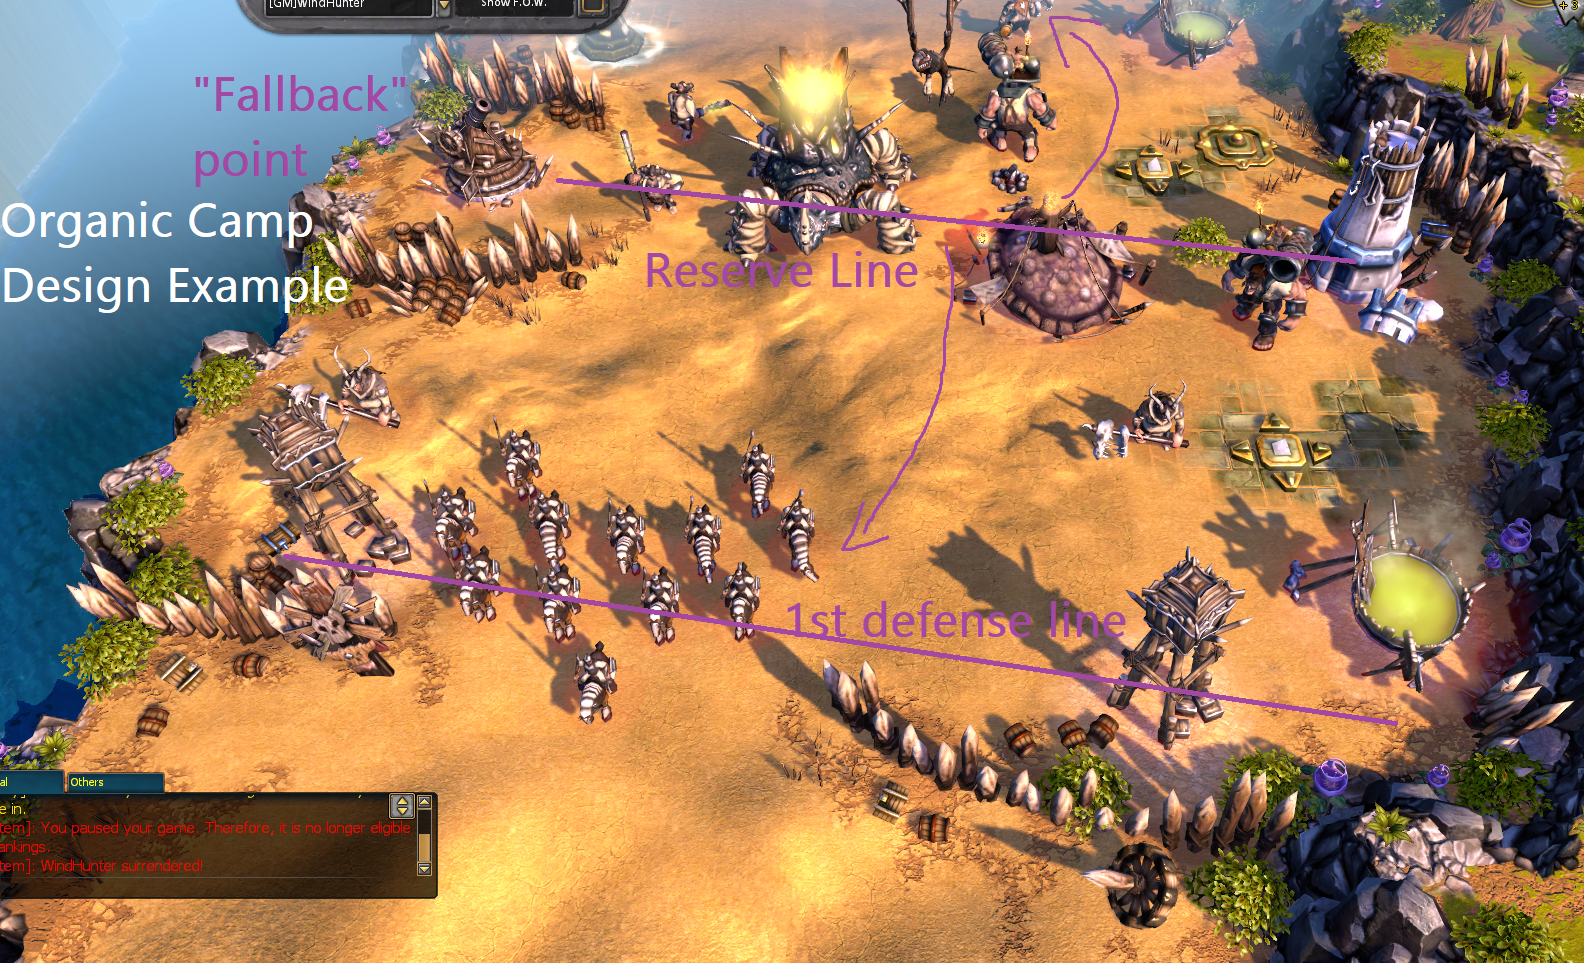
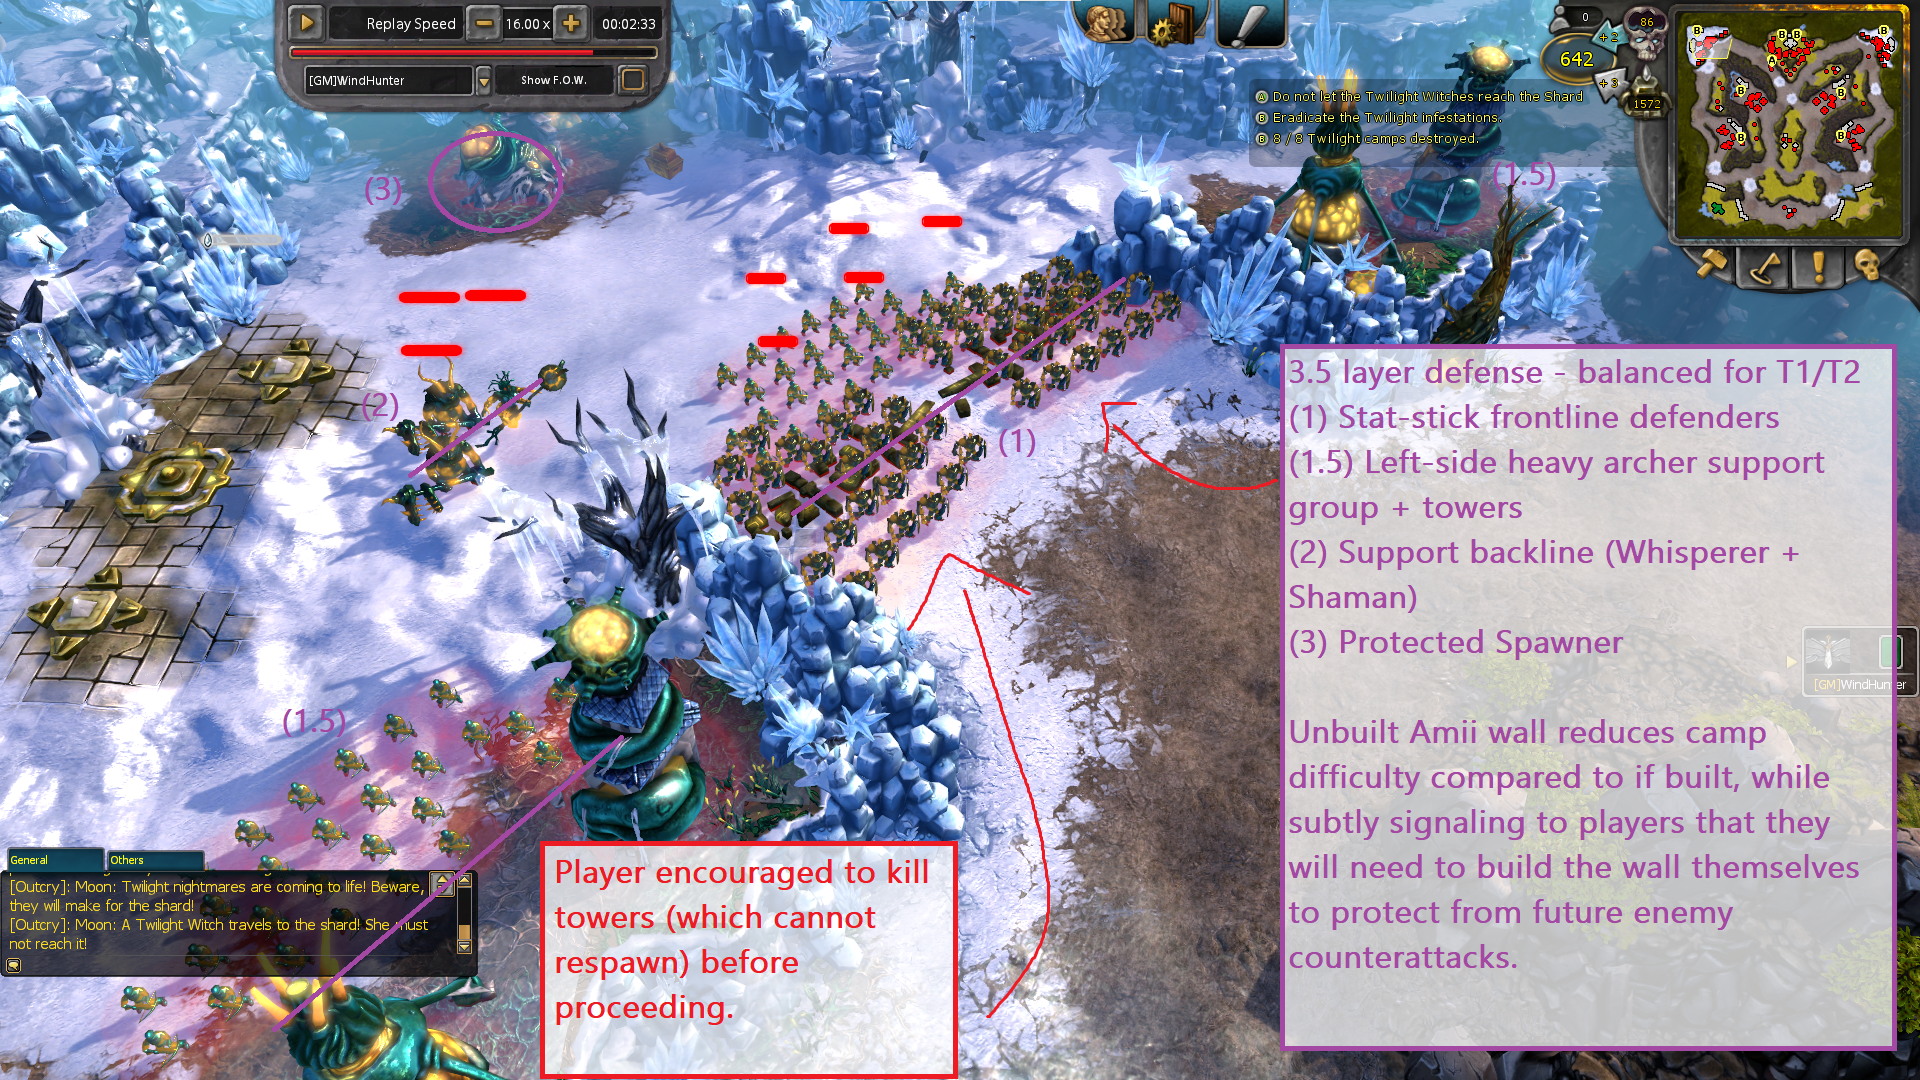
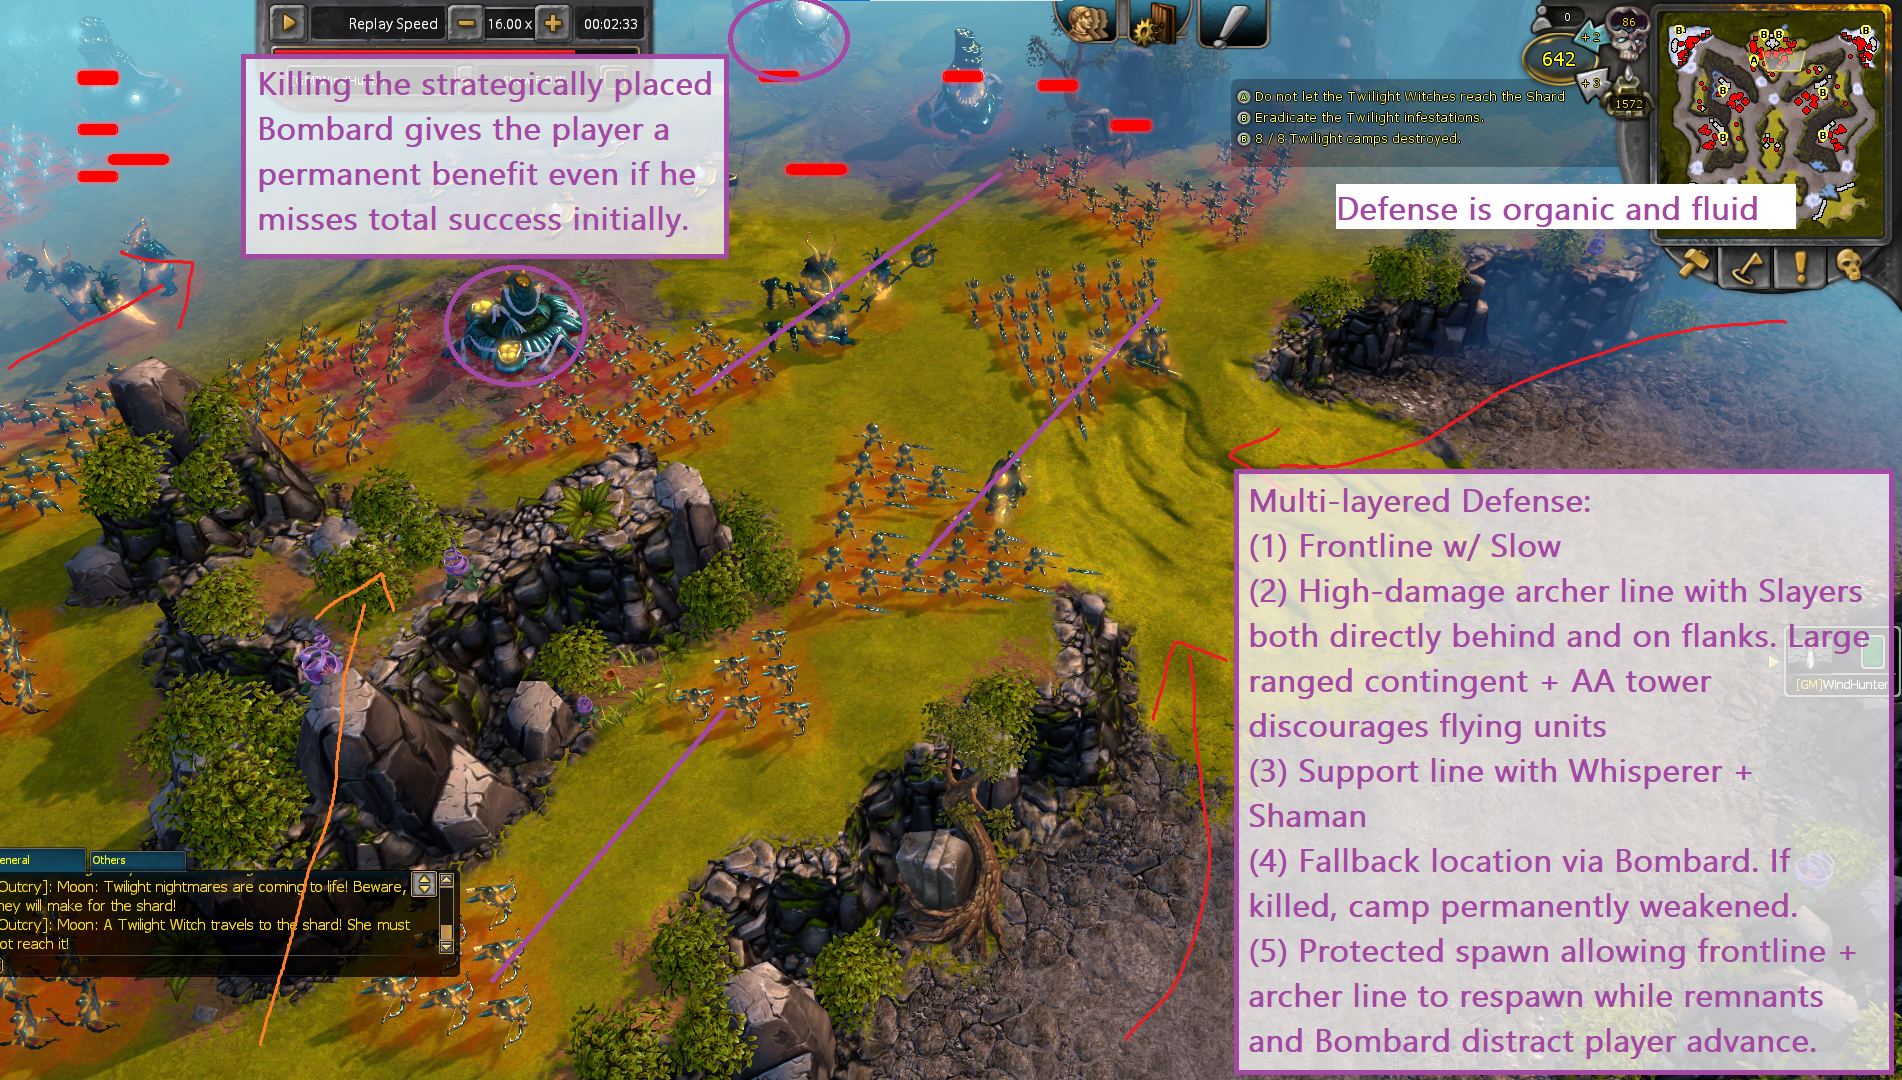
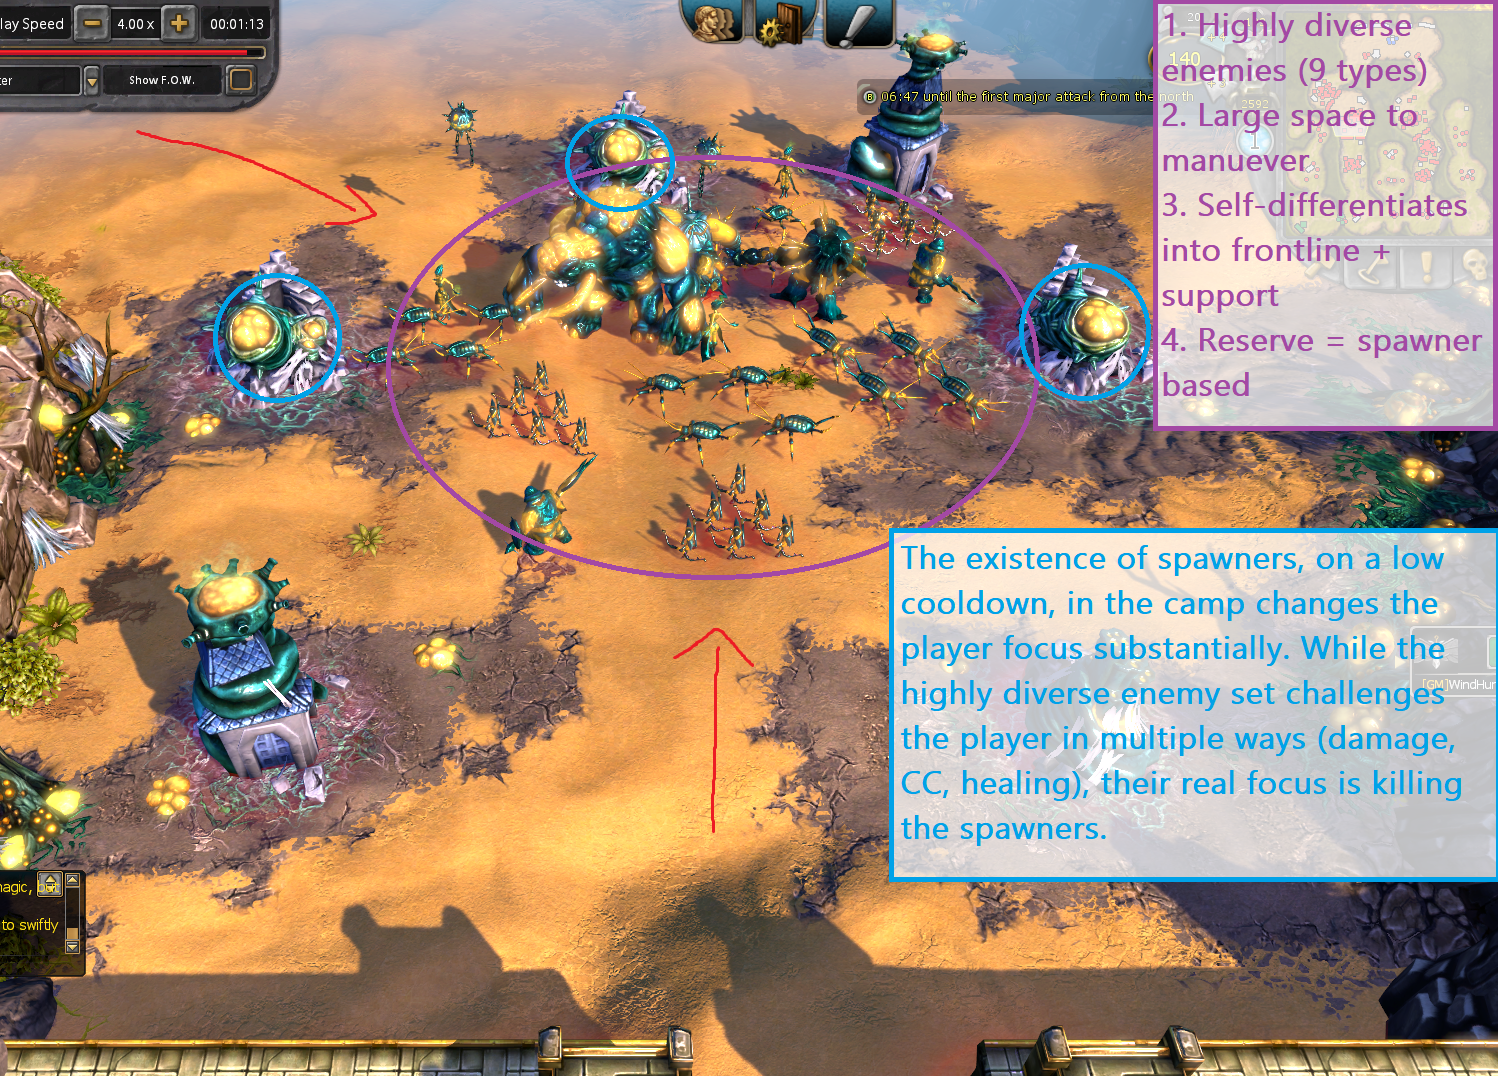
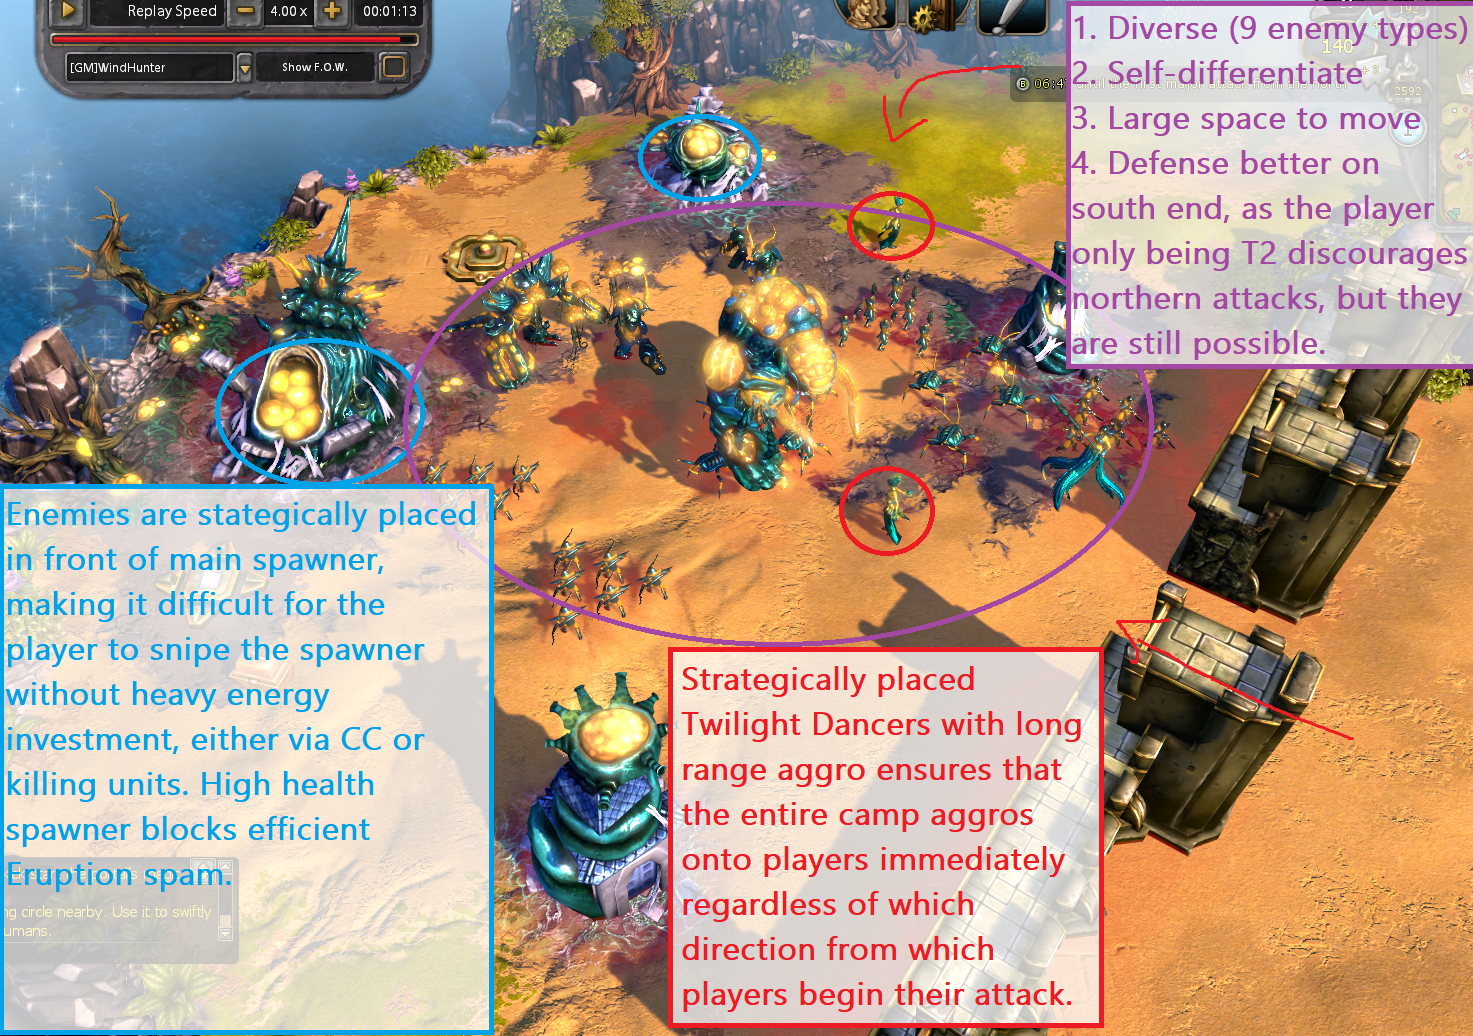
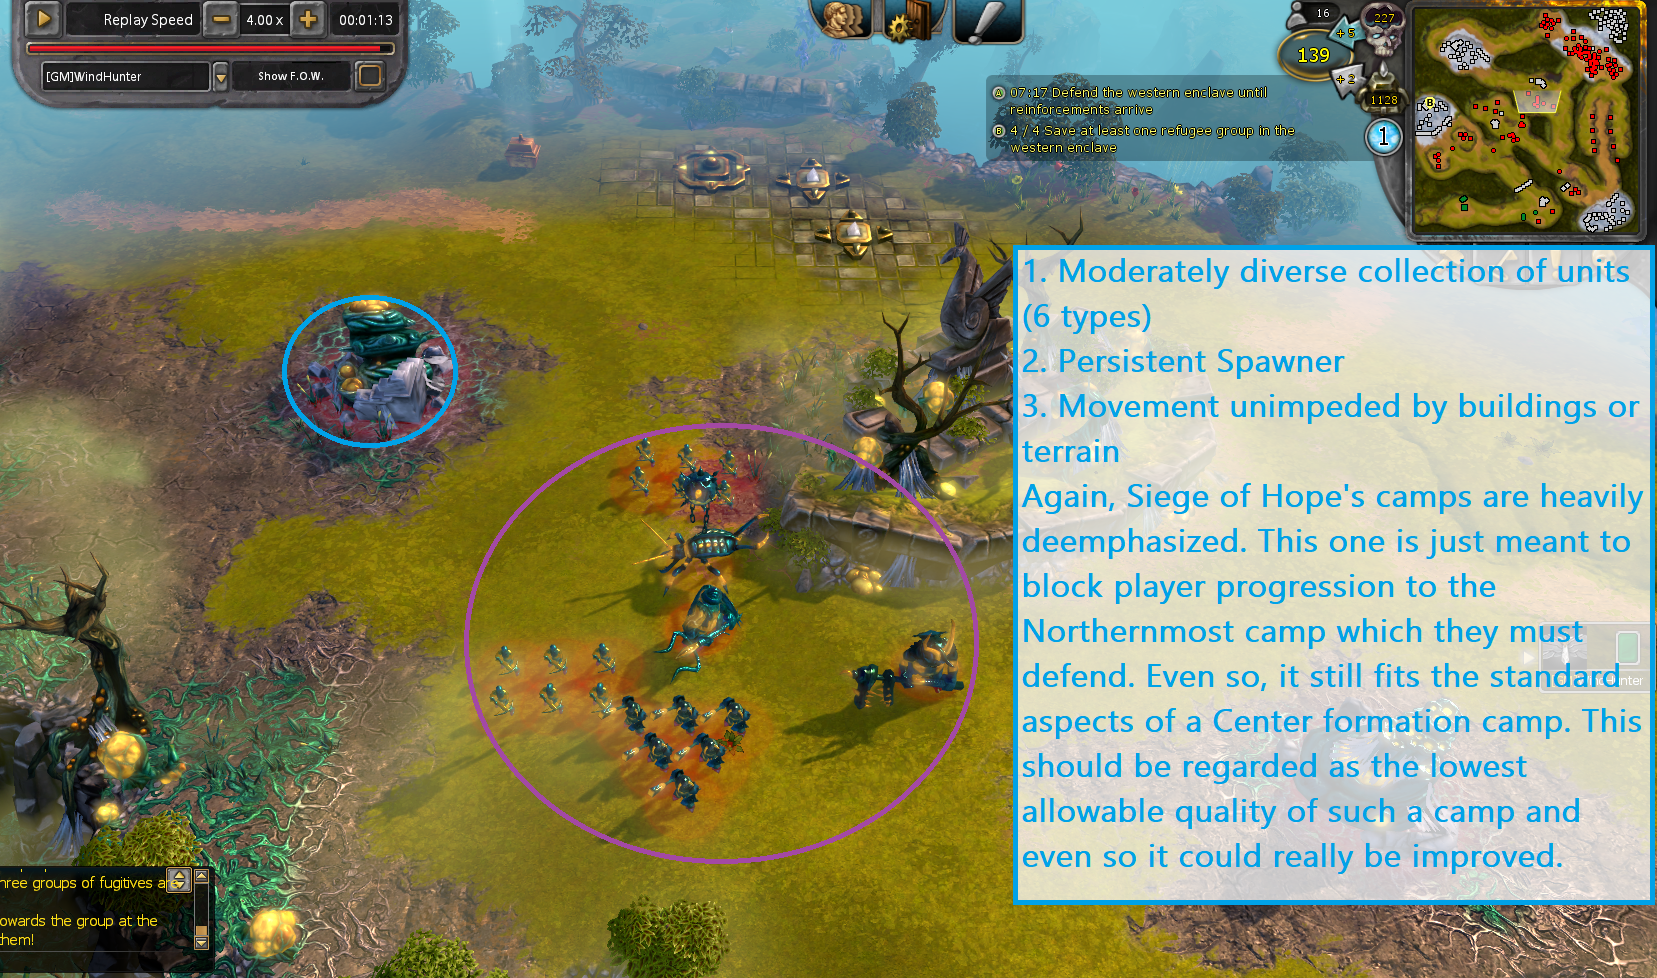
Mapmaking Fundamentals - Spawn Design (Cont.) Practical Considerations In the course of testing and balancing new maps, a number of important questions have arisen regarding practical considerations which must be taken into account. Here we will examine the various practical concerns which have appeared during the development process regarding both spawn and camp design. Small vs. Large Spawn Buildings Each faction should have a small and a large spawn building. As a standard practice, the small spawner should have 1200 life points and the large spawner 3200 life points. There are a few exceptions to this rule, such as the Fire and Nature gateways in Titans, which have 2000 life points, and Lost Temple, which only has 1000 life points. In the case of Lost Souls, a large spawn building is currently in the process of being developed, after which the small spawner Lost Temple will likely see its health pool standardized. There are a few ways to utilize the different spawn buildings. The most straightforward method is to use small spawners for T1 and T2 camps, and large spawners for T3 and T4 camps. This creates a sense of progression and ensures that later camps are not easily cheesed through Eruption spam. On this topic, it is important to position primary spawn buildings within camps such that the player cannot easily destroy them without interacting with the camp itself. Spawn buildings, particularly the primary ones, should be the most protected things within standard camp arrangements. Another way to use the spawners is to differentiate them by purpose, such as objective spawners being of one type while standard camp spawners are of another type, though it is also common to use a spawner as a camp and an objective spawner simultaneously. Some maps alternative between small and large spawners as a way to differentiate between the type of units being spawned. A good example of this would be Encounters with Twilight. The various lodgement areas of Encounters are punctuated by small spawners which only spawn weaker units, while the main spawner is a large spawner which generates the main threat in each respective area. Beyond lodgement areas where the aforementioned type of design is common, some individual camps include both types of spawners with a similar goal, small spawners for weaker units and large spawners for stronger units. Higher tier camps with increased levels of complexity can create a sense of strategic depth and player progression by having a large spawner nestled in the back, with various minor objectives, such as small spawners and artillery buildings, placed in easier to access locations for the player to focus on and destroy. This allows the player to move forward and destroy an objective, thereby permanently weakening the camp's defenses, without requiring that he destroy the camp outright all at once. An example of this might be that in a Twilight map, the primary large spawner generates Abominations and Evil Eyes, while a small spawner closer to the player's expected point of entry generates Whisperers and Mindbenders. While the majority of damage comes from the large spawn units, the destruction of the small spawn would be a major win for the player because it would substantially reduce the camp's CC capacities. Time to Respawn & Player Downtime Imagine playing a Twilight map and moving forward into a well fortified camp. You destroy the frontline of Vilebloods, move forward to wipe out the archer line, and then just as you are about to kill the spawner a second wave of Vilebloods spawn and destroy your army. By the time you return, the entire camp has respawned and because none of it was towers or support structures, you essentially achieved nothing. What I just described is how a normal player experiences trying to destroy the Shadow camp on Nightmare Shard. In the face of this frustration, the player often chooses to learn how to cheese the map, or they decide to suicide their army for the spawn building from the beginning so they can feel like they actually achieved something. What this example illustrates is the problem of camp respawns and how they relate to camp design. A typical spawner in BattleForge has a time to respawn of 15 seconds. This is universal and encompasses nearly all maps and spawners in the game. It should be fairly obvious that the lack of granularity in what is an essential component of map design is a fundamental issue for the balance of both individual camps and maps as a whole. Time to Respawn Considerations: 1. Individual unit strength - If the individual units are weaker, the camp might be balanced around more frequent respawns. This can create a pleasure experience of fighting through waves of the enemy. If the camp's units are relatively strong compared to the player, such as our example of the player fighting Vileblood's with T1, the respawn timer should be longer because each unit that respawns is a substantially bigger threat. 2. Unit to building ratio - If the camp is entirely made up of units, thereby providing no ability for the player to permanently degrade its strength except through killing the spawner, it might be appropriate to exclude some key units from respawning at all or to increase the overall time to respawn. If a camp's strength is mostly concentrated in buildings, a faster respawn timer for units can be used because only a small percentage of the camp's total strength will be reviving. 3. Player Tier - In lower tiers, it is harder for players to reach and destroy spawn buildings due to a lack of available tools. In higher tiers, players have numerous options for disabling units and destroying key buildings, including spawners. This suggests that longer respawn timers are better for lower tier camps, because in these camps players usually have to fight through a significant portion of the camp to be able to begin damaging the spawn building. The same is not true for higher tier camps and therefore the respawn timers can be shorter. In general, the higher the tier, the more complex a camp can be in its design, and faster respawn timers are a component of camp complexity. 4. Distance to Spawner - In a simplified form: time to respawn + travel distance from spawn = player downtime. The farther the distance to the spawner, the longer the player has to recuperate. This is particularly important for defensive scenarios to allow time for healing, respawning, and repairing player defenses. Closer spawn locations will often correlate to longer respawn timers, and vice versa, but the map designer should really balance downtimes based on wall and building repairs and adjust according to the intended feeling of pressure. Group vs. Individual Spawning The general rule is that attack waves should be spawned as a group while units within a camp should spawn individually. By placing attack waves into groups, it means that the player does not have to deal with a constant trickle of units which either preclude any repairs because of a lack of downtime or fail to cause sufficient pressure due to lacking the critical mass needed to challenge player defenses. On the other hand, group spawning often leads to clever players trapping a few units to prevent the group as a whole from respawning. This will be discussed more below. Individual spawns in camps are necessary to allow the camp the dynamism to respond to player attacks. Group respawning, the timer for which only begins after the death of the last member of the group, would mean that the camp will likely never respawn any units before the player can destroy the spawner, but if the group can respawn, the entire camp, or at least a major sub-group, would respawn all at once. Neither of these options are desirable, so camps should use individual spawning. Preventing Spawn Trapping The majority of respawns in the game are based on timers that only begin after the unit which will be replaced has died. The standard timer throughout the game is 15 seconds. As mentioned above, some spawns are group and others are individual, with in-camp respawning typically being individual-based and attack wave respawning typically being group-based. Given that group-based spawns will not respawn until the entire group (or a particular percentage of the group) is dead, this leads to a situation where the player can "trap" units within the attack wave and prevent further respawns from occurring, functionally turning off the defensive aspect of the map. While this mechanic has been normalized on most existing maps and therefore will likely remain unchanged, the same need not be true for future maps. The best way to get around spawn trapping is to make the respawning of attack waves multi-conditioned. For example, if an attack wave takes 30 seconds to reach its destination and lives on average 30 seconds once it has reached its intended location, the average respawn time for that given wave would be once every 75 seconds (15 second respawn + 30 sec travel time + 30 sec fighting to death time). This means, when accounting for slow decks and the player being overrun, it might be appropriate to make the attack respawn on death of the group OR if 120 seconds have passed, whichever is shorter. That way if the wave gets trapped, a second attack wave still spawns after 120 seconds regardless. Another key point to consider with spawn trapping is abuse of waypoint markers. When attack waves progress towards their target location, they act by moving from one waypoint to another, wait for the entire group to arrive, and then proceed to a third waypoint. If a player is able to block one member of the group from successfully progressing to the next waypoint, the entire group will fail to progress. This is what allows the MotK spawn trap trick on Nightmare's End. When a ranged unit enters the spellbane aura, it immediately retreats in an attempt to move far enough away to attack. If the unit's attack range is less than or equal to the spellbane aura radius, it ends up in a loop where it continually moves in and out of the aura. If the waypoint location is within the spellbane aura, such that the other units can progress to it, but not so close that they will aggro on the source of the aura, the looping ranged units will fail to reach the waypoint marker and therefore lead to the entire group remaining permanently stuck (it should be noted that not all ranged units act like this. The flying units on Mo continue to patrol back and forth despite any spellbane aura, so their scripting ought to be studied to learn how to achieve a similar result). There are a few ways to avoid this. One is to include at least one long range unit within the attack wave, which can then destroy the source of the spellbane. A second, if the spawn trap is discovered pre-release, is to add a patrol along the path where the spellbane will be placed to destroy it and free the normal attack wave. A third is to look at maps like Mo and figure out how to circumvent the issue and allow the units to patrol regardless. Tier Emphasis & Camp Design by Tier Nearly all campaign maps will take place over all four tiers, but the emphasis of each map is different. Some maps will have long T1 sections, while others, such as Bad Harvest, will skip T1 entirely. While it might initially seem best to spread the map out equally between all tiers, this is often less ideal than it might initially seem. One of the largest limitations in BattleForge is the 20 card deck limit. By requiring the player to be able to respond to threats equally at all tiers, the designer encourages the player to opt for more generalist deck options. For example, if the map required the player to be able to respond to ranged, melee, and flying units at T3, the player would forced into using cards which can respond to all three threats. If that player were playing Fire, they will likely default to using Magma Hurler with Unity. If he wanted void return and had to defend a wall, he is also going to include Shrine of War and Tower of Flames. At that point, since the player needs to be flexible on all four tiers, he will only have 1 slot left for T3, which he might want to flex into other tiers given Magma Hurler can take care of most threats. If, instead of designing the map to have equal threats at all tiers. the designer instead decided to shorten the T2 and focus on a larger T3, the player will now have more deck slots to specialize versus any challenges the map might include. If there were large amounts of buildings in T3, the player might be able to include Virtuoso or Juggernaut as a response. If there were no flying units, the player could opt for Vulcan or Giant Slayer. If the camps had weak AA or if there were a lot of hard to reach flying units, the player could choose Spitfire. On their own, each of these options is unlikely to be the sole choice of unit for a Fire player, but each can easily become supplemental options when the camps a player faces in a particular tier allow for such specialization and the other tiers do not use up all available deck slots. The key takeaways here are that it is often better to focus on 1 or 2 tiers in a given map, so as to allow for more interesting deck building options within those tiers, and that unifying camp and spawn design across a tier can allow for and push players towards less typical options, for example, not including flying units but giving camps strong AA, can open up space for melee units to succeed. Defender's Advantage When fighting against camps, the general principle is to balance the camp's composition as equivalent to being 1 tier higher than the player (on expert, advanced can be equal strength). The reason for this is that players have an adaptability that NPCs do not. This is seen both in the fact that players can cast spells while NPCs must rely on unit abilities or inflexible events via map scripts, and that NPCs cannot rebuild their own camps. If the artillery piece keeping the camp together dies, it cannot come back. In contrast, if a player loses a unit or misplaces a tower, they can just summon a new one. So if the entities in an NPC camp are typically one tier stronger than those currently available to the player, what about when it is the player defending and the NPCs attacking? It would be nice if we could provide a simple rule here stating that attacking units are always one or two tiers stronger than the defending player, but it is not that easy. Defending scenarios are simply too varied for a one-size-fits-all approach. Instead, let us consider some factors that might change the player's strength while defending. Defense Considerations: 1. Location Fortification Potential - Whether or not a player can easily fortify their location substantially changes the relative strength of incoming attack waves. Fortification potential is related to two key factors, (1) Are they buildable walls, and (2) how wide is the enemy's angle of attack? Buildable walls increase the relative defensibility of a location more than any other single factor. Walls add effective life points to the defending towers and units, while also impeding enemy progress, therefore providing the player with more strength depth. Attack waves which might overrun a player in an open field can become a joke to him when he is sitting behind a set of Amii walls. The width of an enemy's attack angle attacks in a similar way. If, similar to Guns of Lyr, enemies attack into a narrow chokepoint, even giant waves become trivial to defend against. At the same time, if the enemies can spread out such that area of effect spells and abilities cannot hit large portions of the attackers at once, the wave's overall threat increases. Therefore area with narrower angles of attack and buildable walls need stronger attack waves, while areas with wider angles of attack and no buildable walls need weaker attack waves. 2. Length of Defense - The longer a player is allowed to sit in a single location, the larger the attack waves will need to be to dislodge him. While small, low tier waves might threaten a player initially, even waves one or two tiers higher than him will seem insignificant if he has been given a large enough time to prepare. In general, if a player has only been given a short time to begin preparing his defenses, attack waves could be sufficiently strong even at tier and unit count parity. But once he has been allowed to settle in and build a layered defense, attack waves will likely need to be both stronger and more complex to overrun him. 3. Player Tier - Lower tier players have less defensive options than higher tier players. The higher the player's tier, the stronger the attack waves will need to be in comparison to the players on paper strength. 4. Total Areas to Defend - A key point discussed at length in this guide has been that the fewer areas a player needs to defend simultaneously, the easier it will be for him to succeed. While even the equivalent of a Tier 6 attack wave from a single direction might fail to overwhelm a player with T4 protected by a wall, even T3 units from enough different directions could overrun the same player. Creating multiple areas where a player must defend taxes not only his power pool, his charges, and his cooldowns, it taxes his mind. It becomes exponentially more difficult to respond to major threats that could undermine your defenses, when these threats are coming from different directions, and particularly if they are far enough apart to not be visible on the same screen. Particularly at higher tiers, where the tools available to players are so strong, it is essential to create multiple avenues of attack. At the same time, a map designer must be careful not to overwhelm the player's mental capacity with an excess of attack directions simultaneously.

-
Gday and happy new years! Saw the stream after the fact, congrats on the 3rd anniversary! I rediscovered this a month or so ago and have gone back to my roots from the EA days by playing roots for most of my time! The sylvan gate really makes a difference, very useful and enables map wide networks! Have done every campaign map with roots including oceans (only 2 islands are unreachable by a single network if I remember right) and while I do take spore launcher in my deck, its advantages are fairly niche. The main difference it has positively is its damage is more 'spike' damage rather than over time. Only really useful on like bad harvest when trying to kill the shamans before their health jumps up, if you sync up enough spore launchers then they dont get that chance. The disadvantages when compared to razorleaf are significant, primarily the anti air capacity, and when fully supported they both do enough damage anyway. In order to separate them, you either nerf razorleaf (which id not suggest!) or buff spore launcher, but id say it needs to bring something different to the table as just slapping more damage on it might not be necessary when razorleaf fully supported kills most things in a shot! Ive got a few thoughts on potential options that might help! - Adding more range and potentially an artillery type arc that shoots over areas you normally cant (doubt thats viable though from the feel of those areas). Extra range is nice, opens up a few options on the offense, lets it counter other artillery type structures without being hit, but ultimately its not that much of an issue, can usually just tank thru it with forests vim. Increased radius would be nice too, but once again its just a luxury. - Adding a disable to its attack, say the spore causes a delayed cast of ensnaring roots to sprout, or is full of paralysing spores kind of like the gemeye. Something like parasite wouldnt be as good, as most things are dead, at least the delayed disable can catch the next wave, and stunning them lets the razorleaf hit them easier as it can struggle to hit moving targets. Unfortunately thanks to the damage of fully powered up roots, most of this is as irrelevant as its knockback small and medium, as they are just dead. Maybe if it can penetrate boss resistances it will have a more substantial niche? Could have 2 types, one with root spores one with paralysis spores I suppose, but root decks are already pretty packed, very hard to add things to them! - Delayed explosion spores, so there is the impact hit then afterwards the spores explode for a 2nd wave of damage. Could also cause the ground to quake and slow enemies, though I think the option above with roots bursting out of the ground from the spore seeds and entangling foes (and maybe bringing flying units to the ground if being really daring) would look cooler. - Having spore launcher add some kind of passive effect into the root network, perhaps when it kills units it absorbs them and restores void power or something, bit of a stretch there at long range but maybe the spores swiftly decompose them? Root decks main issue is energy, being the amount locked up by expensive units, supporters and repeaters, so a way to get power back is nice, though ways to return power from existing units/buildings or discount them are better. Dont really think spore launcher could do that though, and is too late to do a breeding grounds effect. Maybe if when it kills things it can leech stored power into the void pool from connected units, sort of like some shadow effects, but represented by decomposing its victims in the natural cycle. Once again, its probably a bit late for this kind of effect to work as you usually only need to add a couple of spores to the force at this point, having built the network at t3 and added the supporters and razorleaves, I find its just throwing in a few spores and extending said network for t4. I think if spore launcher can become the damage/disabler with razorleaf being the support that clears air it would become much more tempting. Given the damage of properly used root units, the better way to differentiate is if spores add alot of value to taking out bosses, as most well supported t2/t3 root units will clear out t4 comfortably, and if they cant 1 hit them then a 2nd unit with supporters just need to be added. As to rpve, ive tried roots, unfortunately its just too slow and expensive. At least in campaign mode you can settle in for a longer run! Not sure if it can be made to work, would need cheaper support and network costs (or increased power gain) to get it set up faster. As for forests vim, its pretty incredible being able to heal the entire network for that much over time, though the only one ive tried is shadow variant (havent got the other yet!). I tend to just put it on some unit in the back, a fortress or thornbark near healing wells which can take the damage rather than a front liner who might not survive with enemy damage + vim transferred damage. You could tweak the secondary buffs they provide, but as a healing spell its pretty solid. T1 roots is a bit weak, tree spirits take alot of preparation to be great, but do have a niche on empires when they have alot of shielding in the first attacks. The addition of more lost souls enemies with shielding would make them more tempting, but ive found archers with shamans tend to be faster and pretty much take you right up to t3 in most cases. Purple sylvan gates ability is also a bit unused, but with the addition of more shielding foes it might come into play more, but with current shielding I find its easier just to use the red ones damage buff and if they have shielding just brute force through it. Razorleaf could use 1m more range to avoid the annoying situation of other 50 m range units sometimes attacking while being safe! Not common but does happen! Other ideas could be a healing well variant that can link to the root network, a breeding grounds effect on a t3 root unit or support structure to free up a slot in the deck, spells or supporters that add interesting effects to linked units (like poisions or slows or whatnot), maybe upgradeable structures too (fountain of rebirth getting a bit stronger for higher tier upgrades, root nexus getting a larger range, living tower causing a root effect on impact, healing well adding some percentage regeneration) after the success of soulstone. This is getting a bit long so ill end it here. Congrats again on the 3rd anniversary, looking forward to the new content!
- 1 reply
-
- 1
-

-
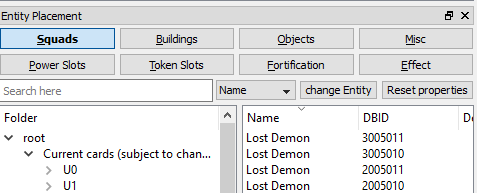
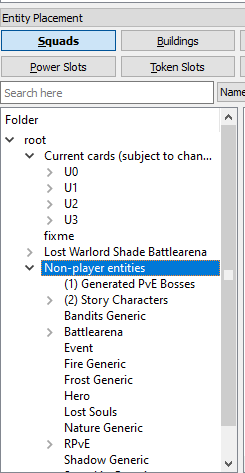
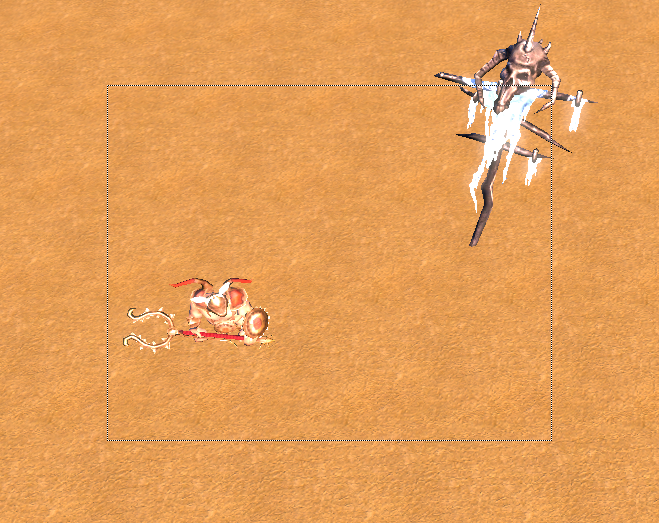
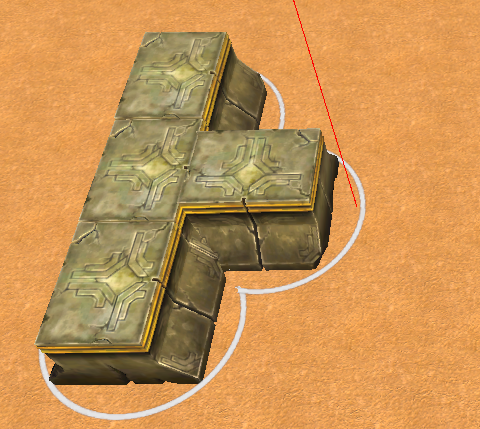
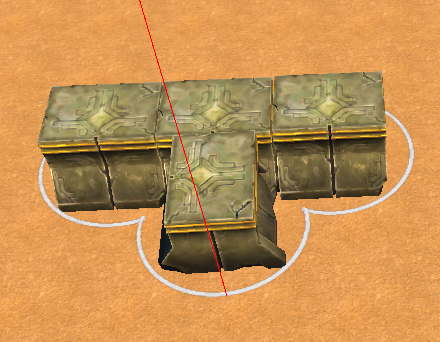
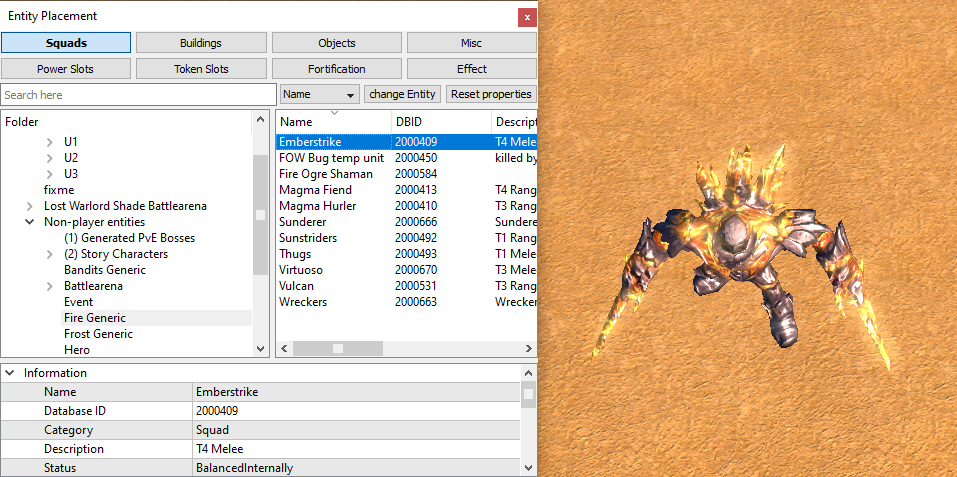
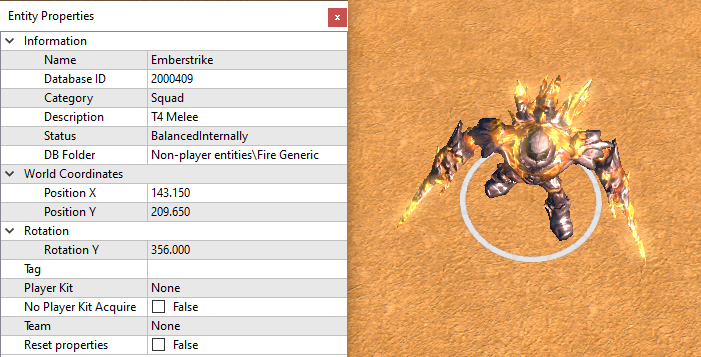
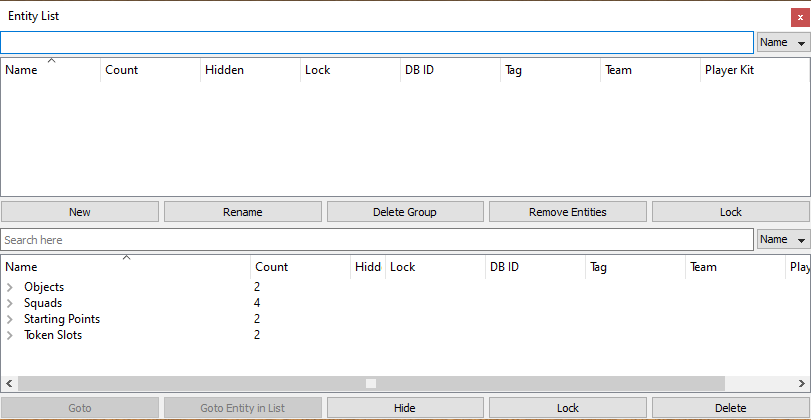
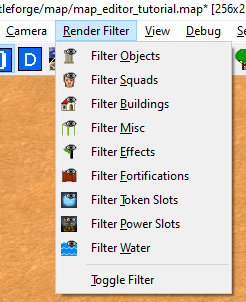
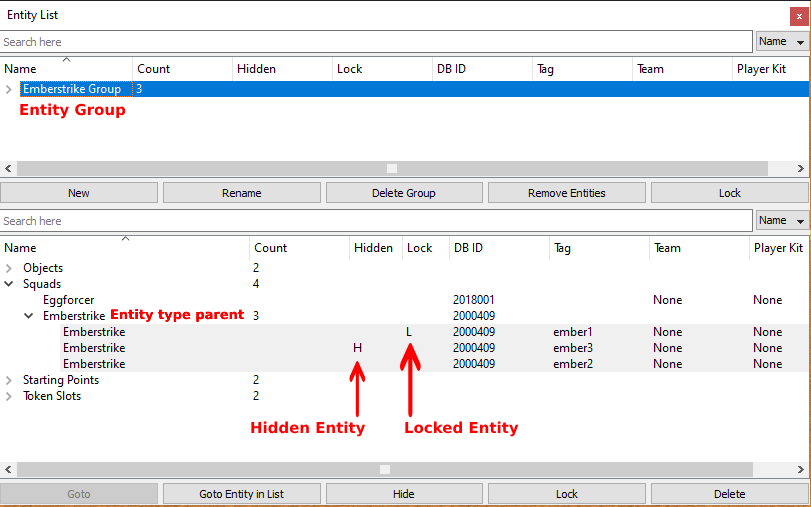
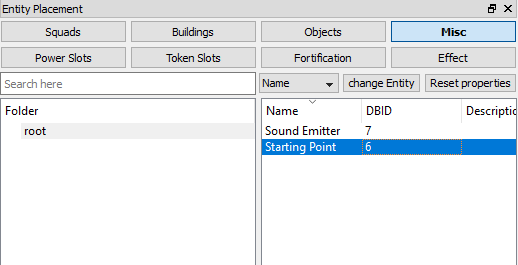
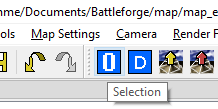
This part of the tutorial will go over placing and tagging entities, and it is where the fun begins. If you encounter any issues, don't hesitate to ask in Skylords Reborn Map Making Discord. • Content Moving in the Editor Placing Entities Moving and Deleting Entities Moving Entities Deleting Entities Entity Properties Tag Entity List Render Filter Next Chapter • Moving in the Editor Let's start by going over how you can control your camera in the editor. Arrow Keys to move your camera Home and End keys to tilt it up or down Insert and Delete keys to rotate Mouse Wheel to zoom in and out Alternatively, you can use: Space bar + Left Mouse Button to rotate the camera Space bar + Middle Mouse Button to zoom in and out Space bar + Right Mouse Button to move the camera If you want to adjust the speed of camera movement and zooming, or invert the direction. You can do that under Camera -> Configure You can also change the type of camera you will use in the editor - stick to the Editor Camera for now. • Placing Entities We went over how you can place entities in the previous step of the tutorial. But let's look at the entities you can actually place on the map. In the Entity Placement window, we have several tabs that each contain different types of entities. Squads gives you access to all the different units in the game Buildings contain all the buildable structures such as towers Objects are mostly map decorations, but there are some of them that have a functional use You will find MOST decorative objects in the Mapart folder, and some under Leveldesign folder Misc tab is only for placing the Starting Point, there is a dedicated tool to bring sounds to the map so ignore the Sound Emitter Power Slots are the Power Wells, they all give power at the same rate - so they only differ visually and in how much power they contain Token Slots are the Monuments Fortification is where you can find the buildable Walls Effect tab contains all the effects used in the game such as smoke, clouds, falling leaves, fire etc. In the Squads and Buildings tabs, pay attention if you are in the Current cards or Non-player entities folder. For NPC units, you want to use the Non-player entities - why? Because these entities are very unlikely to undergo any drastic balance or functional changes. They also automatically use their special abilities (if they have any), which the entities in Current cards do not do. Entities in Current cards may undergo major reworks, changing the difficulty of the map drastically. And again - they do not use their special abilities, you would need to script that manually. • Moving and Deleting Entities • Moving Entities Let's go over how you can move the entities around. With an entity selected, you can: Move it by holding the Right Mouse Button Rotate it by holding the Middle Mouse Button (not all entities can be rotated) You can change the axis along which you rotate the entity by holding down Shift / Ctrl keys Change its height with Shift + Right Mouse Button (again, not all entities can be moved up and down) You can also change the height in the Entity Properties window, if the entity allows it. You can drag-select multiple entities by clicking and holding Left Mouse Button and dragging - forming a rectangle over the entities you want to select. You can move multiple entities the same way as a single entity. With multiple entities selected, rotating them rotates the individual entities along their individual axes To rotate them all around a single pivot point, hold Alt while rotating them with the Middle Mouse Button This will rotate them around the location of your mouse cursor • Deleting Entities You have two ways to delete entities - the slow way and the fast way. The slow way would be through the Entity List window - we will have a closer look at that in a little while. The fast way is pressing Backspace to delete all selected entities - REMEMBER THIS SHORTCUT. • Entity Properties Let's look at properties of Entities. Properties for Squads, Buildings, and other entity types are very much similar. For this example, we will place a non-player Emberstrike onto the map. Our Emberstrike will show these properties when selected: Information - general info about the entity, this cannot be changed One useful information is the database ID which is used by some script commands World Coordinates - location of the entity on the map Rotation - self-explanatory Tag - The. Single. Most. Important. Thing. Player Kit - who controls the entity No Player Kit Acquire - doesn't work Team - entity's relation to other teams and fog of war vision Reset Properties - click this to reset any changes you made to the entity properties We already went over the Player Kit before, now the most important thing in map making - the Tag. • Tag While the Tag falls under Entity Properties, because of its importance, I've split it into its own little chapter. Tag is a text, or a number, that is unique to the entity. There cannot be multiple entities with the same tag on the map - the editor won't let you tag two entities with an identical tag. While tag on its own doesn't have any function, it is the only thing that you can reference when scripting. Name your tags carefully, it is easy to get lost in them. Same as the map naming convention, you should also follow some best practises when tagging entities. Don't use any special characters Use only lower case letters Use "_" instead of spaces or no spaces at all Tag names in English If you have multiple entities such as 3 Emberstrikes, and you want them to serve the same function, or be a part of one group - put numbers at the end of the tag such as - ember1 , ember2 , ember3 Don't tag an entity "default" - this is the only rule that you should strictly follow While these rules are not strict, it helps with debugging and readability. Remember - the BF Editor is very finicky, and you never know when the game works with uppercase letters, lowercase letters and when the game might crash because of this. To tag multiple entities at once, simply select them and write your tag (it's a good practice to put a "1" at the end). The editor will automatically tag the entities with that tag, and increase the number at the end for each selected entity. • Entity List Entity List is a window you won't use most of the time, but it can come in very handy. Let's have a look at it now. The top part of the Entity List are Entity Groups - you create these yourself. They are useful in some cases, where you want to have easy access to - for example - a landmark tower you built out of objects. These groups are only to ease work in the editor, they have no function in the game. The bottom part is the entity list itself - you can search for entities here by name, tag, or database ID (DBID). In this window, you can also Hide or Lock entities - Hidden entities cannot be seen when working in the editor and Locked entities cannot be edited in any way. To Unhide entities, you have to find them in the Entity List, select them and press the Hide button again. To Unlock locked entities, select them and press the Lock button again. You can quickly snap your camera to an entity, by double-clicking it in the list. Selecting an entity type parent in the list will select ALL the entities of that type on the map. In combination with Entity Placement window's change Entity button, Entity List can be a very powerful tool. To exchange an entity or multiple entities for another - follow these instructions: First select the entities you want to change - do that with the Selection Tool or in the Entity List Then click on the change Entity button Lastly, select an entity from the Entity Placement list Sometimes it is a bit finicky - repeat these steps if it doesn't work at first try • Render Filter Render Filter is another useful tool in the editor. You can find it in the top bar of the editor. In here, you can select which types of entities you want to hide in the editor. You can, e.g. filter out decoration Objects on the map, if you don't want them to get in the way of selecting and tagging your Squads or Buildings. • Next Chapter Now you have the knowledge to place entities and assign them to players. Feel free to place some enemy squads on the map. When you have something to fight against, the map is no longer as empty and boring! The next chapter will go over how you can sculpt the terrain and add cliffs. • Sculpting the Terrain and Blocking •


.jpg.b6dde0a2978f08dbba2cd8d016266285.jpg)


.jpg.85fc10e730497e4eec37934ba02ab9a4.jpg)
.jpg.9ccd04b45a58b4c22ce2f8bb63a7a4cf.jpg)
.jpg.cc309188fff5cfae7e23d69f083a6c5e.jpg)
-
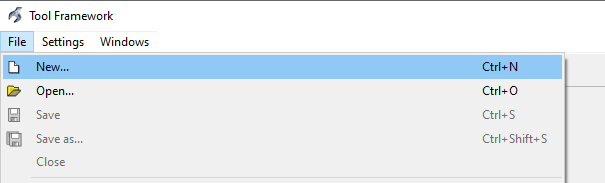
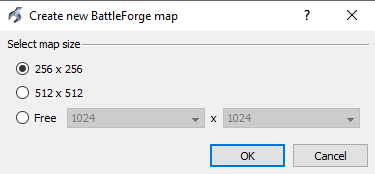
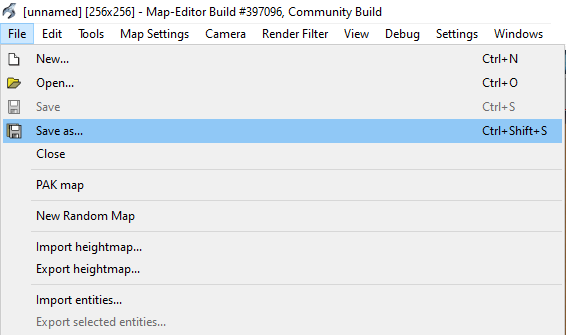
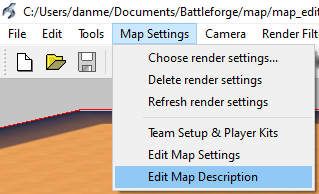
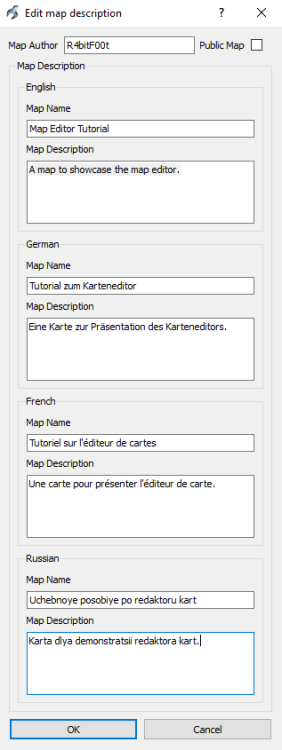
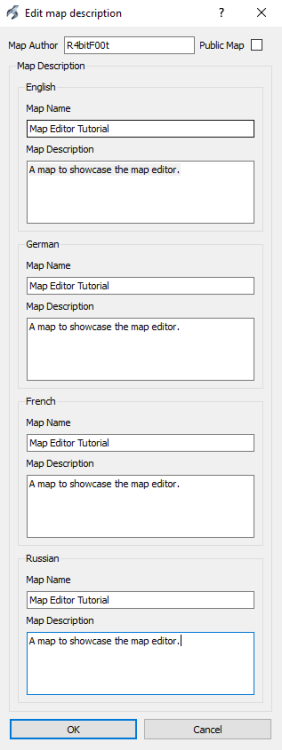
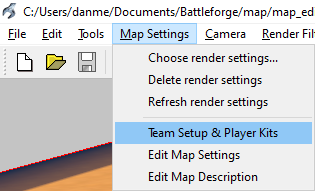
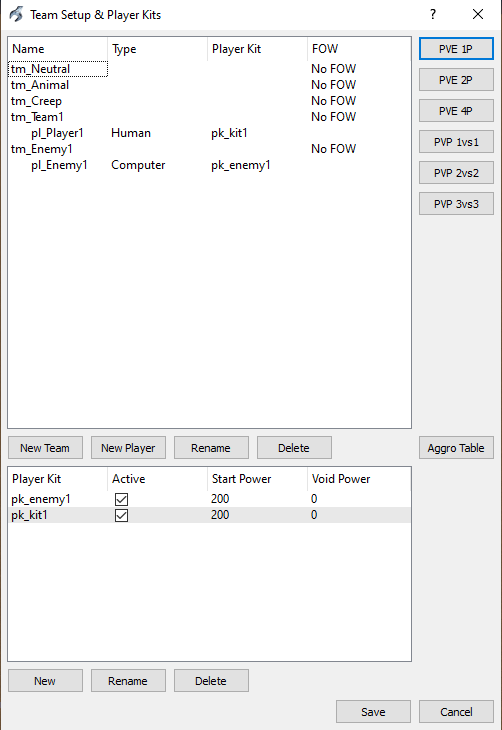
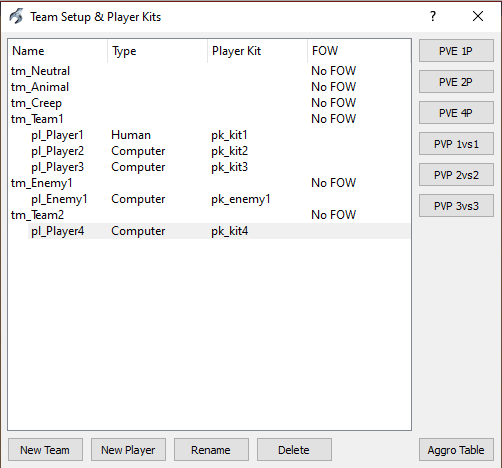
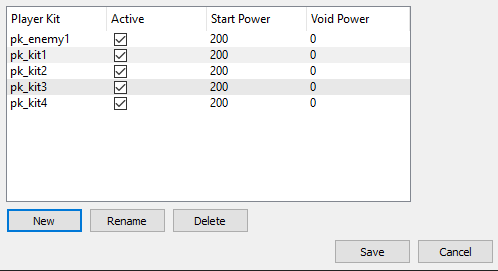
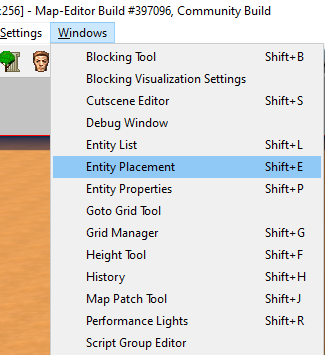
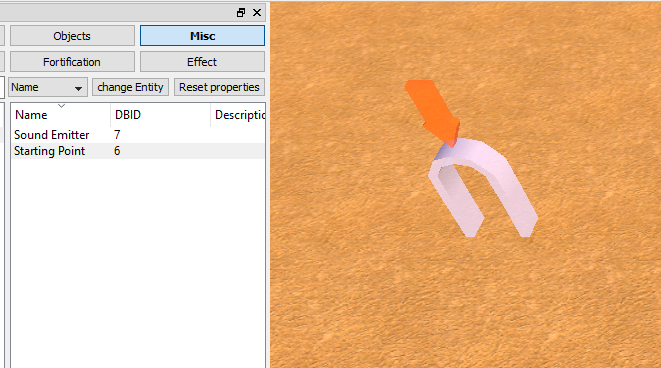
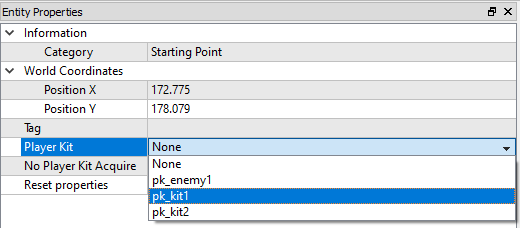
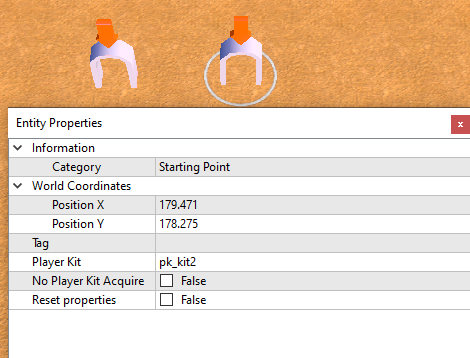
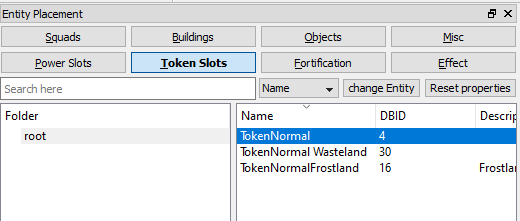
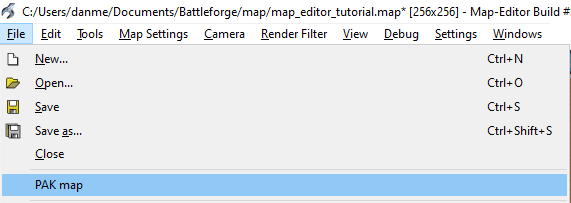
In this part of the tutorial, we will go over how to create your first map, save it and make it playable. It may seem like a pretty lengthy post for something so simple, but I just wanted to make the tutorial foolproof and cover some additional not well known things. In reality, this step in the map creation takes about one or two minutes. If you encounter any issues, don't hesitate to ask in Skylords Reborn Map Making Discord. • Content Creating a Map Saving the Map Making the Map Playable Map Name and Description Team Setup and Player Kits Starting Location Starting Monument PAKing the Map PvP Maps Next Chapter • Creating a Map Now that we have the editor open, let's create our first map, shall we? In the top left of the editor window, click on File -> New... Now we can select the size of our map. To start with, we'll go with the smaller 256x256 map. • Saving the Map Now that we are greeted by an empty map, let's first try saving our map. (this step is optional, you can save the map at a later stage) Since we haven't done anything with the map yet, we'll need to save the map as. You can either open the File tab, or press Ctrl+Shift+S keys (notice the shortcuts next to the actions in the File tab) In the future, you can save the map after every edit you make with the Ctrl+S shortcut - this will be your best friend. You can save the map wherever you want on your computer, but the default save location is best. The reason is that the editor will pak our map into that same folder, so we have everything together. Be sure to follow the naming convention (see quote below). Unfortunately, the map editor is full of traps for map makers that crash the editor. I will try to point out any known crash or corruption causing issues as I go along (you can also check the FAQ). SAVE AS OFTEN AS YOU CAN - EVEN AFTER ONLY A COUPLE OF CHANGES • Making the Map Playable To actually see the map in the game, we first need to go through several steps: Update map name and description Setup teams and player kits Place and assign starting location for each player Place and assign starting monument for each player Let's look at the individual steps now. • Map Name and Description Now that we have saved our map, we can add an in-game map name and description. Open Map Settings -> Edit Map Description In here, we need to fill in the in-game map name and description (shown on loading screen and in map selection) for all languages. You don't need to actually translate the name and description, I used Google Translate for this example, but you can leave everything in English. Then click OK - you will get a pop-up that the map description has been successfully updated. • Team Setup and Player Kits After we've saved the map name and description, it's time to decide what type of map we'll be making - PvE / PvP and how many players. We do that by going into Map Settings -> Team Setup & Player Kits. In here, we can select if we want the map to be PvE or PvP, and how many players there should be. We can adjust the fog of war (FOW) settings for the players. And set the individual players starting power and void power (AI doesn't work with power, so there is no need to set the starting power for the NPC enemies). Ideally, choose one of the available presets! Fiddling with the teams can prevent the map from being playable. You can add more players to the teams, just don't change the team order. (Tip: Usual sweet spot for starting power and void is 200 / 200) If you want to fiddle with the settings, you can manually add more teams with the New Team button. And add Computer players to a team selected in the list with the New Player button. Adjusting the teams and players manually comes with some risk though. Be sure to be familiar enough with the basics before experimenting with teams. For each player, you also need a player kit - that is actually what determines which players control which entities. These can be created with the New button under the Player Kit section. Let's go with the PvE 2P preset, so we can have a friend to play the map with us. After we are done making changes, click the Save button at the bottom of the window. • Starting Location Now it is time to set the player's starting position. For that, we'll need to open our first tool - Entity Placement. We can find it under Windows -> Entity Placement or Shift + E shortcut. A new window will open up - for now, we'll need the Misc tab and under the root folder, we can select the Starting Point. Now we'll have this little object following our cursor around, we can place it by left-clicking the mouse. Congratulations! You've placed your first object on the map. But we still need to make it functional. For that, we will need another tool - Entity Properties. Open it again through the Windows tab. With the Entity Properties window open, you will notice that it is completely empty. Also, that you cannot click the Starting Point you just placed, you will instead place another one. That is because we are in the Entity Placement mode, and we need to get to the Selection mode. You can do that by pressing the blue "0" button in the editor toolbar, or by pressing the Q shortcut (remember this shortcut, it will be your second-best friend). If you need to delete any extra placed Starting Point, use the Ctrl + Z shortcut for now (already on our third-best friend, let's stop counting for now). Now that we are in the proper entity selecting mode, let's select the Starting Point we just placed by clicking on it. The Entity Properties window will now show some information about the selected object. We need to assign the correct Player Kit to the Starting Point. Do that by clicking None and selecting the pk_kit1. Why pk_kit1? If you look into the Team Setup & Player Kits, you will see that the pk_kit1 is assigned to our Human pl_Player1. You might remember that I mentioned that the player kit is actually what determines who controls what squad/building. Setting up the first Starting Point is a good time to make a quick-save (Ctrl + S). Instead of selecting the Starting Point from Entity Placement again, you can select our first starting point, press Ctrl + C to copy the object and then Ctrl + V to paste the object to the location of the cursor. Under normal circumstances, copy-pasting entities preserves their team setup and their player kits. But due to the nature of the Starting Points, the player kit gets reset to None - a player cannot have multiple starting locations. So let's select our new Starting Point and assign it to our Player2 (pk_kit2). You don't need to place and assign Starting Points for the computer players. Setting up the second Starting Point is another good time to save the map. • Starting Monument We could actually see the map in-game and play it at this point, but without any structures or monuments, the player will lose instantly at the start of the map - so let's fix that! In the Entity Placement, go into the Token Slots tab and select TokenNormal. This is a standard monument. All the monuments are functionally the same, the only difference is visual - so pick whichever you want. Place one monument near Player1 Starting Point (or right under it) and another near the Player2 Starting Point. Now, we will need to assign the players to the monuments - simply click them with the Selection tool active (Q) and set it up in the Entity Properties window, same as we did for the player Starting Points. This is another great spot to save the map - by now you certainly get the message. Awesome! • PAKing the Map Saving the map is not the same as PAKing it. The editor works with .map files - that is what you save with Ctrl + S. But the game only sees a PAKed version of the map. When PAKing, the editor takes all the files associated with the map - the .map file and the map's folder - and merges them into a new file (think of WinRAR or WinZip). This PAK file can be seen by the game as the final map. Lucky for us, the editor can PAK the map - simply go to File -> PAK Map If everything is set up correctly, you will get a pop-up saying the map PAKing was successful. The PAKed map can be found in Documents/BattleForge/map folder. Now we can start the game, go to the User Generated Maps node (remember, we made a 2P PvE map) and search for the map name that you set in the Map Description step. We can actually start our map now and have a look around, exciting! Notice that when playing solo - the monument we set for the other player is missing. That is because the game automatically deletes all entities set to a human player that is not present at the start of the map. • PvP Maps Creating a PvP map is just as simple. Set up the Map Description and in the Team Setup & Player Kits step - choose whichever PvP preset you want. Place the starting positions and monuments for all the players and PAK the map. You will find your PvP maps in the Sparring Grounds node. We will not be going into further detail about PvP maps in this tutorial. • Next Chapter Now you have everything you need to get to map making. In the next chapter, we'll talk about placing and working with entities. • Working with Entities •


.thumb.jpg.29b38c68ac82966d80b3fc538a0cbc12.jpg)
.jpg.1a6607cc87d734fcca177610715331ab.jpg)
.jpg.aa97ed24395e47a466b8335919bd3cb7.jpg)
.jpg.443f066264372db368505281642913d5.jpg)
.jpg.78fb7e31ee6d8c7ad0fce42c89ebe262.jpg)
-
 We want to create a deckbuilder mode where you progress through increasingly hard challenges while using a limited pool of card which slowly increased sei-randomly over time. We just have not had the development capacity to implement it yet.
 -
Mapmaking Fundamentals - Spawn Design This was originally written as an internal design document meant to guide our current development of new campaign maps. It has been shared here for interested players and as an aid for aspiring community mapmakers. Introduction BattleForge campaign maps have a particular feel to them, and this feel is a fundamental component of the unique experience which is playing BattleForge. The goal of this design guide is to use existing campaign maps, particularly the best campaign maps, to understand and to categorize the distinct features of the spawns in BattleForge’s campaign, such that we can better design future campaign maps. This guide is therefore intended to categorize the design choices of the original devs and to act as a reference for future development for both community and official map development. Legend Given the nature of map design, this guide uses a high density of visual examples to illustrate map design principles and standard practices. Across all examples, a standard legend is used. Purple – is used to highlight NPC camp formations. Purple text is used to describe the various dynamics occurring in the enemy camp. Light Blue – is used to highlight spawn locations and any special interactions which these spawn locations enable. Orange – is used to highlight non-standard flanking routes available to players. In the majority of cases, orange designates available paths for flying units, but it can also represent potential cliffing opportunities, particularly for artillery units such as Firedancer and Firestalker. Red – is primarily used to highlight player attack routes. It is secondarily used to highlight key features of camps which affect said attack routes. Black – is used to highlight terrain features. Green – is used to highlight map objectives and any locations that might be directly connected to those objectives. Table of Contents 1. Spawn Types 2. Defensive Maps (Defending Hope) 3. Hybrid (Attack/Defense) Maps A. Nightmare's End Analysis B. The Guns of Lyr Analysis 4. Escort Maps A. The Treasure Fleet Analysis 5. Conquest Maps A. Ocean B. Mo Spawn Types Enemy spawns come in four primary types: one-time, timed, conditional, and permanent. These spawn types are not exclusive, in fact it is normal for maps to have multiple or even all four types at once, and often specific spawn interactions constitute multiple types simultaneously. 1. One-time Spawns: These spawns are typically scripted based on the fulfillment of a map objective, such as the Raven fleet’s approach in Ocean when the player clears enough of the center island, or are based on proximity events, such as the many “ambush” events in maps like Encounters with Twilight. Regardless of how they trigger, these spawns only happen once. 2. Timed Spawns: What is meant by timed spawns are those spawns which are primarily triggered based on the passage of time in-game and not player actions or map conditions. These types of spawns are quite rare on their own but are frequently combined with other types of spawns. For example, the permanent spawns on Convoy and Nightmare Shard steadily scale in strength based on the amount of time which has passed. A time component is almost always included in the case of permanent spawns to pressure the player or to keep pace with the player’s growing strength. The attack waves on Siege of Hope and Blight are both conditional timed spawns. If the player fails to kill the spawn buildings in time, a large one-time attack wave is released after a specific period of time. Conditional spawns often contain an alternative time provision. The spawn actives after X objective is fulfilled, or if Y time has passed. 3. Conditional Spawns: Conditional spawns are tied to map triggers which change on their own or due to required player actions. They can be temporary or permanent. Spawn buildings are the primary example of conditional spawners. The spawns are directly tied to the building’s continued existence; destroy the building, and the spawns stop. Many spawners also have additional conditions which must be fulfilled before they begin to spawn units at all. Some spawners only replenish units tied to specific camps, while others only launch attack waves once the player has reached a certain location or has activated a specific trigger condition. In random PvE, only the spawners directly adjacent to the player’s location initially launch attack waves, but if the player attacks a camp and kills an entity within that camp, all adjacent camps also begin spawning attack waves from that point forward. Sunbridge and Slavemaster are examples of conditional spawns tied to player action. In both cases, while the spawns are permanent, the player has the agency to direct the spawn paths via a switch and a fire emitter respectively. In the case of Sunbridge, once the Amii Power Shrines cease to exist, the gate-based spawn waves also cease. 4. Permanent Spawns: Once begun, permanent spawns never stop. This type of spawn is a common feature in defensive maps such as Defending Hope and Guns of Lyr. Non-defensive maps do not typically have unconditional permanent spawns, and if they do, they are typically limited in either strength or location. Mo is an example of a non-defensive map with permanent spawns. Defensive Maps Defensive maps are those maps where the player’s sole primary goal is the defense of an objective or a set of objectives. Any expansion made by the player is meant to better facilitate his defense of the existing objective and not because he needs to conquer additional areas of the map to complete other required objectives. Defense of Hope is the only current official campaign map which is a pure defensive map (Ascension map 1 is the next closest example). Despite only having one such map as an example, we need not fear because Defending Hope is a superbly designed defensive map that contains all the necessary components to teach us how a map designer should design a defensive map’s spawn mechanics. Defending Hope - Spawn Wave Interactions 1. Well Defined Defensive Perimeter – The area which the player must defend is visually distinct from the surrounding area, being protected by naturally existing terrain and buildable walls. This defensive area has overhang spots, occupied initially by Defense Towers, which can attack in a wider arc, as well as plenty of space to build defenses behind the walls. Areas from which enemies normally do not approach are blocked by Lyrish houses, adding an aesthetic flair while also preventing players from building otherwise inefficient defenses. 2. Alternating Attack Waves – Spawn waves on Defending Hope alternative between approaching from the north and from the south side of the city. This allows the player to opt for micro-managing archer units on both the east and west sides, rotating archers between the northern or southern wall depending on which direction is currently under attack. A skilled player can then save up power more quickly to make the transition to T2 or T3. 3. Spread Out, Multi-directional Attacks – While the walls on the east and west sides are close enough that archers can be rotated between them in the early game, they are far enough apart that the player is required to invest in defenses for both the north and south walls on each side, or to invest in a permanently mobile ranged component which can be rotated as needed. This multi-dimensional nature of the defense is important because it keeps the player engaged while also reducing the power of spells. If the units all approached from one-direction, the player would only need to invest in one set of defenses while also being able to destroy most incoming waves with spells, quickly leading to a feeling of stagnation (An example of this stagnation would be position 4 on Bad Harvest, which is initially very challenging, but once defenses are established, becomes dry and boring). With four directions to defend, permanent defenses are encouraged at each location while spells function as a means to plug gaps that form in the player’s perimeter, as their charge limit and cooldown prevent continual usage. 4. Optional Non-fortifiable Expansion Zones – Outside of the singular exception of aiding Rogan Kayle to enter the city, the player need never wander outside of the city’s defined defensive perimeter. Yet, if he choices to, he is rewarded with the possibility of many Power Wells and access to T4. Notably, these areas of expansion are shorn of any means of fortification while also being under constant attack. These means that the player must calculate the potential risk of both venturing forth from the city and investing in additional hard-to-defend assets, but if he proves capable of doing so, he earns himself a permanent benefit in terms of additional power and access to higher tier cards. 5. Permanent & Conditional Spawners – Instead of only spawning enemies from caves, the original designer chose to introduce 4 spawn buildings which the player can destroy. This gives the player more to do, while also forcing him to balance the risk/reward between investing into an expeditionary force that takes power away from the defenses and the benefit of permanently reducing the enemy’s offensive pressure. The buildings themselves have significant defending forces and are XL-spawners with 3200 life points, meaning that the player must do more than just run around erupting them to death. Hybrid (Attack/Defense) Maps Hybrid maps are those maps which mix player responsibilities between attacking and defending. These maps require the player, and any potential teammates, to move forward and conquer new areas of the map while defending map objectives (not Power Wells & Orbs) in other areas. Hybrid Maps: Nightmare's End Nightmare’s End - Player Defense Points & Enemy Spawn Locations The issue with the spawn waves on Nightmare’s End is not so much that spawns can attack every player location on the map, though this is indeed an issue, but that none of the places the player is required to defend are capable of being fortified outside of the initial starting location (which eventually is no longer attacked as the player’s T3 and T4 orbs redirect enemy waves to themselves). Players are required to try and cram defensive structures and units into small areas where buildings often block each other from attacking. These same buildings cannot be built into a coherent frontline due to a lack of space, meaning that even if the buildings placed in the back can attack, they are blocked from reaching the ranged units targeting the building in the front. Additionally, there are no walls or other mechanisms by which the player can slow the enemy’s advance, meaning the frontline units or buildings must also tank the incoming wave. Combined with being the largest map in the entire game by far, making reinforcing areas with existing units nearly impossible, and the fact that enemy waves respawn nearly instantly in close proximity to their intended targets, the spawns on Nightmare’s End are truly a nightmare. Consider then, that after establishing all these defensive networks, the player is suddenly told to abandon them and defend yet another non-fortifiable location from a 5-minute-long onslaught. The fact that this last defense is in no way foreshadowed except for a small wall south of the Forge Shard, is a fitting illustration to how poorly thought through and poorly implemented the spawn mechanics are on this map. A final point worth mentioning about this map is that the trigger conditions for spawning new attack waves and increasing the strength of existing attack waves are poorly defined. For example, one side of the map allows the player to build their T3 without destroying the concomitant Amii Power Shrine within the same camp. This in turn prevents the map from spawning the intended attack waves to attack the player's T3 location, because the trigger for spawning these waves is not the player building their T3, but the Power Shrine being destroyed. Setting aside whether or not the T3 should even be attacked in this manner, the key point here is that the trigger conditions for spawn waves and map events need to be carefully defined to avoid player exploitation. This same issue occurs on Behind Enemy Lines, where the trigger for increasing attack wave difficulty is tied to destroying the Twilight spawn buildings in the T2 and T3 camps. Said buildings are placed in such a way that players can build their T2 and T3 without ever destroying them, thereby trivializing the map in the process. In both cases, simply tying the wave increases to the player achieving a higher tier would have fixed the problem. Nightmare’s End - Southwest Quadrant Hybrid Maps: The Guns of Lyr The Guns of Lyr - Defending Player Progress & Attacking Player Spawn Waves In my opinion, Guns of Lyr is an overly complex, badly designed, and badly balanced map that players have figured out how to exploit in a way that actually makes it enjoyable to play. An entire document could be written solely on how poorly thought through and executed the map's mechanics are in the final product we see in-game. While such a document could perhaps prove useful to the team, we will satisfy ourselves here in pointing out three issues with the map related to how its spawns function. The first is related to what triggers the infected Twilight camps to start sending out attack waves against the player in the "attack" position on each side. These spawns are actually triggered not by the actions of the attacking player, but the defending player. The map suggests to the player, with its set of retreating walls, that the initially defending player is supposed to forfeit their starting base and replace it with the wells and monuments found on the route of the Kobold Engineer which they are told to clear. Simultaneously, the respective side's attacking player is supposed to clear the 3 Twilight camps before transitioning into helping the defender. The issue is that the 3 Twilight camps do not actually trigger attack waves based on interactions with themselves or how much time has elapsed in the map, the camps only replenish defending units lost in attacks on the camp. Instead, the attack waves of these camps are triggered by the defending player attacking the units in camp 1 marked on the minimap above. This in turn leads to a situation where knowledgeable defending players simply do not expand past T2, but wait for the attacking player to reach T4 and trigger the final spawn wave early to end the map. Regardless of intention, it simply does not make sense that the trigger condition for spawning attack waves from these infected camps is tied to attacking that specific location on the map. A valuable lesson can be gleaned from this mistake, which is that spawn triggers for spawn waves need to be carefully defined so as not reward players who exploit the map while punishing those players who engage with the map in the intended manner. The second issue we will discuss in regards to Guns of Lyr is the ability for the player to avoid the map's mechanics and trigger the final spawn wave before actually achieving the necessary map objectives. Map designers need to be cognizant of the ability of players to damage locations behind "impassable" terrain features and take the necessary steps to safeguard these locations or punish the player (in a logical way) for doing so. In the case of Guns of Lyr, the original devs could have responded to the issue in several different ways. An easy method would have been to simply not spawn the final Twilight Manifestation building until the gate was opened, or to shield the building until said condition was met. A more creative approach would have been to immediately trigger other final spawn waves from any remaining Twilight Infestations on the map, making the condition of having to destroy these infestations meaningful, lest these other spawns bypass player defenses and kill Rogan. The Guns of Lyr - Northern Defenses The third and final issue to discuss is how the map's terrain stifles the ability of the primary Twilight attack waves to be meaningful threats by forcing them through single path chokepoints. The map is clearly designed in such a way that the original devs assumed player defenses would steadily move backwards in the face of increasingly difficult attack waves. The map even destroys the original walls in an attempt to force the player to abandon their already constructed fortifications. If players acted in this way, it would cause early waves to attack a single wall, while later waves would eventually attack two and then three walls, spreading out enemies and player defenses over a wider area. The issue is that players do not act in the intended way and are not incentivized by the map to do so. It is always better to defend a single location versus multiple, and it is a hard pill to swallow to voluntarily sacrifice both existing defenses and your starting location, thereby accepting a permanent weakening via lost power and charges. Besides these reasons, allowing enemies to spread out, when you can instead force them through a narrow chokepoint would just be silly. The funnel at the top and bottom of Guns of Lyr clumps together enemies for players to then smash with powerful area-of-effect abilities and spells such as Worldbreaker Gun, Cluster Explosion, and Frenetic Assault. At the same time, the closeness of player defenses means that a single Protector's Seal or Revenge can cover the entire defense, which would not be possible if players voluntarily spread themselves between 3 separate lanes. For the map's defensive gameplay to succeed, it would have to be either more forceful in removing players from the initial chokepoint via harsh penalties or more rewarding in terms of benefits accrued. Another better option would be for the map to spread enemies out initially instead of shepherding them through a perfect kill box. If the devs wanted players to have a last stand location, it would have been better to allow them to set one up directly surrounding Rogan's Stronghold in the center of the map. This would make the map reminiscent of a medieval fortress, with large hard to defend edges that eventually coalesce into a single fortified keep at the city's center. Long story short, do not funnel enemy attack waves through a single narrow chokepoint, spread them out of a wider area or create multiple points of attack to force players to do something more than spam spells and launch Heavy Snowballs. Escort Maps Escort maps are those maps whose primary objective revolves around protecting a non-player-controlled unit as it moves from one location to another. Escort Maps: The Treasure Fleet The Treasure Fleet is the purest form of escort map in the sense that the player has both a direct control of the area around the target being protected, unlike Convoy, and that the target moves forward before the player could have reasonably cleared the route of enemies in any permanent sense. King of the Giants is technically an escort map as well, but it does not feel like one for the vast majority of the map. This is because Rogan arrives far after the player begins conquering the map, so it is less escorting and more clearing a path, and because enemies do not threaten Rogan on the way if the player clears out the pre-existing enemies. These same conditions are not met on Treasure Fleet, and the player is consequently tasked with defending a wagon from the Treasure Fleet as it travels through enemy territory under constant assault. While The Treasure Fleet has a number of issues (which will be discussed later), such as monotonous gameplay, low replayability, and a fixed timer, these issues are largely unrelated to the spawn mechanics of the map. Both the spawn and camp designs of Treasure Fleet are well-done. As the Treasure Wagons move forward, the path itself is relatively unimpeded by walls or permanent enemy encampments, the exception being the Twilight encampment just before the target location which the player can then conquer for himself. Instead, incoming attack waves come from a mix of permanent caves and destroyable spawn buildings built adjacent to the wagon's pathway. The player can choose to only act as an escort for the wagon, or to invest resources into destroying the spawn buildings on the side, making future wagons safer but reducing the resources which can be used to defend the wagon currently en route. At the same time, there are 3 permanent spawn caves, ensuring that players cannot completely eradicate the enemy's capacity to attack. The area around these caves is open, allowing the player space to build defensives without impeding the forward progress of the wagons. There are also a number of optional areas into which the player can expand for additional resources. These side objectives are largely safe from attack, keeping the player's focus on the wagon travel route. The continual focus of the enemy attack waves on the wagon path, along with existence of some of the player's resources on the path itself, is an example of how map and spawn design go hand in glove. The player's own resources are only attacked where it makes sense for an enemy obsessed only with the Treasure Wagons to be attacking. Despite a well designed layout and well scripted spawns, The Treasure Fleet suffers from several balance problems and core design issues. I think these are worth pointing out because it is important to understand how multiple small issues can drag down an otherwise well designed map. The first major issue is that the map has a fixed time limit which cannot be meaningfully changed outside of early game exploits via killing one of the wagons. While this is fine for a few playthroughs, it severely damages the map's replayability, which is the second major issue. A good player quickly learns how to exploit a map's weaknesses to achieve objectives in creative manners and this accumulated map knowledge is typically rewarded with an easier playthrough, or better, a faster completion time. What happens with veterans in The Treasure Fleet, assuming it is played normally without the early wagon kill, is that veterans quickly and efficiently destroy enemy spawn buildings, grab early wells for fast power generation, and neutralize the spawn caves whose attack waves are easily destroyed due to not being guarded by map terrain or reinforcements. By the time the last 1-2 wagons spawn, the player has already beaten the map and merely needs to repair the odd tower while they scroll social media waiting for the wagon to meander its way to the finish line. In other maps, the player's high level of proficiency would lead to a faster conclusion to the map itself, providing a meaningful way for a player to measure their own improvement and to show off. While you could post a replay showing you cleared the map of enemies faster than other people, the fact is that this is not an easily quantifiable measure of skill because it does not show mastery of the map as such, in the same way that faster map completion times do inherently. Also, no one is going to watch the replay. This issue would have been fixable through mechanics such as the ability to reroute a wagon via a faster but more difficult route, or the ability to release multiple wagons at once but by doing so, the player triggers much harder attack waves as a result. Such mechanics would have required much more complex map scripts to achieve and given the time necessary to achieve this, and the fact that the original devs, based on the abilities of the Twilight Edition cards, seemed to believe PvP would be the more popular mode, it is not that surprising The Treasure Fleet was not given the love necessary to generate long-term replayability. Conquest Maps Conquest maps are those maps whose primary objective is to clear the map of enemies, potentially culminating in a boss fight which triggers the map's end. Lodgement maps, as discussed in the companion camp design guide, are a type of conquest map. Conquest Maps: Ocean The majority of gameplay in Ocean is fighting on different islands made up of different combinations of center and line-based camps. These sections of the map are largely uninteresting for our purposes here. Besides island hopping, Ocean has an additional mechanic, which is that Raven Battleships spawn in from 8 different locations around the edge of the map, and if these Battleships succeed in assembling a fleet of 5 ships, the player loses. This mechanic is a good example of creative spawn scripting, which is well integrated into the map and its lore, and which adds a dynamism to the map that helps make each playthrough a bit different. I would also note that I personally think semi-randomized spawn events of this kind make for a better map experience because they make the map feel more alive. In general, I think Ocean does a very good job of making the map feel like a real location and not just a videogame map to play in. While some islands feel silly, such as the tiny ones populated by ground troops, others like the Skyrake island do a good job of both sticking to the standard enemy faction of Bandits, while also feeling like a place where Skyrakes might actually populate and breed. This feeling of life is helped by a large number of one-time map events, such as the bird attack at the beginning, the mines which spawn on the western isle, and the ability to earn Skyrakes for yourself when you conquer their island. This is a good reminder that one-time spawn events play an essential part in making the level feel alive and lived-in. The existence of the Deathray summoner, which seems a bit random when reflected upon, but which is an iconic part of the map, is another reminder that sometimes it is okay to add a twist to the map. After the player reaches the main island, a second Raven ship mechanic activates which spawns Raven ships along the entire edge of the map hellbent on killing the trapped white juggernaut. This is an example of a bad spawn mechanic. The massive invasion comes out of nowhere, is never foreshadowed, and it is poorly executed. Most of the islands and base locations which get attacked by the incoming ships lack the ability to respond to attacks due to the twin factors of little space to build and the fact that Raven Battleships have a 50m range and can fire from fog of war. While this is functionally the boss battle of the map and therefore it is not necessarily wrong that the player's bases are put under real pressure, the issue is that the map itself is not built to facilitate such a fight. In the first part of the map the arrival of each ship is foreshadowed and the player can prepare by building towers and moving units, but the same is in no way true here. The confusing part is that this omnidirectional attack is then followed up by a single direction attack from Blight which seems much less scary in comparison. The final Raven fleet fight would likely be much better if the fleet came from 1-2 directions, instead of all directions, but that the chosen locations were still semi-randomized so that the player could not preemptively defend against it. I personally would have made the existence of the incoming fleet be foreshadowed similar to the singular Raven ships, while giving the player a 1 minute timer to rapidly prepare some defenses in the direction which got chosen. I then would have made Blight appear with ships from all directions to provide a better sense of hopelessness and impending doom, thereby making sense of Mo giving into QueekQueek's blackmail due to a real worry for his life. Conquest Maps: Mo Mo is simultaneously a well designed and a poorly designed map, which is why it alone has been referenced in both the spawn and camp design guides. The general idea of the map, the player getting to control a boss-like NPC unit which he needs to safely guide to the end, is simply a great map concept. The power fantasy of playing as Mo and singlehandedly smashing through Bandit defenses, helps to give the player a real sense of why Mo is treated as such a threat in universe. In terms of sections, Mo is split into three distinct parts. Each of these three parts have substantially different spawn patterns and each have a lot to teach us about good versus bad spawn design. In the first section, Mo smashes through half-camp after half-camp until reaching the player's T3. While passing through this section, Mo activates 3 permanent spawn caves which continue to vomit flying units for the entire rest of the map. These hostile fliers can kill every well and orb from the player's starter base to his T3. After reaching the player's T3, Mo turns north to fight a mini-boss in the form of Banzai Lord. Banzai Lord spawns Banzai Birds, which Mo can either kill or play hide-and-seek with on his journey northward. The layout of this section facilitates both playstyles, giving the player several safe zones where they can stop and heal their ailing juggernaut. Once the Banzai Lord is dead, the Banzai Birds stop spawning and this section remains permanently safe. The third section, which was discussed in detail in the camp design guide, is then mostly self-contained and functions as a lodgement map. The lodgement section makes use of conditionally permanent spawn waves. Enemies spawn from caves, the spawners are therefore indestructible, but once the condition is met (death of Raven Command Walker or Bandit morale reaching 0) the spawns permanently cease. If the spawn locations themselves were moved and the waves spawned less frequently, to allow players to avoid and hide from patrols while otherwise slowly gaining ground, the third section would be very well designed overall. While the third section's spawns feel less organic than the second section's, the concept of Bandit morale is very sound and lacking only in the fact it is hampered by the issues mentioned above. Speaking of the second section, little needs to be said. The whole area is done so well it is a clear example for how Skylords Reborn map designers should design such areas in their own maps. The real issue with Mo's spawn design is the first section. The spawns are clearly intended to place continued pressure on the player as a kind of failure condition. This was likely done because Mo can simply be held back and he is therefore never in real danger of death. If the player were to do that, the player would never be able to fail the map. In light of this, the original devs added the need for the player to continually defend his T1-T3. The issue is just how ham-fisted the whole thing feels in terms of implementation. Does it really make sense that there would be an infinite spawn of only Skyrakes and Windhunters? In terms of map art, it looks like the player disturbed some bird nests and it therefore makes sense that some flying units would spawn in response, but why do they eventually turn into Tortuguns? Overall, the whole bird spawn mechanic just feels like a band-aid to a mistake made in map design which likely could have been fixed in another way. If you look at the picture included above, you will notice that the first and second sections of the map have the same mountain + green field look. Given their connection in aesthetics, it would have been better to connect them in terms of spawn mechanics as well. If I were to remake the map, I would have tied the spawns in the first section to killing the Banzai Lord in the second section. This gives a reason for why the birds were attacking to begin with, because they belonged to the Banzai Lord. The fact that the player would no longer be able to lose permanently after that point is fine, there are plenty of other maps where this is true, and technically they can still lose by letting Mo die which is likely the more common failure condition anyway. The key lesson to takeaway here is that true permanent unconditional spawns should be very rare in maps; it is almost always better to implement conditional permanent spawns when you feel like you need to pressure the player in this way.
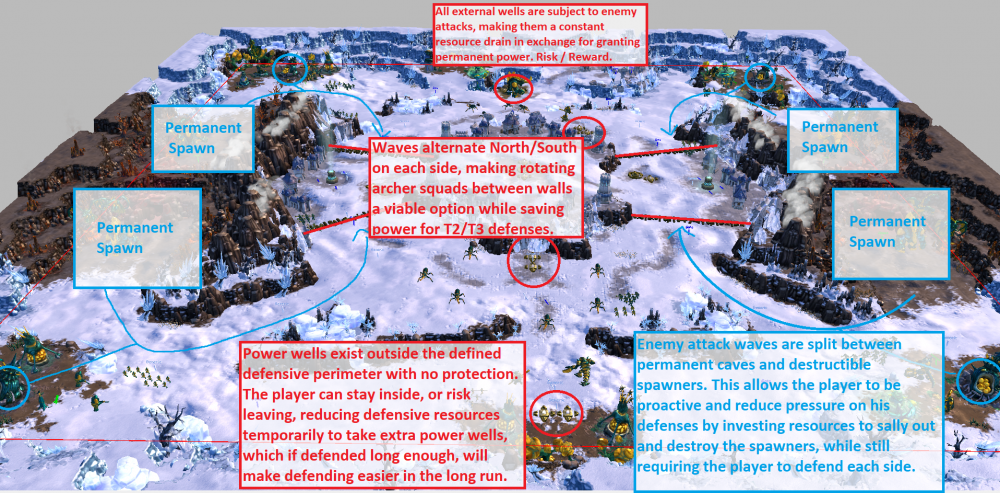
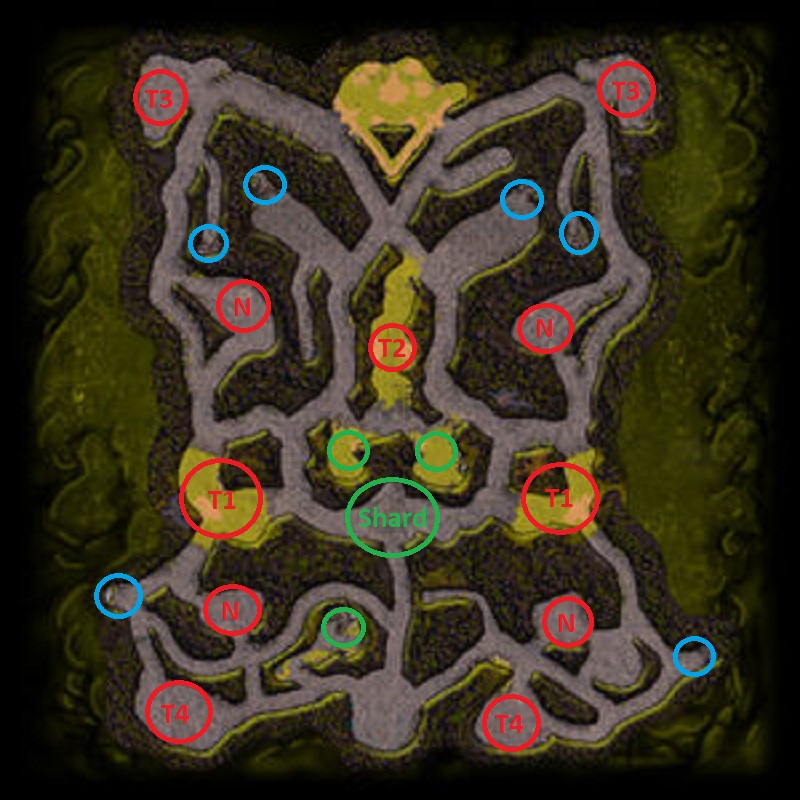

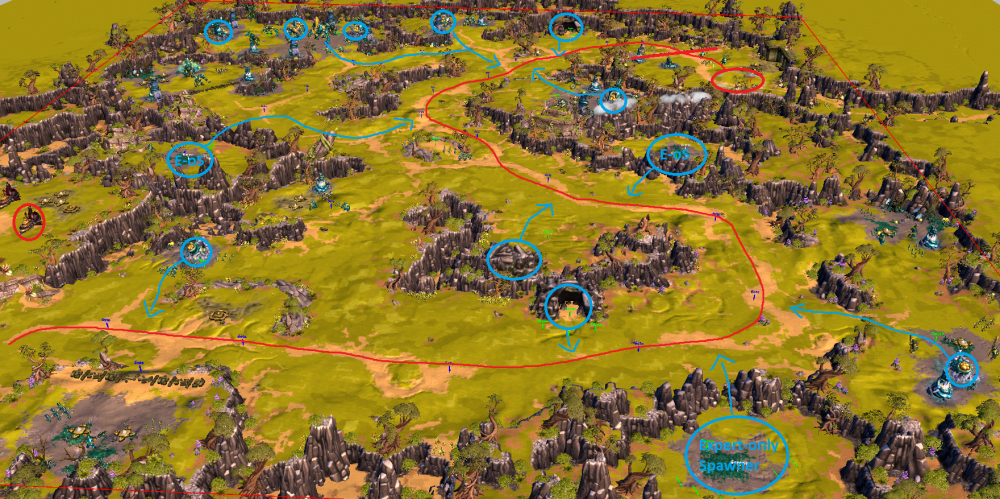
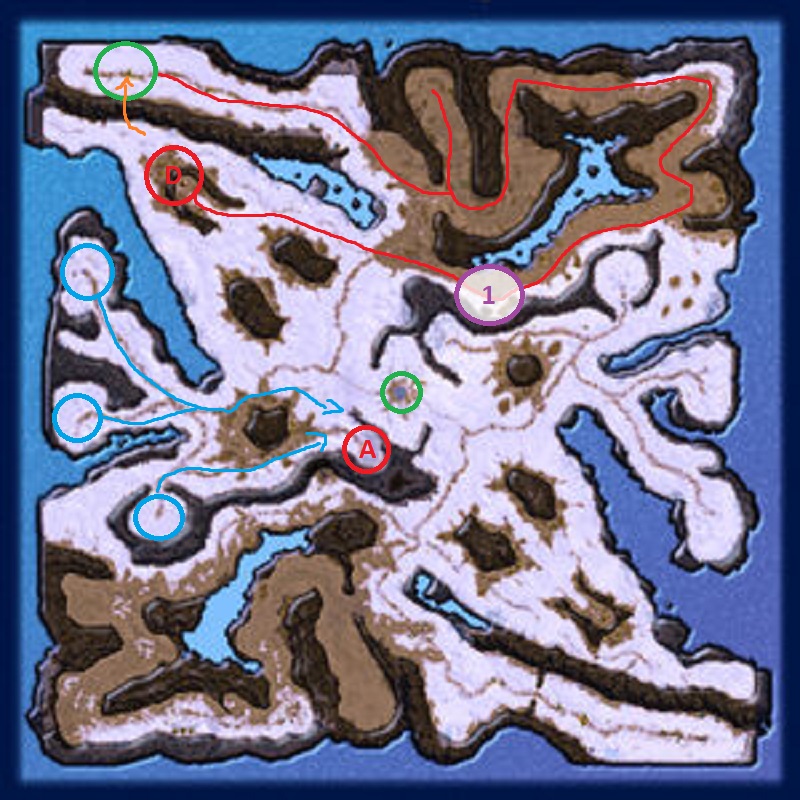
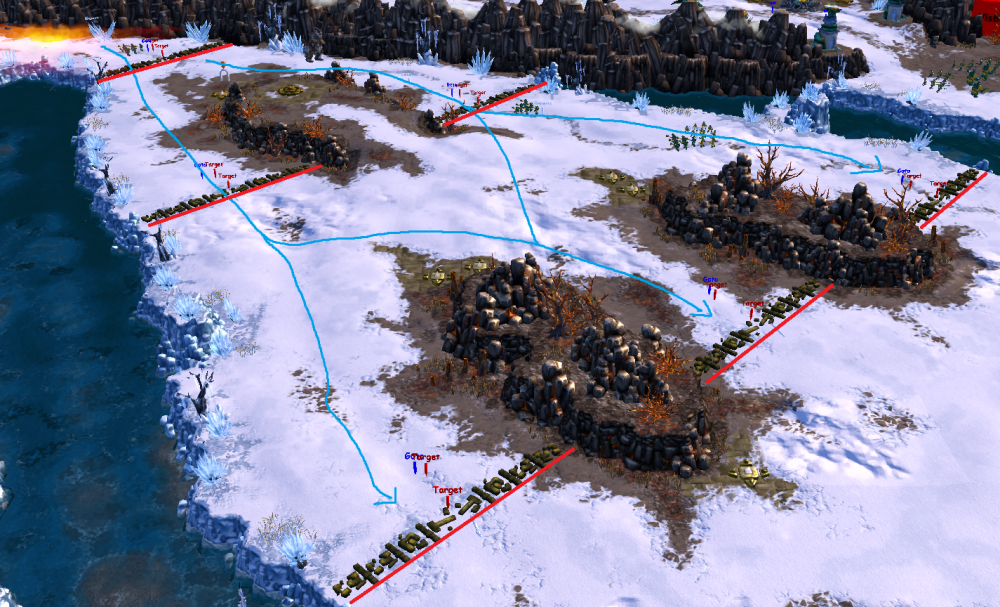
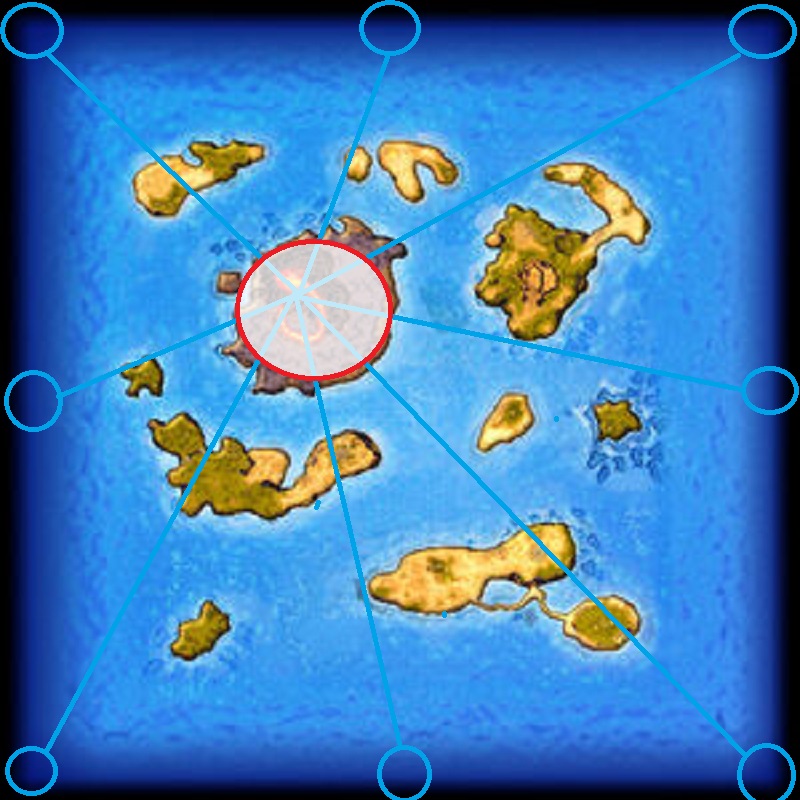
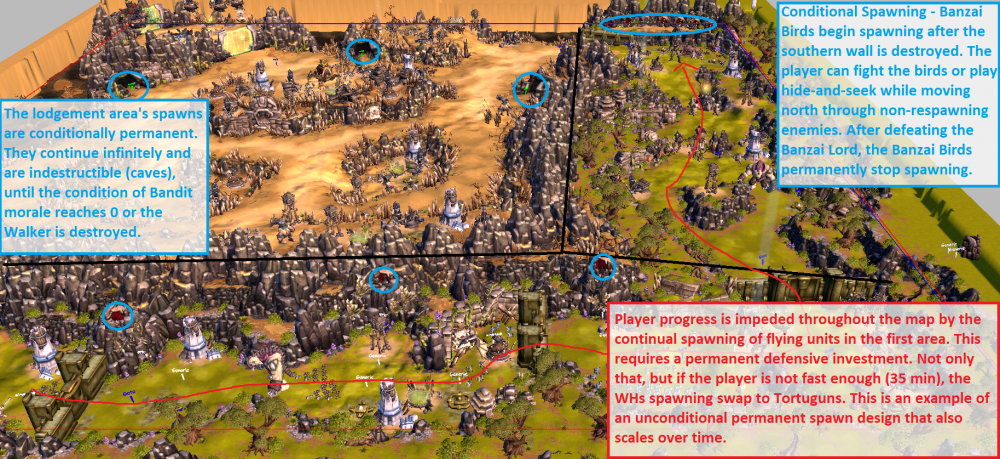
-
New card ideas and suggestions - Megathread
Hrdina_Imperia replied to Hrdina_Imperia's topic in General Talk
Throwing in my a bit older ideas, to somehow create a Stonekin unit with good damage. It has its problems, I'm well aware, but perhaps it can inspire something better 😄 1. Solo iteration Cold veins - self targeted, 15 power - Refreshes duration and strenght of an Ice shield active on this unit. Maximum Ice Shield capacity restored is 1000 points. Reusable every 60 seconds. Lone Hunter - Unit is accustomed to fighting alone. Friendly melee units within 15m radius will actively hinder Crag Lobster, lowering his attack by 20%, to a maximum of 80% (4+ units in an area). Other Crag Lobsters do not provoke this attack decrease, instead they will refuse to fight completely. Adamant Skin - as usual 2. Group iteration Cold veins - self targeted, 15 power - Refreshes duration and strenght of an Ice shield active on this unit. Maximum Ice Shield capacity restored is 1000 points. Reusable every 60 seconds. Group Hunter - Unit gains attack power while being surrounded by allied Stonekin melee units within 20m radius. Every unit will improve Crag Lobsters attack by 200 dp20, which stacks up to 6 times. (Max attack is thus 1800). Territorial - If this unit is within 10m of other Crag Lobster, it will refuse to fight. Adamant Skin - as usual
-
Patch #400043 - 25 July 2023 Welcome to the long-awaited quality of life patch. After this update, the Forge will finally be running smoothly again. Amongst other minor bug fixes and improvements, this patch will also allow you to watch outdated replays. Keep in mind that replays with gameplay affected by patches will still desync. General Changes Enabled playback for outdated replays. However, replays may not accurately reflect the original gameplay if the replay contains actions that have since been affected by balancing patches. General Fixes Improved overall performance in the Forge and while within game creation lobbies. Improved the remaining days display of auctions in German. Improved the RPvE Cosmetic Portrait Names to be more consistent. Improved the descriptions of various achievements to be more consistent: Codebreaker Lone Ranger The Nightmare's Nightmare Urban Planner Card Fixes Player Cards: Abyssal Warder (Fire) / Abyssal Warder (Frost): 1. Active ability Crystal Spikes: Improved description to be more accurate in German. Burning Spears: 1. Toggle ability Weapon Change: Ability display on the card visualization has been reordered. Fleshbender (Shadow): 1. Fixed tooltip to show correct English name in non-English languages on upgrade 3. Hammerfall (Frost): 1. Passive ability Breeze of Strength: A. Fixed ability tooltip to display 40 instead of only 15 shielding capacity regeneration. B. Improved description to be more consistent. Life Weaving: 1. Pain Link: Fixed the damage transfer to no longer target nearby structures but only units. Lord Cyrian: 1. Fixed the description of the upgrade card for upgrade 3 in German. Lyrish Knight / Lyrish Knight (Promo): 1. Passive ability Steadfast: Ability is now displayed as a 5th ability in the card tooltip (does not fit on the card visualization). Mind Control: 1. Infinite Domination: Added the missing origin name of the debuff immunity tooltip. Regrowth: 1. Emerald Blessing: Improved the translation of the Godspell name to be more accurate in German. Sleet Storm: 1. Heavy Rain: Improved the upgrade card visualization of upgrade 1. Stone Warrior (Frost): 1. Active ability Blessed Shatter Lance: Fixed the ability to properly work against some frozen conditions. Sunken Temple (Nature): 1. Autocast ability Gifted Plague: Fixed an issue that caused upgrade U0-U2 to not spawn Pest Creepers. Non-Player Cards: Lost Crawler: 1. Passive ability Blowout: Improved the description to be more accurate. [Disclaimer: The following is about the entities introduced by the nature battlegrounds preset.] Caustic Sentinel: 1. Autocast ability Acid Spit: Added an impact visual effect to the projectile. Overmind: 1. Autocast ability Infinite Domination: Fixed a bug where the ability did not change the population count when mind-controlling a unit. Swamp Drake: 1. The general mind-control immunity that allowed power expenditure without actually granting the target has been removed. Wheel of Juvenescence: 1. Fixed a typo in the card's name. 2. Gift of Juvenescence: Improved description to be more consistent in non-English languages. [Disclaimer: The following is about the testing entity, exclusively available on the test server.] Teststrike: 1. Adjusted the internal classifications and removed the visualization of a Fire affinity. 2. Increased the unit's life points from 5,000 to 10,000. 3. Increased the average damage dealt over 20 seconds from 5,000 to 10,000. 4. Changed the size type from XL to L. 5. Decreased the visual model size scaling from 200% to 135%. 6. Added a German card name to search for it. 7. Active ability Fire Lance: A. Fixed incorrect handling of overkill damage. B. Removed M-sized counter damage bonus. C. Improved description to be more consistent. 8. Passive ability Fiery Birth: A. Increased damage from 10,000 (30,000 in total) to 30,000 (90,000 in total). B. Fixed incorrect handling of overkill damage. C. Removed M-sized counter damage bonus. D. Improved description to be more consistent. That's all for this patch! See you in the Forge!


-
Mapmaking Fundamentals - Camp Design This was originally written as an internal design document meant to guide our current development of new campaign maps. It has been shared here for interested players and as an aid for aspiring community mapmakers. Introduction BattleForge campaign maps have a particular feel to them, and this feel is a fundamental component of the unique experience which is playing BattleForge. The goal of this design guide is to use existing campaign maps, particularly the best campaign maps, to understand and to categorize the distinct features of the camps in BattleForge’s campaign, such that we can better design future campaign maps. This guide is therefore intended to categorize the design choices of the original devs and to act as a reference for future development for both community and official map development. Legend Given the nature of map design, this guide uses a high density of visual examples to illustrate map design principles and standard practices. Across all examples, a standard legend is used. Purple – is used to highlight NPC camp formations. Purple text is used to describe the various dynamics occurring in the enemy camp. Light Blue – is used to highlight spawn locations and any special interactions which these spawn locations enable. Orange – is used to highlight non-standard flanking routes available to players. In the majority of cases, orange designates available paths for flying units, but it can also represent potential cliffing opportunities, particularly for artillery units such as Firedancer and Firestalker. Red – is primarily used to highlight player attack routes. It is secondarily used to highlight key features of camps which affect said attack routes. Black – is used to highlight terrain features. Table of Contents 1. Player Agency - Angles of Attack: 2. Camp Formations – Line vs. Center Based A. Simple Line-based Formations (Blight) B. Complex Line-based Formations (Nightmare Shard) C. Center-based Formations (Crusade & Siege of Hope) 3. Area Formation - Lodgement A. Encounters with Twilight Analysis B. Mo Analysis C. Behind Enemy Lines Analysis 4. Appendix I: Standard Camp Layout Diagrams Player Agency - Angles of Attack BattleForge is a game well beloved for how much agency it gives to players. Players can choose which modes to grind for rewards, which cards they collect, how their decks are constructed, and how they approach each map. The continued cultivation of player agency has and must continue to inform map design. One of the most prominent aspects of player agency is how a player can approach a map, which enemies they fight, which paths they follow, and how they attack any given camp. Given this document’s focus on camp design, it is worthwhile to start our analysis by visually highlighting a good example of camp design which enables player agency by a multiplicity of angles of attack. In nearly every example shown in this document, there are a number of red and orange arrows highlighting some of the available angles of attack for each given camp. I strongly encourage the reader when following along in the analysis of each camp to also consider how the original devs used the terrain features and enemy layout to enable and disable different angles of attack; the reader ought to then consider how this affects the player experience in both positive and negative ways. The diversity of approaches both within and between camps is one of the major factors that contributes to BattleForge’s maps remaining interesting even after dozens of playthroughs. Blight Enclave 1 - Northeast Camp Formations - Line vs. Center Based In general, the vast majority of camp designs in BattleForge’s campaign maps fall into 2 distinct categories, line-based and center-based camps. Line-based camps are so called because the enemies in the camp are visually aligned into line formations, similar to real life pre-modern army arrangements. Each line is typically made up of only a couple different types of units and both the front and reserve lines are often supported by buildings. Center-based camps are so called because the enemies in the camp are clustered in the center as a group. While initially clustered, center-based camps quickly self-differentiate when attacked. Contrary to their line-based counterparts, center-based camps are highly diverse, utilizing as many different enemy types as possible but with a deemphasized focus on towers. Simple Line-based Formations: Blight The majority of camps in Blight fall into the category of simple line-based formations. What this means is that the camp is made up of 2 lines, a frontline and a backline. The frontline is typically melee units, a support building (Waystation), and towers. The backline is composed of support units or buildings (Shamans, Bandit Sorceresses, Waystations), long-range backup (Bandit Sniper, Artillery), and melee reserves. While higher tier camps have increased unit diversity, most simple line-based camps make use of only a small number of distinct units in each line. Diversity is more to be found between the lines than within them. While most camps have spawners, these are usually not the focus of the camp, with several only being triggered by the global map timers. In all cases, while the camp itself is fortified, it also feels lived in. When looking at the camp, the defensive formations are believable, and the player can imagine that the Bandit camps also double as homes. Blight Enclave 2 - Southeast Blight Enclave 3 - West Complex Line-based Formations: Nightmare Shard Nightmare Shard’s design revolves around defending the Forge Shard and destroying 4 camps, each of which is themed after a different element. Each of the four primary camps falls into the category of complex line-based formations. This type of formation is a more complex version of the simple formation illustrated above by the examples from Blight. While simple line camps only have a front and backline, often with no spawner, complex formations have multiple layers of defense and almost always make use of a well-protected spawner. The general design idea is that the frontline, largely made up of melee units, impedes the player’s initial progress, while being kept alive by a possible support line. Simultaneously, an archer line, made up of ranged units and towers often protected by terrain or walls, provides the primary source of damage. Once the frontline dies, the archer and support lines, still protected by towers or a fallback artillery location, delay the player until the frontline can respawn from the spawner farther back. These types of camps at their best create the feeling of a great ongoing battle where the player slowly and steadily advances against the enemy. At their worst, they feel like an unending slog against a never-ending horde. Nightmare Shard - Shadow Camp A major factor that determines if the camp is enjoyable or frustrating is how the camp manages strategic depth. In the 3 examples included here, the strategic depth of the camp is handled significantly differently. In the first example above of the Shadow camp, absent Mana Wings or leaving the camp until post-T2, the player is forced to attack into small chokepoints with no capacity to retreat due to the wild magic zones. Paired with enemy Vilebloods, whose death temporarily blocks any forward progress, this often leads to a choice between reaching the spawner but sacrificing a large portion of your army to Vileblood acid; or delaying to save your army but facing a second wave of Vilebloods. Choices such as these are frustration fodder because the player feels trapped into making a bad choice with little capacity to adapt. Still, the distance between the spawner and the initial engagement zone is very small, and if this were a T2+ camp it would likely be well balanced given stronger player damage and CC spells. In general, lower tier complex formations should have lower strategic depth, measured here as the distance between the initial engagement zone and the priority target, as well as the capacity of the enemy to continue fighting. Nightmare Shard - Frost Camp The Frost camp is an example of a fully fleshed out complex line-based formation. There is a center frontline, with both an archer line and support line directly behind. The sides have additional archer lines (towers + ranged units) which can continue to attack the player if they try to run for the spawner, which is well protected at the very back of the camp. This overlapping multi-layered defense is the major component of any complex line formation. It is also believable. Given the available troops, the arrangement of the Twilight forces makes logical sense. A player given the same troops would likely place them in a similar fashion. Another key part of all well-made complex formations is permanently destroyable strongpoints. In this case, the Frost camp is formidable not just because the units can respawn, but because the towers help to hamper forward progress. When the camp is originally encountered, it is at its strongest. But, if players are careful and destroy the towers before launching a full assault, they increase the chances of taking the camp without being repealed or losing most of their forces. This creates a give-and-take with the camp where it feels like the player and the enemy are actually matching wits against each other. The best complex line formations have a strategic depth that can be degraded or circumvented by smart players, but which acts as a formidable wall to the reckless. Nightmare Shard - Nature Camp Similar to the Frost camp, the Nature camp has multiple layers of defense. The Twilight Pikemen slow enemies while they get damaged by a substantial contingent of Twilight Slayers and a well-positioned Twilight Bombard. The camp has 3 forms of CC: slow, blind, and M-knockback. These make it very difficult to reach the spawner which is located very far back in the camp. While the ultimate goal is the spawner, the Twilight Bombard is provided as a solid secondary objective. By destroying it, the player makes any subsequent attacks on the camp much easier. Additionally, one of the most intriguing aspects of this camp is that, absent the single Bombard and Whisperer, all other defenses are T2 or below, while the camp is a T3 camp. It is the perfect example of how a well-designed camp with significant strategic depth can provide a challenge even to higher tier players without the need to utilize stereotypically powerful units. This camp also well illustrates that many complex line formations make use of only a few units with little compositional diversity in the camp as a whole. Center-based Formations: Crusade Crusade - West Bottom Camp Crusade - West Middle Camp Crusade - West Top Camp Center-based Formations: Siege of Hope Siege of Hope - Western Enclave Siege of Hope - Town Guard
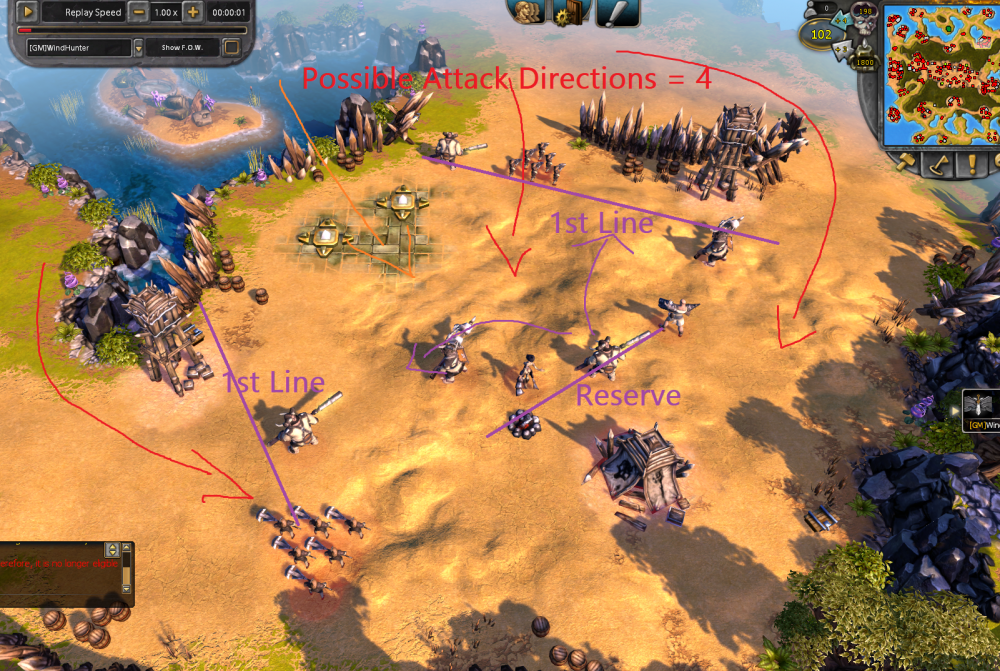
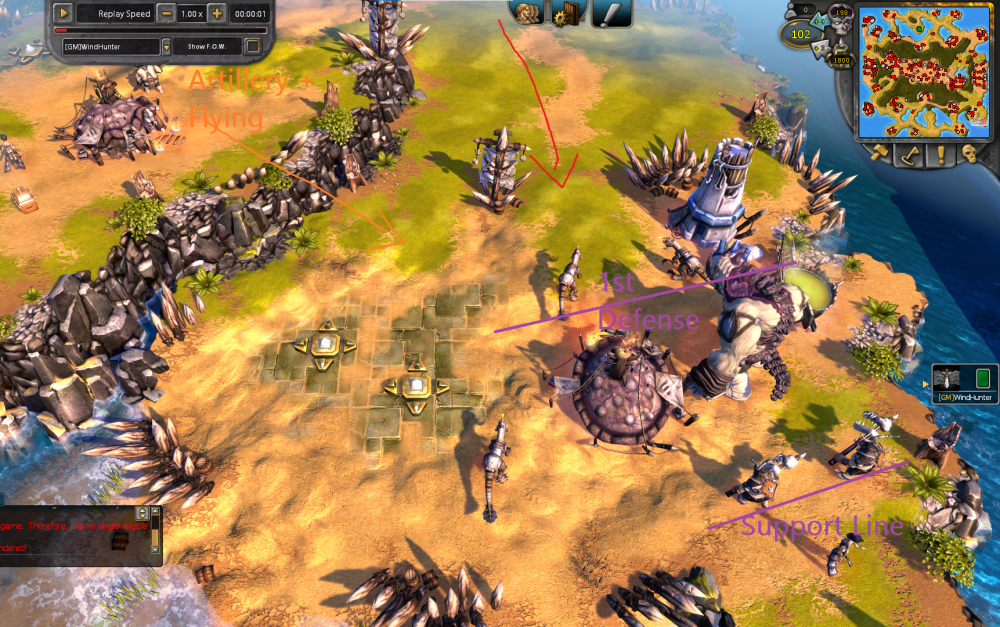

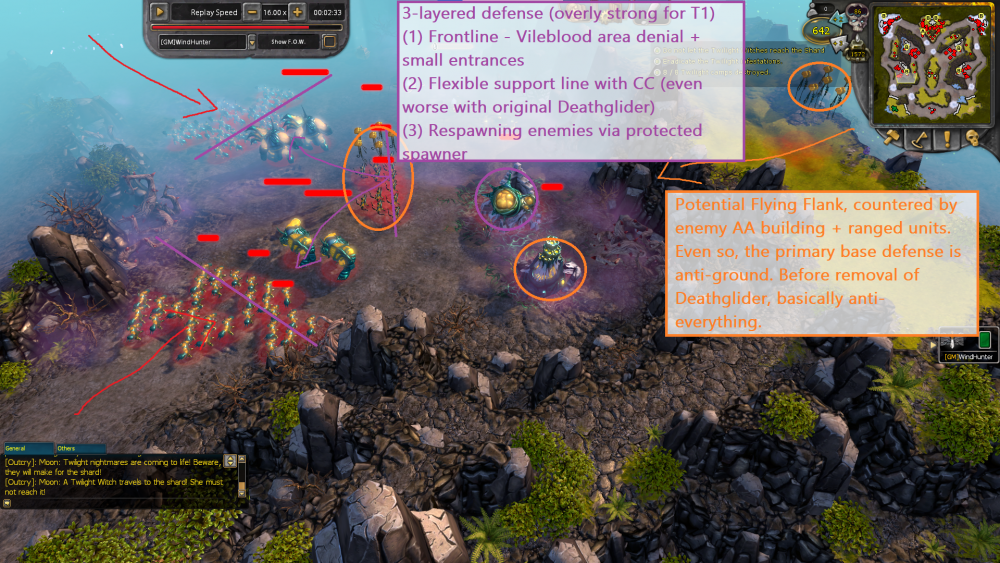


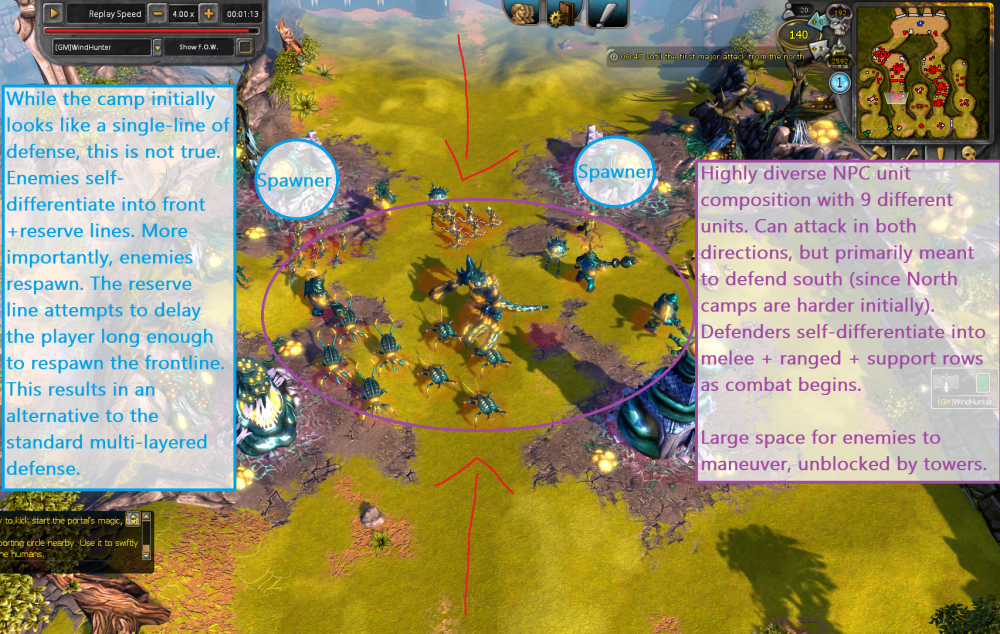


- 1 reply
-
- 3
-
-
It would be nice to be able to have bots fill in slots as allies since it can be difficult to find people to play with sometimes. Probably hard to implement I'm guessing. =(
-
Card Balance Changes Global Balance Changes Random PvE Boss Leader Immunity: - Added Steadfast to all rPvE bosses. Ranged attack delays re-randomized: - Towers and ranged units are now assigned a randomized 0.3-0.7 second delay on a per-attack basis instead of a standardized 0.5 second delay on spawn. This only modifies cards affected by the bug, many ranged units and towers will be unaffected by the change. Last patch, we changed the randomized attack delay assigned on spawn from ranging between 0.1-1.1 seconds to a standardized delay of 0.5 seconds. While this successfully achieved our goal of making each unit and tower a player spawns equal, it introduced other problems. The chief concern reported by the playerbase was an aesthetic one. While previously battles in BattleForge felt very alive, with units and towers on each side attacking continuously, with the standardized delay combat started to feel more turn-based. Your units would attack, their units would attack, then your units would attack again. This also led to easy kiting of enemies, particularly NPC enemies, because you could play around the standard delay to unleash volleys of attacks then retreat until the next volley was ready. Given the widespread and consistent feedback we received that something unique to the BattleForge experience had been lost by this change, we decided to pursue a few alternative solutions that would fix both the old and the new problems. The solution we settled on was to re-add the attack delay with a smaller range and to make it apply on a per-attack instead of a per-spawn basis. This means each affected unit or tower will have a slightly different attack speed for each attack, but will on average have the same attack speed over a long enough period. The chaotic nature of combat should also return, with both sides continuously attacking instead of engaging in a semi turn-based encounter. Revenant's Doom Costs Standardization: - Standardize Revenant's Doom costs by tier, with an increasing discount as the tiers progress: T2: 75%, T3: 65%, T4: 50% of unit's normal power cost NPC Building Power and Orb Cost Fix: - All NPC buildings now have an assigned power and orb cost. Similar to how we fixed the missing power and orb costs for NPC units several patches ago, we have now given each NPC building its own power and orb cost. One motivation for this change is to allow us to add new cards and card abilities that can be limited in terms of which buildings they can and cannot be taken over, which would otherwise not be possible. A second motivation is to create consistency between NPC buildings. Prior to this change, buildings added with Fire rPvE had properly assigned costs, which is also true of the new Nature rPvE buildings, while the original buildings did not. This created a major inconsistency between and within game modes in regard to Matter Mastery, making it difficult or impossible to know when to bring one or the other affinity. A third motivation was to create a real distinction between the two existing affinities of Matter Mastery. Previously, before this change, the nature affinity could overtake every building in the game, meaning there was no real reason to use the tainted affinity or for it to exist. At the same time, we do not want to strongly nerf the nature affinity, which we do not view as inherently problematic. As such, as part of this change, we are also changing the nature affinity of Matter Mastery to work on T3 buildings, up to a power cost of 140p. Below, we have listed each building affected by this change and what will be its new tier and power cost. Tier 2 - 100p Bandit Launcher, Stonekin Hurler, Twilight Infected Tower, Lost Launcher Tier 3 - 140p Bandit Sky Defender, Bandit Waystation, Bandit Wizard Tower, Stonekin Deepgorge, Stonekin Launcher, Stonekin Shatterer, Twilight Fleshbender, Twilight Hatecaster, Twilight Skyscorcher, Lost Banestone, Lost Converter, Lost Disruptor Tier 4 - 200p Bandit Artillery, Stonekin Hammerfall, Stonekin Shredder, Twilight Bombard, Twilight Willsapper XL-unit Turn Speed Increase: - Increased the turn speed of all player XL-units based on category. Ground XL: 25% faster turn speed Flying XL: 40% faster turn speed Worm XL: 200% faster turn speed Global Disenchant Hostile versus Friendly Root Distinction: - Disenchant's immunity no longer prevents the application of the Immobile, Immobileroot is still prevented. BattleForge has two types of root effects, one called Immobile and the other Immobileroot. The distinction between them is that Immobile is only applied by friendly effects, while Immobileroot is applied by hostile effects. This change makes it so that a friendly effect which causes a unit to be rooted in place is no longer prevented by Disenchant's immunity effect. The primary reason behind this change is that effects which self-root a unit or its allies are baked into the balancing considerations of a card and its effects. The ability to bypass this downside, which has become easier as we have added, and likely will continue to add, more ways to apply Disenchant, has therefore become a constant balance consideration for both upcoming and existing cards. We are forced to ask ourselves if we can really buff Forest's Vim if we have to account for a Razorleaf that can walk around at normal speed, attacking the entire time. As we work on campaign maps with longer T4 sequences, we have to consider that a player can summon a Dreadnought and have it permanently stay in its Pledge of the Giants mode while walking around, trivializing vast portions of the map with ease. In such cases, do we nerf the Dreadnought and the Razorleaf, or do we nerf the mechanic which is causing the issue? Our decision was to nerf the Disenchant interaction. Squad Position Fix: - Game now checks and updates the Squad position to the unit position if they are too far away from each other. Any unit has two positions. A squad position and a unit position, which is equal to what we see on screen. This position tends to be close or equal to the units position itself but seems to behave slightly different for some actions. For example,. a Magma Hurler will shift his squad position slightly behind himself when attacking. This is not problematic. But some actions lead to only the unit position being updated while the squad position remained stationary. Prime candidates for this are hold position orders or rooting effects. The squad position can remain at the initial spot while the unit including its unit position can move to attack. Squad position is used by many abilities and spells to check if they should apply to the corresponding unit. Meaning, a unit with a squad position far away from its unit position would no longer be hit by things like CC or AoE attacks targeting the unit position. The fix going live now checks and updates the Squad position to the unit position if they are too far away from each other. Worms are not included here due to issues with worm movement. PvE Balance Changes While changes are split here between PvE and PvP sections, many of the changes have important consequences for both game modes. Our PvE and PvP balance teams work closely together to ensure that the impact of all changes are evaluated for both game modes. Below, we have listed both the changes and our reasoning behind them. [ Tier 1 ] Banner of Glory: 1. Life points: 500 ➜ 300 2. Void return percentage: 33% ➜ 40% Higher percentage void return will allow more efficient cycling of lower tier units into real power. The life points were lowered to avoid situations in PvP where it becomes too strong, such as offensively inside an Aura of Corruption. Decomposer: 1. Void return percentage: 50% ➜ 60% Frost Mage: 1. Remove knock back from damage cone 2. Add non-damaging cone with reduced range, that applies knock back. A 33m knock back cone should result in Frost Mage consistently applying damage to squads she attacks, fixing the issue where units are knocked outside of her damage range, but she continues to attack them anyway. Imperials: 1. Add passive, "Protected Rush:" While under the effect of an Ice Shield, the unit gains significantly increased movement speed. A. Only works while Defensive Stance is active B. Movement speed while shielded = 4.8 m/s Improve Frost Sorceress and Ice Shield Tower synergy with Imperials. Scorched Earth (p): 1. Tainted Deconstruction (p): A. Damage debuff: 50% ➜ 75% B. Remove “The erection of buildings that are presently under construction will be interrupted and it will not be possible to repair anything.” from functionally and description. The increase of Scorched Earth(p)'s debuff allows it to become a semi-suppression of buildings in a large area (20m) and to protect your fragile Fire units in PvE. We removed the construction-suppression effect to reduce double-scorched usage in PvP, which also gives each affinity a role in either PvE or PvP. Snapjaws: 1. Remove Splash Damage: 5 damage, up to 9 in total ➜ 7 damage Snapjaws have an abysmal splash radius of only 3m. This is so small it effectively does not exist and only serves to reduce the unit's damage against squad units. We are removing the splash and changing the unit's damage to single-target. This increases the unit's single-target damage from 138 to 193 dp20, a +40% increase in total effective damage. This will change the damage of Satanael's Snapjaws from 414 dp20 to 579 dp20. Tunnel: 1. Power cost: 40p ➜ 35p 2. Life points: 880 ➜ 600 Encourage Tunnel play by slightly lowering cost. HP reduction to prevent issues with an overly health efficient Tunnel. Witchclaws: 1. Power cost: 65 ➜ 70 2. Damage: 630 ➜ 680 3. Add passive, "Corpse Gathering:" Harvests energy from nearby corpses equal to their former maximum life points to enable more powerful explosions. A maximum of 3000 life points can be stored at once. 4. Infiltration Rework: A. Damage (both affinities): 330, up to 1650 in total damage + up to 600 damage per target, up to 5 targets in total based on the number of corpses gathered B. Enable splash overflow fix for ability. C. Both affinities now damage units and buildings. D. Explosion radius: 20m ➜ 15m E. Fire affinity: Additionally, when 3000 corpses have been gathered, Witchclaws deal 50% more damage after teleporting. F. Shadow affinity ➜ Frost Affinity: Additionally, when 3000 corpses have been gathered, Witchclaws take 50% less damage after teleporting. [ Tier 2 ] Breeding Grounds: 1. Power cost: 70p ➜ 90p Breeding Grounds is one of the stronger cards in the game and has some of the best scaling of any T2 card or building. At only 1 Nature orb and available as easy as T2, it grants a permanent -25% discount to all own and allied units. While the card is something of a third rail due to its popularity, now that we have significantly buffed nearly all parts of Nature, we believe it is time to give the card a minor nerf. When considering what to do with the card, we considered several options, such as making the discount scale upwards or downwards with tier (i.e. 15% discount if player is T2, 20% if T3, etc.) or just nerfing the -25% discount outright. In the end, we settled on a slap-on-the-wrist nerf, at least initially. The increased bound power will delay players initially in T2, but only cost them 2 extra permanent power if they destroy the building. At the same time, the increased bound power cost should encourage players to actually destroy Breeding Grounds made obsolete by map progression, and it will provide a much needed nerf in the PvP game mode as well. Burrow Ritual: 1. Orb cost: 1 Nature, 1 Neutral (T2) ➜ 1 Nature (T1) Reducing the card's tier should allow more synergy with Tunnel, allowing for more strategies to emerge and helping to better justify Burrow Ritual's inclusion in a deck. Defenders: 1. Crossbow Attack damage: 9 per shot (540 dp20) → 10 per shot (600 dp20) 2. Life points: 810 → 750 Stat realignment to make Defenders more viable offensively and a more attractive option. Life points are worth less than damage when considering stat efficiency, particularly amongst ranged units in PvE. Earthkeeper: 1. Fixed a bug which allowed Earthkeeper to make connected units immune to all damage while also not affecting Earthkeeper. Lost Priest: 1. Exhaustion: A. Cast range: 30➜ 40m B. Total targets: 5 ➜ 10 C. Debuff Timer: 20 sec ➜ 30s D. Jump speed increase E. Debuff strength: 30% ➜ 40% Improvements to Lost Priest's support capacity will help its viability in PvE, particularly in combination with other units such as Lost Shade and Lost Dancer. Matter Mastery (g): 1. Gifted Takeover (g): maximum of 2 orbs and 100 power costs ➜ maximum of 3 orbs and 140 power costs See Global Balance Changes above for more details. We are also considering more substantial changes to the tainted affinity in a future update. Revenant's Blessing: 1. Charges: 8 ➜ 12 2. Radius: 20m ➜ 25m 3. Gifted Immortal healing: 15 ➜ 30 life points per second 4. Infused Immortal damage: 25% ➜ 30% more damage 5. Bugfix: Allow overlapping Revenant's Blessings to reapply the effect without requiring the unit to exit and re-enter the area. We are working towards improving the current use case of Revenant's Doom through direct buffs to it and through improving its support tools. With this change, Lost Shades are usable without needing Viridya and the spell scales better into the higher tiers for those you want to use revenants. More support to the faction and to revenants in particular will come in the next patch when we finish the rest of the upcoming Lost Souls rework. Root Nexus: 1. Orb cost: 1 Nature, 1 Neutral (T2) ➜ 1 Nature (T1) 2. Life points: 850 ➜ 650 Moving Root Nexus to T1 gives Treespirit a much-needed support card. Life points reduced to prevent too health efficient blocking options in T1. Spikeroot: 1. Waves per root attack: 2.5 spike waves ➜ 2 spike waves 2. Damage per wave: 100, up to 150 in total ➜ 125, up to 190 in total (+25% increase) Overall damage remains identical. Spikeroot now always deals the same damage at each point in its attack, instead of having high and low points. Sunken Temple: 1. Added Mode-change, "Hibernate:" Pest Creepers enter a state of dormancy and are no longer summoned. 2. Pest Creepers now aggro against enemies in an area around the Temple. The new mode change will allow the player to temporarily turn off Pest Creepers. This will be especially helpful when using a large number of Sunken Temples, which quickly fill up the unit population limit, and you want to summon new non-Creeper units. The other change will make it so that Pest Creepers no longer stand around waiting for enemies to either attack them or move within a short distance. They will now actively aggro on enemies that come within a moderate radius around the Temple which spawned them. Overall, these changes should make the card function much more fluidly. Unholy Power: 1. Stored Strength (ammo): 2000 ➜ 3000 2. Ammo is refreshed whenever Unholy Power is recast on a unit already affected by another instance of Unholy Power. 3. Bugfix: Unholy Power no longer decays all remaining ammo when a previous instance of the spell expires. Unholy Power is a highly inconsistent spell, and a lot of that regards bugs in its original implementation. By fixing the decay issue, new applications of Unholy Power existing concurrently with previous applications should no longer be removed by older instances expiring. Additionally, new applications, in addition to continuing to stack additively, now refresh the card's ammo pool back to full. On top of these important changes to the card's functioning, we also increased its total strength pool by 50% from 2000 to 3000 which should help it to scale better into T3. With all these changes, Unholy Power should become a significantly stronger and more consistent buff spell. Viridya (normal and promo versions): 1. Viridya’s Blessing is now able to restore lost squad members Wallbreaker: 1. Orb cost: 1 Fire, 1 Neutral (T2) ➜ 1 Fire (T1) Opens up several early use cases for the card on Titans, Dwarven Riddle, and Sunbridge. [ Tier 3 ] Abyssal Warder: 1. New Active ability for large and medium-sized golems, "Reassemble:" Bond with two other Abyssal Warders of the same size in a 20m radius to reform into an Abyssal Warder of a larger size. 2. Frost affinity effect, Ice Shield duration: 15s ➜ 30 seconds There is a large disparity between the usefulness of the two Abyssal Warder affinities in terms of effects. The fire affinity (r) provides a permanent buff, while the blessed affinity (b) only grants an Ice Shield for 15 seconds. In an attempt to partially remedy this issue, we have doubled the length of the smaller Warders' Ice Shields to 30 seconds. Additionally, we have finally been able to add a new effect to the small and medium sized Warders which will allow them to rebuild themselves into a larger Warder. Reassemble requires 3 Warders to work, meaning that it is not inherently efficient, though it provides another strong synergy with Promise of Life and builds on the buffs to Abyssal Warder last patch. Blood Healing: 1. Charges 12 ➜ 16 Thornbark: 1. Melee damage: 1400 dp20 ➜ 1550 dp20 Mutating Frenzy: 1. Sacrifice cooldown: 15 sec ➜ 5 sec Santa Claus: 1. Blue Gift, Red Gift, Christmas Peace cooldown: 60 seconds ➜ 40 seconds Satanael: 1. Fealty (both affinities): A. Cannot be activated if the player is at or above 125 population. B. Summoned Snapjaws damage: 200% ➜ 120% Removing all instances of infinite spawning in the game due to the attendant performance issues they cause. Buffing Snapjaws individually as compensation. Overall, the damage of each summoned Snapjaws squad is increased slightly. Shrine of Martyrs: 1. Void return per frozen unit: 12% ➜ 18% of current void pool 2. Bugfix: Void return effect is no longer triggered multiple times per entity. Regular users of Shrine of Martyrs know that the void return effect is often inconsistent. The same group of enemies could provide wildly different void return rates when frozen due to the fact that the effect would switch between applying once or multiple times per enemy. We fixed this inconsistency, but it left the shrine, which is likely already the weakest of the four standard options, even weaker. As such, we have given it a large +50% buff to its void return percentage in compensation for removing the existing bug. This change will allow players to develop an intuitive understanding of how much void is actually returned per frozen enemies. The percentage we chose is a bit of a guess and is subject to change based on the feedback we receive from player testing. Shrine of War: 1. Orb cost: 1 Fire, 2 Neutral (T3) ➜ 2 Fire, 1 Neutral (T3) When we first began nerfing cards, many people asked us when we were planning on touching Shrine of War. We previously delayed any changes to the card due to its importance to the rPvE game mode at all levels and because other factions, such as Frost and Nature, lacked sufficient methods of void return, an aspect we think is integral to the balance of all factions. Now that all factions have a viable method of void return, we have decided to give Shrine of War a nerf. We were between the two ideas of nerfing its void return percentage or increasing its orb restrictions. While Shrine of War has by far the most efficient void return when accounting for multiple players out of all the available options, we decided that we did not think its efficiency was outside the line of acceptability, but that the Shrine was too splashable compared to the other options. As such, we choose to leave Shrine of War as the best void return shrine in the game, but to require the player to invest into 2 Fire orbs to access it. [ Tier 4 ] Altar of Chaos: 1. Change Nether Bomb cast range to work like spells instead of like units & buildings. Still limited to own ground presence only. This seemingly small change substantially increases the positioning capacities of the Nether Bomb and allows own units to be much farther away when placing bombs. Battleship: 1. Barrage damage per shot: 550, up to 3300 in total ➜ 800, up to 2400 in total Battleship's ability has a long range of 50m and can be used to snipe out enemies far into the enemy's backline while remaining safe itself. The ability has a very large amount of splash damage, able to fully damage up to 6 enemies in its target radius. At the same time, the target radius is only 12m making it very unlikely there are 6 enemies to damage. Additionally, despite its long animation and unleashing 5 shots, the single-target damage is not even able to destroy a large spawn building. We are reducing the total splash damage in favor of higher single-target damage, increasing the damage dealt to one target from 2750 to 4000 in total. Cluster Explosion (p): 1. Tainted Burst radii per successive explosion: 25m / 20m / 15m / 10m / 5m ➜ 25m / 20m / 15m / 12m / 10m Increased the radius of the explosion for the 3rd and 4th waves of Cluster Explosion (p). These radii were so small, they often failed to hit any enemies. By increasing them, we hope to give a slight buff to this affinity in ideal situations with a lot of closely clustered enemies. Earthen Gift: Earthen Gift Redesign 1. Charges: 4 ➜ 8 2. Infused Earth (r) ➜ Blessed Earth (b): A. Damage buff: 30% ➜ 50% 3. Tainted Earth (p) ➜ Gifted Earth (g): A. Affects Elemental units, not structures B. Remove "Every hostile building in the current game will deal 50% less damage." C. Damage buff: +50% more damage D. Healing per second: 10% ➜ 5% Earthen Gift is one of the worst cards in the entire game. Before Reforging, its normal price was 3 BFP despite being a Rare spell. As Stonekin's Pure T4 spell, it ought to be one of the reasons why a player goes 2 Nature and 2 Frost orbs, but right now it is a waste of a card slot. The card's existing identity is as a combined buff and healing card, but it is restricted to only work on structures. Even on structures it is not useful. Instead of completely rejecting the card's initial design, we are attempting to improve on it for the one affinity by increasing the damage buff where it may prove useful upon the release of defensive rPvE. For the other affinity, we are swapping its effect from structures to elemental units, which includes all Stonekin units, and modifying its heal and damage buff accordingly. The idea is to potentially allow the spell to replace Regrowth while also giving Stonekin access to a minor damage buff for itself and any other friendly elemental units. Between this and the Grinder buff, Stonekin's T4 should feel significantly stronger. Evil Eye: 1. Damage now ticks every 0.5 seconds instead of every 1 second. Rage still takes the same amount of time to activate. 2. Initial damage delay for Evil Eye's Searing Sight has been removed. Damage will now starts as soon as Evil Eye targets an enemy. Grinder: 1. Harmony: Added a yellow bar akin to Mountaineer showing when the healing effect will next occur. 2. Provoke (both affinities): Single target ➜ All enemies in a 15m radius A. Infused Provoke Buff: 50% more damage ➜ 75% more damage Quality of life change to Grinder's harmony ability. Added some increased strength and flexibility to Grinder's taunt by allowing it to affect multiple targets in a small area. This will also allow Grinder (r) to taunt the empty air versus bosses, allowing it to still generate the personal damage buff, which has been increased to +75%, regards of whether or not any enemy units are actually taunted. Stonekin struggles against strong single target enemies such as bosses and this is one step in an attempt to remedy that without damaging the faction's existing identity. Lost Evocation: 1. Charges: 4 ➜ 8 2. Cast time reduction: 2 seconds ➜ 0.8 seconds 3. Infused Revenant damage buff: 50% ➜ 100% The charge increase allows Lost Souls to get access to its primary support spell without having to use two deck slots on Rifle Cultists + Offering. The cast time reduction prevents the use of both Evocations simultaneously, while the buff to the fire affinity (r)'s damage buff makes it a more compelling option for a faction whose main damage dealing occurs through units. Shadow Worm: 1. Increase turn rate of disintegration turrets: 200 ➜ 260 Tempest: 1. Whirlwind splash radius: 5m ➜ 8m Twilight Pestilence: 1. Damage: 44 ➜ 64 life points per second 2. Healing (both affinities): Both affinities now heal friendly Twilight units by equivalent damage as they deal to enemies. 3. Change Gifted Affinity (g) ➜ Infused Affinity (r) A. Add +30% damage buff for friendly Twilight units Improvements in nearly all aspects of Twilight's marquee spell. Previously, the blessed affinity (b) was the only one worth using due to the damage reduction it provides. We decided to roll the healing effect of the gifted affinity (g) into the base spell and create an alternative damage buff variant instead. The goal with this change is to allow Twilight Pestilence to be a more flexible spell, one able to provide a supportive effect while also clearing minor enemies and recovering chip damage to player units that might otherwise prompt the player to cast an additional healing spell. Void Maw: 1. Void Shear ability cost: 75p ➜ 60p [ Tower Changes ] It is the general principle of the faction design team not to change abilities or introduce complex mechanics needlessly. Cards should generally perform a single function and perform that function well. A lot of the buildings in the game are already well-designed, but lack sufficient stats or possess too strict of requirements. As such, we have opted wherever possible to introduce simple changes to bring towers up to the appropriate power level. If you would like to learn more about our thought process behind the tower changes, please head to Skylords Reborn Documents to read our design Deep Dive on Towers, as well as other design documents. Tower Targeting Fixes: 1. Changed the damage delay of the auto-attacks for a large range of towers to the standard delay of 0.1 sec. These towers should now have an easier time hitting moving targets, including swift units. A. Affects the following towers, including both affinities when applicable: Artillery, Hammerfall, Defense Tower, Lifestealer, Northern Keep, Primal Defender, Twilight Bombard, Tower of Flames Blaster Cannon: 1. Splash radius: 5m ➜ 8m 2. Tainted Magma: 15m ➜ 20m Defense Tower: 1. Splash radius: 5m ➜ 8m Howling Shrine: 1. Essence Bolts firing arc: 90 degrees ➜ 135 degrees 2. New passive, “Restoration:” Regenerate 30 life points every second. To truly fulfill its role as a fortress and to provide a meaningful choice between itself and Razorleaf, Howling Shrine must be a self-sufficient defender able to justify the massive amount of space it occupies. The restoration effect will allow the tower to persist even absent player attention or when facing continuous attack waves that prevent repair. The increase to the firing arc of its main weapon is a much needed change. Prior to this, Howling Shrine could only target most enemies with one turret at a time and XL units with two turrets only if the tower was positioned perfectly with respect to the XL unit's path. The tower should now be able to target units of all sizes with two turrets in most cases. Lifestealer: 1. Splash radius: 5m ➜ 8m 2. Still alive regeneration: 5 life points per second ➜ 8 life points per second 3. Sacrifice cooldown: 15 seconds ➜ 3 seconds Lost Disruptor: 1. Damage: 300, up to 330 in total ➜ 300, up to 450 in total (3000 dp20) 2. Splash radius: 5m ➜ 10m 3. Disruption cost: 50p ➜ 20p Increase Lost Disruptor's effectiveness against multiple enemies. Also, Lost Disruptor's ability is one of the better counters to Shrine of Memory in 2v2 PvP. By decreasing the cost, we better enable players to make use of the card simply for its ability effect. Northern Keep: 1. Splash radius: 5m ➜ 8m Primal Defender: 1. Earthstrike splash radius: 5m ➜ 8m 2. Cloudstrike: A. Damage (add splash): 225 ➜ 250, up to 375 in total (2030 dp20) B. Splash radius: 0m ➜ 8m Buff to Primal Defender's anti-air capacity. This leaves it as a middle ground between a non-raged and a fully raged Blaster Cannon, and should hopefully allow the tower to better aid Nature T1 in dealing with anti-air threats, particularly those which can counter small and medium units. Rocket Tower 1. Orb cost: 2 Fire ➜ 1 Fire, 1 Neutral 2. Power cost: 80p ➜ 70p 3. Life points: 2000 ➜ 1480 4. Rocket Barrage: A. Total rockets: 3 / 4 / 5 / 6 ➜ 4 on all upgrade levels B. Attack speed: Every 5 seconds ➜ every 4 seconds C. Damage per rocket: 85 ➜ 90 (900 dp20) Fire T2 currently lacks a splash tower, while Pure Fire T2 has 2 towers. We think Pyromaniac sufficiently fills the slot of T2 tower for Pure Fire, so we are transitioning Rocket Tower into a splash card. As part of this change, we will be cutting down on its large pool of life points while otherwise increasing the consistency of Rocket Tower, both in terms of knockback and damage dealing. Even with the cost decrease, this change will make Rocket Tower mildly less stat efficient against large groups in exchange for a lower start up cost and the ability to consistently knockback multiple enemies due to the fixed targeting and increased rate of fire. These changes should allow Rocket Tower to fulfill its role as a knockback-centric tower while its high damage allies provide the necessary fire power. Skydefender: 1. Damage: 128 up to 192 in total ➜ 153 up to 230 (2300 dp20) 2. Life points: 1400 ➜ 1600 3. Range: 40m ➜ 50m 4. Splash Radius: 5m ➜ 8m Substantial buff to Skydefender to give it more teeth against the T3 and T4 air threats it is designed to counter. The range increase will make it able to fight back against Raven Battleships, which are one of the most common flying enemies in the campaign. Time Vortex (p): 1. Tainted Void Shock (p), attack speed increase void levels: Above 150, 300, 600, 1200 void ➜ Above 100, 200, 400, 800 void Improve the efficiency of the tainted affinity (p) by decreasing the amount of void which is required to trigger each attack speed increase. Volcano: 1. Power cost: 150p ➜ 200p 2. Damage: 581, up to 872 (3990 dp20) ➜ 766, up to 1149 (5270 dp20) 3. Life points: 4390 ➜ 5690 4. Infused Eruption (r) Rage: A. Rage scaling: 100% 1st stage, 200% 2nd stage ➜ 75% 1st stage, 150% 2nd stage B. Rage reset timer: 7 sec ➜ 10 seconds 5. Lava Sea: A. Radius: 25m ➜ 30m B. Bugfix - Lava Sea now works as described C. Added a new visual effect The goal is to make Volcano more "dense" by increasing its power cost and then adjusting its stats accordingly. Making each Volcano more powerful helps to mitigate the tower's large size and also makes it a better target for building buff effects such as those provided by Frost's Skyelves. Total damage when enraged is slightly increased despite the Rage nerf (12,000 dp20 ➜ 13175 dp20). Overall, Volcano loses a very small amount of total stat efficiency, but gains in total strength by having an ability that actually works. The old Lava Sea provided zero value to the tower because it did not work. The new Lava Sea, which functions as described on the card, turns this Fire fortress into a terrifying strongpoint capable of wiping out hordes of enemy units. PvP Balance Changes [ Tier 1 ] Life Weaving: 1. No longer affects buildings. Life Weaving changes are made to weaken its scaling potential into higher tiers considering most shadow splashes tend to be fairly strong at later game stages anyway. Buffed single unit attacks with straight well focus are very easy to execute and fairly annoying to play against when any damage on the target also increases the damage against your Power Well. Sunstriders: 1. Suppression Fire ability cost: 25p ➜ 10p In PvP, Suppression Fire's most relevant applications arise on higher tech levels, where a 50 energy investment for a fragile T1 unit is already enough of a restriction. As a result, there is room to buff the ability power cost for those niche cases. [ Tier 2 ] Bandit Launcher: 1. Power cost: 60p ➜ 50p 2. Firebug ability cost: 40/35/30/25p ➜ 40p on all upgrade levels The addition of a weaker building with reduced construction time led to some rather unique T2 strategies, but the high bound power requirements restrict its relevance. This change should open up some more room for creative usage of Bandit Launcher and the Fire Bug ability. Bandit Minefield: 1. Mine spawn speed reduced by 0.25 seconds per mine. Bandit Minefield has been a fairly controversial topic. The spell was very powerful and played an important role in every game mode. Based on play rates and general feedback, our PvP faction overhaul succeeded in making Bandits more viable and fun to play, but there was a lot of frustration when playing against the faction due to an overly dominant Minefield. After recent tweaks, play rates have dropped by about 20% and Bandits seems to be in a very healthy position based on global faction popularity and high ELO presence ever since. However, the experience of playing against Minefield continued to be perceived as frustrating by many of our players. The intended goal of this set of changes is to keep the faction at a similar level of strength, but distribute its power more evenly across Bandit T2 cards and strategies. Mine spawn speed will be reduced to enable counter play without removing its zoning power and damage potential upon being ignored. The design direction of allowing placement under units is absolutely intended, crucial for the faction viability, and differentiates the card from basic trap card design. Due to a lack of crowd control and building protection, Bandits needs a tool to defend vs melee unit well focus consistently. A major issue in PvP is that outside of its intended design direction (melee unit zoning and S unit denial), Minefield generates too much trading value as its damage is almost guaranteed. The spell tends to trade up against anything except for swift unit micro. This should be addressed. In return, we will buff Commandos, Sniper, and Bandit Launcher in compensation. As Warriors Death came up to the discussion for compensations: The card design is not healthy for PvP due to a lack of counterplay, as such we will just leave the card as is since its mechanic is also powerful in end game PvE content. Bandit Sniper: 1. Damage: 75 dmg per hit (750 dp20) ➜ 78 dmg per hit (780 dp20) Slight damage increase to compensate for Bandit Minefield nerfs. Commandos: 1. Power cost: 75p ➜ 65p 2. Concentrate ability cost: 10p ➜ 20p After some testing, we think it is safe to make Commandos a little stronger, as long as the upfront cost of mode-switching remains the same. This should be beneficial for the card in all game modes. Gravity Surge: 1. Cooldown: 20 seconds ➜ 15 seconds Allow Gravity Surge to be more functional as a niche counter for air unit heavy strategies. Lyrish Knight: 1. Damage: 400 dp20 ➜ 800 dp20 2. Life points: 980 ➜ 900 3. Surge of Strength: A. No longer increases damage by 100% B. Now increases damage dealt to frozen targets by 50% While we had the intentions to give Lyrish Knight a more meaningful role in the game, finding a healthy buff for the card just by tweaking the stats has not proven easy. The extraordinarily high health ratio makes the unit very powerful when combined with health scaling mechanics like Nasty Surprise. Furthermore, the card is easily spammable and can take over games. As a result, we will allow the card to interact more with Frost's spell arsenal rather than just adding value through raw stats. Mauler: 1. Power cost: 75p ➜ 70p After Mountaineer fell out of the meta, Mauler lost its main purpose in PvP. A slight cost reduction should help him shine more in niche situations. Mountain Rowdy: 1. Tainted Ice Block damage (p): 25 dmg/sec ➜ 20 dmg/sec 2. Blessed Ice Block (b): A. Damage reduction: 25% ➜ 30% B. Now affects friendly air units. With the previous changes, Mountain Rowdy (p) played a strong role in pure Frost due to its high damage potential, which made it a little too effortless to shut down T2 aggression. While Frost should be strong at deflecting attacks around own structures, we want to give players a fair chance to punish the faction when a player acquires a strong tempo lead. Mountain Rowdy (b), on the other hand, has been rather underwhelming, so we will buff the damage reduction percentage a bit. Shadow Mage: 1. Sacrifice range: 30m ➜ 40m 2. Foul Play: A. Damage percentage: 300% ➜ 400% B. Duration until explosion: 20 seconds ➜ 12 seconds C. Cast range: 30m ➜ 40m D. Now deals half damage to buildings Despite her great stat efficiency, Shadow Mage's abilities have been rather underwhelming in relation to what the card is supposed to do with them. By adding a burst limit against structures, we open up a lot of room for Foul Play buffs in order to make this ability more rewarding in unit combat. Spirit Hunter (p): 1. Tainted Bow Attack poison damage: 20 dmg per second ➜ 25 dmg per second The current damage loss compared to the green affinity does not get compensated by the additional piercing damage. This change should grant Spirit Hunters purple some better niche uses. Stone Shards (b): 1. Blessed Fury ➜ Shatter Ice A. No longer deals increased damage to demons and undead B. Now deals full damage to frozen targets Stone Shards (b) are currently unused across all game modes. The affinity effect being effectively useless plays a big role here. This change is supposed to enable alternative strategies in Stonekin (Shards (b) + Spirit Hunters (p) + Coldsnap) without overbuffing the already powerful T2. Stone Tempest: 1. Stone Rest healing: 20 life points per second ➜ 40 life points per second This change is supposed to give the self-heal ability a more meaningful role given that the self-cc almost always outweighs the benefits of using this mechanic. As many of the factions received more tools to counter the unit (i.e. Burning Spears release), we think it is safe to enable more ways to use the card without directly strengthening patterns that have been perceived as oppressive in the past. Twilight Curse: 1. Cooldown: 15 seconds ➜ 2 seconds Allow Twilight Curse to scale into high energy T2s without increasing card efficiency. Warlock (r): 1. Infused Witchcraft damage buff: 15% ➜ 25% We agree that the previous buff reduction was unnecessary when we reduced unit power cost. This has now been reverted. [ Tier 3 ] Drones: 1. Life points: 1760 ➜ 1840 The recent changes for Drones did not help the card as much as we had hoped. Stat efficiency will be increased a bit further. Nox Carrier: 1. New passive, "Push the Cart:" Increase movement speed to 6.4 m/s when at least 3 friendly units are within a 25m radius Based on some previous suggestions by the community in the balancing discord, we will add a conditional movement speed increase to Nox Carrier in order to make sure it actually reaches its destination. Sandstorm: 1. Charges: 8 ➜ 12 Shield Building: 1. Cooldown: 20 seconds ➜ 30 seconds Shield building has been very powerful for a long time, and a card nerf has been requested by the community rather frequently. We agree. 100% uptime on a shield, strong enough to outlast XL unit focus, is too much value even if you invest a full deck slot for a purely defensive spell. Timeshifter Spirit 1. Healing per jump: 275 / 220 / 165 / 110 / 55 life points ➜ 300 / 240 / 180 / 120 / 60 Tremor: 1. Ground Slam: A. Ability cost: 30p ➜ 40p B. Cooldown: 15 seconds ➜ 20 seconds 2. Tremor's walk speed (2.4 m/s) is now half of its normal speed (4.8m/s), instead of being identical. Tremor is one of the most popular and most powerful siege units in T3. We will be making some minor changes to the ability in order to bring it more in line with other T3 options. Unstable Demon 1. Demonic Rage: A. Bonus movement speed: 25% ➜ 60% B. Cooldown: 20 seconds ➜ 15 seconds After the initial round of changes, Unstable Demon is not being used as much as we had hoped. As the card is very difficult to use, we will strengthen it to reward good unit management a little bit more.


- 70 replies
-
- 16
-
-
Talked with @Volin a bit about it a bit in Discord. Resource Booster is probably not even needed. Also, if you have both editions of WBG, you can probably even ditch Rifle Cultists+Offering. This offers slots for Frenetic Assault 🙂
-
Solution: Lower RPVE starting well capacity 😛 Make that Juice Tank viable !!!!! ❤️
-
Why does X suck... I guess it can be called a series now. To read "Why does Wheel of Gift suck", please click here: https://forum.skylords.eu/index.php?/topic/9219-why-does-wheel-of-gifts-suck/ Juice Tank is a Tier 2 building (device). It costs 50 power and passive ability that does the following: "Within a 25m radius the remaining capacity of own and friendly Power Wells takes 40 / 45 / 50 / 55% longer to deplete. Production per time increment remains the same." To explain in simple terms, if you build a Juice Tank near a Power Well, it will take longer for that Power Well to run out, resulting on more total power gained from that Power Well. Maps that take a long time to clear, or where your Power Wells have low capacity, Juice Tank is a card to consider. The only reason you want to put this card in your deck is if you run the risk of running out of power. Running out of power on a map is extremely rare. There are only a handful of maps where this is realistically possible, Nightmare's End comes to mind. Because Juice Tank takes a while to get usage out of it, it is not recommended to use in maps where there is a strict time limit. Prime example of this is Random PvE maps. In none of the difficulties will the Power Wells run out before the timer does. This makes Juice Tanks completely useless in Random PvE. To make matter worse, if you build a Juice Tank on all your Power Well clusters, you bind 200 power. This is the equivalent of (almost) a Tier 4 unit. Considering all of the aforementioned, I earnestly ask everyone to review their Random PvE decks and remove the Juice Tanks. Thank you 🙂 -------------------- Juice Tank can be played in Lost Spirit decks to fuel their ability, destorying the Juice Tank in the process.

-
It is difficult for me to say whether or not this was a conscious design choice, because I have no knowledge of a conversation about it. I remember previously asking for more global slots, but I do not ever remember discussing limiting the amount of buffs to only showing your own buff. It is very possible this discussion happened prior to me joining the team, or perhaps without my knowledge (remember I have only been lead designer for a year now), or perhaps so long ago I no longer remember. I have not followed the thread here, but I would be open to changes to the existing system which I think fails in several key ways to convey the information most important to the player at the time.
-
Boulderdashers 20x6 elemental soldiers blessed/infused union (steadfast/rage) group pressure swift adamant skin T4 frost, nature, frost/nature, neutral 2000 atk xl counter 2000 health s size 100 power rare uses strikers model Basically a different option for stonekin t4 and i thought it would be neat to have another t4 s unit, mainly inspired by the lost minions from the spooky encounters event and also strikers after they got gang up base stats per power is at 40 which is lower than high efficiency t4 units but still about 10% better than grinder base stats per pop cap is about 5% better than grinder these would facilitate more of a capacity tank option for stonekin vs grinder's regen tank style I lowered the health from 2.5k to 2k due to adamant skin likely stacking twice through union per 10 pop cap (2.5 squads) boulderdashers have about 6713 ehp not considering splash, whereas grinder has 5294 or 8823 after one max regen tick per 10 pop cap they have the same dp20s power per 10 pop cap is 250 for boulderdashers and 260 for grinder grinder is going to be the better option per pop cap but boulderdashers are more power efficient, scale more smoothly, and have more potential when spammed i left them with one neutral orb and one half orb because s melee has limitations when piling onto few targets and also cannot attack flying unlike xl or ranged

-
Hello Skyladies and Skylords, Welcome to the eighth official PvE event! Quick Overview: Map - Insane God Difficulty - Advanced Date - 10:30 CET 17.02.2023 until 23:59 CET 26.02.2023 Prizes - Boosters Winner reveal - Via the forum Rules and Goals: Transform an Urzach's Seeker into an Urzach's Guardian atleast 2 times Defend the Living Towers (4) and Temples (2), dont let any get destroyed Destroy all the Twilight Infestations (11) and Twilight Manifestations (6) Between both players you can use a maximum of 20 deck slots, if player 1 uses 12 deck slots then player 2 can only use 8 deck slots (if solo you are restricted to 10 deck slots) Win the scenario as fast as possible How can I participate? Everyone with an ingame account can participate in the event, there is no need to sign up separately. You just have to send in your best replay, including the player names and the time, to nukie on discord (nukie#9354) or the forum (@nukie). Replay name format - "nukie_Metagross_Time_00h20m30s_.pmv" You can send in your replays until 23:59 CET 26.02.2023. You can find your replays here: Documents=>Battleforge=>replays What's the Prize Pool? The prizes are per person, only your highest place will be rewarded: 1st Place: 8 Twilight Boosters 2nd Place: 6 Twilight Boosters 3rd Place: 5 Twilight Boosters 4th-5th Place: 3 Twilight Boosters 6th-10th Place: 2 Twilight Boosters All players in place 11th or below will be entered into a random draw, there will be 10x Twilight Boosters up for grabs! When will the winners be announced? The winners will be announced via a Twitch stream co hosted by Ultralord and Volin! The stream will include the fastest 3 runs, quiz questions (with prizes!) and some interesting data from the event. Location: https://www.twitch.tv/ultralord_t1421 Date: 03.03.2023 19:00 cet Future events If you are interested in helping with these kinds of events for the community, or want to host one yourself, don't be afraid and simply reach out! Send @nukie, @Metagross31, or @Minashigo Hiko a PM on the forum, or direct message via Discord (nukie#9354, Metagross31#1103, Minashigo Hiko#1126). We are happy to assist you with upcoming events and with sponsoring towards your prize pool! We hope you have a lot of fun with this event and are looking forward to seeing all your replays! If you have any questions, please do not hesitate to ask.


-
Card Balance Changes Global Balance Changes Ranged attack delays standardized: - Towers and ranged units are now assigned a standard 0.5 second delay on spawn instead of a semi-randomized number between 0.1-1 second in 0.1 second increments. This only modifies cards affected by the bug, many ranged units and towers will be unaffected by the change. If a tower or ranged unit's attack has a longer resolve timer than its attack speed, a number is assigned to said tower or unit on spawn between 0.1-1 seconds, which is permanently added to its attack speed. For examples, this means that while a certain tower might be capable of attacking every 2 seconds, if it is affected by this mechanic any particular instance of this tower spawned has an actual attack speed of between 2.1 seconds and 3 seconds. This means all affected towers are not created equal, even among towers of the same kind, and can have widely varying performances. Ranged cards with high attack speeds are impacted more strongly than ranged cards with low attack speeds, but all affected towers and units are inconsistent. Given that we have already begun to balance around the average attack speed of each ranged attack after we previously discovered the discrepancy, we did not want to simply remove the attack delay as it would potentially require us to once again rebalance all affected cards. Instead, we have opted to standardize the delay timer to 0.5 seconds, which is on average a slight buff to all affected cards, and which will henceforward make all ranged cards consistent with themselves. Card attack speed descriptions do not currently reflect the change. We will work to slowly remedy this over time as we continue our work to fix existing descriptive issues. PvE Balance Changes While changes are split here between PvE and PvP sections, many of the changes have important consequences for both game modes. Our PvE and PvP balance teams work closely together to ensure that the impact of all changes are evaluated for both game modes. Below, we have listed both the changes and our reasoning behind them. [ Tier 1 ] Nightguard: 1. Damage: 60 damage (450 dp20) ➜ 90 damage (675 dp20) 2. Add "Swift" ability to both affinities. 3. Gifted affinity ➜ Infused affinity: A. Add "Infused Fury" - Deals 50% more damage against elementals. Give swift to both affinities and make their difference be in species damage type. Substantially increased combat stats to make the unit more valuable when unable to immediately swap, but still primarily useful for swapping. Amazon (g): 1. Wildlife Protection healing amplification: 50% ➜ 65% Minor buff intended to make combinations like Amazon(g) + Werebeasts more rewarding. Strikers: 1. Remove "Looter" ability 2. Add new passive "Gang Up!": When being surrounded by at least 3 friendly orcs in a 25m radius, all incoming damage will be spread among all gang members relative to each unit's current life points. Additionally, affected units take 15% less damage. 3. Add new passive "Group Pressure": Unit is immune to Unity and its effects. We are giving Thugs' "Gang Up!" passive to Strikers and changing both Strikers and Thugs' abilities to work based on friendly orcs instead of just friendly Thugs. This will allow Strikers and Thugs to form a gang together, creating a new Fire T1 combo. Additionally, we are fully removing "Looter" from Strikers. Our balance team is currently in the beginning stages of reintroducing a rebalanced Looter ability to the game for higher tier units as part of a project to allow each faction to have a power acceleration mechanic. Shadow's Resource Booster is the most obvious example of such an acceleration mechanic. Nature also has existing acceleration tools in the Breeding Grounds effect (unit cost reduction) and Promise of Life (unbinding units). We think Looter could be a good tool to enable a unique acceleration mechanic for Fire. More details will be announced on this topic when proposals become more concrete. [ Tier 2 ] Earthkeeper: 1. Back Up ability rework: A. Can now be knocked back while ability is active. B. Duration: 30 seconds ➜ Until interrupted C. Power cost: 0p ➜ 25p Earthkeeper has a very powerful ability, particularly the blessed (b) affinity. By making it last indefinitely absent interruption, Earthkeeper can be used by Stonekin decks to set up incredibly durable defenses that do not need to be constantly maintained. We removed immobile to allow Earthkeeper to be knocked back, requiring good positioning, and added a 25p cost to increase initial set up cost in exchange for the indefinite duration. [ Tier 3 ] Abyssal Warder: 1. Power cost: 250p ➜ 240p 2. Crystal Spikes ability damage: 725, up to 2175 in total ➜ 800, up to 4800 in total 3. Class change: Giant Destroyer ➜ Ancient Destroyer Abyssal Warder has been much more viable since the buff to Promise of Life. Players can send Abyssal Warder on a suicide mission, cast Promise of Life just before death, and be rewarded with 2 L-sized warders and a new XL-sized one. This same Promise of Life can then be used in T4 to quickly unbind the player's initial Forest Elder. Even so, Abyssal Warder remains a weak option, and it struggles greatly against masses of weaker enemies. We are over doubling the total damage of its Crystal Spikes ability to allow it to clear crowds of weak enemies quickly and slightly decreasing its power cost to make it more efficient. Deepfang: 1. Damage: 150 damage per second (3000 dp20) ➜ 165 damage per second (3300 dp20) 2. Life points: 3200 ➜ 3500 3. Stonekin Critter (unit): A. Damage: 60, up to 90 in total (500 dp20) ➜ 72, up to 108 in total (600 dp20) B. Life points: 550 ➜ 750 Deepfang is currently underwhelming, particularly as a good portion of its strength relies on the continued existence of two weak support units. Once they die, Deepfang has worse stat efficiency than the almost pure support unit Rageflame. We are giving a general buff to the damage and life points of both Deepfang and its Stonekin Critters. In the future, we also intend to rework the unit's summoning mechanic and to allow Deepfang to cast Union even if its Critters have died. Rageflame: 1. Frostshower (both affinities): A. Now able to target air units. B. Freeze duration: 10 seconds ➜ 15 seconds 2. Blessed Frostshower (b) new affinity effect: Units frozen by this ability will receive full damage when attacked. 3. New passive, "Shatter Ice" (both affinities): The unit is able to ignore the usual damage reduction of frozen targets. Rageflame is meant to be a hybrid damage and support unit, but it does neither well. We are leaning more into its support aspects, while also removing the card's built-in anti-synergy by allowing it to always deal full damage to frozen targets. The unit's freeze duration has been increased, and it can now target air units, removing one of its major weaknesses. Additionally, the blue affinity's freeze allows all units to continue dealing full damage, giving players a choice between ignoring freeze's damage reduction or disabling buildings when choosing between affinities. Unity: 1. Gifted Sharing (g) regeneration: 40 life points every 2 seconds ➜ 50 life points every 2 seconds 2. Blessed Sharing (b) damage reduction: 25% ➜ 20% After the recent Fire changes, Unity(b) has proven too strong. The damage reduction double stacks (once when the initial unit is attacked, once when the remaining damage is transferred). This means that the actual damage reduction granted by the blue affinity is often substantially more than 25%. On the other hand, the green affinity has been the weaker of the two since the beginning. We are giving it a slight boost to hopefully make the decision between which affinity to bring more meaningful. Ward of the North: 1. Units under the effect of this spell can no longer be knocked back. Minor buff to the card to give players a reason to use it over its competitors Revenge and Stone Shell. [ Tier 4 ] Batariel: 1. Stage Duration (both affinities): A. Stage 1: 4 sec ➜ 5 sec B Stage 2: 4 sec ➜ 5 sec 2. Stage Threshold Value (both affinities): A. Stage 1: 1200 damage ➜ 800 damage 3. Damage per Stage Batariel (fire affinity): A. Stage 1: unchanged (100 dmg) B. Stage 2: 150 dmg ➜ 200 dmg C. Stage 3: 200 dmg ➜ 300 dmg Follow-up on previous changes which left Batariel's fire affinity too weak. Death Ray: 1. Leech Guns ability: A. Damage buff: 100% more damage ➜ 150% more damage B. Stored life point cost: 1 additional damage per 1 stored life point ➜ 1 additional damage per 0.66 stored life points Death Ray is a well-designed card which currently demands a substantial amount of deckbuilding cost and in-game micromanagement to make it work. While decent, Death Ray should give more to justify its high investment costs. This change increases Death Ray's damage buff while charged with life points, without otherwise increasing the amount of life points required to be harvested via Leech Guns. This should leave the current experience of the deck unchanged, except that it is now stronger. Fire Sphere: 1. Cooldown: 10 seconds ➜ 20 seconds The last round of buffs left Fire Sphere too strong. Instead of taking away from the aspects of the card that have quickly made it a top tier option, we are reverting a previous change to its cooldown. This should reduce the ability to spam the card, making its initial 10 second wind-up a more important factor to account for when using the spell. Forest Elder: 1. Pest Plants is now a basic ability that exists on both affinities of Forest Elder. A. Radius: 30m ➜ 20m B. Damage: 30 damage per second ➜ 40 damage per second 2. Forest Charm ability rework: A. No longer applies an effect to allies. Now functions more like a mobile Regrowth. B. New ability description: "Activate to release the power of the forest, creating a regenerative zone of 30m radius. Every 2 seconds, friendly units within restore up to 300 life points, up to 3000 in total. Also affects the caster. Lasts for 30 seconds. Reusable every 60 seconds." 3. Gifted Flower Power: The +25% damage buff now also applies to Forest Elder itself. Also affects Pest Plants. 4. Shadow Affinity (p) ➜ Frost Affinity (b): A. Blessed Flower Power effect: Friendly units now ignore slow caused by unit collision in a 30m range. Also applies to Forest Elder itself. 5. Class change: Beast Dominator ➜ Beast Commander Our testing found that Pest Plants was an essential component of Forest Elder's ability to clear early T4 camps and for all melee army compositions to succeed. As such, we added it to both affinities as a basic ability and adjusted its power level accordingly. To enable the all melee deck styles that arose during our testing, we added the ability for the new blue affinity Forest Elder to enable its allies and itself to ignore unit collision based slows. This makes melee armies substantially more dynamic. In general, the green affinity Forest Elder works best combined with Primeval Watcher, while the blue affinity Forest Elder works best when combined with Colossus and Grimvine. Finally, we reworked the Forest Charm healing ability. It is now substantially stronger than previously, as well as much more consistent in terms of expected healing. With these changes, the changes to Mind Control, and the release of Sanctuary, Pure Nature should be comparable in strength to other pure deck archetypes. Gemeye: 1. Damage: 550, up to 825 in total (2750 dp20) ➜ 650, up to 975 in total (3250 dp20) 2. Tainted Spit (p): A. All damage is now piercing B. Contamination damage: 55, up to 165 in total every second ➜ 50, up to 150 in total every second 3. Gifted Spit (g): A. Paralyze targets: 4 ➜ 5 B. Paralyze duration: 10 seconds ➜ 15 seconds Minor buff to Gemeye in general. Gemeye's two affinities widely vary in usefulness. The purple affinity can deal up to 3300 additional damage over 20 seconds, increasing its actual attack value to 5450 dp20. This damage also stacks if there are multiple Gemeyes. By contrast, the green affinity can paralyze up to 4 targets after a 5 second wait period for up to 10 seconds. 10 seconds is already a short duration for crowd control in T4 and the 5 second wait timer makes it even worse, as it is actually much longer when accounting for Gemeye's attack animation and projectile travel time. Additionally, paralyze effects cannot stack, and they quickly run afoul of crowd control's diminishing returns penalty if the player casts spells such as Curse of Oink or a freeze effect. Overall, this leads to the situation where in the vast majority of situations the purple affinity is far superior. The goal here is to break the two affinities into two different deck paths. By allowing the purple affinity to always pierce through damage reduction, it means that its damage will not be reduced when attacking frozen targets. On the other hand, the green affinity's built-in crowd control will synergize with splash options lacking CC and Noxious Cloud which deals a lot of damage but needs time to work. The changes should also allow the green affinity to do a better job when utilized as part of static defenses for its built-in crowd control. Grimvine: 1. Strangling Vines ability radius: 20m ➜ 25m Quality of Life change intended to make Grimvine's ability slightly better. Mind Control: 1. Power cost: 300p ➜ 250p 2. Charges: 4 ➜ 8 3. Takeover limit: 300p ➜ 350p 4. Allow to be used past population limit 5. Now cleanses all debuffs and makes mind controlled unit immune to all major debuffs for 15 seconds after cast. Mind Control is one of those cards which initially seems awesome because it enables you to take over your favorite enemy units, but soon after results in frustration. NPC enemies mostly lack abilities making them no more than stat sticks, charges are extremely limited, the card becomes useless when you hit population cap, your ally's Incredible Mo permanently debuffs the unit even when it becomes yours, and taking over major threats inside a camp usually results in almost instant crowd control into death. We have tried to address all of these issues at once. After the changes, Mind Control should provide a strong incentive to use 3 Nature orbs as well as provide a means by which Nature can bolster its unit-based strategy without binding power in the process. Shadow Worm: 1. Damage: 400, up to 600 in total (4000 dp20) ➜ 440, up to 660 in total (4400 dp20) 2. Life points: 3500 ➜ 4400 3. Mass Disintegration ability targets: May only disintegrate units ➜ May now disintegrate units and buildings 4. Earth Dive ability damage: 250, up to 1000 in total ➜ 325, up to 1300 in total Shadow Worm is the only T4 Pure Shadow unit in the game. While the previous buffs helped the card a lot, Shadow Worm remains by itself an insufficient payoff to give up a splash orb. It also, despite the buffs and its high orb restrictions, remained one of the lowest stat efficiency units in T4. With these changes, we are both giving a general buff to Shadow Worm's stats and making some changes to enable the two unique aspects of the card, its Mass Disintegration and its Earth Dive mechanic. Mass Disintegration will now be able to target buildings (but not spawns which have building immunity), giving the ability much needed flexibility. Shadow Worm's life points increase will also allow the unit to survive 5 seconds longer when disintegrating the maximum number of targets simultaneously. Additionally, the 30% damage increase to Earth Dive damage will enable a particularly unique playstyle given that Life Stealer also affects Earth Dive. Thunder Wagon: 1. Remove "Tainted Death" from shadow affinity 2. Change Shadow affinity (p) ➜ Frost affinity (b) A. Blessed Flamethrower (b): Now able to target air units. [ Building Changes ] It is the general principle of the faction design team not to change abilities or introduce complex mechanics needlessly. Cards should generally perform a single function and perform that function well. A lot of the buildings in the game are already well-designed, but lack sufficient stats or possess too strict of requirements. As such, we have opted wherever possible to introduce simple changes to bring the tower to the appropriate power level. If you would like to learn more about our thought process behind the tower changes, please head to Skylords Reborn Documents to read our design Deep Dive on Towers, as well as other design documents. Artillery: 1. Range: 50m ➜ 60m 2. Increased turret turn speed. Allow Artillery to damage siege units even when placed behind a wall. Bandit Launcher: 1. Flame Arrow splash radius: 5m ➜ 8m 2. Life points: 1500 ➜ 800 3. Add "Fast Construction" - Construction time is reduced by 50%. 4. Firebug: A. Radius: 20m ➜ 25m B. Power cost: 20 ➜ 25 Energy C. Infused Firebug damage: 400, up to 1200 in total ➜ 600, up to 1800 in total D. Tainted Firebug damage: 600, up to 1800 in total ➜ 800, up to 2400 in total Differentiate Bandit Launcher from its more defensive oriented brother Rioter's Retreat by focusing it around attacking and using its suicide ability to quickly and cheaply clear enemies. Deepgorge: 1. Cold Clutch radius: 25m ➜ 30m. Deepgorge has substantially increased in strength since the most recent changes, particularly in connection with North Star(b) with which it naturally synergizes. Unfortunately, due to the tower's large size, its ability radius is still too small when the tower is placed behind a wall making it difficult even for a well-placed Deepgorge to hit all melee attackers on long walls. Fire Bomb: 1. Damage: 715 up to 1650 in total ➜ 720, up to 1800 in total 2. Add "Fast Construction" - Construction time is reduced by 50%. 3. Allow to hit air units & enable splash overflow fix. Small buff to Fire Bomb that should allow it to be used more aggressively. Hammerfall: 1. Increase turret turn speed. 2. Breeze of Life (g) / Breeze of Strength (b): A. Maximum capacity: 1500 ➜ 3000 B. Recharge rate: 15 per second ➜ 40 per second C. Radius: 20m ➜ 25m 3. Breeze of Strength, Ice Shield cost: 495 capacity ➜ 600 capacity Increased turret turn speed should increase damage output due to faster target tracking. Change to affinity effects: Higher maximum capacity should make both affinity effects better, but especially Hammerfall (g) which is only drained as required. Higher recharge rate means that a new Ice Shield can be bestowed every 15 seconds instead of every 33 seconds, even with the higher cost. Radius increase will make it easier to place units around it. Total charge time is now 90 seconds. Additionally, Hammerfall's shields do not decay while within the aura. This makes them a stable source of extra health for allied units. Hammerfall's recharge and healing is still less than Healing Well's, a T2 60p card, with the same maximum capacity. Howling Shrine: 1. Essence Bolts damage: 600, up to 900 in total (3000 dp20) ➜ 750, up to 1125 in total (3750 dp20) 2. Crowd control duration (both affinities): 10 sec ➜ 15 seconds Howling Shrine is feeling better after the buffs both to itself and to the root network in general. When the initial changes were proposed, some people suggested larger buffs to the card, but we urged caution due to the difficulty to account for how things would change once the full set of root network changes came through. Now that we can evaluate the changes more fully, it appears that Howling Shrine is still on the weak side. To remedy this, we are giving it a +25% damage increase and increasing the duration of both its root and paralyze to help it keep dangerous melee units at a safe distance. Infected Tower: 1. Damage: 114, up to 172 in total (1215 dp20) ➜ 138, up to 207 in total. (1466 dp20) 2. Splash Radius: 5m ➜ 8m A +20% damage increase and small splash radius increase. Changes to Infected Tower's ability have been postponed until we can properly rework it. Lost Converter: 1. Add Soul Splicer's "Soul Suction" ability to the card, allowing it to gather corpses outside its passive range. 2. Corpse cost to freeze: 200 ➜ 250 stored life points All corpse support buildings should have a way to gather corpses from further away. As such, we are adding Soul Splicer's Soul Suction ability to both Lost Converter and Waystation, as well as any future buildings of this type. Morklay Trap: 1. Enable splash overflow fix 2. Explosion Blast total damage: 2640 in total ➜ 4400 in total Increase total targets from 3 to 5 and enable splash damage properly transferred even when units die. This should make Morklay Trap a viable option to clear T3 camps or defend against incoming waves. Stone Hurler: 1. Damage: 100 damage, up to 150 in total (834 dp20) ➜ 120 up to 180 in total (1000 dp20) Align actual damage with stated damage on the card through an approximately +20% damage increase. Twilight Bombard: 1. Remove "Siege" from Infused affinity 2. Add "Rage" to Infused affinity. A. Stage 1: +25%; Stage 2: +50% damage B. Attacks per stage: 3 C. Reset timer: 10 seconds 3. Increase turret turn speed. The red affinity of Twilight Bombard has Siege as its affinity effect, which is largely useless. By changing it to Rage instead, we make the choice between the two affinities one of increased damage versus crowd control. Waystation: 1. Add Soul Splicer's "Soul Suction" ability to the card, allowing it to gather corpses outside its passive range. 2. New passive, Fast Construction: Construction time is reduced by 50%. 3. Infused damage buff: 30% ➜ 40% 4. Tainted poison damage: 30 life points every second ➜ 40 life points every second 5. Corpse storage: 2500 total ➜ 4500 total 6. Corpse cost per potion/poison (both affinities): 180 ➜ 400 stored life points will be used up. 7. Radius: 25m ➜ 30m The first step in what will eventually be a full rework of Waystation. For now, the addition of fast construction means it can be set up offensively as its name suggests and the addition of Soul Suction means it should be able to easily gather corpses to fuel itself. Gave a small boost to both affinity effects and increased the radius to require ranged units to enter its effective radius to damage it. Worldbreaker Gun: 1. Life points: 4500 ➜ 5400 2. Descriptive: Add "Has a long range of 50m" to its Ground Attack description. WBG is the best defense in the entire game, but that is achieved primarily through its Heavy Snowball ability augmented by Skyelf Sage. In terms of functions as a tower, it is still good, but has uncharacteristically low life points for its cost and tier. We are giving it a slight bump in total health, which should help it when functioning as a tower, while leaving it unchanged as a long range artillery piece. PvP Balance Changes [ Twilight Follow-up ] After the first round of Twilight buffs and the new introduction of Twilight Crawlers, the faction did not reach the level of performance for which we had hoped. Making good use of Twilight cards and transformation mechanics in a dynamic environment turned out to be too difficult. We will buff some cards to add further incentive of mastering Twilight decks. This might not be the last Twilight iteration as we will continue to monitor the situation moving forward. Slaver: 1. Life points: 780 ➜ 820 Increased durability to make Slaver better when used on open ground, where the unit is prone to kiting. Twilight Brute: 1. Life points: 780 ➜ 820 2. Bloodlust ability duration: 20 seconds ➜ 25 seconds Increased stat efficiency and also extended buff duration upon Transforming, making it a little easier to utilize. Twilight Crawlers: 1. Damage: 940 dp20 ➜ 1000 dp20 2. Chitin Shell ability damage reduction: 20% ➜ 30% Whereas Twilight Crawlers scale decently well into high energy game stages, they don’t provide enough stability in early game. They had problems dueling some units they were supposed to counter making it incredibly difficult to play from behind. Increased stat efficiency and higher absorption rate on their passive should settle this and make Twilight Crawlers a worthy S-counter. Twilight Minions: 1. Incentive ability duration (both affinities): 20 seconds ➜ 25 seconds Extended buff duration upon Transforming, making it easier to make use of the effect. Vileblood: 1. Power cost: 130p ➜ 120p 2. Damage: 1400 dp20 ➜ 1250 dp20 3. Life points: 1350 ➜ 1250 4. Transformation ability cost: 111p ➜ 102p 5. Infused Liquids (r) ability: 130 damage per wave (520 total) ➜ 150 damage per wave (960 total) 6. Gifted Liquids (g) ability: 250 healing per wave ➜ 300 healing per wave Reduced unit cost and adjusted stat efficiency to reward multi-unit set-ups and transformation effects. The decreased damage ratio will limit the impact Vileblood has on its own, but with less bound power, there are many more options to combine it with other cards and abilities. [ Tier 1 ] Executor: 1. Burnout ability: A. Damage buff: 60% more damage ➜ 80% more damage B. Damage debuff: Now 60% less damage on all upgrades C. Damage buff duration: 20 seconds ➜ 30 seconds D. Damage debuff duration: 30 seconds ➜ 20 seconds on all upgrades After Nightguard received nerfs, Executor's performance as a compensation tool has been a bit underwhelming. These changes should address early L-counter issues and diversify Shadow’s defensive options in T1. Forsaken: 1. Frenzy ability initial cooldown: 0 seconds ➜ 7 seconds With this patch, we intend to distribute the power of Shadow T1 more evenly and improve faction design overall. Shadow T1 is very Forsaken centric against Fire T1 and in the mirror matchup. The Frenzy ability allows them to be good in skirmishes, defense, and siege at the same time. While this can’t be changed fundamentally for slot reasons and due to available design options, we can shift a bit of Shadows' defensive strength from Forsaken to Wrathblades and Executor. This should add a bit more depth to the mentioned matchups and goes more in line with what would be expected from the counter system. Thugs: 1. Damage: 720 dp20 ➜ 750 dp20 2. Gang Up! ability: Now works based on nearby friendly orcs, not just friendly Thugs. As newly buffed Wrathblades will have a certain impact on skirmishing against Fire T1, Thugs will receive a slight damage increase as well. Warden's Sigil (g): 1. Gifted Sigil Ice Shield regeneration: 25 strength per second ➜ 35 strength per second Providing clear identities to both Sigil affinities and granting more reasons to pick anything besides the frost one. Wrathblades: 1. Burnout ability: A. Damage buff: 60% more damage ➜ 80% more damage B. Damage debuff: Now 60% less damage on all upgrades C. Damage buff duration: 20 seconds ➜ 30 seconds D. Damage debuff duration: 30 seconds ➜ 20 seconds on all upgrades [ Tier 2 ] Moon: 1. Necroshade ability cost: 50p ➜ 40p Moon has access to fairly strong abilities, but very high upfront costs put her into a very niche position, especially for a legendary card. Necroshade cost being reduced should add more room for skill expressive gameplay and reinforce her identity as an assassin type unit. Ripper: 1. Cannibalize ability regeneration: 25 life points per second ➜ 35 life points per second Buffed the corpse interaction for increased card value in extended combat and better survivability of dazed summons. This change will also affect the Rippers spawning from Nox Carriers. Viridya: 1. Damage: 90, up to 135 in total (750 dp20) ➜ 108, up to 162 in total (900 dp20) 2. Unit's attack radius now applied around the unit hit instead of the squad's center. Viridya’s autocast is nothing but frustrating to use. Attacks apply such a widespread knockback against squad units, to the point where she stops dealing any damage to them after a single attack. These changes should alleviate the mentioned issue and add a fair reward for utilizing her as an S-counter overall. [ Tier 3 ] Amii Ritual: 1. Power cost: 150p ➜ 80p 2. Duration: 20 seconds ➜ 25 seconds 3. Cooldown: 60 seconds ➜ 100 seconds In the past, Amii Ritual has been underwhelming as its high cost made it fairly difficult to use the spell when needed the most. With this change the drawbacks of the card will be shifted to a long cooldown instead. This puts more emphasis on good strategic usage. Payoff can be significantly higher, but additional time between activations makes it easier to punish a mistimed use. Mo: 1. Mo's Better Blues ability: A. Duration: 20 seconds ➜ 30 seconds 2. Group Hug ability: A. Minimum healing: 500 life points ➜ 1000 life points B. Maximum healing: 3000 life points ➜ 4000 life points Whenever Mo sees occasional play, it is due to Stampede being one of the most valuable abilities in the game. More often than not, the cost and cast animation of his remaining abilities make it better to just not use them at all. These buffs should address this without reinforcing his base-nuke oriented play pattern. Nox Carrier: 1. Power cost: 180p ➜ 80p 2. Charges: 8 ➜ 16 3. Life points: 1500 ➜ 1050 4. Necro Strike ability (both affinities): A. Initial cooldown: 10 seconds ➜ 15 seconds B. Damage: 3400 damage ➜ 900 damage 5. Tainted Necro Strike (p) poison duration: 15 seconds ➜ 10 seconds Nox-Carrier has been fairly problematic due to its one-dimensional design. The ability to destroy full health orbs turned the unit into a raw stat check, especially when combined with cards that can remove the downside of heavily reduced movement speed. In order to buff this card to a viable state, we needed to get rid of this pattern. As a result, we strictly nerfed the siege ability followed by a drastic cost reduction. This puts higher emphasis on Ripper spawns instead of ability damage. With Rippers also getting buffed, this should add a lot of room for creative card usage and remind everyone that Nox Carrier is actually carrying something. Queek Queek: 1. Damage per attack: 76 (610 dp20) ➜ 80 (640 dp20) 2. Attack range of normal Queek Queek: Now always 9m 3. Superpig ability damage buff: 120% (1340 dp20) ➜ 150% (1600 dp20) Pushing unit stats to at least match other flying units in T3. The opportunity has also been used to clean up damage numbers. Shadow Insect: 1. Soul Shock ability damage: 500 ➜ 600 Shadow Insect is a strong unit with a rather unique ability design, but often requires too much micromanagement to outweigh the cons of having weaker stats compared to most other T3 units. We will strengthen the ability a little for that reason. Vulcan: 1. Conflagrate ability cost: 50p ➜ 30p With buffs to many T3 units across the board, Vulcan was left somewhat behind in comparison. With lowered ability cost, it should be easier to make use of his strong damage spikes.


- 45 replies
-
- 14
-
-
There is 6 slots, we already tried increasing that, but it did not work. Showing only own buffs was discussed shortly, but refused, as they are considered important 😞 So I do not see any good solution here 😞
-
Hello. I was wondering if there is a way to make global buffs more readable, for example when using shrines you see 1 icon per player witch dont make much sense, i belive it should show buffs that afect you alone and maybe add slot or two as there are 4 slots now. There are lot of situation where wheel is used and all clarity is lost becouse it show 1 wheel buff 4 times.
-
I CANNOT STOP! But truly, already submitted my entries, but my head just wants to keep going 🥲 Name: Possesed Fortress Tier & Orbs: T3, Frost, Shadow and Frost/Shadow Type: Building Power: 175 Hit points and Size: 3195 Attack value and Type: 2400 Passive Abilities: Ghost Turrets - Every 3 seconds, 8 turrets deal 50 damage each to enemies in 5m radius, up to 75 in total. Knocks back small units. Can attack only ground troops. Ray of Despair - Every 4 seconds, unit casts an energy lance that deals 110 damage to enemies in a 12m radius around it's target, up to 165 in total. Can only attack airborne entities. Cadaver Walls - Possesed Fortress can collect corpses from fallen enemies every 5 seconds, storing the avaible energy. When damaged, the Fortress will use up this stored energy to heal itself, using 1:1 ratio of energy to HP. Maximum storage capacity is 750 lifepoints. Maximum healing is 150 hp every second. Uses Stronghold model as a base. Explanation of idea behind the card: Well, Lost Souls buildings are mostly lackluster. Only faction defense is Lost Launcher, while on higher tiers player has to rely on pure Shadow/Frost cards. Time to change that! Possesed Fortress provides that mid-to early late game defense, which can hold its own against both ground and air troops. It can also use the corpses to heal itself, while having only limited storage for balance purposes. Its not meant to be completely sustainable in every situation, but with perfect conditions (or some support) this building can hold the line very well.
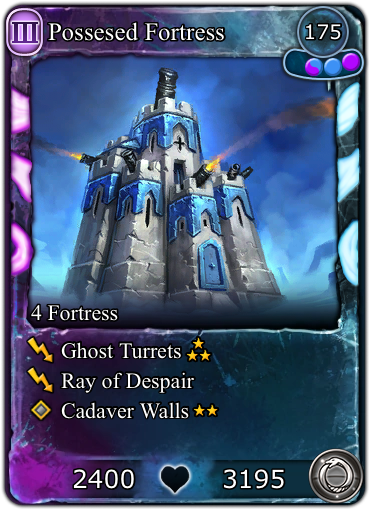


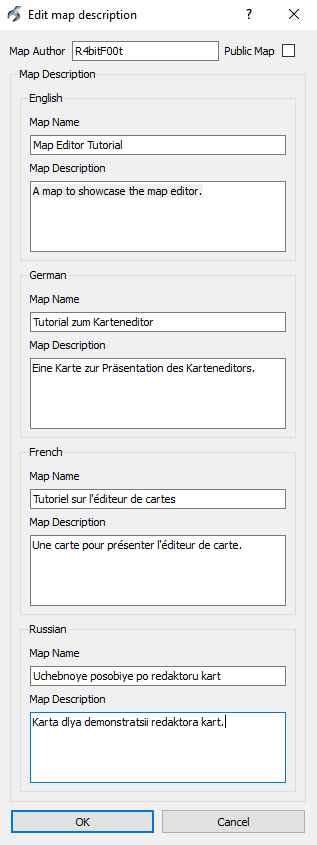
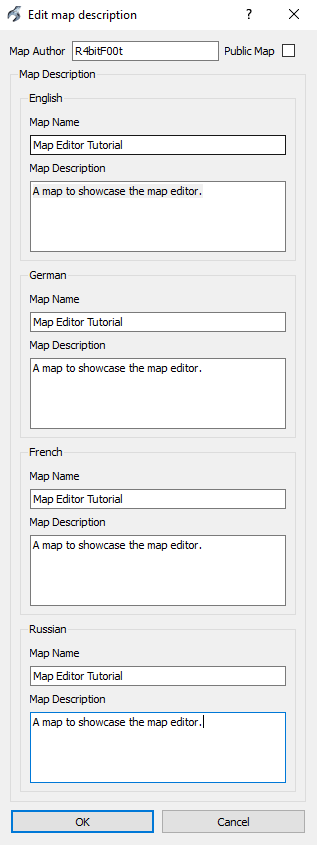
.jpg.33a390d26becead0a8c05b5c312ef05e.jpg)