R4bitF00t
-
Posts
22 -
Joined
-
Last visited
About R4bitF00t

R4bitF00t's Achievements
")
Savage (3/34)
56
Reputation
-
 Thank you all for your kind comments, they mean a lot to me ^^ I'm already working out the second map's layout and mechanics, wish me luck 🤞
 -
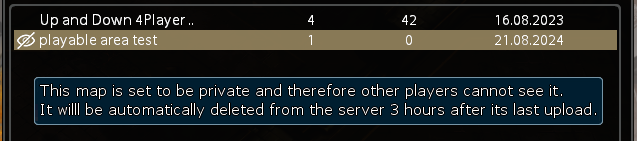
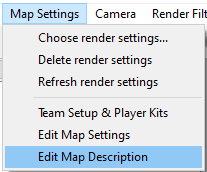
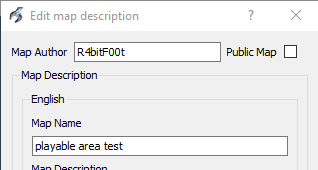
Hello! Once you have completed your map, or at least got it to a functional state, you might want to publish the map to the community maps section of the campaign map. While BattleForge allows you to create almost any map you want, I just want to stress one thing - please make sure your map is playable without crashes, especially on loading. There is nothing that will discourage people more from trying your map, when it keeps crashing, or cannot even load properly. And just to make sure - please don't include anything offensive in your maps, be it vulgarisms or obscenities. With that out of the way, let's get to it! If you encounter any issues, don't hesitate to ask in Skylords Reborn Map Making Discord. • Content Publishing a Map Next Chapter • Publishing a Map To make the map publicly visible, we need to return to the map editor. In the Map Settings -> Edit Map Description window, you can notice a little Public Map checkbox at the top. Simply check that, save and PAK the map. Only do this if you are ready to send your map out into the world. Make sure your map is playable before publishing publicly! Then, navigate to the community maps section of the campaign map (User Generated Maps). In the next window, search for your map, I will search for my "playable area test" map. The map should have a blue folder icon to the left of it - symbolizing the map is present locally on your machine. As you can see, the minimap is the beautiful one, we've made in the previous topic. Now you can press the Upload Map button to upload your map to the server. Once you upload it, you should see it in the list without any icon. If you forgot to set your map as public and upload it, you will see a crossed over eye icon to the left of it. You can hover your mouse over it to see what it means. This is to prevent accidental publishing of maps, or for you to see how the published map looks like before making it public. In that case, you will need to wait for the map to be deleted after the 3 hours, and then upload the map again - setting the map as public and uploading again immediately doesn't work. In the future, if for some reason you want to delete your map from the server, you need to contact a GM. • Next Chapter This concludes the editor functionality and visual side of the tutorial. Now we will get to making our maps functional with scripts. For that, we will first need to set up a script editor. • Script Editors • Alternatively, return to the Map Editor Tutorial homepage here. • Map Editor Tutorial •


.thumb.jpg.58f06b4a8b6e5ffb3e747bf3457749e2.jpg)
.thumb.jpg.ecc8724f8ea543f78af27d7176a25b5c.jpg)
-
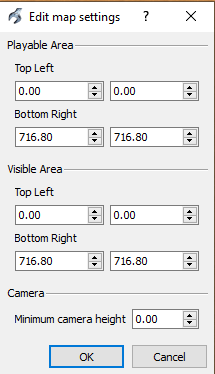
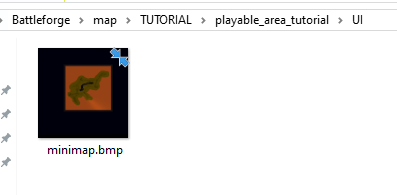
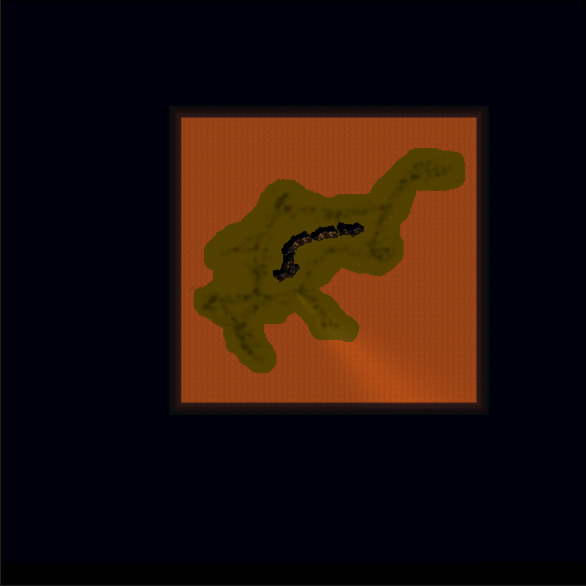
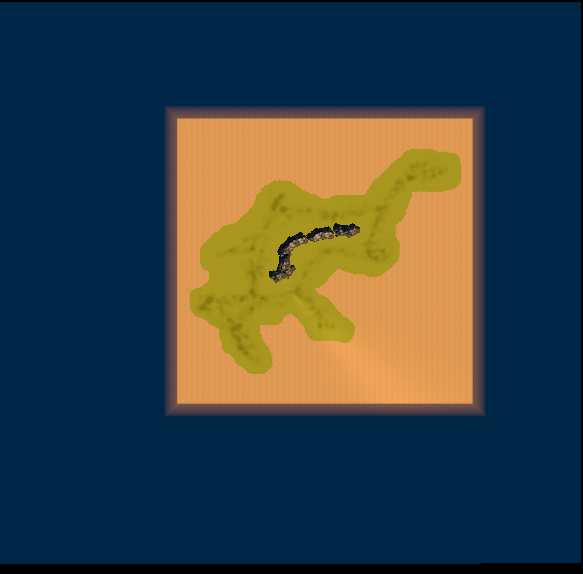
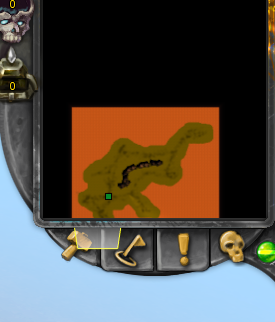
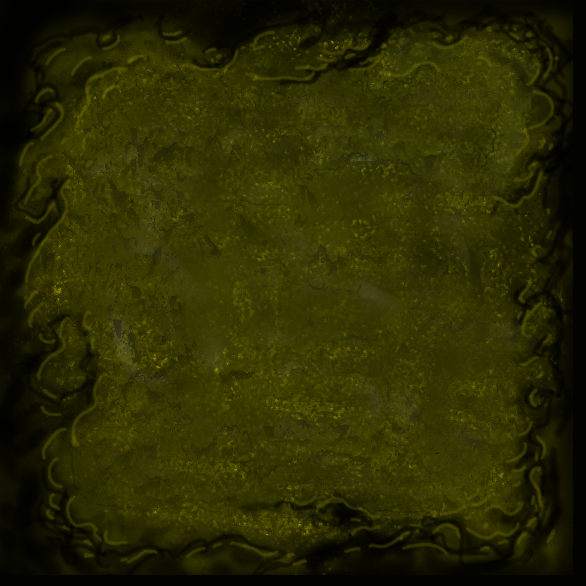
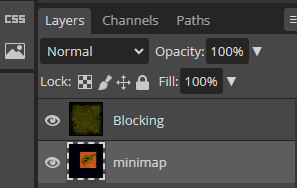
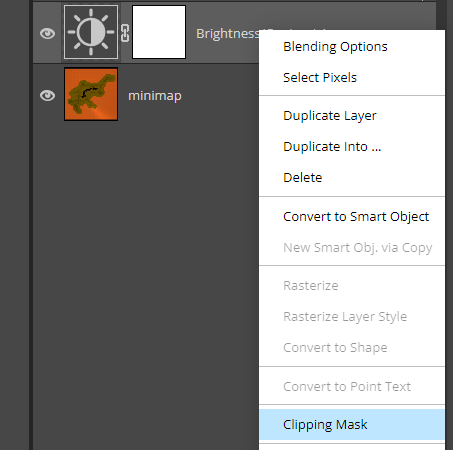
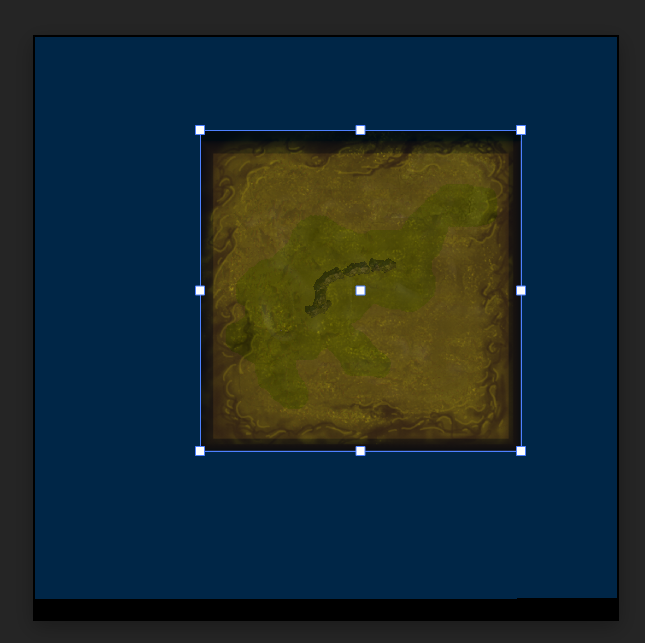
Hello again! You've seen me mention before, that you should generally choose larger map size than what you think you will need. That's because you can always make the playable area smaller, but not larger. Let's look at how we can adjust the visible and playable areas, and create a nice looking minimap for our maps. If you encounter any issues, don't hesitate to ask in Skylords Reborn Map Making Discord. • Content Adjusting the Playable Area Creating a Basic Minimap Polishing the Minimap in Photopea Next Chapter • Adjusting the Playable Area As mentioned before, the standard map size in BF is 512x512. This size is ideal for most of the maps, as the map is not too big or empty - too large maps can feel like a drag to play. You also want to reserve some space for the map border, as having the skybox visible is not exactly visually appealing. Remember that the average playtime of a BF map is around 20-30 minutes and 512 map is usually ideal for that. With that out of the way, let's see how you can make the playable area smaller. You can adjust the playable and visible areas in the Map Settings -> Edit Map Settings on the top hotbar. A window will pop up that has the values we need. You can see the border of playable and visible areas on the edge of the map, delineated by the red and blue lines. Red line is the playable area Blue line is the visible area By default, you will only see the red playable area line, as it is drawn over the blue visible area line, I've moved the playable area a bit so you can see both of the areas. The playable area serves an important purpose - it limits the area where you are able to play out cards and move your camera in the game. If you make it too large, and forget to block out the areas that should not be available on the map, players will be able to summon useless units outside of the intended map area, or worse - find exploits by skipping parts of the map. The playable area should cover ALL PARTS OF THE MAP THAT ARE ACCESSIBLE TO UNITS and be sure to reserve some free space on the sides. The visible area influences the in-game minimap preview and positioning. If the visible area doesn't match the player area, you will get weird minimap behaviour, like this. So generally, the visible area should match the playable area. Now, for the adjusting of these areas, there is not much to tell, you will need to play around with the numbers to adjust the areas to fit your map. (Your map doesn't need to be centered but it is a good practice.) I've created this really quick preview for my map - the green texture is my map layout, the dirt around it is the map edge - area where I don't want the player to be able to play out units, and in most cases even move them over that area. You can see the playable and visible areas are way out on the actual map edges where the terrain ends, I have highlighted my intended playable area in the yellow square. So now I need to play around with the settings in the Edit Map Settings window to match my actual areas to my preview. As you can see, it is a bit different from the preview, as I've tried to make the area more squared. You might have the black map border enabled. You can enable/disable that in the View -> Map Border. • Creating a Basic Minimap When you think you have the areas correctly set up, you can check the minimap by using the Camera -> Create Minimap (experimental) option. Note that you need to have the map saved for this to be available. This will generate a very basic (and mostly ugly) minimap in the map's UI folder. If the visible area is roughly squared, you should be golden. While not perfect, this step is needed, as it gives us a great basis to continue working on our minimap in an image editing software. I personally recommend using Photopea - it is a free, browser-based image editing software, very similar to Photoshop. • Polishing the Minimap in Photopea To make our minimap making easier, here is an image of the basic background that denotes the unplayable area - we will carve our playable area out of that. Right-click the image, and save it as. I will import my generated minimap and this image into Photopea, with the minimap on a lower layer, and the unplayable area on a higher layer. Next, I need to match the size of the blocking layer to the minimap, so it covers the visible part of the image. Select the Blocking layer and press "V". Nodes will appear around our blocking image, grab the corner nodes and scale the image so it covers the visible part of our minimap image. Note - I've made the blocking layer slightly transparent so you can get a glipmse of the minimap underneath it. I will do an easy setup to be able to smartly delete the blocking according to the map shape. For that, you will need to select the Blocking layer and click this icon at the bottom, which will add a mask to the selected layer - a white square image will appear next to the layer preview. Now, you can click on the white square image, pick a black color for your brush and paint it on the canvas, you should see the blocking image disappearing while you paint. Awesome! Now, we just need to paint the black onto the mask so that we mask our map shape. To re-paint the blocking back, use white color instead of black. You can use the X key to quickly switch between your two selected colors. This looks pretty rough, but with polishing the borders more, adding some layer effects and boosting the colors of the minimap, we can get a pretty decent result in a couple of minutes. To add effects to a layer - double-click the layer (click away from the layer name), it will open up a window with all the effects available. For the blocking layer, I use an Outer Glow with Multiply blend mode - to give it a semblance of depth, and a Bevel and Emboss effect. I've also added a Brightness/Contrast adjustment layer above the minimap layer, but below the blocking layer. An adjustment layer affects all the layers below it, so like this, it increases the brightness of the minimap, while leaving the blocking layer as-is. If you want an adjustment layer to only affect the first layer below it, right-click the adjustment layer and check Clipping Mask. Now, all that's left is to replace the minimap in the map's UI folder. The map can be in the .jpg / .png / .bmp format, but be sure to only have one minimap in the folder. One final gripe I have with this minimap is that some parts of it are too close to the edge of the image. To fix that, I would need to adjust the playable and visible areas to be larger so I have more free space around the map, but alas, sometimes these things are a bit of a trial and error 🙂 • Next Chapter Just remember, stick with square shaped areas and you should be fine. To better flesh out the playable area, you will need the Blocking Tool. While the minimap creation can be daunting for an inexperienced person, I think with these basic principles anybody can create it pretty quickly. You can also use other adjustment layers, such as Hue/Saturation to adjust the colors of your layers - if you have a snowy map, it might be nice to desaturate the blocking layer so it is gray-ish/white-ish instead of green. In the next chapter, I will go over how to finally publish your map to the community map section. • Publishing a Map • Alternatively, return to the Map Editor Tutorial homepage here. • Map Editor Tutorial •
.jpg.27b876ad1876b5bbcfc1531a1d414bce.jpg)
.thumb.jpg.c53276e0d6fb9f1f581571429a7d7f51.jpg)

.jpg.fe2ced440415ea3276413c475611b0bb.jpg)
.thumb.jpg.e7d7f872377ceebcb132c4dc7f9b0bdb.jpg)
.jpg.d9f4e6b368ebdb1b044edeafef0a1319.jpg)
.jpg.2b1e5695e10bae622e5456bf67a23c3d.jpg)
.thumb.jpg.828e0d05f945b65d78c3925fd0144ed0.jpg)
.thumb.jpg.2053f2041e81115933b81689b940f711.jpg)
.thumb.jpg.3660d2b1e32c4edf1f3a7bdb6d94c07a.jpg)
.jpg.8cb916654e5d7d87c6ae44c4d6e98953.jpg)
.jpg.5ee21b9a1f913b58df38fc30fb681b44.jpg)
.jpg.dc2edff055883c02d347d9e3d51407b5.jpg)

-
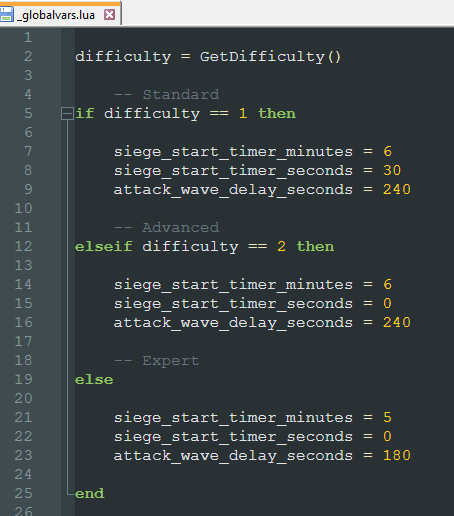
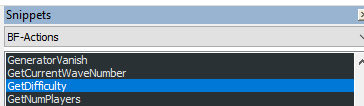
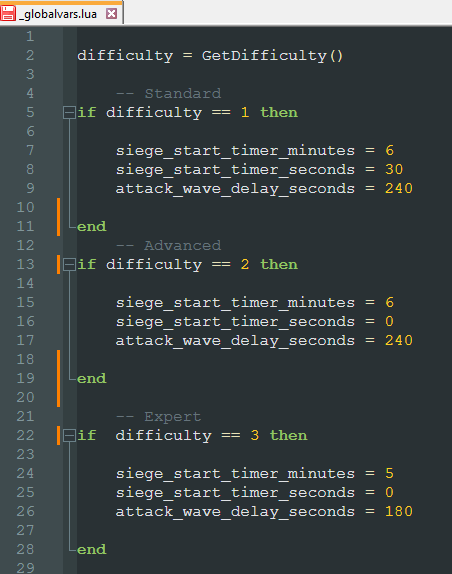
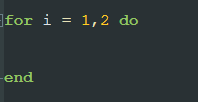
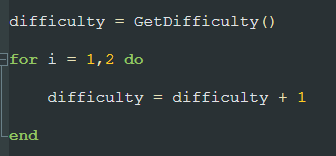
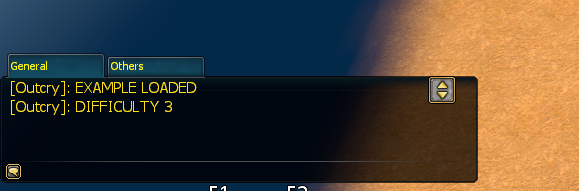
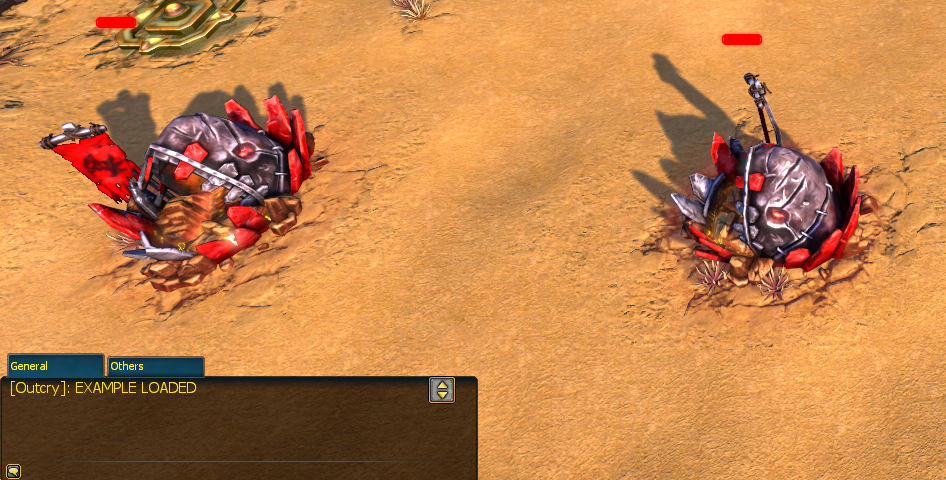
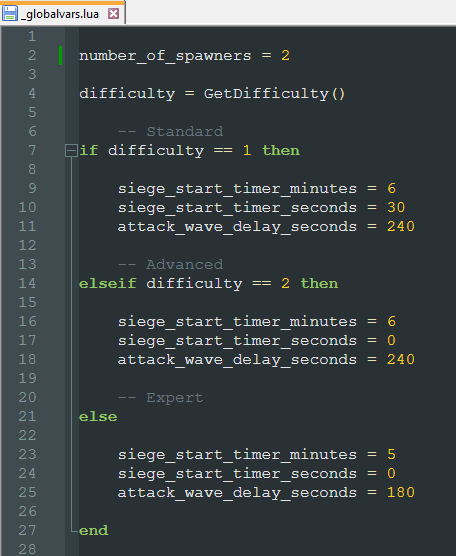
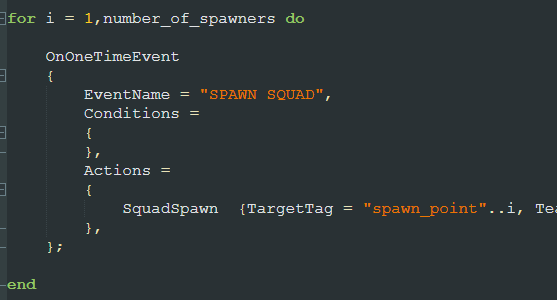
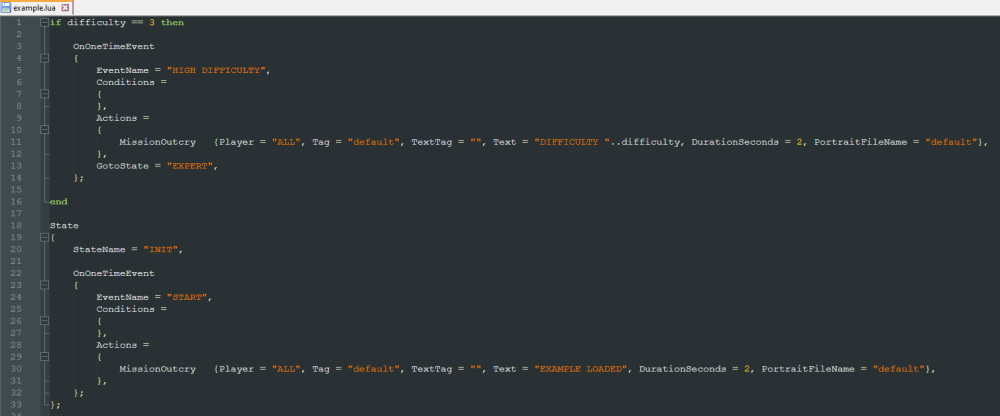
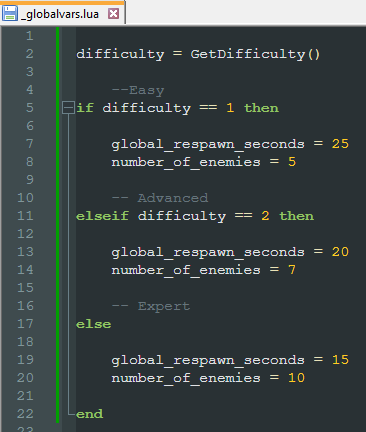
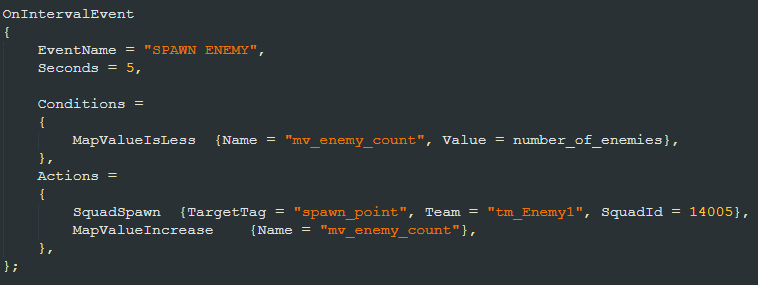
Hello once again! We are near the end of advanced scripting principles. Ifs and for loops are the last step between you and an official Skylords Reborn Advanced Scripting Degree! (jk) Let's look at them now, shall we? I will create two script files for this chapter, you can download them here. Don't forget to define the example.lua script in _scriptlist.lua! _globalvars.luaexample.lua If you encounter any issues, don't hesitate to ask in Skylords Reborn Map Making Discord. • Content If, Elseif, Else For Loops Using Ifs in BF Scripts Using Loops in BF Scripts Next Chapter • If, Elseif, Else First, I will use if, elseif and else conditions in a _globalvars.lua script. There, we can most easily see how to work with these conditions. In Lua, using the if condition is very simple. There are three basic keywords you need to know: if - starts the if condition block, is followed by the actual condition then - defines the actions that should happen if the condition is true end - closes the if condition block Let's look at the _globalvars.lua example above. I've declared a difficulty variable and used the GetDifficulty() function to get the difficulty we are playing the map on. The GetDifficulty() function returns the numbers 1, 2 or 3 based on the difficulty. 1 - standard difficulty 2 - advanced difficulty 3 - expert difficulty Then I use the if condition to check if the difficulty is equal to one of these numbers. To compare values, we use the following characters. == - checks if the value on the left is equal to the value on the right, be sure to use double = > - checks if the value on the left is bigger than the value on the right < - checks if the value on the left is smaller than the value on the right >= - checks if the value on the left is larger or equal to the value on the right <= - checks if the value on the left is smaller or equal to the value on the right As you can see, I've used the else keywords in the code. If you want to check another condition for the same if condition, use the following keywords. elseif - starts another if condition block, if the previous if conditions return false, is followed by the new condition to check needs the then keyword after the condition else - defines the actions that will happen if ALL the above ifs and elseifs return false, does not need then keyword In my example - if the difficulty is not standard, I use the ELSEIF condition to check if the difficulty is advanced. If the difficulty is not standard or advanced, then it must be expert, so I use the ELSE keyword - no further condition needed, as the ELSE actions get executed if all the other conditions fail. If you don't want to deal with the ELSE and ELSEIF keywords, you can separate the check into three separate IF conditions. Keep in mind that you then need to end every if condition with the end keyword. • For Loops I am going to show you how to declare for loops outside of BF scripts at first. For loops are used to execute code multiple times, until you reach the loop count you specify. If you were to use for loops in general Lua scripts, you would go about it like this. So these are the keywords you need to remember. for - declares the for loop, is followed by definition how many times the loop should run do - defines the actions that should happen for every run of the loop end - ends the for loop After the for, we need to declare a variable for that loop, that we will increase by one every time the loop finishes, and the range the variable should start and end at. Like this. i = 1,2 This tells the loop to define the i variable that starts at the value of 1, and the loop will stop once the i reaches a value of 2. So the loop will run two times. first time when the loop starts at i = 1 second time when i = 2 the loop will not start a third time, as the i has reached the specified value of 2 This for loop would do absolutely nothing, but if we were to add an equation into the for loop... With this loop, it would increase our difficulty variable by 1 every time the loop runs. So in the end, if we started the map on standard difficulty, the difficulty variable would return 3 - as if we were playing expert, and it would return 5 if we were actually playing on expert. (GetDifficulty() returns 1 on standard difficulty and 3 on expert difficulty, then we add 1 for every loop -> 1+1+1 = 3 or 3+1+1 = 5 ) For now, let's just declare a variable number_of_spawners in _globalvars.lua. • Using Ifs in BF Scripts To show you how to use ifs and loops in BF scripts, I am going to create an example.lua script. I want the game to give me an outcry that the script was successfully loaded, so I add a state (remember, every script needs at least one state) with a OnOneTimeEvent that sends out an outcry. Now if we define the example.lua into _scriptlist.lua, upon map start, we should get the outcry "EXAMPLE LOADED". To actually use the ifs and for loops in the script, we will need to define them OUTSIDE OF ANY STATE. The events we declare in ifs and for loops will be added to the next state after them. I've added an if difficulty == 3 condition above my INIT state. This condition will use the difficulty variable I've declared in _globalvars.lua and check if we are playing on expert difficulty. If the condition is true, it will add the declared OnOneTimeEvent to the INIT state below the if condition. You probably didn't notice this, but I've added something special to the MissionOutcry. A "..difficulty" after the outcry text. Believe it or not, but we can actually use the variables in BF actions and conditions. The double dot (..) tells the script to add whatever comes after the double dot to the text before it. In our case, it will add the difficulty variable to the outcry text, like this. Awesome! Also notice that the event will switch the script to the EXPERT state via the GotoState. Note that, it is important in the following topic. • Using Loops in BF Scripts I've prepared a little scenario to showcase the usage of for loops. I have two fire spawners, one tagged spawn_point1 and the other spawn_point2. I want to spawn a squad next to each of them on expert difficulty. To do that, I will add the EXPERT state, to which the if condition from before switches to. And above the EXPERT state, I will define my for loop. I have two spawners, and I want to spawn one squad next to each of them. So I will declare the i = 1,2. I use the SquadSpawn action to spawn the squad and in the TargetTag, I use the good old double dot (..) to spawn the squad next to each spawner. The SquadSpawn action takes the "spawn_point" tag we specified and the for loop adds the number of the i after it. So what this for loop does is, it adds two OnOneTimeEvents with the SquadSpawn action to the EXPERT state. And the TargetTag for the first event is spawn_point1 and for the second event it is spawn_point2. Now, the number of spawners I have on the map can change as I work further on the map, for easy access to the number of spawners, I have declared the number_of_spawners variable in _globalvars.lua. We can use that variable in our for loop, now we won't need to sift through all the scripts to adjust the number of spawners we have, we can only change the variable in _globalvars.lua. Let's check our script in game. When we start the map on standard or advanced difficulty, the squads will not spawn. The EXAMPLE LOADED outcry tells us that the script works as it should, we just didn't select the expert difficulty. But when we start the map on expert (remember - we switch to the EXPERT state in our event in the first if condition), we will get a squad of Sunstriders next to each spawner, alongside the DIFFICULTY 3 outcry. YAY! Before we leave thic topic behind us, I just want to reiterate that the contents of the ifs and for loops get added to the next state that comes after them. • Next Chapter I know this chapter was a bit... ify. But you successfully got through the advanced scripting principles. Don't worry, a bit of practice and some help from your fellow map making skylords will carry you a long way. In the next chapter, we will look at the very complex topic of Warfare Patterns. Using them can be really great and easy if you know what you're doing, but they include some weird behaviours that might confuse you. Don't dread, I will be there to guide you on your Warfare Pattern jouney to victory. • Warfare Patterns • (Coming Soon)


.jpg.30b0b8914578303ef14eef12a843df0c.jpg)


.thumb.jpg.3fc4ec7472e989317017ae2097964157.jpg)
.thumb.jpg.cdf720bd6c228de270074d29ffaacb70.jpg)
.jpg.cb1610c83919b9d0b658aa4daa7952aa.jpg)
-
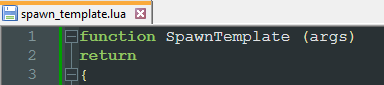
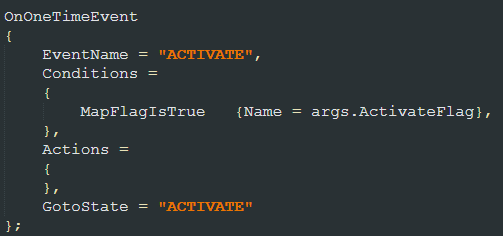
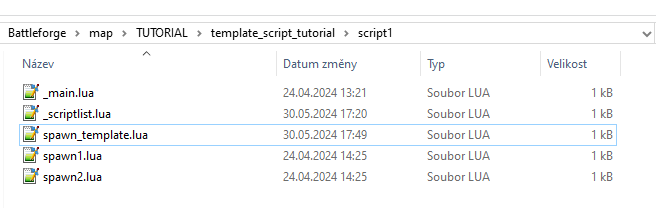
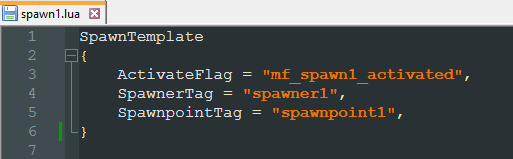
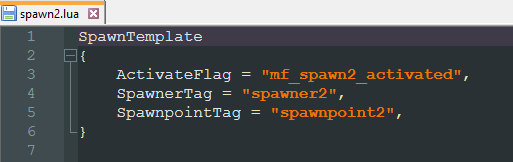
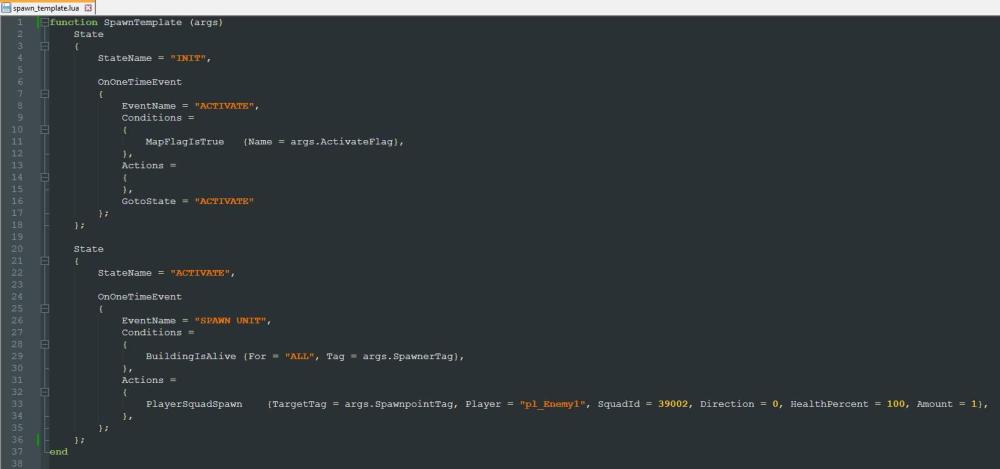
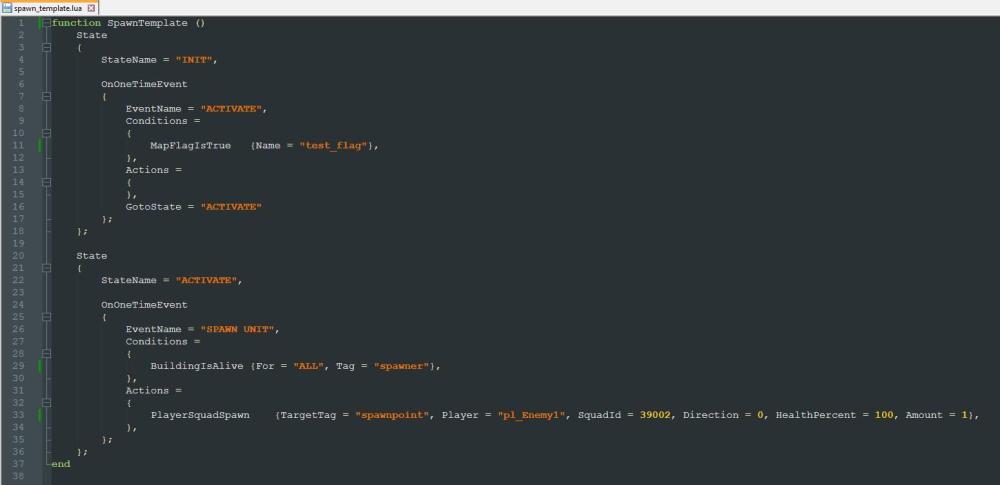
Hello again! As I have investigated some scripts by the original BattleForge developers, I have stumbled upon template scripts! These templates are used when you want multiple scripts to have the same functionality, but with different targets, spawnpoints, respawn times etc. You define one template and use it in multiple scripts, in which you only need to declare the specified arguments. This can prevent mistakes that can happen when you copy-paste the same code multiple times, and forget to adjust the values, or introduce some typos. Here are the scripts I will create in this tutorial. spawn_template.luaspawn2.luaspawn1.lua If you encounter any issues, don't hesitate to ask in Skylords Reborn Map Making Discord. • Content Creating a Template Script Passing Arguments Using a Template Homepage • Creating a Template Script I will create a simple script as a template to show you an example. I will create a script called spawn_template.lua (it is always best to include the "template" in the name of your template scripts). In the template script, we need to declare a function - I've called it "SpawnTemplate". A function needs to have the () brackets after its name is declared (I will tell you what these brackets are for in a little while). And we end the function with the end keyword after the closing curly bracket. Inside the function, I have created two states, each with one event. I want the script to be inactive at the start, and spawn a squad of thugs, once it is activated. And, this is it, this is a template script. It is very basic mind you, it does only one thing and with all the same parameters, so it is not very useful at the moment, we might as well have written this into a standard script. Now, let's have a look at how we can make this script actually usable... • Passing Arguments We can pass arguments to the function, that we can then use in the code! For that, we need to tell the function to expect some arguments first. We do that by writing something in the function's () brackets - I chose args (for arguments), but you can write whatever you want in there, just name it something sensible. Now, in our code, we can specify which arguments the function will expect. We can do that by writing args.ArgumentName for the arguments we want to pass to the function, like this. I have added arguments for the map flag that activates the spawning, the tag of the spawn building which needs to be alive, and the target tag, where to spawn our squad of thugs. Now the code is actually reusable! Let's look at how we can do that. • Using a Template I will create two scripts - the spawn1.lua and spawn2.lua. So my script1 folder looks like this. In these scripts, we only need to type the name of our template function, and pass it all the arguments we've specified in the template script, separated by a comma - In my case, the ActivateFlag, SpawnerTag and SpawnpointTag. You need to write these arguments between curly brackets {}, otherwise you will get an error. These are my arguments for spawn1.lua and spawn2.lua. Now, obviously our template is very simple, and copy-pasting it into multiple scripts wouldn't be much of an issue, but when you have more complex behaviour that is used in multiple scripts, having a template can really save your time, as you only need to truly debug the template script. At last, I will add the spawn1.lua and spawn2.lua scripts into _scriptlist.lua, as they don't share the name with a tagged entity, or a script group. Now, if I were to activate my map flags, for example in the _main script, I will have a squad of thugs spawn on every spawnpoint I declared, if the tagged buildings are alive. • Homepage You can return to the homepage here. • Map Editor Tutorial Homepage •
.thumb.jpg.d60cbaebb5627bf5bf38c3c7a8fbed2f.jpg)
-
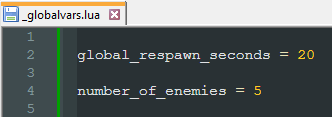
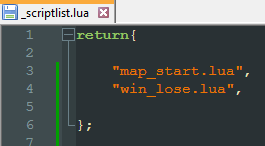
Hello there! We have went over quite a few scripting topics, and they just keep coming. In this chapter, we will look at which scripts the game loads by default, and how you can create your independent script, that is not tied to any tagged entity. If you encounter any issues, don't hesitate to ask in Skylords Reborn Map Making Discord. • Content Default Scripts Tagged Entity or Script Group Scripts _main.lua _scriptgroups.lua _spawngroups.lua _globalvars.lua _scriptlist.lua Next Chapter • Default Scripts BattleForge automatically loads some predetermined scripts when starting the map. I have named these scripts the default scripts. The scripts the game automatically loads are: scripts that are named after a tagged entity or a script group _main.lua - this is the main script of the map, as such, every map needs to have a _main.lua script _scriptgroups.lua - you define script groups in this file _spawngroups.lua - here, you define the waves for warfare patterns _globalvars.lua - you can have global LUA variables in this file, and reference them in any other script in your map _scriptlist.lua - here you can declare your own independent scripts, that are not tied to any entity • Tagged Entity or Script Group Scripts BattleForge automatically detects scripts, that share the name with a tagged entity or a script group. For example: If you have an entity on the map tagged big_guy - you can create a script named big_guy.lua and it will automatically load upon map start. Same with script groups, if you have a script group named sg_small_guys, you can create a script named sg_small_guys.lua and it will be automatically loaded. These scripts have one downside, as they only work for as long as the entity / entities are alive. Once the entity is dead, and there is no OnRespawnEvent in the active state, the script will stop working. • _main.lua As stated above, the _main.lua script is the main script of the map. You can script general functionality in this script as it is not tied to any entity on the map. In official development, this script is mostly used for implementing difficulties or starting global timers. • _scriptgroups.lua We went over the _scriptgroups.lua file in the Script Groups, Script Areas and Script Paths chapter. We define our script groups in this file, and add any adjustments to script groups for different difficulties. Example of the script • _spawngroups.lua _spawngroups.lua is used for warfare patterns. Warfare patterns are used to easily create waves of enemies, control them and have them respawn. We will dedicate a whole chapter to warfare patterns. • _globalvars.lua Sometimes, you want to use the same value in multiple places in your script, or even in multiple scripts. You can either type the value manually everywhere, or you can declare it as a global variable - giving you access to the same value in all your scripts. We can do that through _globalvars.lua. Inside the script, you just need to name your variable and assign it a value, like this. Then, you can reference the global variables in any script. In my case - reference global_respawn_seconds to get a value of 20, or number_of_enemies to get a value of 5. _globalvars.lua makes it also very easy, if you want to change global variables based on difficulties. In my case - I can shorten the global respawn time and increase the number of enemies on higher difficulties. Here is the script, if you want to make use of this on your map. I will be covering ifs and loops in a separate chapter. _globalvars.lua • _scriptlist.lua As stated above, scripts that are tied to entites on the map only work for as long as the entity is alive. While you can design around this, it is not ideal and after a while, you might have trouble finding specific events. In _scriptlist.lua you can declare "independent" scripts. You can name them whatever you like, and these scripts will execute their events regardless of any entity on the map. We can, for example, create a script called map_start.lua, where we will handle the setup of the map - outcries, objectives and fog of war. Then, create a win_lose.lua script, where we will handle all the victory and game over events. For the game to recognize these scripts, we need to declare them in the _scriptlist.lua - so we also need to create that. Inside the _scriptlist.lua, we need to return the names of our independent scripts, like this. We will return a list of the names of our scripts in parenthesis, with the .lua extension. The names are separated by commas. You can also write this into one line, I just like to separate them into multiple lines for better readability. Generally, you want to script all specific functionality into separate scripts for clarity. Having everything in the _main script can lead to a mess of hundreds, if not thousands of lines of code, and working with the script becomes very inconvenient. Compare that to separating the functionality into individual scripts like: boss_behaviour.lua, objectives.lua, main_gate_opening.lua etc. Each script having only a couple of events, that are all tied to a specific function. I think you can see the benefit of doing this. • Next Chapter This might have been a bit complex. But these special scripts become essential as you start creating more intricate maps. The next chapter covers script group member scripts, which allow you to do some neat stuff with individuals inside a script group. • Creating Member Scripts •
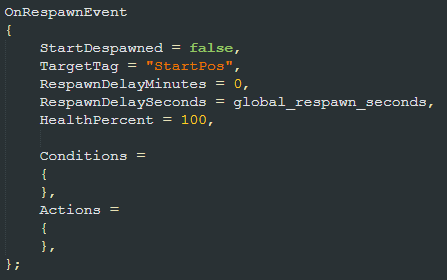


-
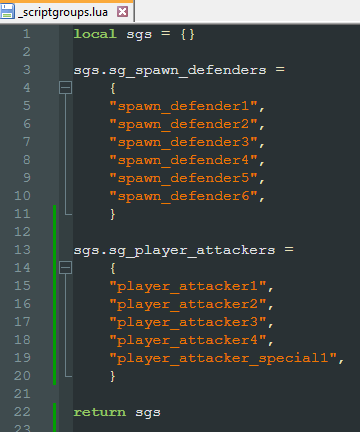
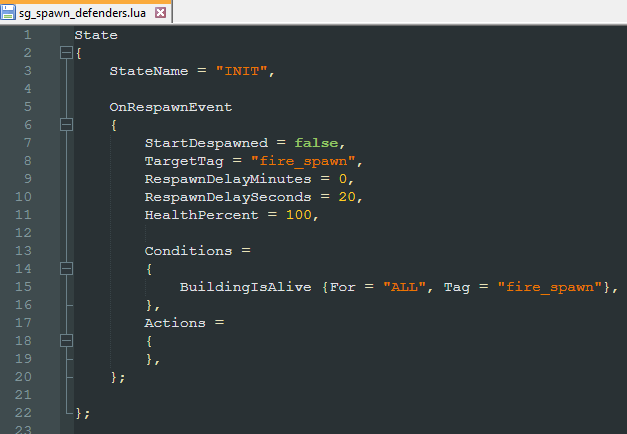
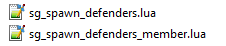
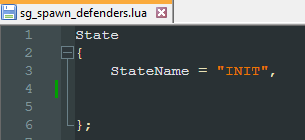
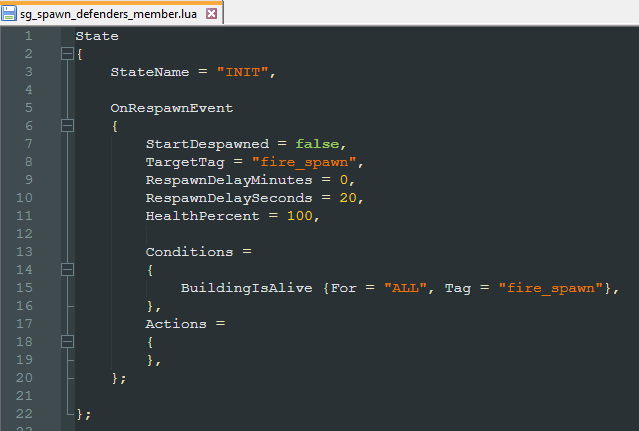
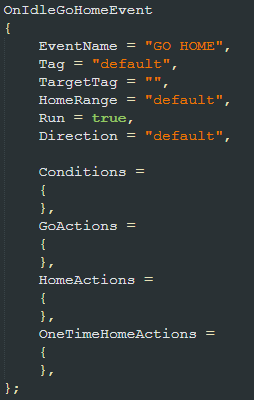
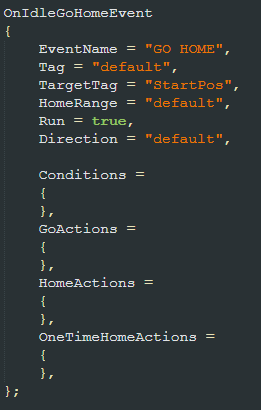
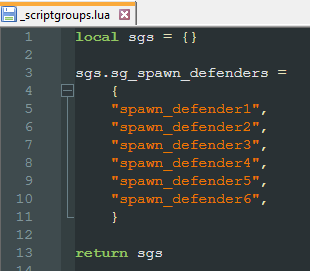
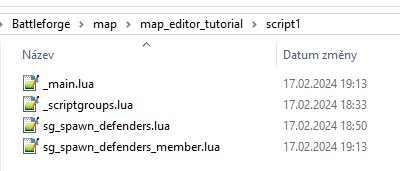
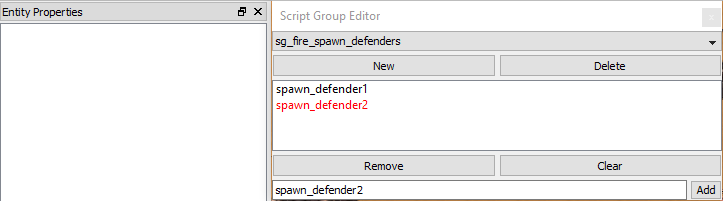
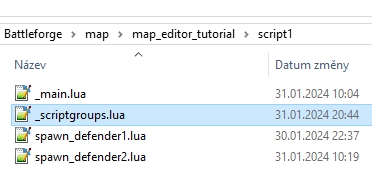
Hello again! Script groups are a great tool for map makers. While they make referencing and scripting with multiple entities much easier, the script group, by default, is pretty rigid. You lose access to the individual units, or you need to create separate scripts for them, and take care that they do not clash with the script group's script. That's why the original devs implemented member scripts. These scripts offer you access to all the units inside a script group, and allow them to act almost as separate entities again, while preserving the ability to work with them as a group. If you encounter any issues, don't hesitate to ask in Skylords Reborn Map Making Discord. • Content Setting Up a Script Group Member Script Usage Creating Member Scripts OnIdleGoHomeEvent Next Chapter • Setting Up a Script Group Before we can make a member script, we of course need a script group to create it for. In our Map Editor Tutorial map, I've prepared these units and tagged them spawn_defender1 to spawn_defender6. I will create my script group through the _scriptgroups.lua file. But feel free to use the in-editor Script Group Editor. In the _scriptgroups.lua, I've created a group called sg_spawn_defenders and assigned the spawn defenders to it . Since I want these units to respawn, I will create a script named sg_spawn_defenders.lua and add an OnRespawnEvent. Now, the units will respawn. But with a small twist - they will only respawn once ALL of the units in the script group have died. While there is nothing inherently wrong with that, and this behaviour may be desired in some cases, we usually want our spawn defenders to be more responsive. This can also lead to exploits, such as leaving one of the units alive to prevent the respawn of the remaining defenders. As you might have guessed, we will remedy this by creating a member script. • Member Script Usage Member scripts need some further setup, but when finished, they can offer vastly improved functionality and control over units in a script group. Before I get to the creation of member scripts, I will give you some examples what you can do with them. make squads in a script group respawn individually, instead of as a group make squads in a group return to their original placement after respawning make squads in a script group behave as individuals, instead of as a group - instead of copying the same script for multiple entities, you can just use a member script to have multiple units have the same behaviou • Creating Member Scripts Creating the member script is extremely easy. We will just copy the sg_spawn_defenders.lua script, and rename the copy to sg_spawn_defenders_member.lua. Please note that you NEED to name the member script as scriptgroupname_member.lua. This lets the game know, that you have created a member script for that specific script group. You also NEED the script group's original script file. Now, when we have the member script created, we need to clean up the original script. Just open the script, and since we don't want this script to do anything, just leave in an empty state - you need to have a state in the script for the game to register it. And our member script will have the OnRespawnEvent inside it. With only these few steps, we have made it so that, the units in the script group will respawn as individuals, instead of having to wait for the rest of the group to die. • OnIdleGoHomeEvent Maybe you've noticed, that in the official campaign maps, the respawned units will return to their starting positions, instead of just standing around the spawner. This is a great little detail that not only makes the camp feel more alive, and look more visually appealing when players try to destroy the camp again, it also preserves the camp defenders' strategic placement. Ideally, when designing a camp, you want to place the defenders in a strategic manner - ranged units in the back, melee units in the front, maybe have them defend a chokepoint. When the units don't return to their original starting positions, it can negatively impact the camp's balance. We can fix this issue by adding one more event into our member script - the OnIdleGoHomeEvent. This event simply tells the units to return to a "home" position when they are idle for some time. We can leave everything as-is, except the TargetTag parameter. This parameter tells us, where "home" is. We will set this to StartPos. The StartPos parameter references the entities original placement - as it was placed in the editor. This parameter only works in scripts, that are named after a tagged entity or a script group. And more importantly - also in member scripts. With this one extra event, that works almost from the box, we can see that the units will return to their originally designated positions upon respawning. In the end, you should end up with these scripts in your script1 folder. sg_spawn_defenders_member.luasg_spawn_defenders.lua_scriptgroups.lua • Next Chapter This concludes the member scripts chapter. First of our advanced topics. Just remember that you can create a fun and interesting map without ever needing member scripts. They can help the map feel better to play but are in no way necessary. In the next chapter, we will look at how we can use actual LUA language in our scripts to save ourselves a lot of time. • Using Ifs and Loops •
.jpg.26ced55abf1115fbbc4c540658c595db.jpg)
-
R4bitF00t changed their profile photo
-
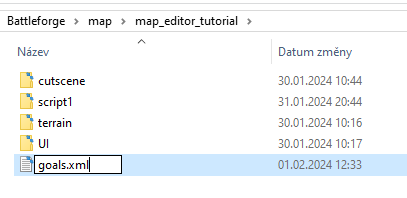
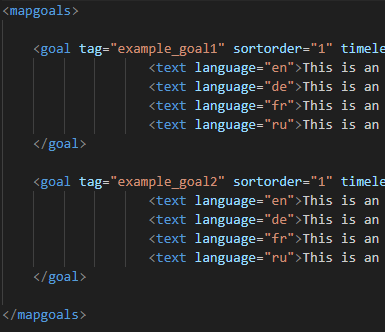
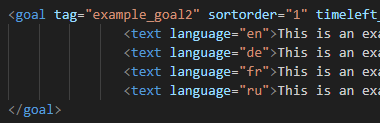
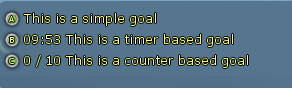
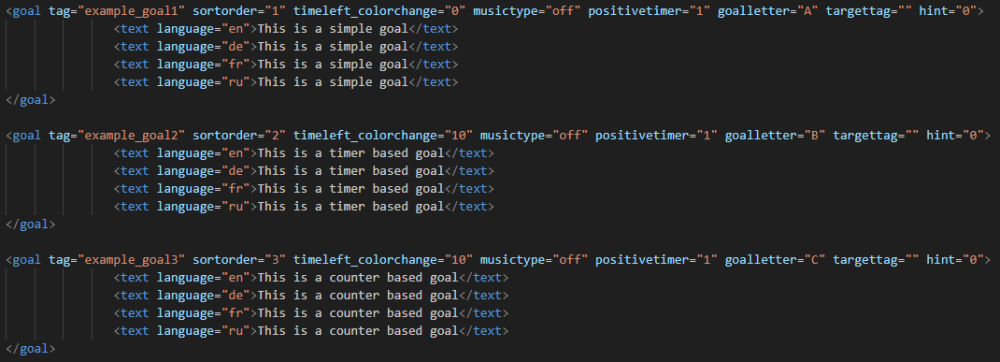
Hello there! Working with goals properly needs some additional setup. Goals use an .xml file with it's own formatting and sctructure. Luckily, you only need to create the goal file once per map. Now, let's see about these goals. If you encounter any issues, don't hesitate to ask in Skylords Reborn Map Making Discord. • Content Creating goals.xml Defining Goals Working with Goals Simple Objectives Timer Based Objectives Counter Based Objectives Next Chapter • Creating goals.xml To work with goals, we first need to define them. We do that in an .xml file named goals. Create a text file in the map folder (outside of any of the other folders inside) and name it goals.xml. Now, we are ready to define our goals. • Defining Goals I will give you an example goals.xml file, so you have a backup to fall back to. goals.xml Since I don't have the proper knowledge of .xml files, I will at least explain to you what the parameters do, to the best of my knowledge. Upon closer examination, you can see that, again, the file is divided into logical chunks. First line declares what version and encoding we use for the file - just copy this into every other goals.xml file you create. Then, we need a defined space to put our goals in. This space starts with <mapgoals> and ends with </mapgoals> and inside it, we define our goals. Same as with the <mapgoals>, the individual goals are defined between the <goal> and </goal> pointers. Inside the <goal> parenthesis, we can declare some additional parameters for our goal. The only parameter you truly need is the tag parameter. Without it, you cannot reference the goal in your scripts. The other parameters are optional. Let's look at them now. sortorder - defines the sort order of the objective, lower numbers will appear higher in the objective list timeleft_colorchange - when you use the goal as a timer, this defines when the timer will change color, signalling it is running out musictype - defines whether the timer will use special "time is running out" music, it is unconfirmed if this works positivetimer - defines whether the timer is positive - such as reinforcements arriving, or negative - such as enemies arriving, or map loss upon timer expiration goalletter - here you define which letter the goal will use in-game, this increases clarity targettag - references a tag, or a script group, the goal markers will appear over these entities on the minimap, with the set goalletter hint - I don't know what this does, never used it Then, inside the <goal> and </goal> area, we define the text that is displayed in the objective list for each language. Every line starts with <text language = "xx"> and ends with </text> with the goal text written between these. You need to define one language for each line - en, de, fr, ru, and write the objective text - in each language, if possible, but you can write everything in English if you don't speak the language. Now that we have set up the goals file, we will look at how you work with goals in scripts. • Working with Goals Simple Objectives There are a lot of actions and conditions that work with goals. You can set any goal to be a simple objective, timer based objective, or a counter based objective. These are the basic actions used with objectives. MissionTaskSetActive - activates a goal as a simple objective - no timer, no counter MissionTaskSetFailed - fails a task, be it simple objective, timed objective, or counter based objective, also removes it from the objective list MissionTaskSetSolved - completes a task succesfully, be it simple, timed, or counter based, also removes it from the objective list MissionTaskRemove - removes a task from the objective list, without any message to the players You only need to use two parameters. The Player parameter and the TaskTag parameter. With the Player parameter, you declare which players are affected by the task - meaning you can have different tasks for different players. The TaskTag parameter references the tag, that you set for the goal in the goals.xml. The text of the objectives in the objective list is determined in the goals.xml file. So you don't need the Summary and Description parameters. Timer Based Objectives With timer based objectives, you use these actions. MissionTimerStart - starts a timed objective and makes it active in the objective list MissionTimerStop - stops a timed objective and removes it from the objective list MissionTimerPause - pauses a timer until MissionTimerResume is called MissionTimerResume - resumes a paused timer MissionTimerChange - changes the text of the timed objective, for text of another objective and keeps the remaining time You can use the same actions of MissionTaskSetFailed, MissionTaskSetSolved and MissionTaskRemove as you do with the basic objectives. Counter Based Objectives With counter based objectives, use these actions. MissionCounterShow - shows the objective in the objective list with a max value (such as 0/10) MissionCounterHide - hides the objective from the list MissionCounterSet - sets the counter to a given value MissionCounterIncrease - increases the objective counter by one MissionCounterDecrease - decreases the objective counter by one MissionCounterSetToHealthPercent - sets the counter to display percentual current health of a tagged entity - DOES NOT UPDATE AUTOMATICALLY, you will need to use, for example, an OnIntervalEvent where you will execute this action periodically As with the previous objective types, MissionTaskSetFailed, MissionTaskSetSolved and MissionTaskRemove work as you would expect. The MissionCounterSetToHealthPercent is a bit special. It doesn't update automatically, so you need ideally an OnIntervalEvent that calls this action periodically. You also need the MissionCounterShow action and set the MaxValue parameter to 100 (as 100% is full health). Here is an example of each of the different types of objectives. • Next Chapter This concludes the Creating Goals chapter. In the next chapter, we will look at which scripts the game automatically loads, and how you can create your custom scripts, not tied to any entity. • Default Script Files •


-
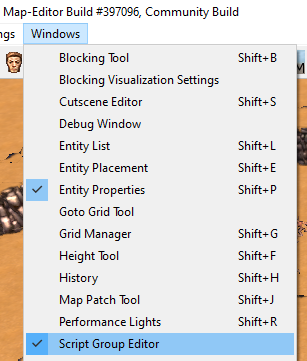
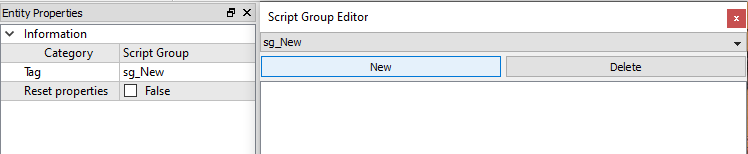
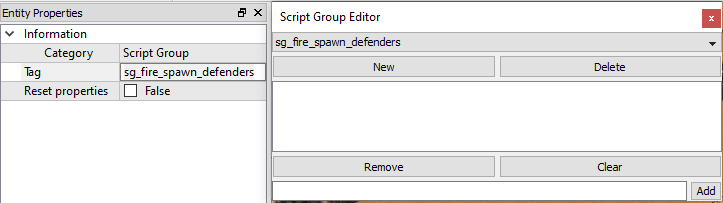
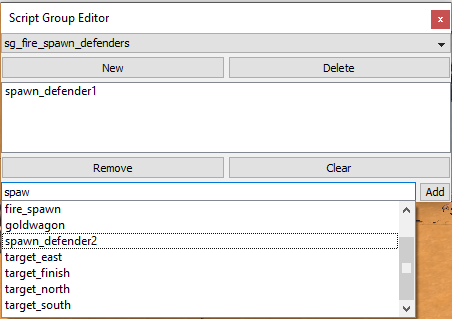
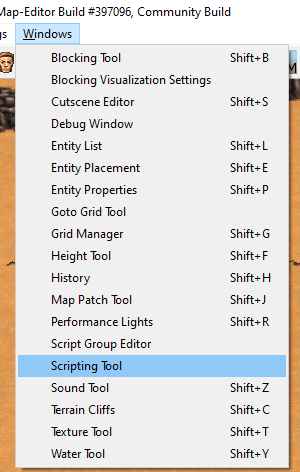
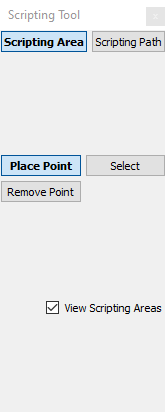
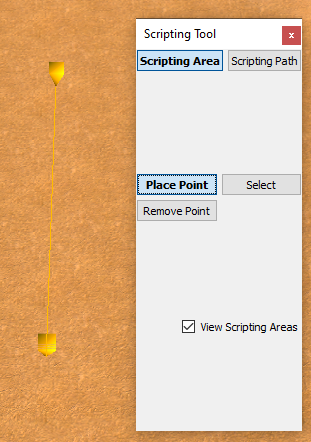
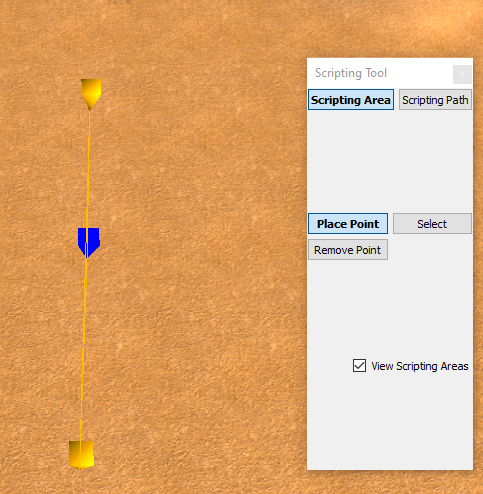
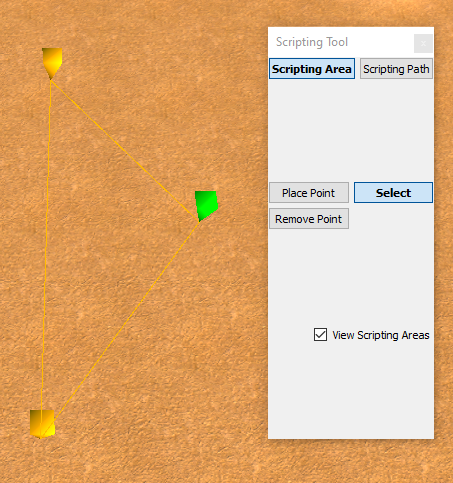
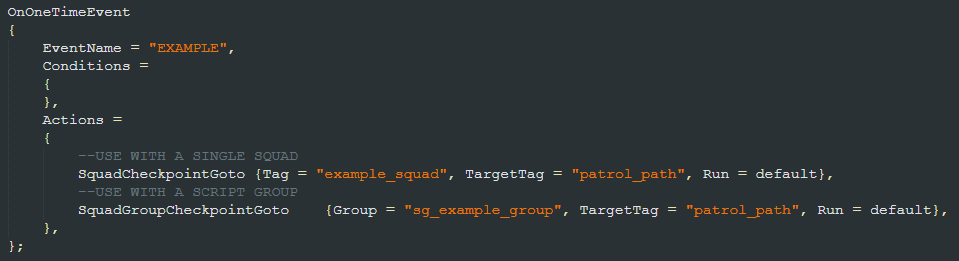
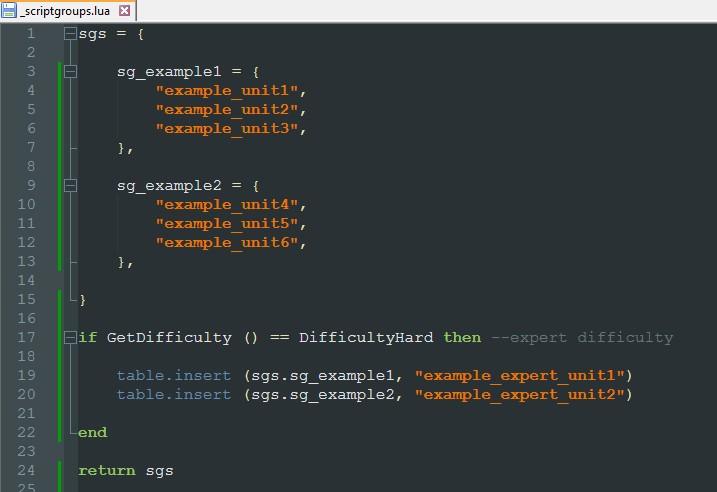
Hello there! Scripting groups, paths and areas are extremely useful when creating maps, I would even go as far as to say that they are necessary in most cases. Now, it is time to see what these groups, areas and paths are all about. If you encounter any issues, don't hesitate to ask in Skylords Reborn Map Making Discord. • Content Script Groups Creation in the Editor Creation in the _scriptgroups.lua Script Areas Script Paths Next Chapter • Script Groups Let's start with the most important topic first. Script groups do what their name implies. They group individual tags under one, master tag. If you learn one thing from this chapter, let it be how to create script groups. You can use script groups in scripts the same way as you would normal tags. You can easily discern if a tag references a script group, because a script group's name starts with the prefix sg_. Naming conventions for script groups follow the same rules as tagging entities, with the addition that the name of the script group must start with the sg_ prefix. E.g. sg_fire_outpost_defenders. There are two ways of creating script groups. Through the editor, or through a script called _scriptgroups.lua. I would suggest you pick one of these and stick with it, combining them is not ideal for clarity. Let's look at both of them now. • Creation in the Editor Creating script groups in the editor is very simple and super quick. In the beginning, this should be all you need. But as time goes on, and you get more experience, you will find that doing the groups in the editor is very rigid and prevents you from using some advanced coding practices. To create a script group in the editor, we need to open the Script Group Editor in Windows -> Script Group Editor. We will also need the Entity Properties window. We can create new script group by pressing the New button in the Script Group Editor. The group's properties will be shown in the Entity Properties window. That is where you can rename the script group. Let's name it sg_fire_spawn_defenders, this group will include our spawn_defenders from the previous chapter of the tutorial. (Remember, we need to put sg_ prefix at the start of the group name!) Now, we need to insert our spawn_defender1 and spawn_defender2 squads into the script group. At the bottom of the Script Group Editor, there is a search bar, you can start typing the tags there and the editor will automatically offer you autocompletions. Select the spawn_defender1 in the offered list and press enter to insert it into the group. Do the same for spawn_defender2. There is also a very helpful feature, that will highlight tags that are not on the map in red. This is very useful if you have decided to change the tags of entities, or delete them. • Creation in the _scriptgroups.lua Creating script groups in the _scriptgroups.lua is a bit trickier, it actually requires you to follow some strict formatting. But in return, it gives you more flexibility when you need to adjust your script groups at runtime. The good thing is, once you've set up one _scriptgroups.lua, you can just copy it into other maps. To start defining our script groups, we first need to create _scriptgroups.lua, same as we would create any other script. Create the script in the script1 folder. Because of its complexity, I will give you an example _scriptgroups.lua, so you can fall back on it if anything goes wrong. _scriptgroups.lua The _scriptgroups file will return an array (think of an array as a list) of script groups to the game. Since the script groups themselves are arrays of tags, the _scriptgroups thus returns an array of arrays. This is just to confuse you, now to the example. Similar to a State, declare your script groups array - I've named mine "sgs" follow the name by the = sign and {} curly brackets. Like this. sgs = { } You will define your script groups inside the curly brackets. To create a script group, we define it the same way as our previous array - we name the script group and declare its contents (tags) between the curly brackets. Though in addition, we need to separate all the script groups by writing a comma "," after every closing bracket. sg_example1 = { "example_unit1", "example_unit2", "example_unit3", }, sg_example2 = { "example_unit4", "example_unit5", "example_unit6", }, At the bottom of the script, we just need to return our script groups array to the game. In my case, like this. return sgs You can probably see that writing dozens of script groups, each of them containing up to dozens of tags, is not exactly fast. Luckily, there is a function in Notepad++ that can make inserting tags easier, and that is Column Editor. I will just direct you to official Notepad++ tutorial on how to use that functionality. https://npp-user-manual.org/docs/editing/ I will cover creating difficulties in more detail in another tutorial. For the moment, you have the example script that includes adding entities into a script group on expert difficulty. • Script Areas Script areas are mostly used to check if an entity is inside it, or not. You can access script areas via Windows -> Scripting Tool. You might need to check the View Scripting Areas checkbox to be able to see what you are doing. To place a script area, click the Place Point button. Then, click and drag to extend the area from point to point. After the first two points are placed, you can extend the area by clicking and dragging a new point from anywhere along the line between two points. You can add as many points as you want to an area. If you need to move the points, you can do that by clicking the Select button. To remove the points, click Remove Point button and click on the points you want to delete. To use the area in scripts, we need to tag it. We do that by using the Select mode, and double-clicking any of the points of an area. That will select the whole area, and give us the ability to tag the area through the Entity Properties window. If we go back to our _main.lua script from previous chapter, we could change the TargetTag of the PlayerSquadIsInRange check. With the area clearly defined, we don't need to measure or gauge the distance ourselves. I have also changed the range to default, which seems to work best with script areas. Like this. • Script Paths The Scripting Tool also houses our next guest - scripting paths. You can place a script path the same way you do a script area, only with script paths, you extend the path by click-dragging a new point from the last point of the path. Select a script path by using the Select mode and double-clicking any of the points of the path. Scripting paths have some extra options in Entity Properties. Here, we have: Continuous - makes the path continuous, meaning if you send units along that path, they will patrol it indefinitely. Travel in Reverse - reverses the direction in which you placed the points, making units start from the last point placed. When you send units along the path, they will follow it as closely as possible. The units will first start walking towards the first point of the path, and from that, they will continue to the next point and etc. remember that units will walk to the first point placed, first. If the path is continous, the units will patrol the path indefinitely. Sending units on a script path uses a different action than SquadGoto. To send a single squad along a path, use SquadCheckpointGoto action. To send a group of units along a path, use SquadGroupCheckpointGoto action. As stated, units sent on a script path will follow the path as closely as possible. When sending a script group along a path with SquadGroupCheckpointGoto, the units will wait at each point of the path, until all the units from the group are present before continuing. This is extremely useful when sending attack waves. • Next Chapter This is the end of three, very imporant topics. It wasn't as much fun as making units move around, but these three things are practically necessary for map creation. Now, goals in BattleForge are a bit unwieldy to work with, I will tell you all about it in the next chapter. • Creating Goals •

.jpg.e36b6acb3c8c9d378a25dbe8f24b52c8.jpg)

.jpg.60c6314c0449a7f5300276677a15e070.jpg)
.jpg.aa7b4a088af05cf520bcd400e4917b6b.jpg)
-
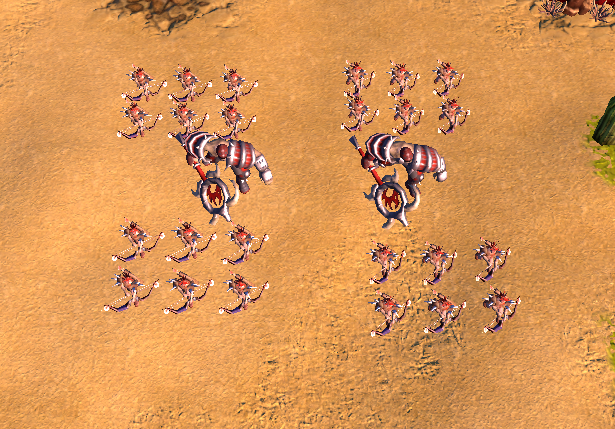
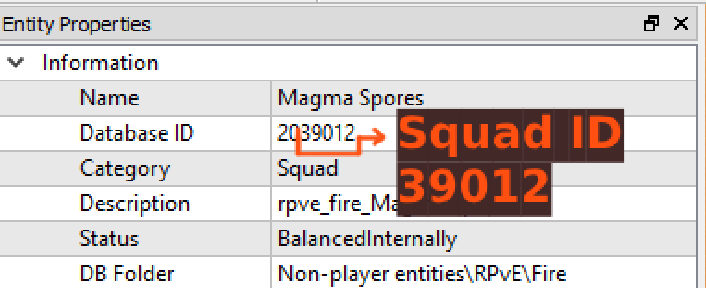
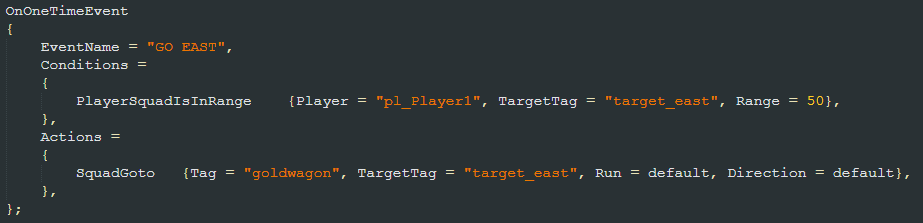
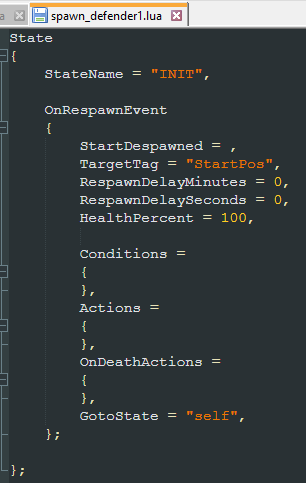
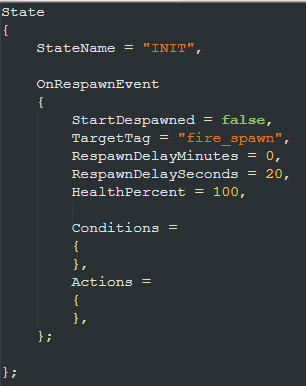
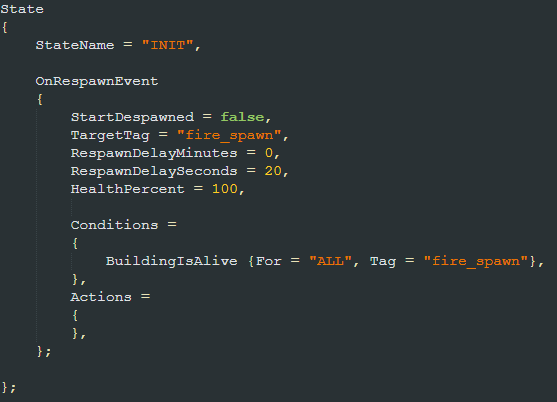
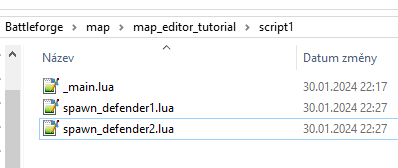
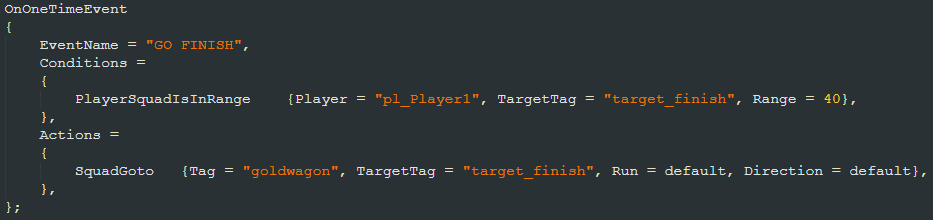
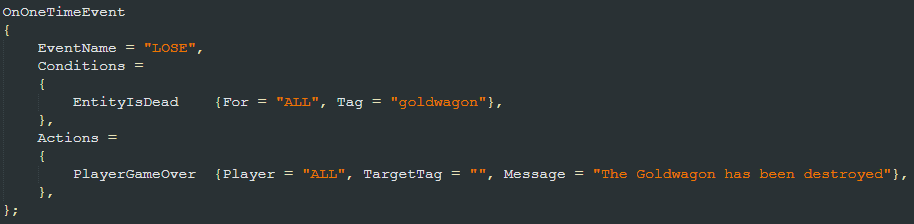
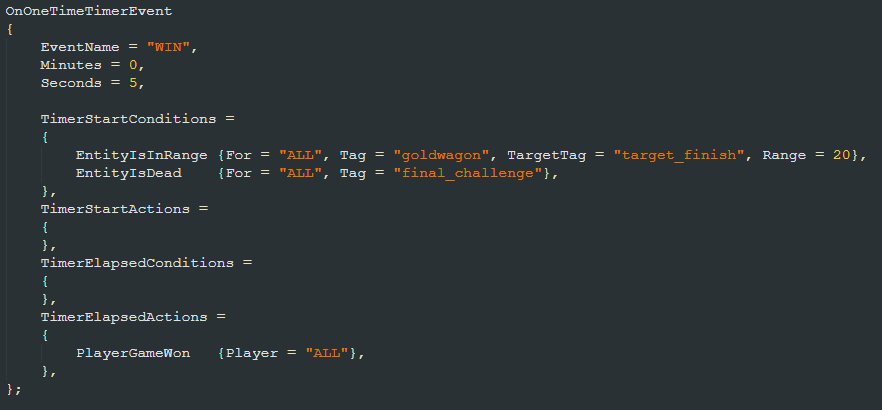
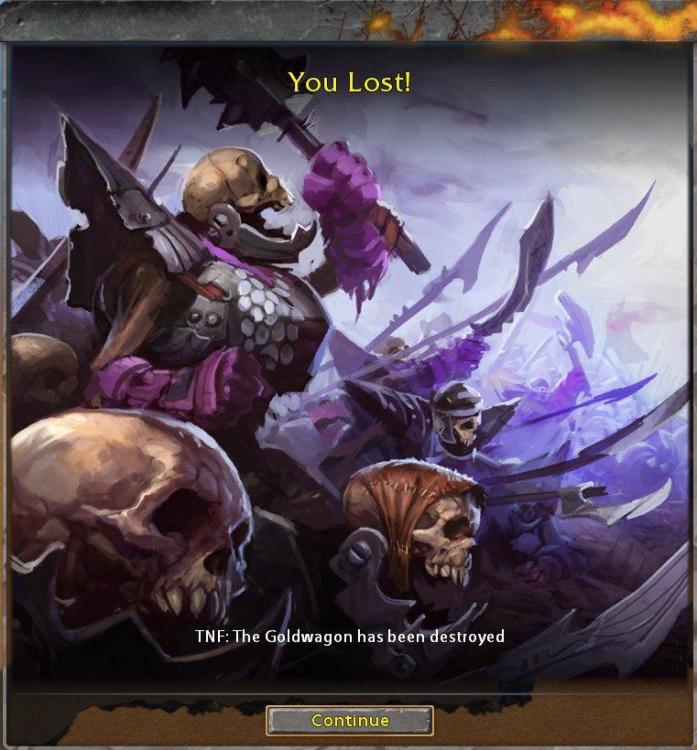
Welcome back! I hope you are properly refreshed and ready to get back into action. We will look into further actions and conditions we will need to complete our scenario. If you encounter any issues, don't hesitate to ask in Skylords Reborn Map Making Discord. • Content Setting up the Scenario Pt.3 Scripting Pt.3 - Ambush Setting up the Scenario Pt.4 Scripting Pt.4 - Respawning Scripting Pt.5 - Victory and Loss Next Chapter • Setting up the Scenario Pt.3 In the previous chapter, I mentioned a surprise to the south. Since the southern path only has one Firesworn, I want to add a little ambush when the player approaches that location. Put another marker near the southern cave and name it ambush_cave. We will also want to set up the next waypoint for our Goldwagon, further to the east. Tag it target_east. • Scripting Pt.3 - Ambush Let's return to the _main script once again. Now, we need to script our cave ambush. For that we need another OnOneTimeEvent. (See how much you can get done with the simplest things.) And add PlayerSquadSpawn action to it. I want to spawn a Magma Spore - for that, I will need to know its ID. Squad ID can be found in the editor, in entity properties as Database ID. The actual ID starts with the first non-zero number after the initial number. I filled in the TargetTag, Player, SquadId and amount into the PlayerSquadSpawn action, and I am ready for testing. And our Magma Spore spawns as expected. (I have moved the cave location, so that the Spore aggroes to the approaching player units.) Finishing the Goldwagon movement is simple, we just need a OnOneTimeEvent, with a very similar condition as the first two, that sends the Goldwagon to the target_east position. • Setting up the Scenario Pt.4 In the east, I want to have an enemy base with respawning defenders. So we need to set it up. Let's add a fire spawner building, and tag it fire_spawn. You can use any building for this, including towers, but keep in mind that players are used to which buildings are the spawners. I've placed a defensive tower and a squad of Sunstriders and a Wrecker to act as defenders of this fire outpost. Now we need to tag our squads so we can respawn them. You can either tag the units one by one manually, or you can select all the squads (Sunstriders and the Wrecker) and with both of them selected, tag them spawn_defender1 and hit enter. The units will automatically be tagged as spawn_defender1 and spawn_defender2. This is very useful, particularly with larger groups. Last thing I want to do is create our final waypoint in the east and tag it target_finish. Then, I added a Thunder Wagon to act as a final obstacle before the players can win the map. I tagged him final_challenge. Now we will look at how we can respawn the outpost defenders, and script the win and lose conditions for the map. • Scripting Pt.4 - Respawning Respawning units can be done in several ways. The easiest and most correct way is through the OnRespawnEvent. You might remember that I noted that the OnRespawnEvent is a special event. That is because it needs to be inside a script, that shares the name with a tagged entity or a script group on the map (I will explain script groups later). So let's look into that. On our map, we have two squads in the fire outpost - spawn_defender1 and spawn_defender2. We need to create a script for each of them. Create a new text file in the script1 folder, and name the new file spawn_defender1.lua. BattleForge automatically detects scripts that have the same name as a tagged entity on the map -> we have an entity tagged spawn_defender1 on the map, so we can create spawn_defender1.lua script and the game will automatically load it. The game only loads some predetermined scripts that start with "_" - such as _main, _scriptgroups, _scriptlist and _spawngroups. You can have a script that isn't named after a tagged entity, in that case, you need to declare it in _scriptlist.lua, which we will look at in future chapters. Now, open the spawn_defender1.lua script, create a state in the script (name it whatever you want) and insert an OnRespawnEvent into that state via the snippets. Now we need to adjust some parameters and declare a condition for the respawn. StartDespawned - determines if the units vanish at the start of the map, so they can be respawned at a later time TargetTag - position where the unit will respawn, "StartPos" means the unit will respawn at the position it was placed in the editor RespawnDelayMinutes - delay in minutes before the unit respawns after death RespawnDelaySeconds - delay in second before the unit respawns after death HealthPercent - with how much health the unit should respawn We want our units to be at their positions at the start of the map, so we will set StartDespawned to false. The units should respawn at the location of the fire spawner, so set the TargetTag to fire_spawn. The respawn should take only a couple of seconds, so leave the RespawnDelayMinutes 0 and set RespawnDelaySeconds to 20. We want the units to be respawned at full health, so leave HealthPercent as it is. I will do some further cleanup to make the script more readable. I have deleted the OnDeathActions block, as I don't need anything to happen when the unit dies. I have also deleted the GotoState as it is not necessary. Now, the unit will respawn every 20 seconds after it died. We need to insert a condition, that only if the fire_spawn is still alive, the units should respawn, otherwise the units will respawn out of thin air. We declare such condition with BuildingIsAlive. Now, we have explicitly written that the squad will respawn only if the fire_spawn building has not been destroyed. Instead of creating a new script and writing all of this again, we can simply copy-paste the spawn_defender1.lua script, and rename it spawn_defender2.lua. This way, we have easily set up the other squad to respawn as well. • Scripting Pt.5 - Victory and Loss There is only one last thing we need to script, and those are win and lose conditions. First, we need to create a simple event, that will send the Goldwagon to the final target. We have done this a couple of times now. Now let's do the lose condition. Obviously, since we have an escort mission, we want the player to lose if enemies destroy the Goldwagon. The players lose automatically if they lose all of their monuments, you don't need to script that. For the Goldwagon, we use a simple condition EntityIsDead. This condition is found in the Conditions-Negated snippet library, as it is the negative of condition EntityIsAlive. And game over is an action PlayerGameOver. You can ignore the TargetTag parameter. For the win condition, I want the players to win if the Goldwagon approaches the final marker AND the Thunder Wagon final_challenge has been killed. When we want to check if a tagged entity is in range of other tagged entity, we use EntityIsInRange. You can probably guess what is the condition for when the Thunder Wagon is dead. To win the game, we need to declare an action PlayerGameWon. Let's do something a little bit different. Since winning the game instantly upon the completion of our objectives is a bit anticlimactic, we will set the victory on a delay. We can do that with the OnOneTimeTimerEvent. Set the delay to 5 seconds, and try to estimate where you need to put the conditions and the victory action. Your event should look like this. If you got it right, great! If not, don't worry, I will explain. When the TimerStartConditions are met, the event will start its timer and TimerStartActions will trigger. Since we want to win AFTER the timer is elapsed, we need to write our victory action into TimerElapsedActions, which get triggered when the timer elapses and if the TimerElapsedConditions are met. Now, we just need to test everything in game and... The fire outpost defenders respawn as expected. And I was unable to best the Thunder Wagon guardian and lost my Goldwagon... Only on my second try did I get a win. The bright side is that, everything works! • Next Chapter This concludes scripting basic events! With this knowledge, you should be able to create mechanically interesting, yet simple maps. Search through the available Actions and Conditions in the snippets or on the wiki. Try things out, experiment and soon you will be able to do amazing things in the editor. In the next chapter, I will go over some very, very useful information on how to create and work with script groups, script areas and script paths. • Script Groups, Script Areas and Script Paths •
.jpg.6be6e1212ffe670306a102d6c5d531e7.jpg)
.thumb.jpg.e314468e0779efefc35e483bf2e14d77.jpg)


.thumb.jpg.24a749368a1907a6c8cdeaef029b4964.jpg)
.jpg.dcb7fa64b7c5aa44be43208f0bffeb42.jpg)
.jpg.6f3d64d5748905dc4105602ac85e7210.jpg)
.thumb.jpg.f2ad32e1916a51b6ab0c845e8c96ed56.jpg)
.jpg.4684c61345baf4f823bb480ef65bb20a.jpg)
-
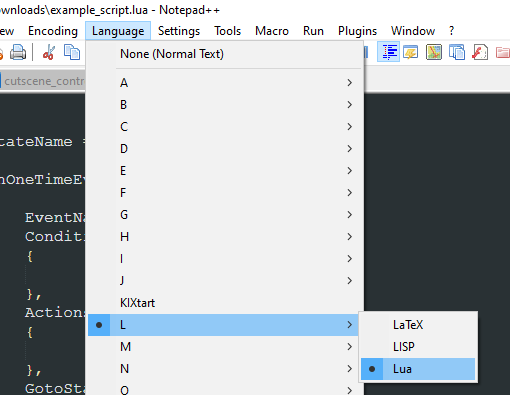
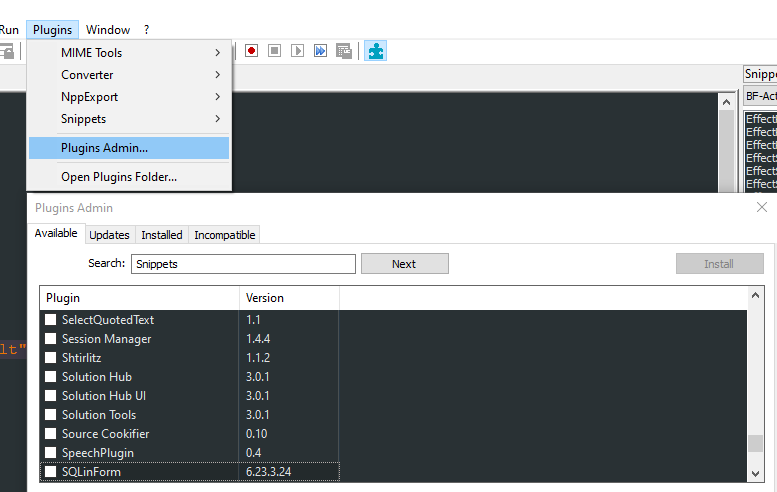
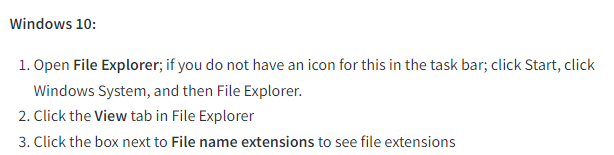
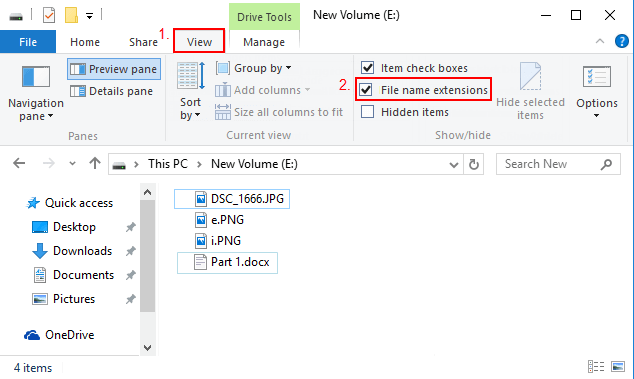
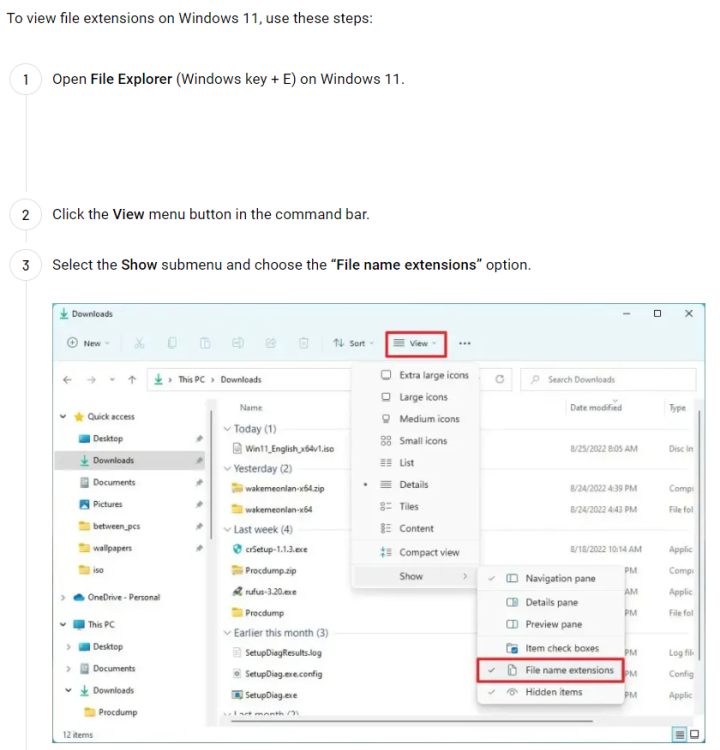
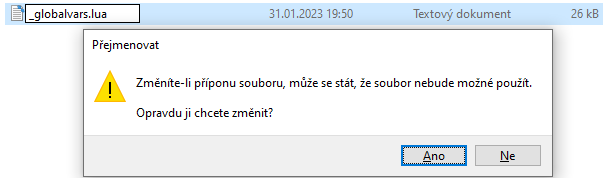
Before we can start scripting, we need to have a script editor. While you can use any text editor to create BattleForge scripts, there are some widely used, free text editors, that make scripting incredibly easier. We will look at one popular text editor that is used to edit BattleForge scripts - Notepad++. For advanced users, I will direct you to Visual Studio Code. If you are already familiar with BattleForge scripting editors, you can skip to the next part HERE, where I explain the principles of BattleForge scripting. If you encounter any issues, don't hesitate to ask in Skylords Reborn Map Making Discord. • Content File extensions Notepad++ Visual Studio Code Next Chapter • File Extensions First thing you will need to do, is to enable file extensions in Windows. With this option enabled, you can create a text file in your script folder and rename it with the .lua extension. Windows will ask you if you want to change the file type - just confirm, and you will have created a Lua script. To enable the file extensions, follow these instructions. Windows 10 Windows 11 • Notepad++ You can download Notepad++ HERE. It is a simpler text editor, more suited to beginners. After installation, we will need to set up the Notepad working language and the most important thing - Snippets. To set the script language in Notepad++ to Lua, go to Language -> L -> Lua in the top toolbar. Once you've done that, download the following RAR file. It includes the Snippet libraries. NotepadSnippets.rar What are Snippets? They are a collection of pre-written lines of code. You can browse through a list of them, find whatever action or condition you need and simply insert it into your script. Now that you have downloaded and extracted the snippet libraries, we might need to download the Snippet plugin. Don't worry, it's quite easy. In Notepad++ go to Plugins -> Plugins Admin... In the Available tab, search for Snippets. Select Snippets in the list by checking the small box on the left and click the Install button at the top right of the window. Now that you have installed the Snippets plugin, you can open the Snippets tab Plugins -> Snippets -> Snippets A Snippets window will appear. For now, we can only see the Templates library. We need to import our BattleForge snippets, and we do that by right-clicking the Library selection field (Templates), and selecting Import library... Then navigate to your extracted snippet library files and import them, one by one. Now, whenever you are working on BattleForge scripts, you can find the snippet you need in the corresponding library, and insert it into your script by double-clicking it in the list. • Visual Studio Code You can download Visual Studio Code HERE. VS Code is for advanced scripters with some experience. You will need at least some knowledge of BattleForge Script to use it effectively. As I don't use Visual Studio Code myself, I will direct you to Bergerb's tutorial on how to set it up HERE. Alternatively, HERE is a video tutorial for VS Code snippets by Metagross31. If you want snippets in VS Code, download this file. sr-scripting.code-snippets And put it into \AppData\Roaming\Code\User\snippets folder. • Next Chapter Now that we have our preferred script editor set up. We can move onto the script structure and basic scripting rules. • Scripting Introduction •


-
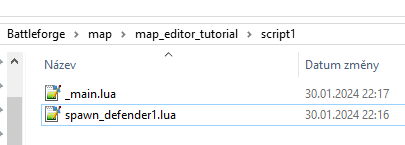
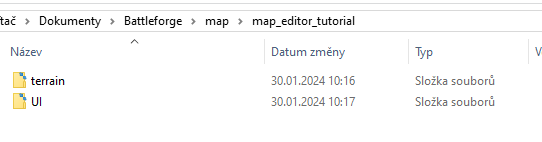
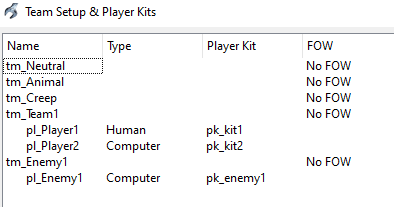
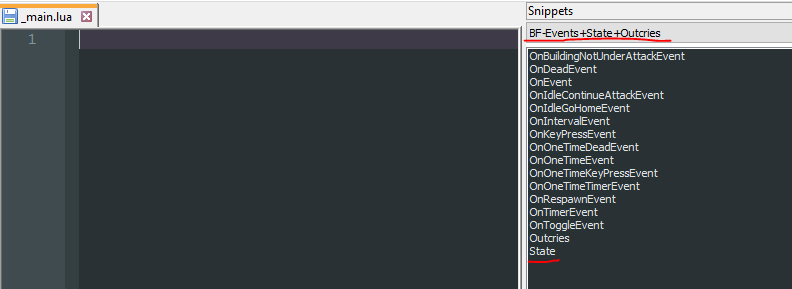
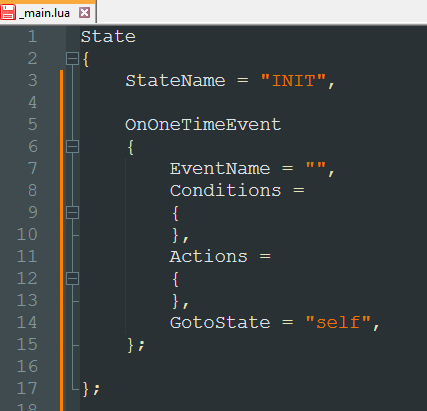
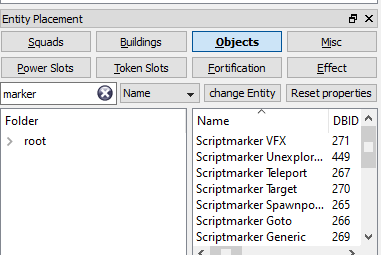
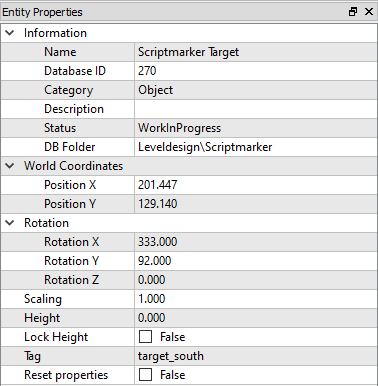
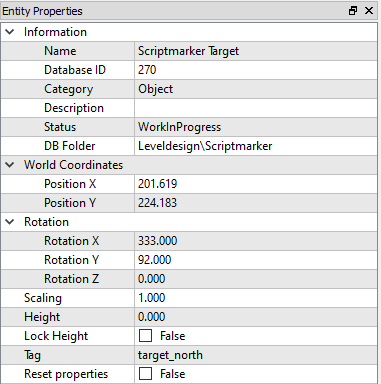
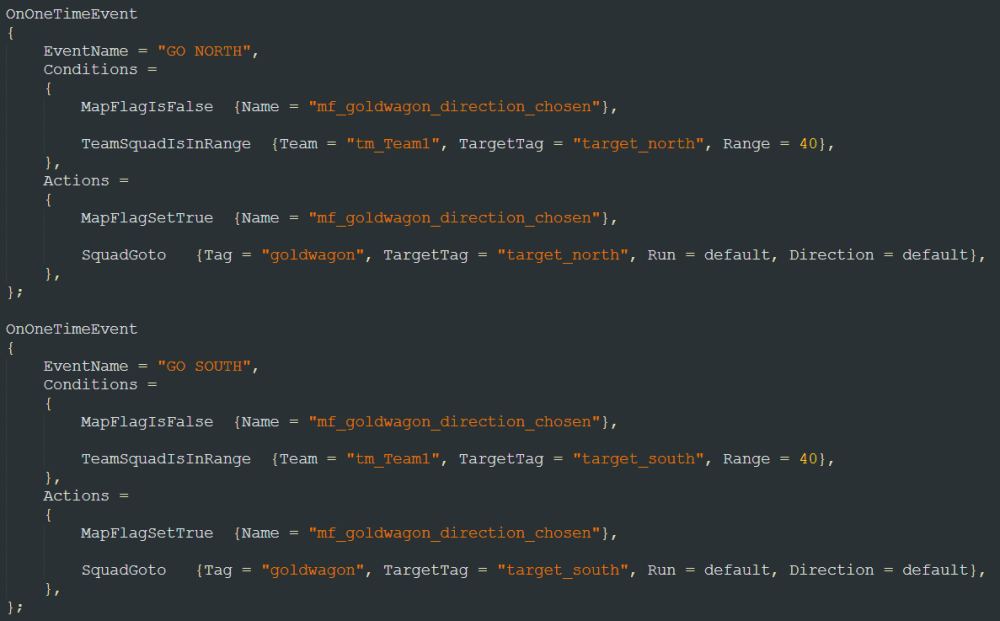
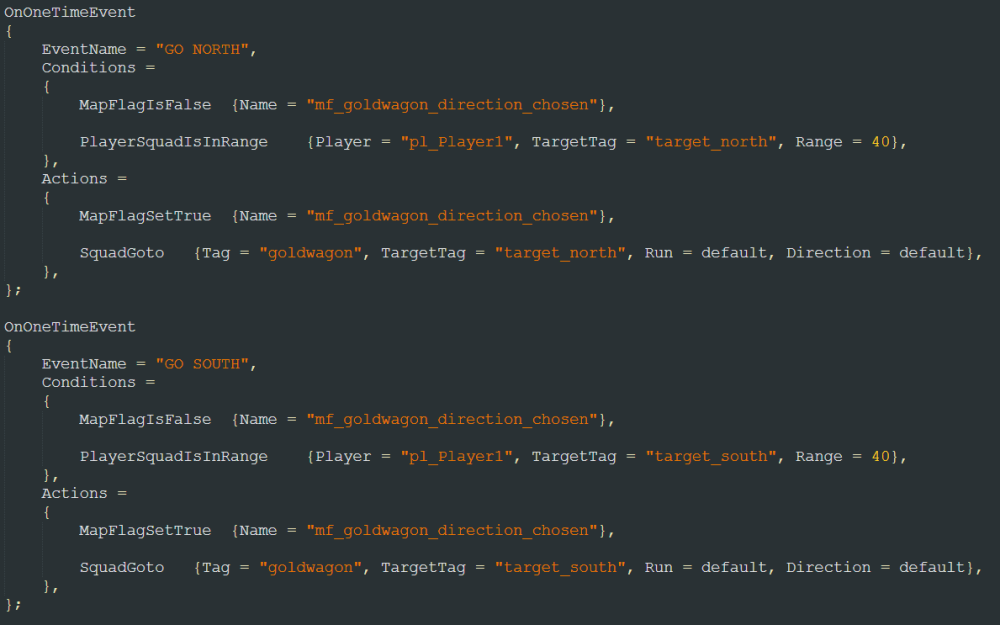
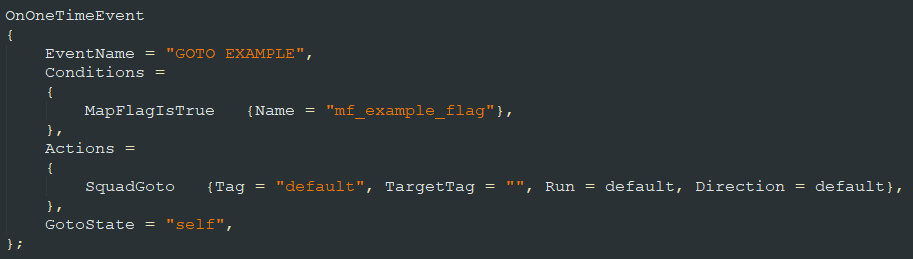
The time has finally come! Now, we are ready to get to the meat and bones of map making - scripting. Here, we will learn by example and create a very tiny scenario to ease you into creating your own scripts. To create LUA scripts, we will need the ability to edit file extensions, if you don't know how to do that - see File Extensions chapter in the Script Editors tutorial. From this topic on, I will presume that you have read, or are familiar with the previously covered topics in this tutorial. If you encounter any issues, don't hesitate to ask in Skylords Reborn Map Making Discord. • Content Creating the Map Setting up the Scenario Pt.1 Creating _main Script Scripting Pt.1 - Intro Outcry Setting up the Scenario Pt.2 Scripting Pt.2 - Moving the Goldwagon Next Chapter • Creating the Map To start off, we will need to create a map. I will be creating a PVE 1P map, but feel free to deviate. Decide on map size Set up the teams and player kits Place and assign starting position and monument to each player Don't forget about power wells Then save the map, and update the map description. I've named my map "Map Editor Tutorial". Now we have a playable PVE map. • Setting up the Scenario Pt.1 I've decided I want to make an escort mission (yay!). There will be a Goldwagon near the player's starting monument. The goldwagon must reach safety in the east. Depending on which way the player will choose, the goldwagon will follow his decision. This is what my layout looks like. For this scenario, I will not be designing the map past T2. Since the Goldwagon needs to be friendly towards the player, hostile towards the enemy, but not under player's direct control, I've added a new player to tm_Team1 and created and assigned a new player kit to him. Then, add a Goldwagon near the starting monument and add some fire enemies to every path. I've added two Rageclaws and two Gladiatrix to the north, and one Firesworn to the south. (I will explain why later.) Assign all the fire enemies to the pk_enemy1 and tm_Enemy1 so we see them as enemies in the game. (Don't forget to assign the correct team and player kit to the Goldwagon.) I also want to have a little surprise in the south, so I've added a cave. (Image rotated for better clarity) Now that we have the starting challenges in place, we can create the first script. • Creating _main Script Every map needs to have a _main.lua script. We will need to create it ourselves. If you navigate to your map folder, you will notice we have no script folder, so we will need to create that, too. Create a folder and name it "script1". Then open that folder and create a new text file. Rename the file to _main.lua and confirm. Here is a list of scripts we will create by the end of next chapter. spawn_defender2.luaspawn_defender1.lua_main.lua Now we are ready to start scripting. • Scripting Pt.1 - Intro Outcry Let's open our _main.lua script. It is harrowingly empty at the moment. But we can quickly fix that with snippets! Under BF-Events+State+Outcries, you will find the State snippet. When you double-click it in the list, it will create a State for us, like this. Since the StateName cannot be empty, let's name the state INIT, for example. Let's save the script, PAK the map and try playing it - remember, we will find the map in the Community Maps node of the world map. If everything is set up correctly, and you didn't make any typos in the script, you will be able to start the map. Great! Now that we've checked that everything is working, we can get around to the _main script actually doing something. In the same snippet library that we have the State, we have all the types of events available to us. Let's add an OnOneTimeEvent. OnOneTimeEvent is the most basic event available. This event will only trigger once, as soon as its conditions are met. Now, I want to have an outcry at the start of the map, telling us what we need to do. For that, we will need to search for MissionOutcry in BF-Actions library and insert it into the action block of our event. Set the text to something like "Get the Goldwagon to safety in the east!" and set the DurationSeconds to about 5 seconds. (Notice I've deleted the GotoState as I don't need it for this event.) Be sure to follow the correct formatting or the script will not work, or the game will crash. With our introductory OnOneTimeEvent set up, we can save the script, save and PAK the map, and return to the game to test out our outcry. For the future, I will assume you have saved the script, map and PAKed it after every change we do. This is the general workflow of scripting. Make changes to scripts Save the scripts Save the map PAK the map Test the changes in-game Close the game and repeat And everything is working, great! Before we continue, I will give you a list of most commonly used events. OnOneTimeEvent - triggers only one time, once the conditions are met. OnIntervalEvent - evaluates the conditions every X seconds, and if the conditions are met, triggers the actions every time. The game will start the timer immediately upon map start, so depending on when the conditions are met, you might have a delay in the execution of the actions. OnEvent - evaluates the conditions every tick, and if the conditions are met, triggers the actions every time. Use carefully as it will spam the actions several times per second. OnOneTimeTimerEvent - once the conditions are met, triggers the TimerStartActions and starts a timer, upon expiration of said timer, it will evaluate the conditions in TimerElapsedConditions, if the conditions are met, triggers the TimerElapsedActions - works only one time. OnTimerEvent - very similar to OnOneTimeTimerEvent, with the exception that once the event's timer expires, the actions get executed and the timer resets if the TimerElapsedConditions are true. I have run into issues of these events sometimes just spamming the actions, instead of reseting the timer properly. OnToggleEvent - this event activates when the OnConditions are met, in that case it will trigger the OnActions Once the event is turned on, it will wait for the OffConditions to be met to trigger the OffActions. The event will switch between on and off state and trigger the on and off actions every time the conditions are met. OnRespawnEvent - this is a special event, used to respawn killed entities. It can only be used in scripts named after tagged entities or script groups - we will look at this in detail a bit later. • Setting up the Scenario Pt.2 Now, let's set everything up so we can make our Goldwagon move. Almost every action and condition in BattleForge needs a target - be it a location on the map, or an entity. We label these important targets with tags. I want the Goldwagon to move south if my units move south, and for it to move north if my units move north. Once I've picked a direction, I don't want the Goldwagon to turn back and go the other way. Since we will need to somehow check where our units are, and where to send the Goldwagon to, we will need an object with a tag. We could place a small stone at the target area, tag it and use that as our target, but for these purposes, the game has special objects called Scriptmarkers - these are visible in the editor, but invisible in the game. You will find them in the Objects category in Entity Placement. Let's place one Scriptmarker Target near the fire units to the north, and one near the Firesworn in the south. Which Scriptmarker you use, or if you decide to use any other object instead, doesn't matter. Using the correct Scriptmarkers only makes the map more organized. Now, we will need to tag the Scriptmarkers - tag the one in the north target_north and the one in the south target_south. Remember the tag naming convention! Use only lower-case letters No spaces or special characters Don't use the tag "default" Tag things in english - you might not be the only one working on the map Next, we will tag our Goldwagon - goldwagon, we need to tag it, otherwise we are unable to give it commands or reference it in scripts. Now, save the map and let's do something with these markers. • Scripting Pt.2 - Moving the Goldwagon Return to our _main script. We need to create some single fire events, that will send our Goldwagon one way, or the other, based on some conditions. OnOneTimeEvents will be best fitted for this situation. First, I don't want the Goldwagon to go the other direction, once it has chosen its path. We can do that with a simple MapFlag. Map flags are one of the most useful conditions, and are the simplest to understand. Map flags can either be true, or false. Every map flag you declare automatically starts as false and we will use that to our advantage. Also note, that map flag names should start with the mf_ prefix. Now, we have declared one condition for our events. Right now, both of these events would trigger at the start of the game (Because the map flag starts out as false), and nothing would happen, because our Action blocks are empty. So let's add an action to both events, that will set the map flag to true. With this, once we have triggered one of these events, the other event will not trigger because of our MapFlagIsFalse condition. We will need further conditions and actions to complete our events. First, I will add a SquadGoto action to both events, the Tag parameter references a squad you want to move, TargetTag parameter references the target location. Then, we will need a condition to check if the player's units are near one of the targets. I have used TeamSquadIsInRange to check for squads of a given team. I have chosen the check range so that the Goldwagon (which is also set to tm_Team1, remember) doesn't trigger the events. Since we have only one human player on the map, more appropriate condition would be PlayerSquadIsInRange - this checks for squads of a given player, regardless of their team. With this, we don't need to take the Goldwagon into consideration when going to the checkpoint. I am only presenting you the different options you can choose, but the final choice is yours. Depending on how you set up the teams, distances between the targets and starting location, TeamSquadIsInRange might be more suitable for you, especially if you have multiple human players in the same team. Let's save and PAK everything, and try our script in-game. And indeed, the Goldwagon will go the way we choose first, and if we move our units to the other side, it will not turn back, excellent! • Next Chapter This is the end of the first part of basic events. Go grab a snack, something to drink and have a little break. When you're ready, continue to the second part of the tutorial. • Scripting Basic Events Part 2 •


.jpg.0d06cb45b58c350640787e20af8637f2.jpg)
.thumb.jpg.5aa0a2371ef7856ac77dd7c21c26e4aa.jpg)
.thumb.jpg.8c0092231eb6b9671b078f83c09abad2.jpg)
.thumb.jpg.9eed0807843f8e2f120c7ccbf9302429.jpg)
.thumb.jpg.c6d9a24b73aafc34694822959631b389.jpg)

.thumb.jpg.09b4d3dac380a0db0e25d82851e88126.jpg)
.thumb.jpg.115f226240c7a68e549ccf890680ca53.jpg)


.thumb.jpg.3080a6a6da45c9744b08f0482688ae78.jpg)
-
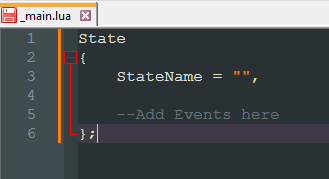
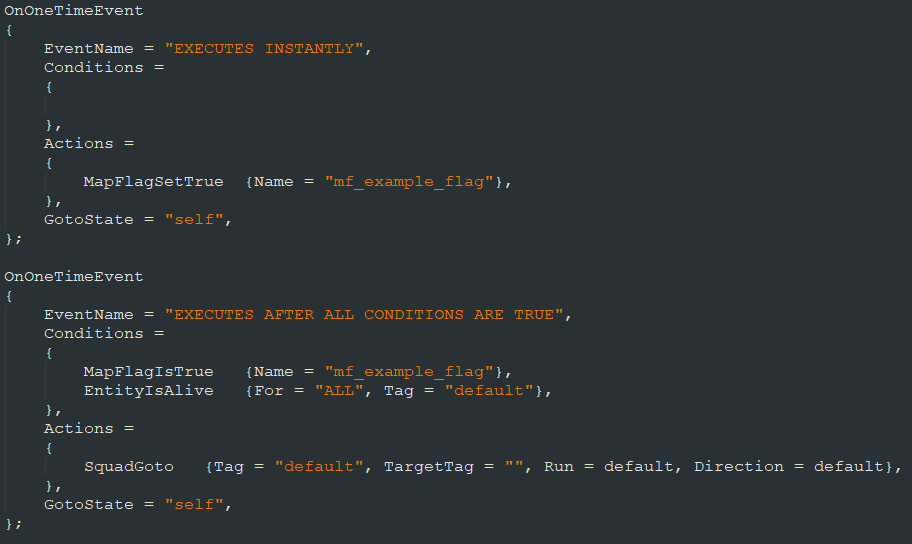
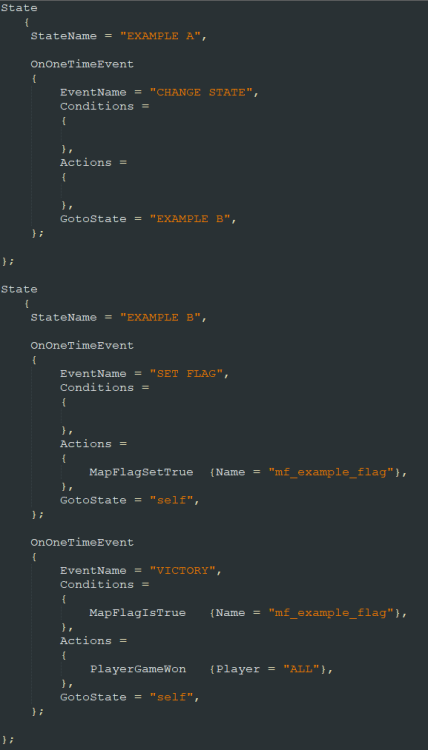
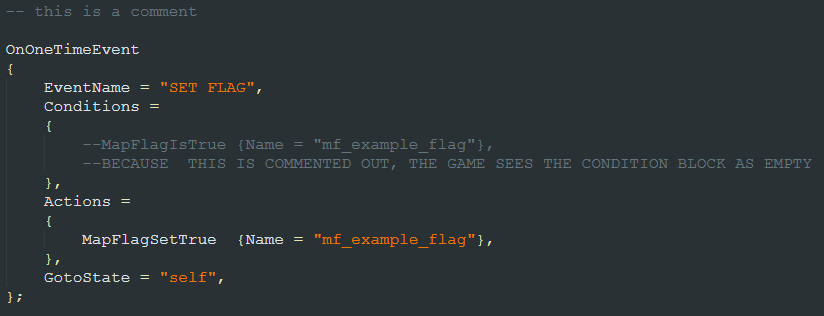
Welcome to the scripting introduction. Here, I will explain the basic principles of writing BattleForge scripts. This part focuses a lot on explanation of script structure and rules, if you are not interested in this, and you prefer to learn by doing - skip to the next part of the tutorial HERE. Just be aware that having solid basics can save you a ton of headaches when debugging your code. If you encounter any issues, don't hesitate to ask in Skylords Reborn Map Making Discord. • Content Script Structure States Events Conditions Actions Commas Next Chapter • Script Structure BattleForge uses LUA scripts to influence the map when playing. These scripts are not pure Lua, they use a customized version of Lua called BattleForge Script (BF Script for short). The name of the script can be whatever you choose, just follow these pointers. Use lower case letters Don't include spaces in the name Don't put any dots or special characters in the name File extension needs to be .lua All the scripts for a map need to be located within the script1 folder. To start off, I will provide you with an example script, so you can see what I am talking about. example_script.lua BattleForge scripts are state machines. The machine (or script) contains one or more states, and can switch between the states, but only one state can be active at any time. Think of it like a machine that can make either lollipops or baskets. The machine cannot make lollipops and baskets at the same time - you need to switch it from lollipop making state into basket making state, and vice versa. Within these states, we have events. Events are functions, that will execute actions once the conditions are met. Take a while to look at the example script and try to identify the states, events, and where they begin and end. • States The states are the basic building blocks of scripts. States don't do anything by themselves, but they are containers for events. The state starts with { and ends with }; Everything between these brackets are the contents of the state. An example: State { StateName = "Example State", }; Every state needs a name - you should not include any dots or special characters, and the name should be unique to that script. (You can have multiple scripts that contain a state of the same name, but you cannot have one script with multiple states with the same name.) You declare the name between the state brackets with "StateName = "State name here",". You need at least one state in each script, but you can have as many states as you want. Just be aware that, the more complex you make the script, the harder it will be to fix if something goes wrong. The script will start in the first declared state in the script (the one at the top). Functionally, the script can only be in one state at a time, so you will need to switch between states via events. Remember: Every state needs to have a unique name. Only one state can be active at any time - meaning the script will evaluate events only from the active state. Now this might have sounded a bit robotic, but the gist of it is, within your script, you need at least one state with a unique name, and you can put events that influence the map into that state. State is the only part of the script, where you need to have a semicolon ( ; ) after the closing bracket. • Events The events are the workhorses of scripts. They control the behaviour of maps, for example: casting spells on Nightmare Shard, sending attack waves, respawning enemies, timers etc. Similar to states, the events can be named. Contrary to states, the name of the event doesn't matter - it is there so you can label the event, quickly explaining what it does. You can have multiple events with the same name. Same as states, the event's contents are declared inside the { and }; brackets. Like this: OnOneTimeEvent { EventName = "Name here", Conditions = { }, Actions = { }, GotoState = "self", }; There are a number of different events you can use in your scripts, we will go into detail about them in the next part of the tutorial. At the moment, the important thing is this. All events have conditions and actions. If the conditions are met, the actions will execute. You might have already deduced what the GotoState parameter is for. Once the conditions are met, the event will execute the actions and switch into the state declared in the GotoState. You need to write the name of the state exactly as you have declared it. Note that not all events have the GotoState parameter. The GotoState parameter is optional, you can delete it if you don't intend to switch states in that event. The events contain actions and conditions, let's look at them now. Conditions Condition is a line of code that returns either true, or false. There are too many possible conditions to list here. The best way to find out what the conditions do, is simply by looking at their names and experimenting. Condition can have one, or multiple parameters. Some are optional, some are not. You can consult the scripting reference wiki for condition parameters and descriptions. Conditions are written into condition blocks of events. You can have multiple conditions inside a condition block - meaning that ALL the conditions written need to be true, for the event to execute its actions. You can also have no conditions in a condition block - meaning the event's actions will be executed instantly, because no condition is preventing the execution. Actions Action is a line of code that determines what the event will do - spawn a squad, destroy a building, send out an attack wave etc. There are too many possible actions to list here. The best way to find out what the actions do, is simply by looking at their names and experimenting. Actions are written into action blocks of events. Same as conditions, an action can have one, or multiple parameters. Some of these can get pretty long. You can consult the scripting reference wiki for action parameters and descriptions. All the defined actions will get executed in the order they are declared when the conditions are met. So if you, for example, want to spawn a squad and send it somewhere - make sure to declare the spawn action before the goto action. • Commas Notice the commas ( , ) at the ends of most lines. These commas are not optional, they separate the different blocks of code from each other. You need to put a comma ( , ) or semicolon ( ; ) after every Closing bracket } of an event, action block, and condition block Parameter inside a condition or action Extra parameter - such as StateName, EventName, GotoState and others You need to put a semicolon ( ; ) after the closing bracket } of every state. Personally, I use commas inside an event, and semicolon after the closing bracket of an event. Look at the example below (or any other examples), and notice where the commas and semicolons are written. To reiterate, States are the only parts of the script, where you need to have a semicolon ( ; ) after the closing bracket. • Next Chapter This concludes the scripting theory. It was a bit boring, I know. But in the next chapter, we will go over how we can create a fully functional script, and influence enemy squads placed on the map. • Scripting Basic Events Part 1 •


-
In this part, we will go over how you can import a heightmap image into the editor. Sometimes, you want to have a symmetrical map, or just want to create the layout of your map really quickly. You can do that through creating a heightmap in an image painting software first, and then importing it into the editor. If you encounter any issues, don't hesitate to ask in Skylords Reborn Map Making Discord. • Content Creating a Heightmap Importing a Heightmap Calculating Height Measuring Distances Return to Mainpage • Creating a Heightmap We will need to create an image to serve as our heightmap. Heightmap images are black and white - with black being 0 height in the editor, and white being the max height we set when importing the map. In general, you don't want your heightmap to include black color, or have it too dark. If you change your mind about the layout later and want to add some deep chasms, you might find that you don't have enough height left for that. Before we make a heightmap image, we actually need to decide on the map size first. The reason is that the heightmap resolution MUST be the same as the size of the map. Why? Because every pixel on the image is equal to one node of the terrain in the editor. The red dots on the image are the terrain nodes. If you have a different number of pixels in the image than the map size, the editor cannot use the pixels to deform the terrain nodes. So stick to 256x256 images for 256x256 sized maps, and 512x512 images for 512x512 sized maps. When painting the heightmap, I would recommend painting with sharp pixels. If you paint smooth transitions between pixels, the results in the game might not be what you desired - the cliffs generated will be staggered like stairs. For clean cliffs, you need to have sharp pixels. This is the heightmap I made for the sake of this tutorial. Now that we have a heightmap image, we can import it. • Importing a Heightmap You can import your heightmap through File -> Import Heightmap... When you select the heightmap you created, you will be greeted by this window. In here, you can set what white color means in terms of height - note that in this dialogue window, the height is in meters, while in the Height and Cliff tools, the height is in centimeters. If you have incorrectly sized heightmap, you will get an error when hitting Apply. We, however, have created a 512x512 heightmap for 512x512 sized map, so our heightmap is imported successfully. There is one unfortunate thing, and that is we have no cliffs generated. Units will be able to walk over all of these steep hills. To fix that, we will need our Terrain Cliffs tool. In there, set up the cliffs you want to use, and with Attach Manually function, paint the cliffs over all the steep terrain. This is where you might notice the difference between sharply painted pixels, and "smooth" pixels. On the left are cliffs generated by smoothly transitioning pixels. On the right are cliffs generated by sharply painted pixels. You might have to clean up the map after importing your heightmap. If you made any mistakes in the heightmap, simply fix them in the image and import the heightmap again. • Calculating Height Further down the line, you might need to calculate the map height precisely. We will need math for that (eww). White color has an RGB value of 255 - when importing, you are asked what white color means in terms of height on the heightmap. Well, we need to decide on how high each point of RGB value will be - I suggest a nice, whole number such as 20 or 25. When you want your ground to be 5000 centimeters high, and cliffs to be 6000 centimeters high, you can calculate the value you need to use to paint the proper height. I will give you an example. I have decided on height of 25 centimeters per 1 RGB value. And I want my ground to be 5000 centimeters high and cliffs 6000 centimeters high. Then I divide 5000 by 25 to get the RGB value of my ground. 5000/25 = 200 So I need to use RGB value of 200 to paint height of 5000 in game centimeters. To paint my 6000 centimeters high cliffs, I need to calculate the same equation. 6000/25 = 240 So to paint 6000 centimeters high cliffs, I need to paint a RGB value of 240. Now I need to calculate how high the 255 RGB value will be. Simply multiply 255 by 25. 255 * 25 = 6375 So, when we want to import our heightmap, we need to specify that white (255) means 6375 centimeters, or 63.75 meters. • Measuring Distances I will flat-out tell you, that one terrain node - or one pixel - measures 1.4 meters in game. To measure distances in the image editor, you will need an editor with the measure or ruler functionality. Make sure to set the tool up so it measures in pixels. Afterwards, measure the number of pixels between two points and multiply the number by 1.4. • Return to Mainpage You can return to the Map Editor Tutorial homepage from here. • Map Editor Tutorial Homepage •


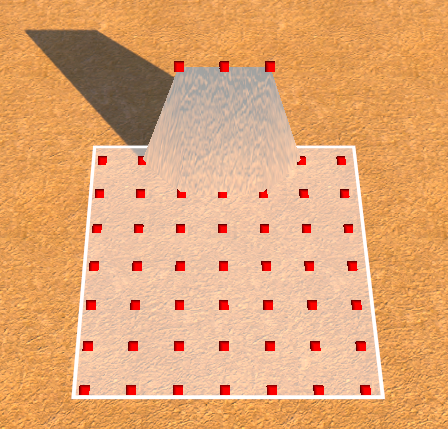
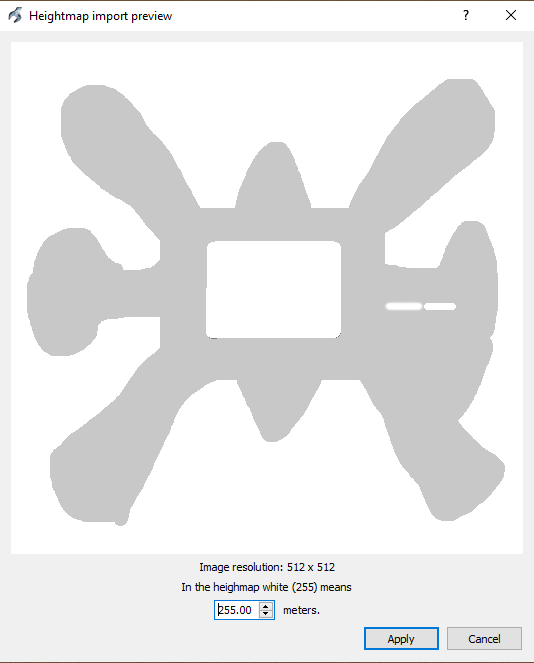
.thumb.jpg.7058fc4b6373e5e54ef7d94a0c0337b4.jpg)
.jpg.40381cc3de857e0abb571077789f6ed0.jpg)
.thumb.jpg.be258f8b482a586dcccadffeb5f36736.jpg)
.jpg.a2fc43a6ffa291e6aeecb75217bc86a0.jpg)
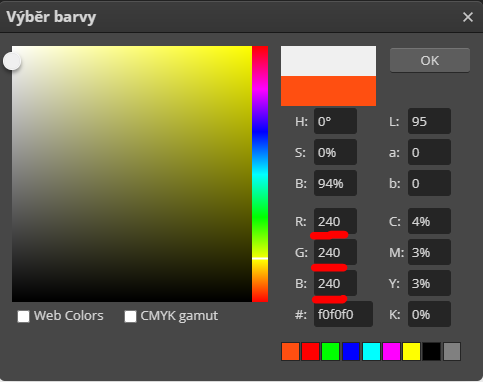
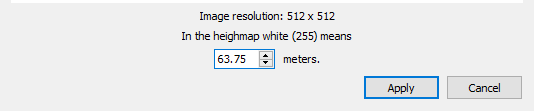
-
How you texture the terrain is probably the most important visual aspect of the map. It may not seem like it, but 90% of the time, players look at the empty spaces of the map - the playable area. Due to the nature of playable area, it should be sparse in visual clutter, but still look interesting - we can achieve that with texturing. Since textures are such a big part of map feel - I've also included a chapter with some texturing tips. This is where we diverge from the correct order in which you should do things when working on a proper map. For a fully fledged map, you want to have an idea and interesting map mechanics first. Make that map as bare as possible. Set up the players and enemies, block out the layout with cliffs, and then script the functionality. Otherwise, you may find that you need to delete hours of your work, because you made the map pretty, before you made it functional and fun to play. Because we are gradually exploring the tools available to you, the tutorial continues with how to work with the map visuals. If you want to get to the functional part of the tutorial, skip to the Scripting topics. Just remember - function first, make it pretty later. If you encounter any issues, don't hesitate to ask in Skylords Reborn Map Making Discord. • Content Texture Tool Working with Layers Layer Setup Texturing Texturing Pointers Base Layer Gradients Borders Next Chapter • Texture Tool Let's have a quick look at the Texture Tool window. It is split into 3 areas. Area 1 is the Layer Setup area Area 2 is the Texture Atlas Area 3 is the Brush Settings If you don't see area 2 you need to press the Arrow Button (4) on the right of the window • Working with Layers The game uses Layers made up of different textures that you can apply to the terrain. If you are familiar with photoshop, you will understand this from the get go. The basic premise is that the layers at the top of the list are drawn over all the layers that are below them in the list, creating a hierarchy. The layers don't interact with one another, they are stacked on top of one another. You set up these layers in the Layer Area (1) with the components (textures) found in the Texture Atlas (2). We can create a new layer with the New button and copy it with the Duplicate button. There are also buttons to Load and Save a layer setup as a Prefab. When you create a layer setup you like, you can save it and then load it into another map to save yourself some time. The rest of the buttons are self-explanatory. When you find that you need to rearrange the layers, you can click a layer and drag it above/below another layer to change the hierarchy. To ease our work even more, at the top of the layer area there are some useful buttons. Load Layer Set - will load a preset of layers there are default layer setups for the greenland, frostland and wasteland layer sets Save Layer Set - will save your current layers into a layer set you can load the layer set into another map to get access to the same layers as they were set up With these buttons, you can get quickly up to speed by loading a previously used layer set you liked. The Export and Import buttons are used to export the textures as they are painted on the map itself - meaning you can save the painted map and paste the textures as they were onto another map. You will probably never use this functionality. • Layer Setup Each layer is made up of several textures from the texture atlas. One from each category: Color - determines what the texture looks like Blending - determines how the texture will blend when painted Essentially what border it will create, NOT how it will blend into other textures Normal - determines the 3D effect of the texture, it's highlights and shadows, so it doesn't look so flat Specular - determines shininess High specular means the texture will be very shiny - look metal-like, low specular textures will not shine and will look more dirt or grass-like The only required texture is the Color texture. With a layer selected in the layer hierarchy, you can pick whichever combination of textures you like from the texture atlas to create your unique layer. Color, Blending and Normal textures have the highest visual impact on the layer. You can usually get away with the default Specular texture. Buttons at the bottom of the texture atlas are not important for working with textures. • Texturing When you think you have set up a layer that you like, it's time to try it out and paint it on the map. There are two modes in which you can paint your layers - Texturize and Texturize additively. In either mode: Paint the texture onto the terrain with Left Mouse Button Erase the texture from the terrain with Right Mouse Button In Texturize mode, you will paint and erase the texture INSTANTLY to the Opacity set in the brush settings. In Texturize additively mode, you will paint and erase the texture GRADUALLY by the Opacity set in the brush settings. I have created a layer from these textures to demonstrate. With the Texturize mode, I painted this beautiful piece of land. The Color texture I set means the texture is green. The Blending texture I chose creates that interesting blend (border) at the edge of the painted texture. And the Normal texture is what creates the effect of 3D cracks in the texture. If I were to paint the layer with a lower opacity - in this case, because of the Blending texture - the cracks in the grass would gradually disappear the lower I set the opacity. By now you might feel a bit confused by the Texture tool, it is one of the more complex tools in the editor after all. Play around with different layer setups and with how the different painting modes work, and you will get the hang of it in no time. • Texturing Pointers I also want to include some advice about texturing. I'm not the definitive authority on this, I am still learning more tricks and what makes a nice looking map. So don't take these tips as etched in stone. Experiment on your own and find something that works for you. You can learn a lot and gain a better feel for the original developers' work, simply by analysing the campaign map's visuals. Just get in game, play the map and then pause in the replay. Explore and analyze what the original devs did and why. As a general rule, though, simplicity seems to be the king when it comes to BattleForge map art. • Base Layer The bottommost layer in the layer hierarchy is the base layer. This layer is automatically applied over the whole map. Naturally, using it well can save you a lot of time when texturing, but there are some things you should do. If you want it to cover most of the map - the base layer should have a Color texture that doesn't have any major details - look at the greenland grasses or dirts to see what I mean. They are almost singular color with only very minor details and contrast. The Normal texture of the base layer should be something very decent - almost flat. You might be wondering why would I make the base texture essentially as boring as possible. Well, that's because you want the playable area to be as clear as possible. Including large contrast or a lot of details in the texture that is all over your map, means the players' eyes are constantly bombarded by information about detail - leading to visual fatigue and generally unappealing maps. Just look at the difference between these two images. You cannot really grasp the difference, until you see these textures over the entirety of your map. This principle can be generally applied to any layer that you want to use on larger playable areas. Apply high-detail layers with care. Note: I know everything visual is highly subjective, but trust me - having large areas of detailed textures with strong normal textures will not feel appealing to a lot of players. If you want your maps to feel truly BattleForge-like. There are two general principles that the original devs seemed to go by. I will name these principles Gradients and Borders. • Gradients Gradients are used to break up the monotony of larger spaces, that use a single texture. What you do, is create an underlying layer - let's say smooth grass. Then you create a new layer above that underlying layer - with the Color texture of a slightly different color than the underlying layer. Let's call the underlying layer the Basic Layer (not to be confused with the Base Layer) and that second layer on top the Gradient Layer. The Normal texture of the Gradient Layer is generally the same as the Basic Layer. Blending texture of the Gradient Layer would be the greenland 000 blending texture. An example of two textures with suitably different colors - greenland 004b and greenland 001. You then Texturize the Gradient Layer on top of the Basic Layer with different Opacities, creating a linear blend from the Basic Layer to the Gradient Layer. You don't have to go from 0% to 100% Opacity, I usually paint about 20% opacity area, and inside I paint a smaller area of about 30-50% opacity. When you combine the gradient principle with the height tool to deform the terrain, you will get a result that is much more visually interesting than a flat plane of one color - while keeping the playable area clean. Note: When you deform the terrain based on the color of the texture, it can create more pronounced ridges and valleys. Add some cliffs, smaller 3D details with rougher textures around them and within a couple of minutes, you can have an interesting little scene. • Borders Borders is how the original devs eased a transition between two textures. The easiest example can be seen, when we want to add a road to our little scene. Pick a Color texture, choose a nice Blending texture (usually one that has smaller blend area) and paint the road. While there is not much wrong with this, and you can get away with it, the transition between the grass and the dirt feels kind of flat. Well, let's fix that. We can duplicate the dirt texture - that way we'll have it set up exactly the same. Now we just choose a different Normal texture, that will have some more roughness to it, and we apply it at the edge of our dirt road. As you can see, the dirt road now looks more interesting, believable and BF-like. If we wanted to impove the scene, we could add some more 3D details. And definitely some textures along the cliff's upper and lower borders. But you can do that on your own. • Next Chapter In the next chapter, I will tell you how to adjust the size of the playable area, and create a nice, basic minimap. • Adjusting the Playable Area and Minimap • Alternatively, there are some extra topics about working with the map that are not that important, but can be very useful. You can find them back on the Map Editor Tutorial homepage. • Map Editor Tutorial •
.thumb.jpg.2ec92f71186660228c08f90e9c77b5de.jpg)
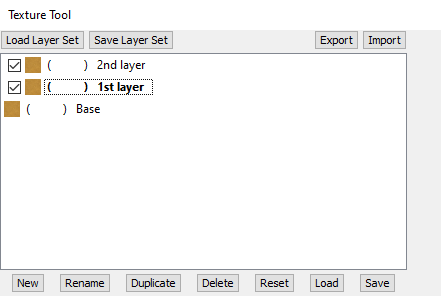
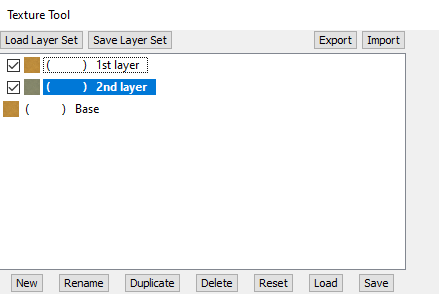
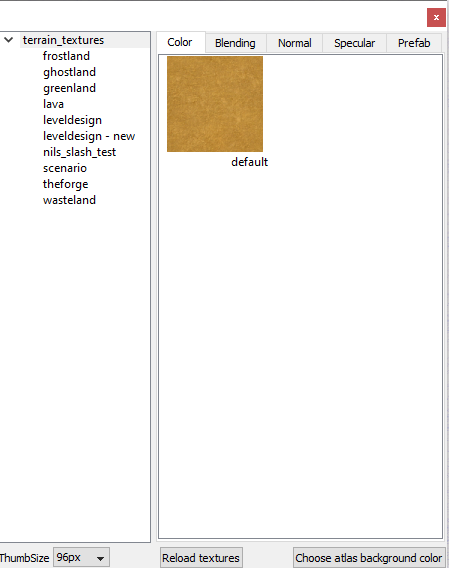

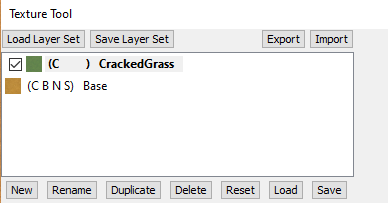
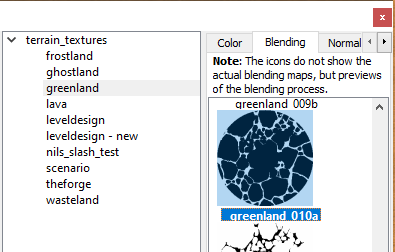
.thumb.jpg.1dfbb1add83b667187da7da90d9a5319.jpg)

.thumb.jpg.61ceb43586812a47958d811b6d88958c.jpg)
.thumb.jpg.30120ce55eb4fbbee0f27e61617e669c.jpg)

.thumb.jpg.e1cb1b261c28281db7ce7a5c0075f2f0.jpg)
.thumb.jpg.9f9526b441a5ae9781934347ec216603.jpg)
.thumb.jpg.928f8376d56487d8faa845cc3f38ff34.jpg)
.thumb.jpg.15a6e35b503a2ad2818efc7c23a1fa86.jpg)
.jpg.4e087eb1fdd8461f9a775b60a2df9f93.jpg)
.jpg.842ac8ab4862a0f68e8f0c564f102398.jpg)
.jpg.531907934d827c2506d1de89187309d3.jpg)
.jpg.f14bdcefbbb43df72ea9bcdcdff33c9a.jpg)
.jpg.f1e6a6ec6da6d919ee33f0163e7d8f3f.jpg)
.jpg.89c29411a92b9b31beb97bb8a03ad21b.jpg)

.jpg.0462b9d36f00d897ada1ef254c32df3b.jpg)
.jpg.78533c7207281f131dd09303fadfb7ef.jpg)
.jpg.a65e5c7487b52f9511bf315cea659ad1.jpg)
.jpg.4bc310447a67ee8cf9f40900faeb30e9.jpg)
.jpg.df183da87a83295c9b1b9fb736c560c1.jpg)
.jpg.a26e84d217eb018fd28e217f01e1400d.jpg)
.jpg.a3bf2286f00bd39a4bce2e8daac9affd.jpg)
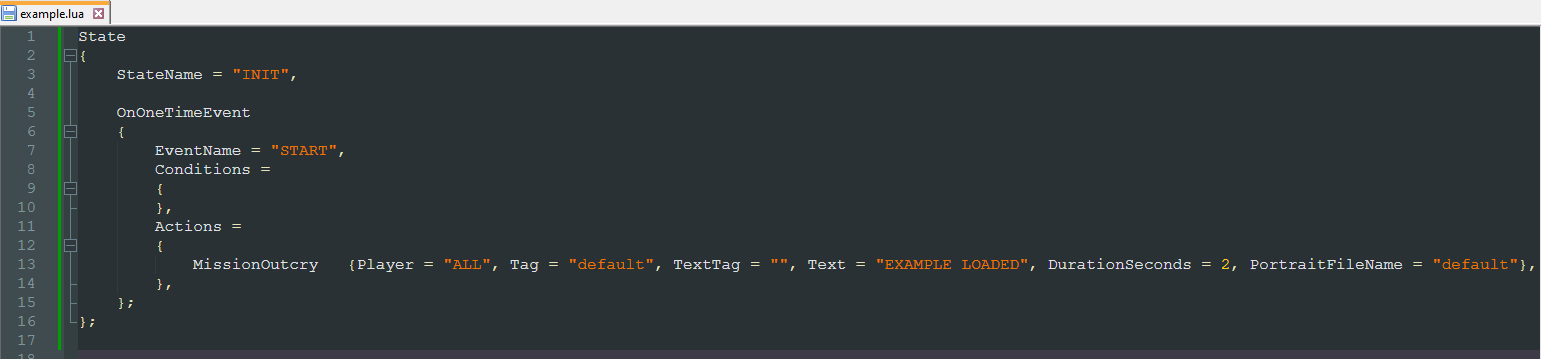

.jpg.5e11ad471caba78360e79330992d01f0.jpg)
.jpg.45068e5ecec7daa9715175b7d0274b46.jpg)
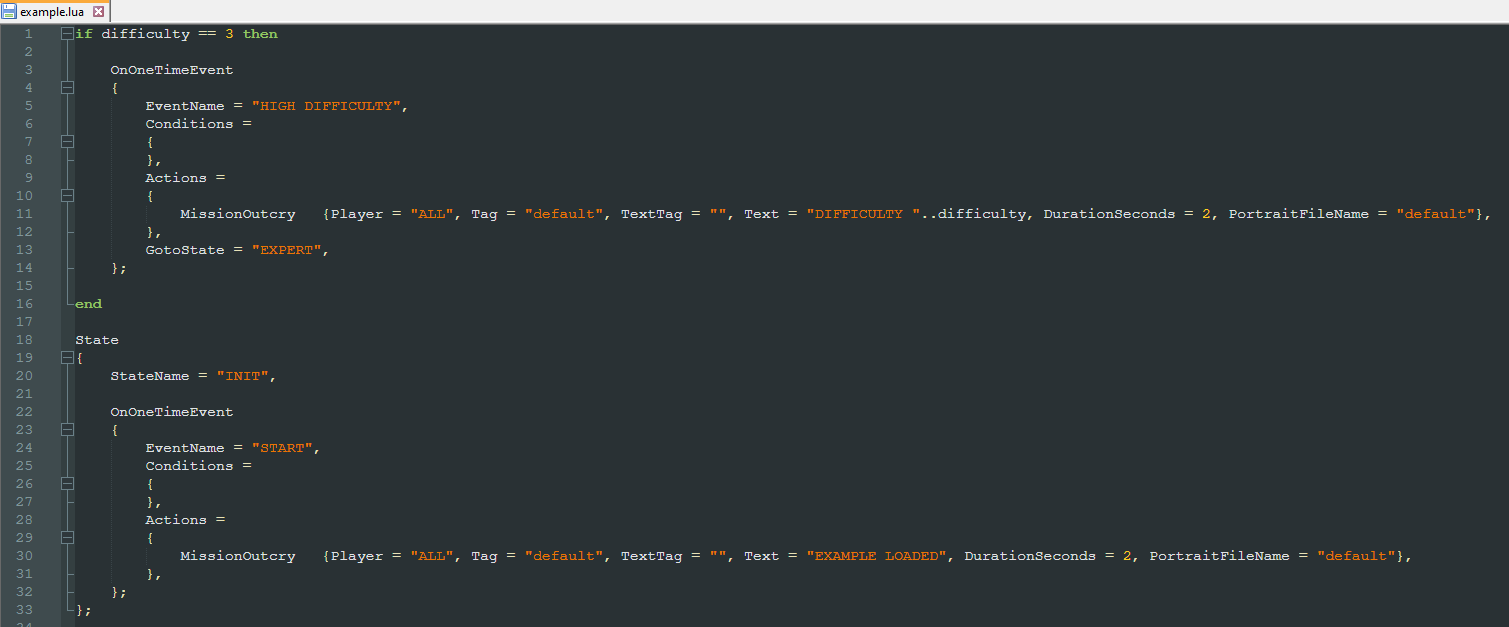
.jpg.6bc473778e147cb1010672809563af56.jpg)
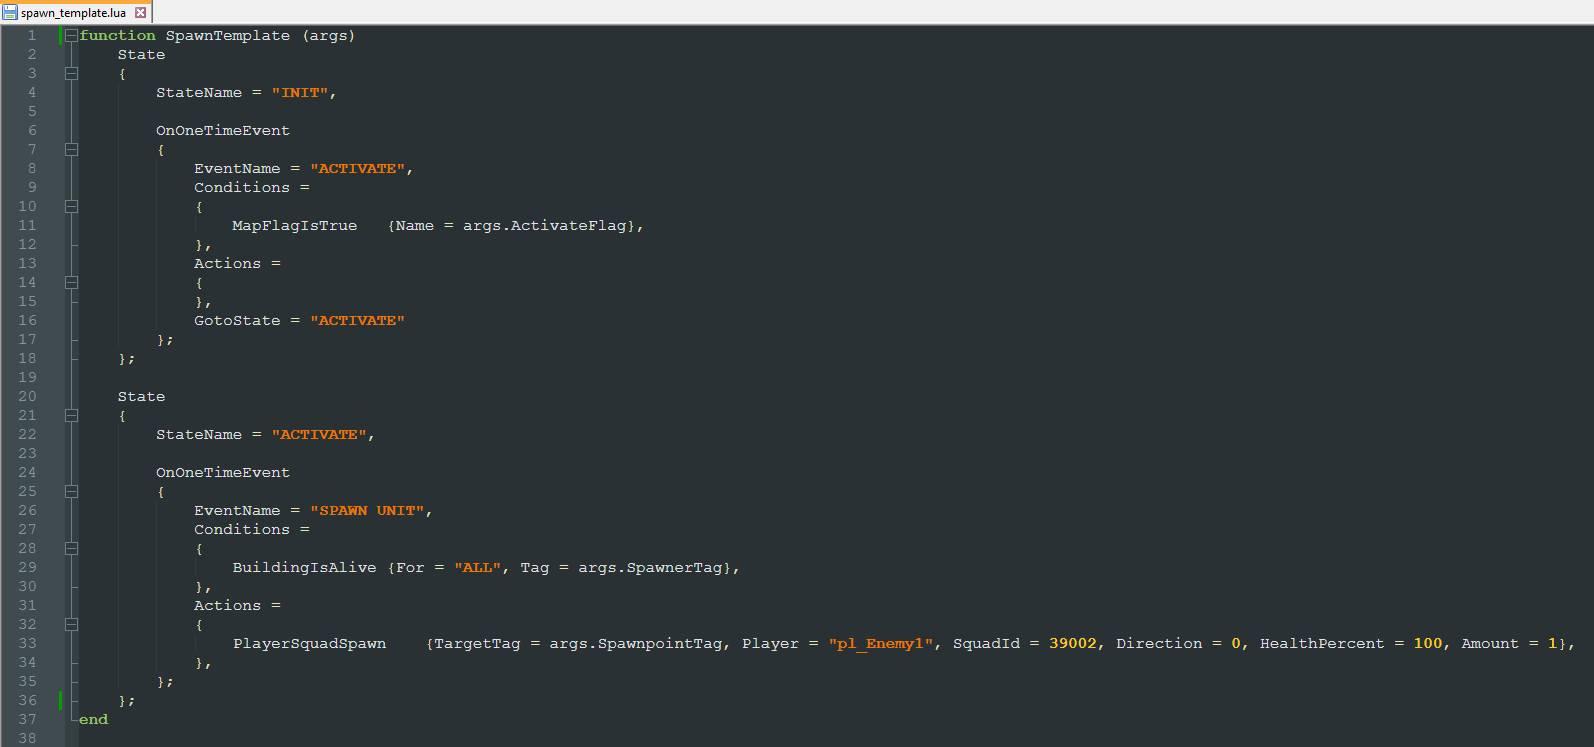
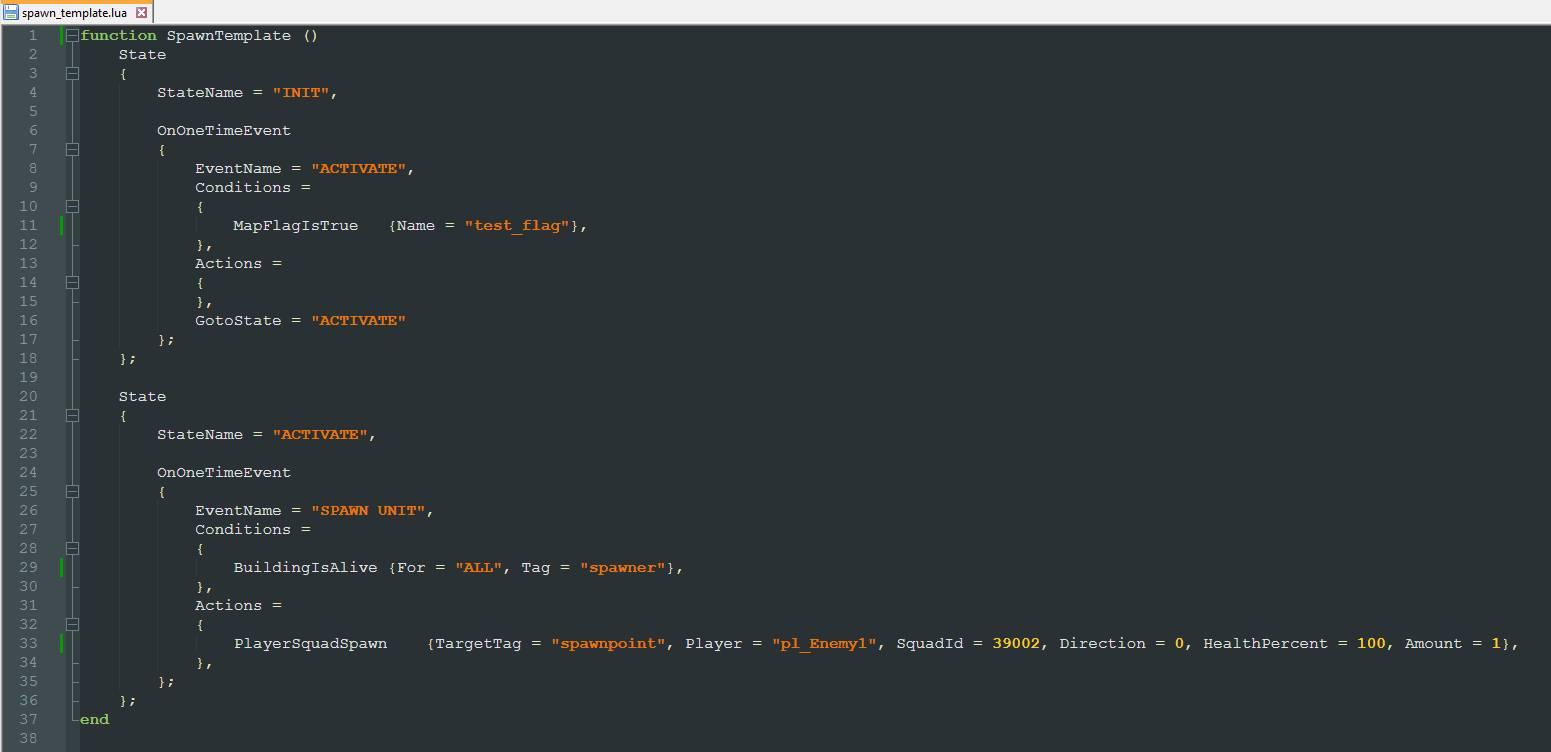
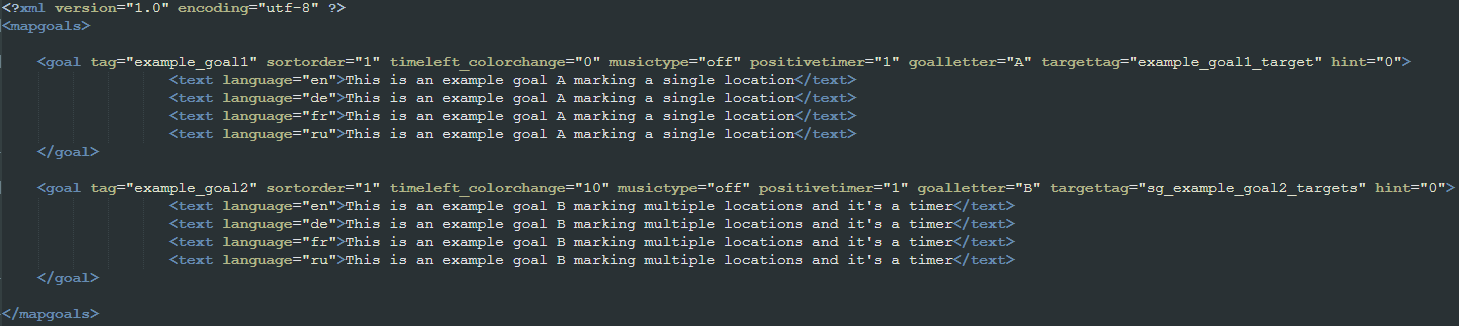

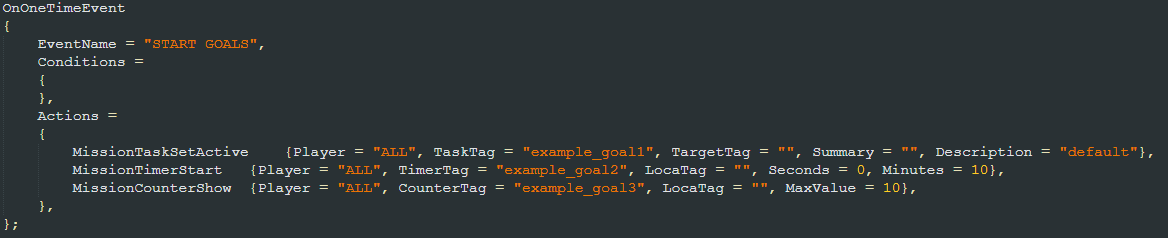
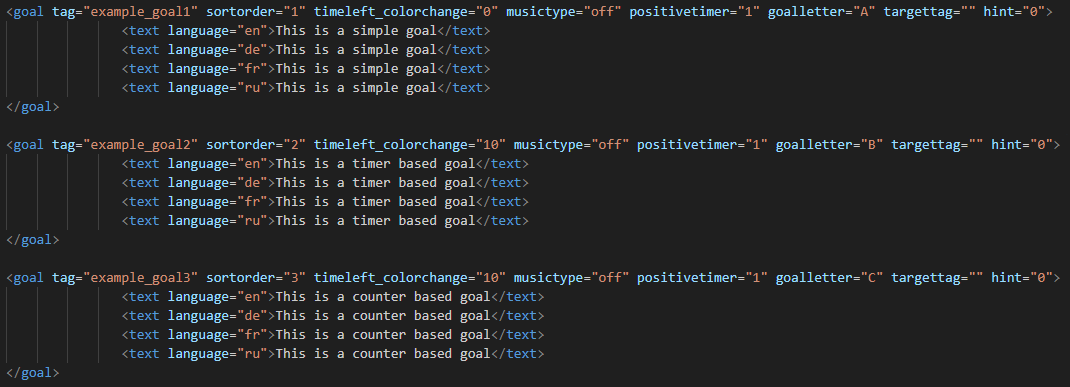
.jpg.31d63fac01fd82e88af21e952bdbf853.jpg)


.jpg.3331139cc5c65d19c1be64460520ccee.jpg)
.jpg.c45eeaa8ed3e670e0c63fff45864e359.jpg)

.jpg.80e21a7b46644f419b2781e65452e27e.jpg)
.jpg.a22a8e2952659e11f183d3dd015e3cc7.jpg)
.jpg.9a4a849a84f092ad1fba2620b764bf93.jpg)
.jpg.fd9bed2745ec50e198d8d201ca76fe38.jpg)

.jpg.f4ee5c3588f6172d13f4180c3902a414.jpg)
.jpg.48f588b2572854886f6580e05cad9f77.jpg)

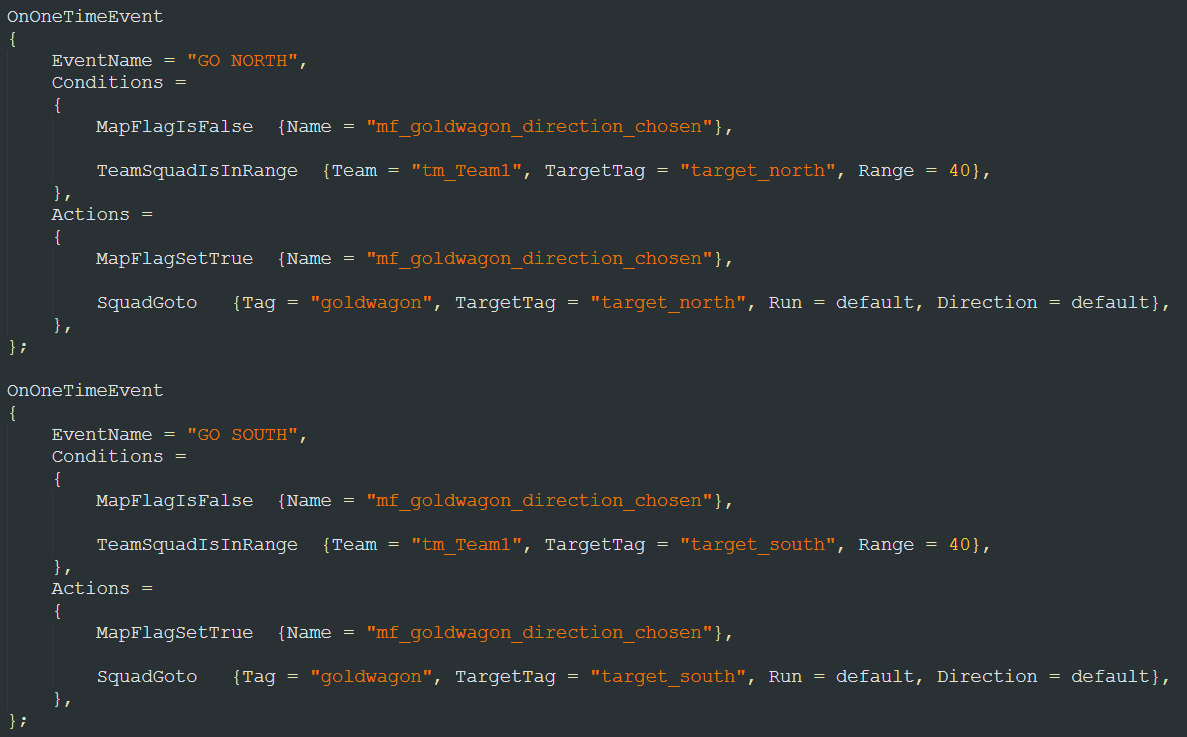

.jpg.3a86716f7e4ebb081911a03fa205c259.jpg)


.jpg.3a2244be464fde1e83e7c4c844bf6539.jpg)
.jpg.7b6d3c1e559ae1af7ccaa92389a56c5f.jpg)
.jpg.f94732293fde2e1c4a7335ca58a8ab82.jpg)
.jpg.f36437dd786e18ebb557c51d8e55bb46.jpg)
.jpg.1e0e3f0e27c41c682b5483e3717c2376.jpg)
.jpg.ceeeb1d78ec7893b6acd525193bcc561.jpg)
.jpg.a962cd2bd00d1b9c02dae5590bfac450.jpg)
.jpg.4afc2ab8a637e4dbff9da2a8dbe6567c.jpg)
.jpg.48a99ad4280f89b506652dfd09ecd647.jpg)
.jpg.4b32e662b57e5a574a28ea6747997fd0.jpg)