WindHunter
-
Posts
340 -
Joined
-
Last visited
3 Followers


About WindHunter

- Birthday January 29
Recent Profile Visitors
6409 profile views


WindHunter's Achievements
")
Reaper (15/34)
593
Reputation
-
Making both affinities of a card equally viable is a difficult task. It is something we have achieved on probably less than 20% of all cards with affinities. It is also why we do not add affinities to a lot of the new cards we introduce into the game, because we do not want to contribute to an already substantial problem. In terms of Banditos, I think it is fine if the green affinity's primary use is in combination with Corsair. But even then, I think you underestimate how important damage scaling is on S-units. While Bandits might lose to Thugs in an army vs. army match-up, this is hardly representative of scenarios players will encounter in PvE. The new Girl Power (Fire Force) will provide damage reduction scaling, giving Banditos more survivability, while the natural limitations of melee S-units means more damage per squad member is one of the highest prized stats. Melee units have an attack limit against enemies and S-units are the ones most affected by this. There reaches a point where more squad members simply cannot attack the enemy. The damage scaling of Banditos is a creative way around this limitation. Will this be enough? Honestly I am not sure. Melee S-units will likely never be top tier strategies, there are simply too many structural issues at play for them to thrive. But we are hoping they become viable, which is a different standard entirely.
-
First of all, great post. You did a good job of analyzing the state of the card and you did so through the lens of the existing literature we have on card rarity and the Bandit faction. We as a dev team agree with your assessment and we actually have proposed some Banditos changes for next patch in our official card balancing discord. Banditos - Iteration 1 1. Alliance friendly unit requirement: 3 per stage ➜ 2 per stage 2. Blessed Alliance Rework: A. No longer based on nearby enemies. B. Now grants increasingly more damage reduction based on number of friendly units nearby. C. Description: "The unit will be incited to resist more damage when being surrounded by friendly units within a 25m radius. Per every 2 friendly ground units around them, Banditos will receive 20% less damage up to a maximum of 6 units that will spur them on." With these changes we want to buff the swarm aspect of the card by giving them access to their scaling buffs earlier. We think this is a better approach than trying to turn Banditos into a trading card or a one-unit wonder. As you pointed out, the blue affinity simply lacks the tools to be an anti-swarm card, so we are giving it scaling damage reduction, like the red affinity has a scaling damage increase, and making it into a swarm card as well. We have also proposed changing Girl Power into a melee unit swarm support card on our balance discord. If these changes both go through, we hope it will help to carve out a new melee swarm archetype in Fire T2 splash decks. We also know this will constitute an indirect buff to Corsair, and we think that is perfectly acceptable.
-
It is the same dancing flame, yes. And glad to hear you are enjoying the game, that is really why all of us continue to do this.
-
Defensive random PvE has been on hold while we work on campaign maps. We plan to get back to it once we release our first set of maps, hopefully sometime in the summer.
-
Elemental Mastery Suggestion - Megathread Our intention as a team is to create a new category of mini-achievements specific to each faction called elemental masteries. These masteries will be split into two categories: Individual - these will track specific card actions, such as the number of spawns erupted to death. General - these will will track player progress with the overall faction, such as how many maps a player has completed with Pure Fire. Each category will reward minor rewards along the way, mostly in the form of faction-specific cosmetics. Our goal is for this topic to function as a brainstorming area for which masteries we want to track. The goal is for each faction to track 5 interactions per tier, as well as 5-10 general faction progress trackers. We are interested in the community's ideas for what types of card actions they would like to track, with focus on things which are commonly repeatable. Focus can be either PvP or PvE, though the final choices will be a mix of both. Examples of Trackable Actions Due to recent advancements in our understanding of the game, we can track most internal and external card interactions. Below are a list of some of these trackable events, all of which have been taken from Fire cards. Number of units charged by Enforcer Enemy spawn buildings erupted to death Buildings suppressed (Sunstriders + Suppression) Enemies knocked back with Lava Field Total time Batariel has spent in his stage 3 burning phase Total damage dealt by Fire Dragons Void returned with Shrine of War Further Discussion Brainstorming is also taking place in our official discord dedicated to discussion of card balancing in Skylords Reborn. Please join us there if you would like to see more elemental mastery suggestions or if you would like to participate in discussions relating to proposed changes to the game before they happen.

-
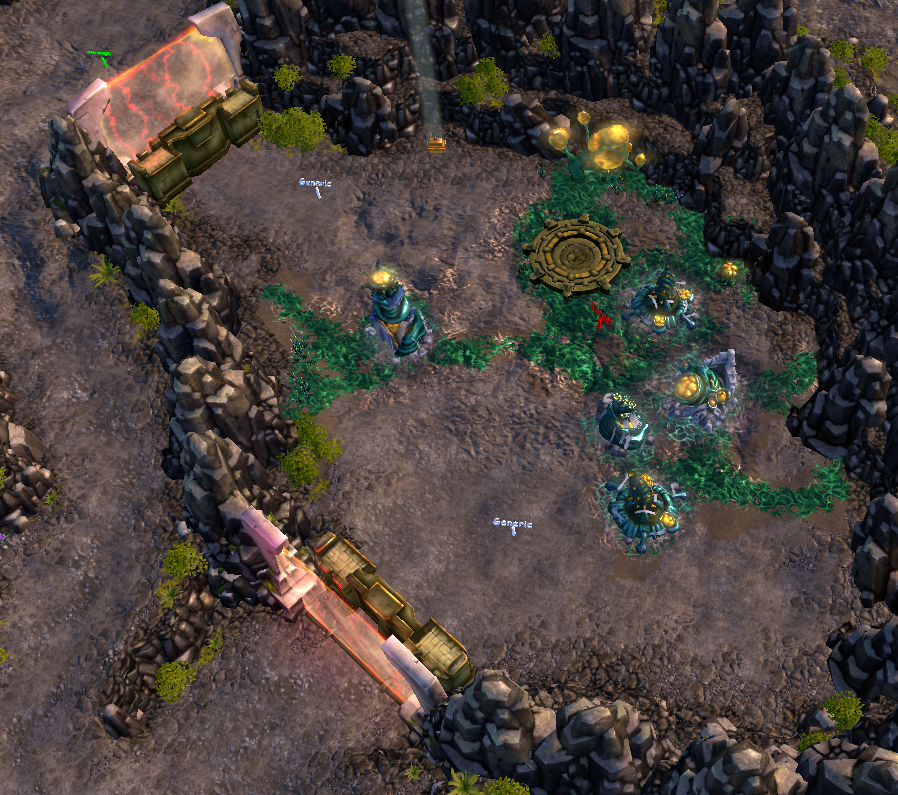
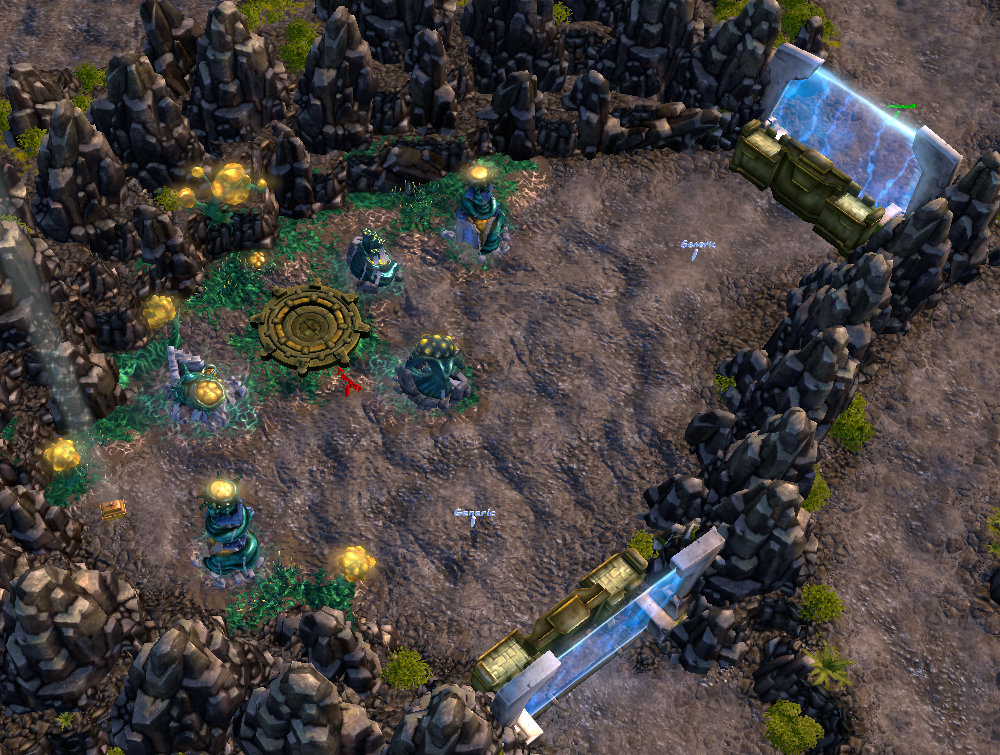
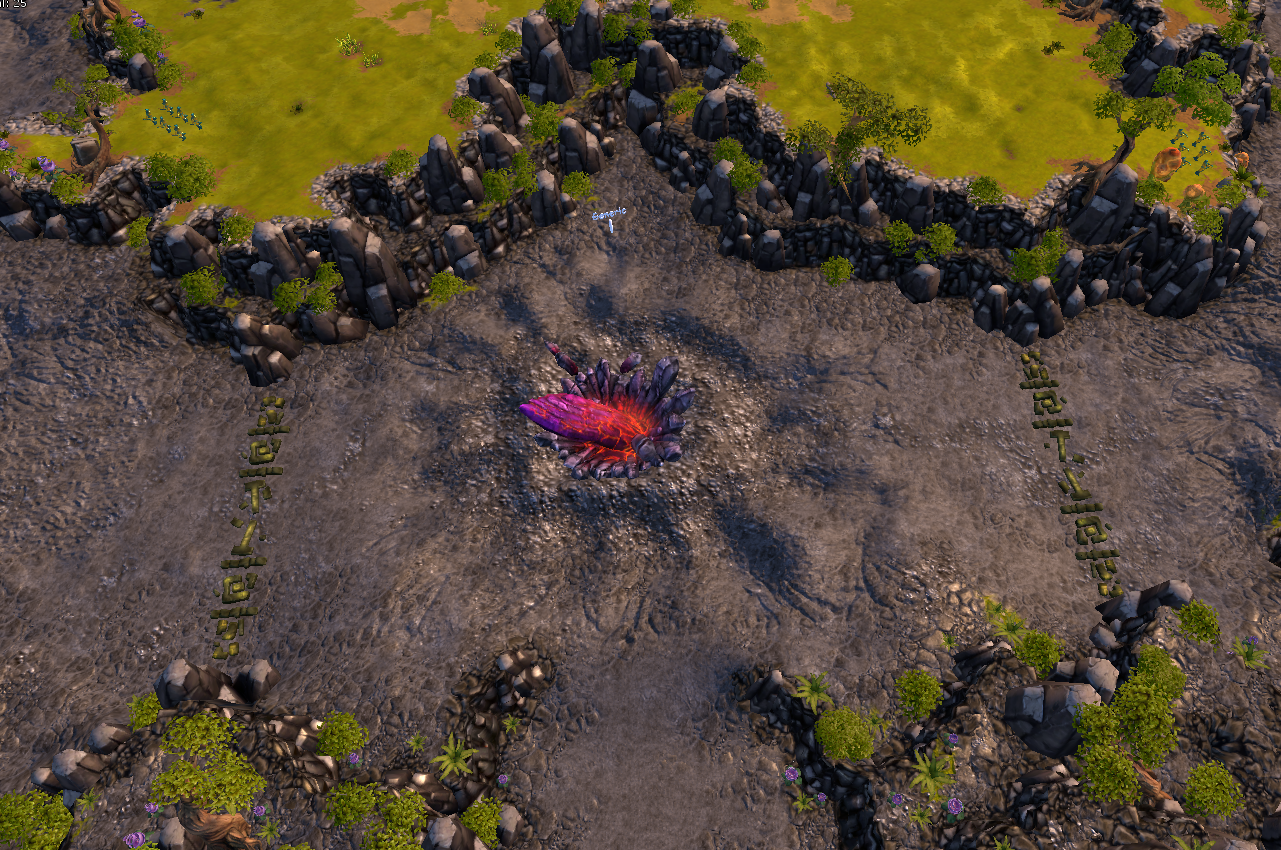
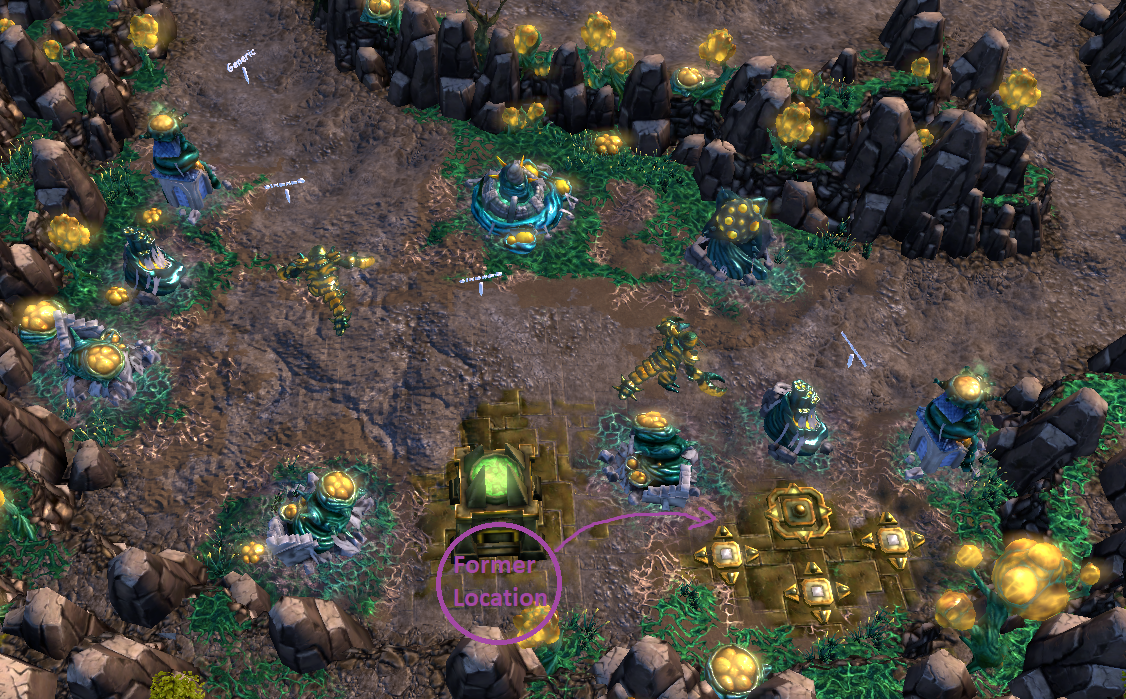
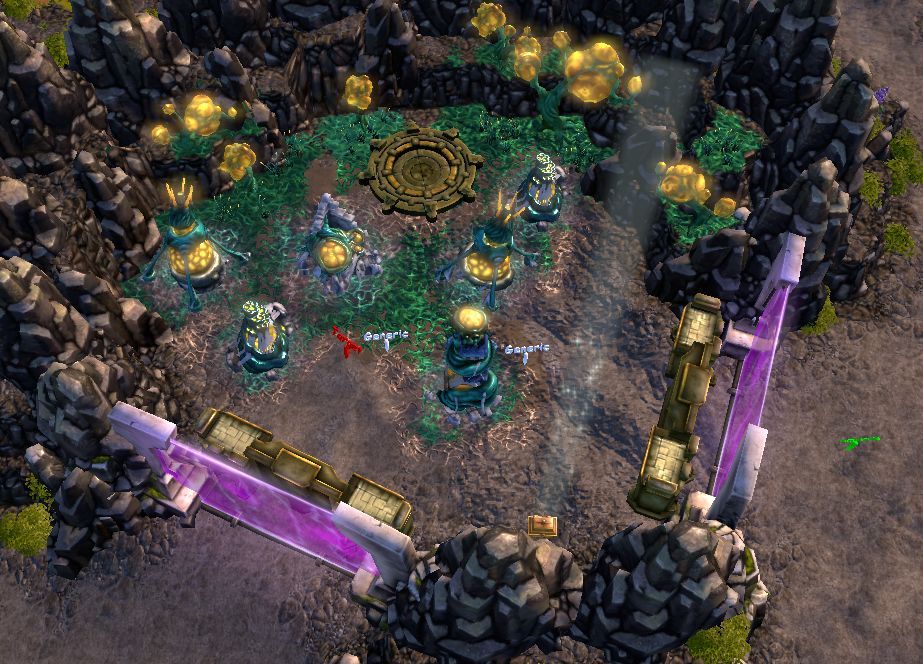
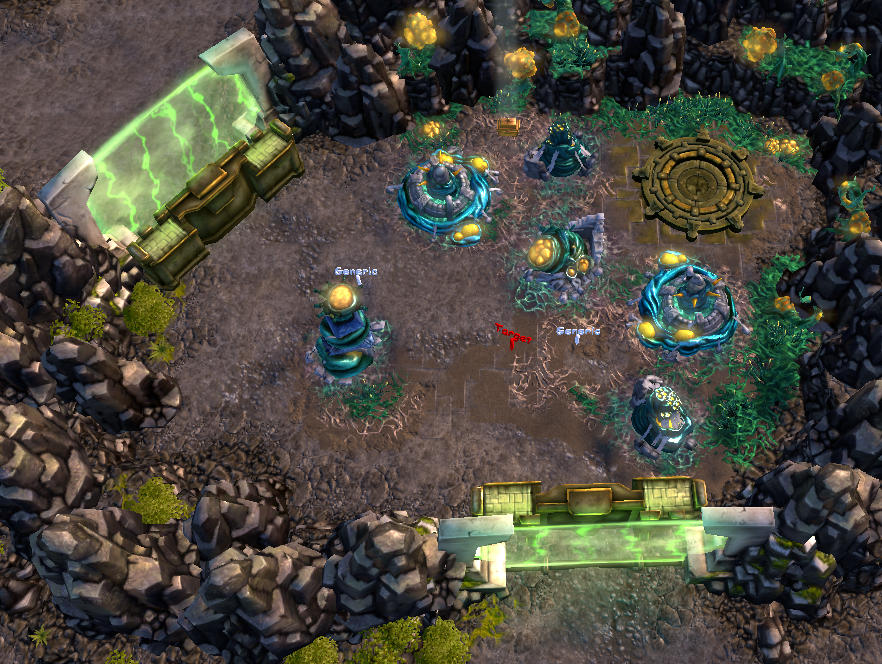
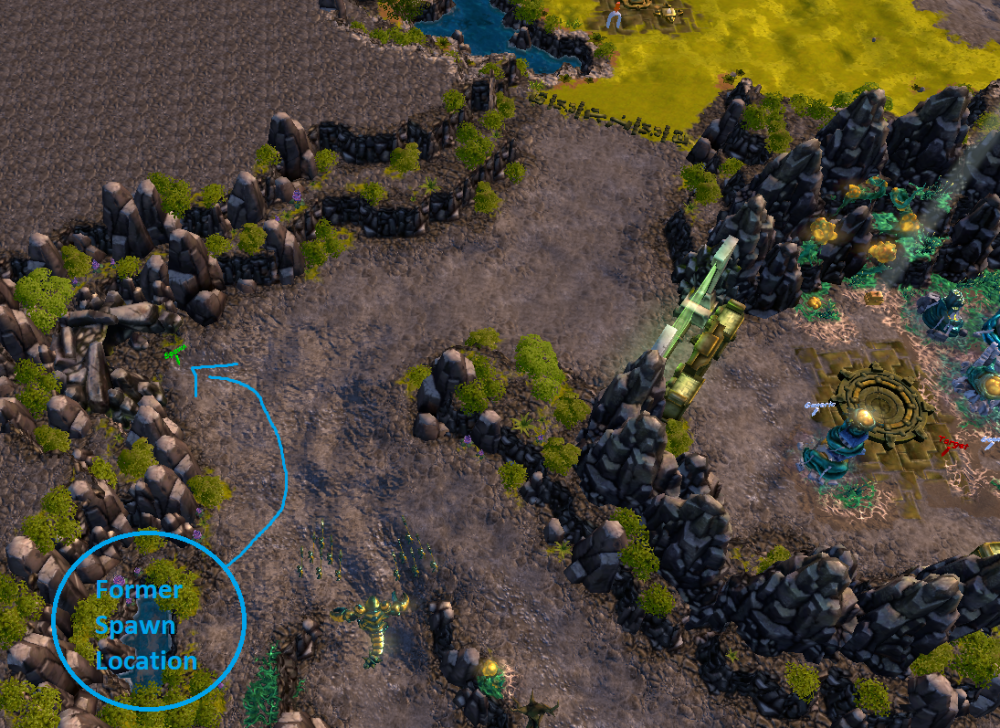
Nightmare's End - Proposed Changes - Iteration 2 A major issue with Nightmare's End is that the map requires the player to defend a substantial amount of locations, but almost none of these locations are capable of being fortified. This encourages players to fight back against the map, warping its mechanics in an attempt to reduce the defensive load on the player. Our goal with these proposed changes is to improve the experience of playing the map in the way intended by the original designers, without impacting the creative approaches to conquering the map that have emerged over the years. All changes mentioned here are proposals. Some, all, or none of the proposed changes might make it into the game depending on the results of community feedback and map testing. Elemental Node Changes All nodes have been moved to the back of their respective area, freeing up more space for buildings and maneuvering units All nodes now have buildable walls behind the Amii Gates, allowing players to fortify their position and defend the nodes more easily. Note: the walls in the pictures below are not pre-built, they are only shown that way for illustrative purposes. Shadow Node Nature Node Fire Node Frost Node Shard of the Forge Changes Add buildable walls to the left and right side of the Shard of the Forge. This will help to foreshadow the final defense for new players and give everyone a more stable defensive location. This is particularly important because the final attack adds a major point of failure to a map that exceeds 40 minutes in average playtime. Move the final wave spawn caves to prevent the attack waves from instantly aggroing onto the new walls surrounding the Shard. Shard Defensive Walls Final Attack Wave Spawn Locations Southwest Spawn & Monument Changes Move the Monument + 3 Power Wells in the southwest to the right to create more space to place defenses and lengthen the time between when attack waves arrive. Move the spawn cave north to see if we can redirect the waves to attack the western player's T1 location which has defensive walls to aid the player in defending. This change is experimental and will require testing to see if it works. Southwest Monument + Well Location Southwest Spawn Cave


-
 The gold system and the bfp system are designed to be entirely separate systems. This separateness makes it easier for us to balance them individually, and it also ensures that we avoid gold selling schemes which could get the project in trouble. After we released some veteran-oriented achievements in January 2023, we spent the last year working on the early to mid-game experience. We think these are now in a good place with the gold rework, tutorial missions, and early game achievements. As such, we will be focusing on late-game content moving forward with one of the intentions being gold sinks.
 -
Is Construction Hut Supposed to have a Healing Aura?
WindHunter replied to ReleeSquirrel's topic in Cards
Hey ReleeSquirrel, All friendly buildings cause the units around them to passively regenerate a percentage of their life points each second, as long as they have not taken damage recently. So this is a feature not just of Construction Hut, but also your wells, orbs, and all other buildings. This passive regeneration is a big reason why people bring Ice Barrier in Frost decks, because it can function as a 20p healing location. The blue ring around Construction Hut reflects the area in which the "Maintenance" effect takes place. The area in which units can passively regen is likely 5-10m smaller. -
Fall of the Twilight Cult: Expansion Idea 1
WindHunter replied to Dragonchampion's topic in Suggestions
The post is too large to comment on everything so I will give a few impressions based on what I did read. The proposed story takes too long and an insufficient amount of plot occurs in each map. There are 9 proposed maps here to finish off the Behind Enemy Lines story and then set up for the next actual story arc. BattleForge just does not tell story in this manner. Consider the Renegade campaign. It follows the treasure fleet, introduces and crowns Mo king, and tells the story of Blight's reemergence and fall. All of this happens in 7 maps. While it could be argued this is rushed, and it likely is, the amount of story that occurs per map is far in excess of what is presented here. BattleForge maps jump into moments of intense world-changing action, then tell everything else in the lore book. I would much rather see 2-4 very carefully crafted maps which are absolutely overflowing with story, then spread this same content over 9 maps. It was smart to introduce new characters, because we cannot use the old ones. We do not have Moon's voice actress anymore. Therefore the story cannot be told by her, she needs to become a background character. I appreciate the attempt to combine new cards related to the maps with the map themselves, but in the future I would recommend just focusing on one aspect. Card design should ultimately flow out of gameplay considerations, with lore performing an inspirational role. I think you are a bit out of the loop as regards our currently announced plans. We already announced the next 2 campaign maps and the Amii are good guys in them. See here: 3rd Anniversary Stream Lastly, I do not like the Amii twist. It flies directly in the face of the Amii's established identity and frankly makes no sense. It also ruins the existing Amii plotline. The Amii manifested themselves physically for the sole purpose of freeing the enslaved mortals. Those same Amii, after failing, sold the Key of Ashia to the Assemblers to purchase the Forge to accomplish the liberation they themselves had failed to achieve. Eventually the Amii returned themselves to the elements after performing a mass ritual, but not before carefully constructing structures across Nyn that the future gods and skylords would be able to use in the coming war against the giants. That these Amii would then be revealed as the puppet masters behind the Twilight and the Lost Souls just makes no sense. And as I said it ruins the existing storytelling. The Amii are meant to be a tragedy and they are a very well written tragedy. They come to Nyn, fail, and then not understanding the importance of an afterlife because they are immortal spirits, they trade temporal freedom and satisfaction for eternal denial and slavery. They inadvertently cause the creation of the Lost Souls, who themselves then create the Twilight. This makes the Amii the ultimate cause of the events of the campaign, but they are hardly the villains. It is the law of unintended consequences and a lesson that the best intentions do not cover up poorly made decisions. The Amii make every decision with the best of intentions, but hyper-focus on mortal liberation so much they accidentally create a cosmic evil which almost leads to mortal extinction. Making them suddenly come out as evil the whole time ruins this tragic story and underlines the moral power of the existing story. -
AI generated art as a solution to quicker generation of new content?
WindHunter replied to Vrizz's topic in Suggestions
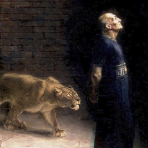
We have considered using AI artworks before and have had less than satisfactory results. While our artists sometimes still use it for the concepting phase, the actual quality is far below our art standards. As an example, I have included 4 artworks from SR-team released cards below. Which ones do you think were drawn using an AI base and which ones do you think were hand drawn? Also regarding the examples here, the gems look like mobile game icons to me. While I think AI art might eventually be decent enough to use assuming we can train it on existing BattleForge artwork, I do not think the public-facing tools are quite there yet, particularly when you consider that we do not have any budget to use for high-end tools.

-
Beyond an initial wipe, the timers are the only method of loss in random PvE. They are therefore a necessary component of a mode which is based around speed. If the timers are leading you to regularly lose matches, I would recommend playing at a lower difficulty level until you can get used to some of the mode's mechanics. Our recent changes to the gold rewards are ensured that lower levels of random PvE properly compensate players for their time.
-
I would recommend giving the new Infernal Chain a spin before writing it off. It is far more user friendly and better in 99% of situations, particularly as relates to high-end PvE content. While the changes might look like LSS was significantly nerfed, this is less true than it first appears. First off, the card has the same stat efficiency as previously due to the cost decrease. Additionally, the Crystal and Recycle changes are substantial buffs since you can now vacuum up revenants, who will die eventually anyway, as fodder for the Crystal. The splash reduction is a direct nerf, but the removal of S & M-knockback is actually a buff. It would knock back units, particularly S-squads, so far that it and other splash cards could no longer damage them. Additionally, there is a hitbox bug with flying S-units which makes it so that when they are knocked back their "click-box" extends over a massive radius. This issue was a major problem for LSS which is supposed to move around the camp to stay safe and to damage enough targets, as the player could no longer click a location to move, but now only press "attack" on the displaced S-unit." Finally, given its new revenant synergy, LSS is much stronger when used in a dedicated Lost Souls deck. It acts as both damage dealer and healer (or speed buff provider) while Lost Warlord and Lost Evocation make sure it always has enough stored life points for another Crystal.
-
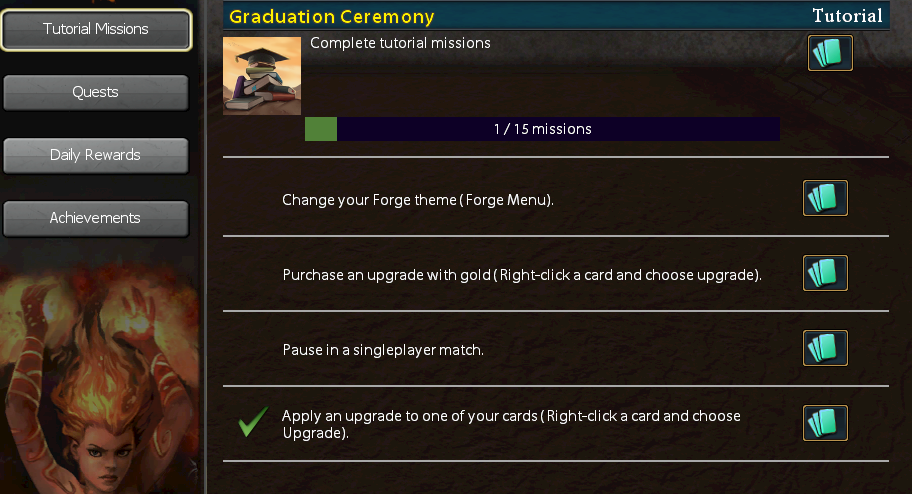
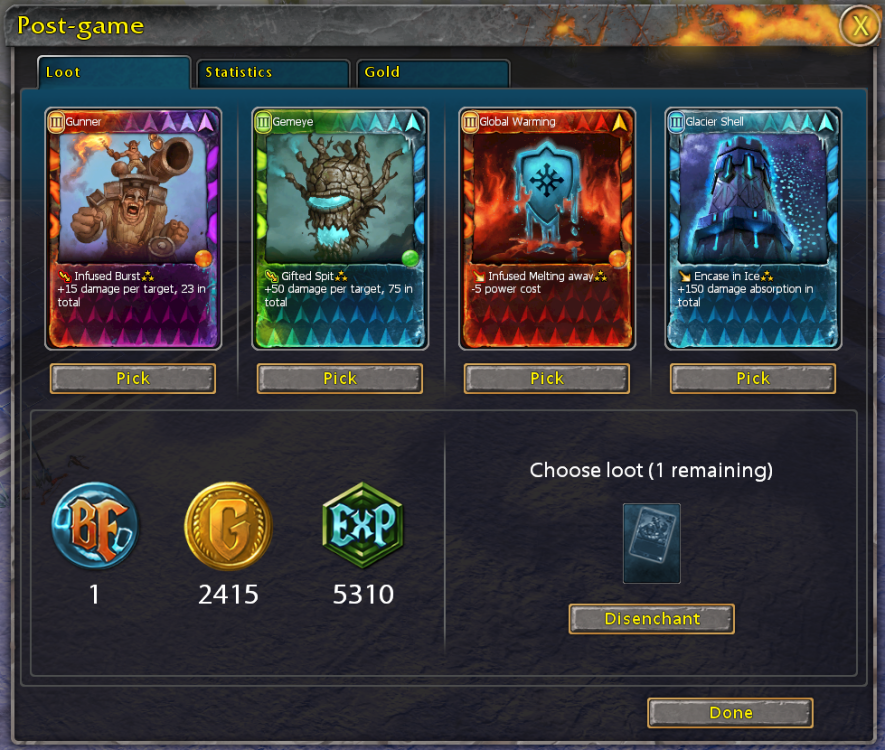
Patch #400045 - Revenant's Doom Welcome to our newest patch. This update contains our tenth balance patch for the game, two brand-new cards, a rework of the rPvE difficulty system, tutorial missions, and many other changes, enjoy! Patch Preview Two new cards are now available! Jump in-game to collect Tectonic Shift and Lost Manabeast. Added tutorial missions! New and old players alike can now receive rewards for simple missions meant to explain some of the harder to understand mechanics of BattleForge. A new rPvE difficulty and changes to the existing difficulty system to align it better with the campaign map difficulties. Our much anticipated Lost Souls rework, a large number of buffs to well-designed but underperforming cards, and a change to the neutral unit exclusion rule. A complete rework of the campaign reward system, with individualized upgrades, gold rewards overtime, and gold rewards on-loss. General Changes Pause, Speed-up, and Slow-down buttons have been added to the Forge. Standard difficulty has been removed for the 12p maps Passage of Darkness and Ascension. Achievements have been adjusted accordingly. The game will now remember the difficulty you selected for each map until you restart the game. Removed post-game message "Maximum rank achieved" for those players who are Master of the Forge rank in PvE. The post-game reward screen now always displays the player's current rank and experience earned. A description of the achievement completed has been added to achievement reward mail. Added previews when hovering over card and boosters rewards for achievements. The networking library used for the client has been updated. Linux users will now need Wine 7.13 or higher to play the game. The game should still work on Windows 7, but support has been discontinued. General Fixes Improved user interface responsiveness. Longer gaming sessions were previously experiencing slowdowns. Resolved an issue that prevented free PvP decks from being cloned. Fixed a game crash related to map scripts, most commonly affecting the "Titans" map. New Cards Tectonic Shift - 50p T3 Stonekin Spell You will find the upgrades for this card on the map "King of the Giants". When thinking about Stonekin's design, we determined that more buildings interactions fit well with the faction. More specifically, we thought that a building-based archetype was the natural expansion for a faction of living stones. Tectonic Shift is a T3 spell that adds a teleport ability to friendly Stonekin, Frost, and Nature buildings. This teleportation ability functions highly similar to Phase Tower's ability as a permanent addition, similar to how Santa and Infernal Chain add new abilities to a unit. For more information, check out Community Update - September 2023. Lost Manabeast - 120p T3 Lost Souls You will find the upgrades for this card on the map "Titans". As part of our Lost Souls rework, we wanted to add the well-known NPC unit Lost Manabeast to the faction. The player version of Lost Manabeast is a ranged unit, which collects the souls of its victims to reset the revenant timer of allied Lost Souls units. It is a perfect fit for those players wanted to engage in revenant-based gameplay. For more information, check out Community Update - December 2023. Random PvE Difficulty Redesign A major part of the upcoming update is the addition of a new random PvE difficulty between level 9 and level 10. The significant gap that exists between level 9 and level 10 is well known, and this new difficulty, often referred to as level 9.5, is meant to help players prepare themselves to make the jump into level 10. Alongside this new difficulty, we are also changing the naming scheme of the random PvE difficulties and removing difficulty levels 1 to 3, which are almost never played. We hope this new system will make it easier for players to understand what difficulty is right for their skill level. [ New Difficulty Naming Scheme ] Standard difficulty - Old level 4 Standard+ difficulty - Old level 5 Standard++ difficulty - Old level 6 Advanced difficulty - Old level 7 Advanced+ difficulty - Old level 8 Advanced++ difficulty - Old level 9 Expert difficulty - NEW level 9.5 Expert+ difficulty - Old level 10 Campaign Loot Rework Anyone who plays PvE in Skylords Reborn knows that the most commonly played multiplayer game mode is random PvE. One part of this is due to the ease of matchmaking, you can go to the 4p area and join a random PvE game of any difficulty without needing to jump around the map checking lobbies, and the other part is due to rewards. In most cases, random PvE simply rewards the player better, unless you get lucky while looking for an expensive level 3 upgrade. While our upcoming improvements to campaign map matchmaking will have to wait for a future patch, we are now rectifying the reward discrepancy between the two modes. [ Campaign Reward Changes ] Campaign maps now reward gold over time. The total amount of gold rewarded has been substantially increased at all difficulty levels, even if players previously disenchanted all upgrades. Solo maps and multiplayer maps now give the same rewards. Campaign maps also reward players who lose a map part of the gold they would have obtained had they won. Standard maps reward 70%, advanced maps 40%, and expert maps 25% of the expected gold on-loss. Gold on-loss cannot be earned unless at least 5 minutes have passed in-game. The new Pick reward mode has replaced Random, Need/Greed, and Assign, which have been removed from the game. Upgrades are now decided on a per-player basis, with each player able to choose the upgrade(s) of their choice. Expert and advanced maps reward 1 upgrade, while standard maps reward 2 upgrades. In the future, players will have the ability to earn more upgrades per map completion under special circumstances. Disenchanting an upgrade now rewards the same gold regardless of the rarity of the upgrade, while also providing the player with PvE experience, depending on the level of the upgrade. Tutorial Missions Twenty-one new tutorial missions have been added to the game. These missions are designed to help new and old players alike to discover basic game features, as well as many of the new functionalities the Skylords Reborn team has added since the game's revival. Completing all 21 missions will reward players with 12 common cards, 8 uncommon cards, 900 gold, and the new in-game title "Lyrish Scholar." These rewards are designed to help new players and function as a supplement to the existing starter decks. All missions are completable within an hour. Tutorial Missions will be the new focus of attention when opening the rewards window, but focus will revert to quests once the missions are complete.


- 40 replies
-
- 12
-

-
Card Balance Changes Global Balance Changes Neutral Units are now limited on a per-player basis: - Each player will now be able to play one copy of each neutral units. Neutral buildings are still limited on a per-team basis. We have been increasing neutral unit synergies and releasing new neutral cards, but an issue is that if one player is running a neutral archetype, say Ravenheart & Raven Archwalker, the other members of the team are also restricted in their deckbuilding choices. We think this is contrary to the spirit of the game, and since there are no balance considerations preventing a change, we are loosening the restriction while keeping the uniqueness of neutral units intact. Balance Changes While changes are split here between PvE and PvP sections, many of the changes have important consequences for both game modes. Our PvE and PvP balance teams work closely together to ensure that the impact of all changes are evaluated for both game modes. Below, we have listed both the changes and our reasoning behind them. [ Tier 1 ] Envenom: 1. Base damage: Restored one missing tick on both affinities 2. Infused Intoxication: Scaling damage: Each time the 80 dmg threshold is reached, the poison damage increases by 10, stacking up to 6 times up to a maximum of 95 damage per second, and refreshing the spell duration. This change should allow the card to remain near its current state in PvP by allowing the player to micro their unit away before the poison stacks out of control, while providing a powerful new tool for Nature T1 in PvE as powerful singular units steadily kill themselves by stacking the poison damage higher and higher. Mumbo Jumbo: 1. Power cost: 40p ➜ 50p 2. Targeting: Units only ➜ Units and buildings 3. Debuff strength (both affinities): 25% ➜ 35% Improve Mumbo Jumbo's usability in PvE by allowing it to target buildings. This will be especially useful with the infused affinity (r) which increases damage taken by 35%. This should help Nature T1 focus down troublesome towers and spawners. [ Tier 2 ] Earthkeeper: 1. Damage: 540 dp20 ➜ 660 dp20 2. Back Up, power cost: 25p ➜ 0p Improve use cases for Back Up by removing activation cost and give the card slightly more in-combat power by giving it a 22% damage boost. Lost Reaver: 1. Mob: A. Targets: Hostile and friendly units ➜ Hostile units B. Corpse cost: 1500 ➜ 2000 C. Crawler health: 310 ➜ 440 life points 2. Corpse Gathering maximum amount: 1500 ➜ 2000 Lost Reaver's ability seems made for PvE, but it has anti-synergy because it damages other friendly units and even its fellow crawlers. We have increased the corpse cost to make it slightly harder to use in PvP, while increase crawler health for better survivability. Additionally, and most importantly, we have removed the ability's friendly fire, which will allow players to spawn multiple crawler groups at a time without worrying about them killing each other instead of the enemy. Lost Shade(p): 1. Tainted Union A. Remove existing reflect effect. B. New effect, "When surrounded by at least 2 other Lost Shades, each individual unit will deal 61/61/61/68 damage per second and take 15% more damage." Lost Shade(p)'s reflection effect has never quite worked, the more shades are in the union, the less damage is actually reflected. Instead of attempting to salvage an affinity effect we think is unfitting to the unit, we have instead decided to make the tainted affinity the true opposite of its frosty counterpart. Tainted Shades will receive more damage but deal more in turn, making them a high risk-high reward option. Vileblood(g): 1. Gifted Liquids (g) healing per wave: 300 life points equally spread ➜ 160 life points, up to 800 in total Now works similar to Forest Elder's healing ability, with a separated single-target and multi-target healing amount. There are 6 total healing waves, meaning this changes the spell from 1800 total healing to 960 single-target healing to up to 5 targets. [ Tier 3 ] Ethereal Storm: 1. Charges: 8 ➜ 16 2. Power: 150p ➜ 130p 3. Duration: 21 / 21 / 21 / 26 ➜ 25 seconds on all upgrade levels 4. Now only damages hostile units. 5. Blessed affinity (b): All enemies in range take full damage, even when frozen (everything does full damage). 6. Infused affinity (r): Enemy units take 20% more damage. 7. Remove all stages except 1: A. Only one stage, baseline (0 Revenants) and stage 1 (1 Revenant). B. Baseline: 40 damage / Stage 1: 100 damage The existing scaling effect is bugged, so we are simplifying the mechanic. There is now a base effect and an improved effect if one Revenant is present. This gives LS a consistent damage spell for itself but with reduced effectiveness in helping allies due to a lack of Revenants unless the player also casts Lost Evocation. The affinity effects provide missing things in the faction, such as the ability to ignore freeze's damage reduction. Lost Banestone: 1. Underworld Gate: A. Remove existing effect B. Add affinities, Tainted and Blessed C. Now spawns an own Lost Shade Revenant of the respective affinity D. Duration: Infinite ➜ 20 seconds E. Cooldown: 60 seconds ➜ 40 seconds 2. Tainted Underworld Gate (p): A. New effect: "Activate to curse the targeted enemy unit. Every second, the targeted unit will lose 40 life points. Additionally, if the target dies, it explodes dealing 300 damage to every enemy in a 10m radius and a Lost Shade revenant with an affinity toward Shadow will spawn out of its corpse with a lifetime of 25 seconds." 3. Blessed Underworld Gate (b): A. New effect: "Activate to curse the targeted enemy unit. Every second, the targeted unit will lose 40 life points. Additionally, if the target dies, Lost Banestone is fully repaired and a Lost Shade revenant with an affinity toward Frost will spawn out of its corpse with a lifetime of 25 seconds." 4. Glacial ➜ Everlasting A. Remove affinities, now one effect B. Radius: 25m ➜ 30m C. Now suspends the duration of any friendly revenants in the area. With its new aura and the ability to generate unbound defenders, Lost Banestone will allow players to transition their T2 offensive units into T3 defenders. This fits in line with the new Revenant-based playstyle we envision for the faction. This will also remove the exploit where Banestone can permanently stop enemies on some cPvE maps from spawning, such as Bad Harvest and Siege of Hope. While this exploit is well known and used, these maps are perfectly completable without them, and they trivialize defending by functionally turning the map off. Promise of Life: 1. Affected units can no longer be healed. 2. Blessed Revive (b): A. Spawn delay: 15 seconds ➜ 10 seconds B. Ice Shield strength: 800 ➜ 1500 Improve blue affinity without impacting the current workaround to spawn extra legendary units. Additionally, add a new effect to both affinities preventing units affected by Promise of Life from being healed. This should especially help in multiplayer, where well-intentioned allies heal units you want to die. Stone Launcher: 1. Orb cost: 1 Nature, 1 Frost, 1 Hybrid (T3) ➜ 1 Nature, 1 Frost, 1 Neutral (T3) Twilight Slayers: 1. Orb cost: 1 Nature, 1 Fire, 1 Hybrid (T3) ➜ 1 Nature, 1 Fire, 1 Neutral (T3) [ Tier 4 ] Green Peace: 1. Protect the Environment! allied buff duration: 20 seconds ➜ 30 seconds 2. Protect the Environment! (r) damage buff: 50% ➜ 60% Infernal Chain: 1. Orb cost: 2 Shadow, 2 Neutral (T4) ➜ 4 Shadow (T4) 2. Power cost: 150p ➜ 100p A. Spell now costs 50p to cast once applied to the unit. 3. Ability Rework: A. Target: Single-target ➜ Up to 5 enemy units B. Bugfix: Allow Infernal Chain's healing to regenerate squad members 3. Blessed Bond (b) ➜ Tainted Bond (p): A. Remove 50% damage reduction for caster ➜ Add healing effect (55 per second) for each bond established B. Affected enemies now return 12% of current void power as power from the void 4. Gifted Bond (g): A. Healing: 75 per second ➜ 55 per second per bond B. Stuns affected targets after 5 seconds for 15 seconds. Two dedicated Shadow orb decks already have a lot going for them, 3 dedicated Shadow orb decks have both Death Ray and Plague, and Shadow Worm fails to provide a sufficient reason to go Pure Shadow on its own. The changes allow multiple bonds, with healing occurring per bond. This is intended to synergize with Shadow Worm's life loss from Mass Disintegration. Each affinity has a different role: the shadow affinity provides in the field void return, and the nature affinity grants a crowd control effect. Lost Evocation: 1. Power cost: 150p ➜ 140p Lost Spirit Ship: 1. Torpedo Changes: A. Splash Radius: 15m ➜ 10m B. Knockback: Remove S & M-knockback 2. Life points: 3930 ➜ 3630 3. Power cost: 240p ➜ 230p 4. Recycling: A. Target: Own buildings ➜ Own buildings and Revenants B. Cooldown: 10 seconds ➜ 5 seconds C. Ability description simplified 5. Crystal Rework: A. Gifted Crystal (g): Damage effect removed, it now only heals B. Infused Crystal (r): Grants a +40% movement speed increase to friendly Lost Souls units C. Ability description simplified Lost Spirit Ship (LSS) is the major damage dealer for Lost Souls, which relies on units to deal damage. Therefore, we would be unable to remove its high damage without providing heavy compensation in other places. Instead of doing a full stat realignment of Lost Souls units, we are focusing on LSS. While the changes might look like LSS was significantly nerfed, this is less true than it first appears. First off, the card has the same stat efficiency as previously due to the cost decrease. The splash reduction is a direct nerf, but the removal of S & M-knockback is actually a buff. LSS would frequently knock back units, particularly S-squads, so far that it and other splash cards could no longer damage them. Additionally, there is a hitbox bug with flying S-units which makes it so that when they are knocked back their "click-box" extends over a massive radius. This issue was a major problem for LSS which is supposed to move around the camp to stay safe and to damage enough targets, as the player could no longer click a location to move, but now only press "attack" on the displaced S-unit." The crystal is being changed to either heal or increase movement speed, with the pointless spawn zone effect being removed. By allowing it to vacuum up Revenants, we add strong synergy with both Lost Warlord's new ability and Lost Evocation. This means that LSS will scale in strength the more a player invests into Lost Souls. Lost Warlord: 1. New passive, "Undying": A. Blessed Undying (b): The unit's revenant form spawns with an Ice Shield that absorbs up to 3000 damage. The Ice Shield refreshes every 25 seconds. B. Infused Undying (r): The unit's revenant form deals 50% more damage. 2. Onslaught rework: A. Remove affinity B. Provides ground presence. C. New effect - "Activate for Lost Warlord to project a revenant of himself to a destination within a 40m range. This revenant provides ground presence, has no abilities, and lasts for 25 seconds. Reusable every 30/25/25/25 40/35/35/35 seconds." With these changes, we hope to make Lost Warlord into the ultimate Lost Souls card, with a heavy focus on Revenants that synergizes with Nether Warp for quick movement of armies. We view this violation of fundamental game principles to be justified by the card's high orb restrictions and the recognition that by T4, the exploits enabled by teleporting ground presence are largely moot. The blue affinity is being buffed to have a refreshing Ice Shield for when players use cards like Lost Banestone and Revenant's Blessing to extend Revenant life times. This should help to equalize the two affinities. Overlord: 1. Blood Share: A. Life point cost: 1000 life points ➜ 1500 life points B. Healing: 1500 life points ➜ 1500 life points, up to 7500 in total C. Cooldown: 5 seconds ➜ 30 seconds D. Ability cost: 0p ➜ 20p This change makes Overlord's "Blood Share" work similar to Forest Elder's "Forest Charm" in that it heals the group and the individual in different amounts. The goal here is to allow Overlord to function more fully as a sustain tank for the units it is protecting, as it already does for itself. This will help it to support army-based Shadow compositions, such as Shadow Worms, which is important because Overlord is the only melee Shadow unit in T4. Twilight Pestilence: 1. Power cost: 150p ➜ 120p Miscellaneous Changes Added Nature faction classes to generic NPC Nature buildings: Mark of the Keeper, Primal Defender, Stranglehold, Healing Well, Living Tower, Root Nexus, Healing Gardens, Howling Shrine, Mindweaver, Gateway of Nature, Temple of Nature, Wheel of Resilience, Wheel of Juvenescence, Wheel of Strength, Earth Crystal, and Fortress of Nature. Added Fire faction classes to generic NPC Fire buildings: Makeshift Tower, Rocket Tower, Blaster Cannon, Pyromaniac, Volcano, Tower of Flames, Gateway of Fire, Temple of Fire, Flame Crystal Added over 20 new Shadow NPC enemies for use in community maps. Includes units, towers, and spawn buildings. Units - Dreadcharger, Forsaken, Skeleton Warriors, Wrath Blades, Nox Trooper, Harvester, Shadow Mage, Mutating Frenzy, Cultist Master, Rifle Cultists, Necrofury, Unstable Demon, Ashbone Pyro, and Grim Bahir. Buildings - Stone of Torment, Lifestealer, Soul Splicer, Time Vortex, Necroblaster, Church of Negation, Embalmer's Shrine, Incubator (small spawner), and Shrine of Greed (large spawner) Worldbreaker Gun: Fixed animations not playing on U3. Fixed the normal maps of several map objects to correct their interaction with light. Nomad: Improved upgrade description to be more consistent.


- 40 replies
-
- 14
-
-
Mapmaking Fundamentals - Spawn Design (Cont.) Practical Considerations In the course of testing and balancing new maps, a number of important questions have arisen regarding practical considerations which must be taken into account. Here we will examine the various practical concerns which have appeared during the development process regarding both spawn and camp design. Small vs. Large Spawn Buildings Each faction should have a small and a large spawn building. As a standard practice, the small spawner should have 1200 life points and the large spawner 3200 life points. There are a few exceptions to this rule, such as the Fire and Nature gateways in Titans, which have 2000 life points, and Lost Temple, which only has 1000 life points. In the case of Lost Souls, a large spawn building is currently in the process of being developed, after which the small spawner Lost Temple will likely see its health pool standardized. There are a few ways to utilize the different spawn buildings. The most straightforward method is to use small spawners for T1 and T2 camps, and large spawners for T3 and T4 camps. This creates a sense of progression and ensures that later camps are not easily cheesed through Eruption spam. On this topic, it is important to position primary spawn buildings within camps such that the player cannot easily destroy them without interacting with the camp itself. Spawn buildings, particularly the primary ones, should be the most protected things within standard camp arrangements. Another way to use the spawners is to differentiate them by purpose, such as objective spawners being of one type while standard camp spawners are of another type, though it is also common to use a spawner as a camp and an objective spawner simultaneously. Some maps alternative between small and large spawners as a way to differentiate between the type of units being spawned. A good example of this would be Encounters with Twilight. The various lodgement areas of Encounters are punctuated by small spawners which only spawn weaker units, while the main spawner is a large spawner which generates the main threat in each respective area. Beyond lodgement areas where the aforementioned type of design is common, some individual camps include both types of spawners with a similar goal, small spawners for weaker units and large spawners for stronger units. Higher tier camps with increased levels of complexity can create a sense of strategic depth and player progression by having a large spawner nestled in the back, with various minor objectives, such as small spawners and artillery buildings, placed in easier to access locations for the player to focus on and destroy. This allows the player to move forward and destroy an objective, thereby permanently weakening the camp's defenses, without requiring that he destroy the camp outright all at once. An example of this might be that in a Twilight map, the primary large spawner generates Abominations and Evil Eyes, while a small spawner closer to the player's expected point of entry generates Whisperers and Mindbenders. While the majority of damage comes from the large spawn units, the destruction of the small spawn would be a major win for the player because it would substantially reduce the camp's CC capacities. Time to Respawn & Player Downtime Imagine playing a Twilight map and moving forward into a well fortified camp. You destroy the frontline of Vilebloods, move forward to wipe out the archer line, and then just as you are about to kill the spawner a second wave of Vilebloods spawn and destroy your army. By the time you return, the entire camp has respawned and because none of it was towers or support structures, you essentially achieved nothing. What I just described is how a normal player experiences trying to destroy the Shadow camp on Nightmare Shard. In the face of this frustration, the player often chooses to learn how to cheese the map, or they decide to suicide their army for the spawn building from the beginning so they can feel like they actually achieved something. What this example illustrates is the problem of camp respawns and how they relate to camp design. A typical spawner in BattleForge has a time to respawn of 15 seconds. This is universal and encompasses nearly all maps and spawners in the game. It should be fairly obvious that the lack of granularity in what is an essential component of map design is a fundamental issue for the balance of both individual camps and maps as a whole. Time to Respawn Considerations: 1. Individual unit strength - If the individual units are weaker, the camp might be balanced around more frequent respawns. This can create a pleasure experience of fighting through waves of the enemy. If the camp's units are relatively strong compared to the player, such as our example of the player fighting Vileblood's with T1, the respawn timer should be longer because each unit that respawns is a substantially bigger threat. 2. Unit to building ratio - If the camp is entirely made up of units, thereby providing no ability for the player to permanently degrade its strength except through killing the spawner, it might be appropriate to exclude some key units from respawning at all or to increase the overall time to respawn. If a camp's strength is mostly concentrated in buildings, a faster respawn timer for units can be used because only a small percentage of the camp's total strength will be reviving. 3. Player Tier - In lower tiers, it is harder for players to reach and destroy spawn buildings due to a lack of available tools. In higher tiers, players have numerous options for disabling units and destroying key buildings, including spawners. This suggests that longer respawn timers are better for lower tier camps, because in these camps players usually have to fight through a significant portion of the camp to be able to begin damaging the spawn building. The same is not true for higher tier camps and therefore the respawn timers can be shorter. In general, the higher the tier, the more complex a camp can be in its design, and faster respawn timers are a component of camp complexity. 4. Distance to Spawner - In a simplified form: time to respawn + travel distance from spawn = player downtime. The farther the distance to the spawner, the longer the player has to recuperate. This is particularly important for defensive scenarios to allow time for healing, respawning, and repairing player defenses. Closer spawn locations will often correlate to longer respawn timers, and vice versa, but the map designer should really balance downtimes based on wall and building repairs and adjust according to the intended feeling of pressure. Group vs. Individual Spawning The general rule is that attack waves should be spawned as a group while units within a camp should spawn individually. By placing attack waves into groups, it means that the player does not have to deal with a constant trickle of units which either preclude any repairs because of a lack of downtime or fail to cause sufficient pressure due to lacking the critical mass needed to challenge player defenses. On the other hand, group spawning often leads to clever players trapping a few units to prevent the group as a whole from respawning. This will be discussed more below. Individual spawns in camps are necessary to allow the camp the dynamism to respond to player attacks. Group respawning, the timer for which only begins after the death of the last member of the group, would mean that the camp will likely never respawn any units before the player can destroy the spawner, but if the group can respawn, the entire camp, or at least a major sub-group, would respawn all at once. Neither of these options are desirable, so camps should use individual spawning. Preventing Spawn Trapping The majority of respawns in the game are based on timers that only begin after the unit which will be replaced has died. The standard timer throughout the game is 15 seconds. As mentioned above, some spawns are group and others are individual, with in-camp respawning typically being individual-based and attack wave respawning typically being group-based. Given that group-based spawns will not respawn until the entire group (or a particular percentage of the group) is dead, this leads to a situation where the player can "trap" units within the attack wave and prevent further respawns from occurring, functionally turning off the defensive aspect of the map. While this mechanic has been normalized on most existing maps and therefore will likely remain unchanged, the same need not be true for future maps. The best way to get around spawn trapping is to make the respawning of attack waves multi-conditioned. For example, if an attack wave takes 30 seconds to reach its destination and lives on average 30 seconds once it has reached its intended location, the average respawn time for that given wave would be once every 75 seconds (15 second respawn + 30 sec travel time + 30 sec fighting to death time). This means, when accounting for slow decks and the player being overrun, it might be appropriate to make the attack respawn on death of the group OR if 120 seconds have passed, whichever is shorter. That way if the wave gets trapped, a second attack wave still spawns after 120 seconds regardless. Another key point to consider with spawn trapping is abuse of waypoint markers. When attack waves progress towards their target location, they act by moving from one waypoint to another, wait for the entire group to arrive, and then proceed to a third waypoint. If a player is able to block one member of the group from successfully progressing to the next waypoint, the entire group will fail to progress. This is what allows the MotK spawn trap trick on Nightmare's End. When a ranged unit enters the spellbane aura, it immediately retreats in an attempt to move far enough away to attack. If the unit's attack range is less than or equal to the spellbane aura radius, it ends up in a loop where it continually moves in and out of the aura. If the waypoint location is within the spellbane aura, such that the other units can progress to it, but not so close that they will aggro on the source of the aura, the looping ranged units will fail to reach the waypoint marker and therefore lead to the entire group remaining permanently stuck (it should be noted that not all ranged units act like this. The flying units on Mo continue to patrol back and forth despite any spellbane aura, so their scripting ought to be studied to learn how to achieve a similar result). There are a few ways to avoid this. One is to include at least one long range unit within the attack wave, which can then destroy the source of the spellbane. A second, if the spawn trap is discovered pre-release, is to add a patrol along the path where the spellbane will be placed to destroy it and free the normal attack wave. A third is to look at maps like Mo and figure out how to circumvent the issue and allow the units to patrol regardless. Tier Emphasis & Camp Design by Tier Nearly all campaign maps will take place over all four tiers, but the emphasis of each map is different. Some maps will have long T1 sections, while others, such as Bad Harvest, will skip T1 entirely. While it might initially seem best to spread the map out equally between all tiers, this is often less ideal than it might initially seem. One of the largest limitations in BattleForge is the 20 card deck limit. By requiring the player to be able to respond to threats equally at all tiers, the designer encourages the player to opt for more generalist deck options. For example, if the map required the player to be able to respond to ranged, melee, and flying units at T3, the player would forced into using cards which can respond to all three threats. If that player were playing Fire, they will likely default to using Magma Hurler with Unity. If he wanted void return and had to defend a wall, he is also going to include Shrine of War and Tower of Flames. At that point, since the player needs to be flexible on all four tiers, he will only have 1 slot left for T3, which he might want to flex into other tiers given Magma Hurler can take care of most threats. If, instead of designing the map to have equal threats at all tiers. the designer instead decided to shorten the T2 and focus on a larger T3, the player will now have more deck slots to specialize versus any challenges the map might include. If there were large amounts of buildings in T3, the player might be able to include Virtuoso or Juggernaut as a response. If there were no flying units, the player could opt for Vulcan or Giant Slayer. If the camps had weak AA or if there were a lot of hard to reach flying units, the player could choose Spitfire. On their own, each of these options is unlikely to be the sole choice of unit for a Fire player, but each can easily become supplemental options when the camps a player faces in a particular tier allow for such specialization and the other tiers do not use up all available deck slots. The key takeaways here are that it is often better to focus on 1 or 2 tiers in a given map, so as to allow for more interesting deck building options within those tiers, and that unifying camp and spawn design across a tier can allow for and push players towards less typical options, for example, not including flying units but giving camps strong AA, can open up space for melee units to succeed. Defender's Advantage When fighting against camps, the general principle is to balance the camp's composition as equivalent to being 1 tier higher than the player (on expert, advanced can be equal strength). The reason for this is that players have an adaptability that NPCs do not. This is seen both in the fact that players can cast spells while NPCs must rely on unit abilities or inflexible events via map scripts, and that NPCs cannot rebuild their own camps. If the artillery piece keeping the camp together dies, it cannot come back. In contrast, if a player loses a unit or misplaces a tower, they can just summon a new one. So if the entities in an NPC camp are typically one tier stronger than those currently available to the player, what about when it is the player defending and the NPCs attacking? It would be nice if we could provide a simple rule here stating that attacking units are always one or two tiers stronger than the defending player, but it is not that easy. Defending scenarios are simply too varied for a one-size-fits-all approach. Instead, let us consider some factors that might change the player's strength while defending. Defense Considerations: 1. Location Fortification Potential - Whether or not a player can easily fortify their location substantially changes the relative strength of incoming attack waves. Fortification potential is related to two key factors, (1) Are they buildable walls, and (2) how wide is the enemy's angle of attack? Buildable walls increase the relative defensibility of a location more than any other single factor. Walls add effective life points to the defending towers and units, while also impeding enemy progress, therefore providing the player with more strength depth. Attack waves which might overrun a player in an open field can become a joke to him when he is sitting behind a set of Amii walls. The width of an enemy's attack angle attacks in a similar way. If, similar to Guns of Lyr, enemies attack into a narrow chokepoint, even giant waves become trivial to defend against. At the same time, if the enemies can spread out such that area of effect spells and abilities cannot hit large portions of the attackers at once, the wave's overall threat increases. Therefore area with narrower angles of attack and buildable walls need stronger attack waves, while areas with wider angles of attack and no buildable walls need weaker attack waves. 2. Length of Defense - The longer a player is allowed to sit in a single location, the larger the attack waves will need to be to dislodge him. While small, low tier waves might threaten a player initially, even waves one or two tiers higher than him will seem insignificant if he has been given a large enough time to prepare. In general, if a player has only been given a short time to begin preparing his defenses, attack waves could be sufficiently strong even at tier and unit count parity. But once he has been allowed to settle in and build a layered defense, attack waves will likely need to be both stronger and more complex to overrun him. 3. Player Tier - Lower tier players have less defensive options than higher tier players. The higher the player's tier, the stronger the attack waves will need to be in comparison to the players on paper strength. 4. Total Areas to Defend - A key point discussed at length in this guide has been that the fewer areas a player needs to defend simultaneously, the easier it will be for him to succeed. While even the equivalent of a Tier 6 attack wave from a single direction might fail to overwhelm a player with T4 protected by a wall, even T3 units from enough different directions could overrun the same player. Creating multiple areas where a player must defend taxes not only his power pool, his charges, and his cooldowns, it taxes his mind. It becomes exponentially more difficult to respond to major threats that could undermine your defenses, when these threats are coming from different directions, and particularly if they are far enough apart to not be visible on the same screen. Particularly at higher tiers, where the tools available to players are so strong, it is essential to create multiple avenues of attack. At the same time, a map designer must be careful not to overwhelm the player's mental capacity with an excess of attack directions simultaneously.