Search the Community
Showing results for tags 'guide'.
Found 19 results
-
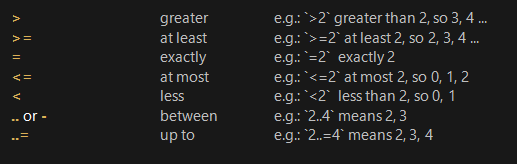
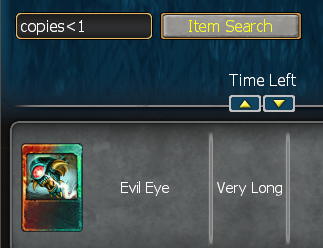
 What is Advanced Filtering? Your card collection has clickable filters like rarity, orb colour, and more. But there is also an extremely powerful search bar that accepts special commands to filter your cards. Below you will find a list of all those commands with some explanations. (Please note, due to the necessary formatting, this article will look weird on mobile devices.) Basic Filters Command Example promo: + 1 or 0 `promo:1` (Instead of 1/0 you can also use: true/false, yes/no) flying: + 1 or 0 ranged: + 1 or 0 melee: + 1 or 0 name= + exact card name e.g.: `name=Mo` (exact match) name: + part of card name e.g.: `name:enli` name? + approximate card name e.g.: `name?abonimation` class name= e.g.: `class name=Soldier` (exact match) class name: e.g.: `class name:Archer` class name? e.g.: `class name?Dominatrix` ability= e.g.: `ability=swift` ability: ability? class: + ID (or SR assigned name) e.g.: `class:female` rarity: or rarity= + rarity name e.g.: `rarity:rare` affinity: or affinity= + affinity name e.g.: `affinity:shadow` edition: or edition= + edition name (or ID) e.g.: `edition:twilight` colors() e.g.: `colors(nature, !fire, !shadow)` to see only nature, and Stonekin `colors(fire, !other)` to show only fire cards colors=() exact match, e.g. `colors=(fire, nature)` to see only Twilight size: + type e.g.: `size:XL` counter: + type e.g.: `counter:XL` Affinity names: `shadow`, `nature`, `frost`, `fire`, and `-` or `none` for cards without affinity Edition names: `3` =`twilight`, `4` = `renegade`, `5` = `lostsouls`, `6` = `amii`, `7` = `rebirth` Color names: `fire`, `frost`, `shadow`, `nature`, `neutral`, `other` Size and Counter types: `S`, `M`, `L`, `XL`, `special` (special is used for buildings or magic) Number Range Filters Operators: power + number range e.g.: `power>300` damage + number range e.g.: `damage>500` health + number range e.g.: `health>500` upgrade + number range e.g.: `upgrade<3` to show cards that are missing an upgrade charges + number range e.g.: `charges<3` to show cards that are missing a charge copies + number range e.g.: `copies>4` to show what to reforge ID + number range (mostly for internal/development use and for the search in market feature) Combining Filters Operators: Logical OR matches at least one of the filters. If one is matching and the other is not, it will return a result. Logical AND has to match both filters. Only if both conditions apply will it return a result. Logical NOT inverts the result. Beware that not all filters can be inverted, that's why it may be advisable to use !(filter). Wrapping the filter with `( )` does not change it in any way, but allows easier organization. Error Tolerance ? Name ?<number> Name The question mark will help you to search a text with error tolerance. If you know the card name, but you are not sure about spelling, you may use this. You can also use ?<number> to specify the error tolerance you want, e.g. 'name?5' for up to five typos in the name. If you do not specify the tolerance level, level 3 will be used. “?Light blade” will find “Lightblade” even though the search input had a space in it – “?1Light blade” would also work (because it only contains just one typo). Custom Filters *name* You can create any custom filter you want, `Documents\BattleForge\custom_filter_extensions.json` contains some examples. In-game you can use `*name*` (where `name` is the name of the custom filter), e.g.: *shiny* Note: Numbers [0-9] are not allowed for naming custom filters. Market Place Filtering Advanced Filters also work on the marketplace – for example, if you want to see all cards that you do not own yet, you can use 'copies<1' to find out: Filter Examples class:Dragon Finding dragons for the Draconic Desolation achievement class:Female What works with Girl Power? charges=3 & copies>1 Something you might want to sell on the market charges=3 & copies>4 Something you might want to Reforge charges<3 & copies>1 All cards not fully charged, but you have additional copy, so you might want to apply it rarity>2 To see only rare and ultra-rare cards Suggest your best filters in the comments, so we may add them to the examples! Keyword List – Languages and Synonyms Final Notes There is an always up-to-date version of this information in your Skylords Reborn\docs folder. Additionally, for more information about why this system was created, and how it works, feel free to read HERE. A special thanks goes out to @Kubik, who made this awesome feature possible and keeps on developing more features for it.
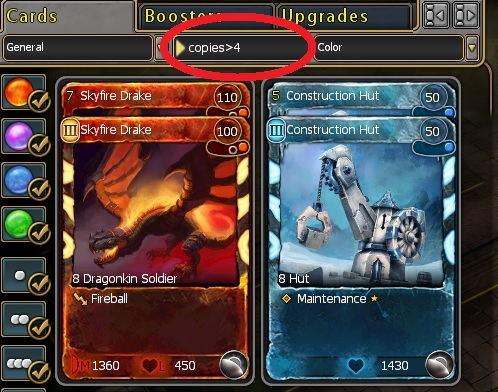

- 21 replies
-
- 13
-

-
HOW TO SUPPORT Not so rarely new Skylords ask a simple question on Discord or the forums: How can I help? As we all wish for more players, there are things you can do to help to make Skylords Reborn succeed. Skylords Reborn can be supported through many actions, some of them are just two minutes for some clicks, others are a long-term commitment. Important Disclaimer: This guide does not rank people by importance - these are suggestions how to help the game succeed, ranked by their needed involvement level. Also, you don't have to “climb this ladder” to become part of the Skylords Reborn team. Hopefully some of these suggestions speak to you, and inspire you to take some action: SOLDIER Quick Tier - the most helpful clicks to settle in Help drive the most essential metric by subscribing to the official Skylords YouTube channel, and like the trailer. Join the Skylords Discord to stay on top of news, and help build an enjoyable community. Subscribe to the other official Skylords Reborn socials: Instagram, Facebook, Reddit, and TikTok. CHAMPION Basic Tier - become a part of the community Subscribe to BattleForge content creators, and like their videos if you enjoy them. Participate in events - not just for prizes, but to support event hosts. Make sure beginners are welcomed properly: Answer questions, and play multiplayer maps with them. Read the monthly Community Update and help spread correct information about the state of the project. Interact with forum posts or Discord messages through likes, emoticons etc. - the creators will appreciate that. Make a proper bug report when you encounter a bug or crash. This rarely happens, but: report rule violations, either ingame or on the #contact-staff Discord channel. Suggest the game to people you know that will enjoy a RTS/TCG game, but make sure you coordinate with the Skylords team Outreach Coordinator when contacting high profile people or outlets. HERO Dedicated Tier - invest some time to make the Skylords experience better Accompany some Twitch streamers, while the community is still small, one viewer more or less makes a huge difference. Participate in the votes or share your decks on the SMJ community deck section. Become an educator: Help others understand core concepts like void power or faction mechanics, and give advice on expert maps on the ingame strategy channel or on the deckbuilding channel on Discord. Write a beginner guide or a deck building/strategy guide on the forum, or a more general one like the one you are reading right now. Create something: make a painting, a graphic, a short clip, a song, a text, a meme, an animated GIF or just some cookies, and share it in the art, video or meme channel. Become a sponsor of a community contest/event to beef up its prize pool. Join the discussion and give quality feedback on the Balance Discord. SKYLORD Invested Tier - halfway down the rabbit hole Become a Contributor: There are several roles that don't require you to join the team, like Map Tester, Translator, Proofreader, Art Critique, or Internal Tester. Get involved into more detail-focussed Discords, like lore, descriptions, mapmaking, or rPvE. Help maintain the Skylords Reborn Wiki by either adding or updating articles. Create an enjoyable community map. Host an event for other Skylords to enjoy, be it PvE, PvP or something else. Contribute to Skylords Open Source projects. Become a content creator on YouTube, or start to stream the game on Twitch. Maybe this rather long list inspired you to help in one way or another. As a final suggestion: If you have free resources, you might be interested in joining the Skylords Reborn team and directly work on the game to make it better! Please be aware that almost everybody thinks “I'm not good enough” at first. Don't let that stop you! There are loads of different positions for nearly every skill set. If you have any suggestion about something I missed, please write it in a comment down below, so I may add it! Kapo.


-
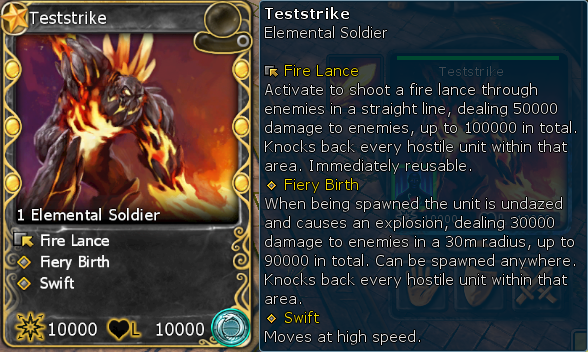
Afraid of joining Expert lobbies because you have never played them before? Want to try a new deck but don't know how it'll work out? Would you like to train maps without the pressure of potentially failing your teammates? Really want to see for yourself if a certain card is worth the purchase and performs well? The Testserver got you covered! Introducing: This unit is exclusive to the Testserver and as you can see has insanely high stats. Not only that, it costs no power and can be played on T1 with any color. Additionally, it can be spawned anywhere on the map, regardless of ground presence. This means that using Teststrike, you can more or less remove certain parts of maps and only focus on training the ones you want to. Build your deck as you would normally but swap out one card for Teststrike. Want to train defending on position 1 or 2 of Guns of Lyr but are unsure which cards can hold for long enough and how quickly you have to progress? Spam a couple of Teststrikes around the fortress and they will kill anything that comes close. So you can focus on your own game. Unsure how to approach the difficult camps on Nightmare Shard? Lock one side of the shard down with Teststrike so you don't have to worry about fending off witches from that direction. Now you can experiment on how to free your T2. No idea how to either be quick enough or defend against the attack waves on Blight? Teststrike can nuke the other camps so you can put your own strategy to the test. Can you save the civilians in time on Titans or clear a path for Rogan before Jorne stomps him? Just let Teststrike do the tasks in the other sections of the map and get your position down. The only thing to keep in mind is that, as you start a map solo, certain wells and monuments that would be dedicated to other players on that map won't spawn. Maps that unfortunately cannot be trained solo are: Empire, Ascension, Passage to Darkness. So when you find yourself really struggling with a map, want to try a new deck or just get a closer look at certain aspects you can log onto the Testserver and give everything a go in a pressure free environment. Everything will get a lot less scary once you have a couple of reps under your belt and can confidently join an Expert lobby on Live, knowing that you can handle your position. You will learn a lot! How to access the Testserver Open your install directory of Skylords Reborn where SkylordsRebornUpdater.exe is located. Now, instead launch the game with LauncherTest.exe and you will connect to the Testserver. You will have to make a new account specifically for this server. This is a separate account and doesn't interact with your regular Live-server account. As such, progression with Achievements or anything won't carry over to the Live server. Speaking of which, on the Testserver you get 100m gold and BFP as well as all cards fully upgraded (may need to relog once to receive everything). Every now and then you might even catch a glimpse of a yet-to-be-released card! Happy testing!
-
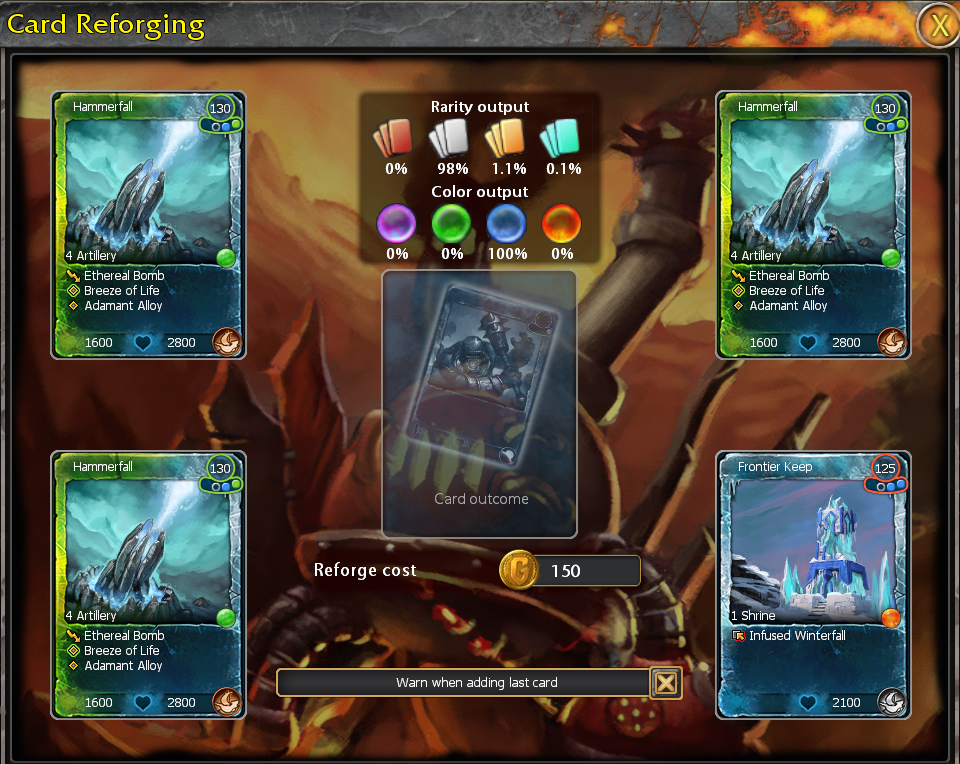
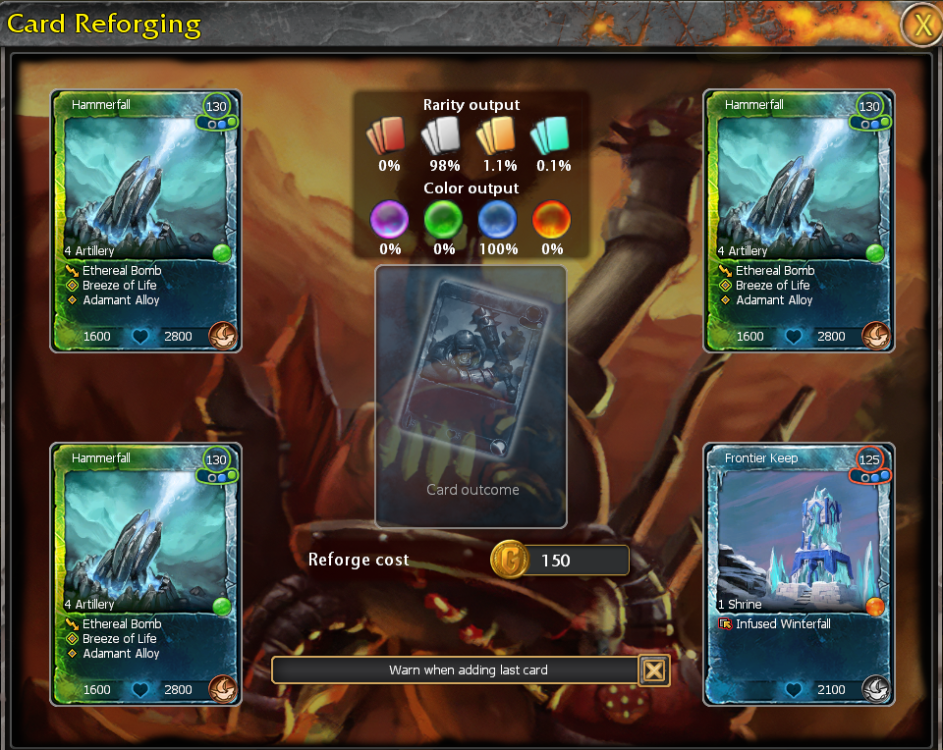
In this roughly 10-15 minute read you'll learn how to get BFP and gold in Skylords Reborn. You'll also see that even cards that seem out of reach like an expensive Harvester, Avatar of Frost or Forest Elder are not that far off at all! There is no way to spend money in the game, as such BFP and gold have to be earned through gameplay. They are separate currencies that are used for different things. BFP can be traded, gold cannot. BFP is used to: purchase boosters from the shop purchase cards from the auction house apply card-artworks as avatars Gold is used to: purchase upgrades apply upgrades purchase cosmetics pay the fee to send mail, list auctions and reforge cards Daily Quests Each day you get two quests that are worth 75 BFP each upon completion. You can hold a total of six quests simultaneously. Keep completing those and that's 150 BFP in the bank each day. Here is the entire pool of available quests. Daily Rewards For time spent in-match you get a steady flow of BFP. Each day a Daily Boost of 250 BFP is added, colored in blue. If you don't manage to drain your Daily Boost then some of it carries over to the next day. But no matter how much Daily Boost you saved up, it will always drain over the course of 45 minutes of in-match time. Below is the Reserve, colored green, which steadily refills at a slow pace. So you can continue earning BFP even when playing past the 45 minutes. But the lower the Reserve gets, the slower it distributes BFP. So if you manage 45 minutes of playtime each day, you consistently get 250 BFP here. For more information see here. Daily Discount In the Marketplace you can unlock a daily booster discount after spending 45 minutes in-match. Two options here: Sell the booster for profit. General Boosters sell the best. Buy the discounted booster for 350 BFP and trade them for more to another player. Usual rate is 420 BFP, so 70 BFP plus for you. Great if you want raw BFP for specific cards. Open the booster. You only get to experience organically growing your collection by opening boosters once. Same goes for getting and trying new cards and building decks with whatever you have. Not to mention that in a collectible Trading Card Game it's kind of an essential component to roll the dice on boosters. Also, most valuable Promo cards only drop from boosters. 1 in 200 boosters on average. Either way, you should always take advantage of this discount. Map of the Day Each day one of the maps on the world-map is on fire, which indicates that it's the MotD. You get to pick an additional reward for winning, be it another upgrade or extra Gold/XP. Additionally you gain 50 BFP. Winning the MotD on ten different days on Adv or Exp will grant you one Rebirth Booster. This is a valuable booster that only contains cards from the Rebirth Edition. As such they are very sought after, especially when new cards are released. Since the content of a booster is determined on opening even stockpiled boosters have a chance of dropping new cards. Test your luck by opening them when new cards are released or sell them to somebody that wants to. Depending on the demand (should be much higher on new card releases) you can sell a Rebirth Booster for 1000 - 2000 BFP or even more. In total: 450 BFP each day Whatever you drain from the Reserve 100 BFP discount on a booster. If you don't want to open your booster and pass it on, that's 520 BFP each day. Rebirth Booster every 10 days, valued 1000 - 2000 BFP. Even the most expensive Ultra Rare (UR) cards (excluding Promos and newly released ones) are 1000 - 2000 BFP. So that's like, what, 2 - 4 days of playing? Very approachable for the most desirable content in the game! Achievements There are a ton! And many of them are very beginner friendly. Focusing on those will give you a quick boost after starting out. The easy ones to keep in mind are: Up and Coming - 1 Mini Booster Complete the Introduction. Going in Cold / Lighting the Spark / Nurturing the Soil / Beginning the Ritual - 1 Mini Booster each Win a match where you start your game with one of the four main faction colors Frost / Fire / Nature / Shadow. Always Adapting - 1 Mini Booster Win with a deck level of 30. The deck level increases with each upgrade (making a card stronger) and charge (loading an extra copy of a card into one to increase the amount of times you can use it before it goes on cooldown) a card has. You'll quickly get there. Ever Evolving - 1 General Booster Same but with a deck level of 60. Will take a bit longer but if you focus in a few cards you really like to use it's still achievable in a timely manner. Especially with Common cards, as those are cheap to upgrade with gold. Thirsty for More - 1 General Booster In-match time of 5 hours. Afterwards even scales to 15 and 30 hours, granting an additional 2 and 3 General Boosters. A Reputation To Uphold - 1 Mini Booster each level For each PvE Rank/Level you rise you get one Mini Booster up to Rank 6. So a total of 5. Afterwards you get General Boosters. Friendly Neighbourhood's Skylord - 1 General Booster Do 20 Daily Quests. This is repeatable, so you can get one General Booster every 10 days. Heart of the Cards - 1 General Booster Open 20 Boosters. Also repeatable. Just a Story - 1 Twilight Booster Winning Encounters with Twilight, Siege of Hope, Defending Hope, The Soultree, Crusade, Sunbridge, King of the Giants, Titans, Ascension on any difficulty. The Most Dangerous Game - 1 Bandits Booster Winning Mo, Ocean, Oracle, Slave Master, Convoy, Blight, Raven's End, Empire on any difficulty. Saviour of Nyn - 3 General Boosters Win all campaign (cPvE) maps on any difficulty. Godslayer - 250 BFP Win Sunbridge and Insane God on any difficulty. Apprentice - 1 General Booster Win any 20 randomly generated PvE (rPvE) maps of any difficulty. Draconic Desolation - 250 BFP Spawn 7 different dragonkin in a single match. The cheapest are: Giant Wyrm, Fire Dragon, Lost Dragon G+P, Northland Drake R+B, Swamp Drake, Skyfire Drake, Wasteland Terror R+G, Windhunter G+P. You can just switch orbs during the match to spawn them one after another. To see which ones you currently have, just type in "class:dragon" into the search bar of your own collection. This also works in the marketplace so you can look up the cheapest. A Wrinkle in Time - 250 BFP Win the map Empire under these conditions: Your deck only contains Frost, Shadow and Lost Souls cards. You play at least 5 different Lost Souls cards during the match. There are a couple more rather easy Achievements but they require specific cards. If you really want to complete some of these, you can check if they are currently cheap on the marketplace, buy them for the Achievement and sell them again afterwards. But the above alone nets you a total of 750 BFP, 11 Mini Boosters, 8 General Boosters (3360 BFP total value), 1 Twilight and 1 Bandit Booster (~ 880 BFP total value). And those are just the easy Achievements that can easily be done within the first couple of days. Dozens of other Achievements to do after that! Trading If you want to dedicate some time to speed up your BFP gains you can get into the economy. In short: Buy low, sell high. Paying attention and taking notes on the usual prices for certain cards will give you an idea of their marketplace value range. Then, whenever you notice a card dipping on the low end of their usual value, you can buy those up. When the price for your newfound inventory rises again you can ditch them for profit. The Skylords Market Journal is an amazing resource for this approach. Some cards have a much higher variance in their prices than others. Changes to the game can affect prices as well. After you have a good feeling for card prices it takes maybe 30 minutes a day to buy and sell inventory, if you keep track of a lot of cards. But in return you could make an extra 1000 BFP in that amount of time. Since the introduction of reforging every rarity has a price floor it doesn't really dip below. Cards that would have a very low marketplace value are instead given inherent value as reforging material. Therefore reducing overall supply and increasing demand as long as they are very cheap. Meanwhile, very expensive cards are dead-ends as far as reforging is concerned. They are not being used as material and either kept or sold. That means reforging has a soft rubber-band effect, dragging the lowest prices up and the highest prices down. Because low value cards become more desirable as material while being funneled into high value cards, increasing their supply. That also helped making opening boosters less volatile since you are guaranteed a minimum return simply because of card rarity. The usual price floors for rarities are ~10 BFP for Cs (Commons), ~25 BFP for UCs (Uncommons), ~100 BFP for Rs (Rares) and ~200 BFP for URs. You will notice hardly any cards ever notably dipping below that. However, there are sought after cards that will be much more expensive than their rarity suggests. For example Lost Dragon or Nomad can be around 20 BFP despite being Cs. Shaman or Frost Mage, both UCs, regularly go for well above 60 BFP. Popular Rs like Mine or Mana Wing sell for over 300 BFP and iconic URs like Enlightenment or Harvester change hands for more than 1000 BFP. These high value cards also often have big fluctuations in price. Newly released cards are also always very expensive shortly after release and then slowly settle down. So carefully think about whether you want to use them immediately on release or rather wait and buy them later. If you get your hands on a copy early on, either through a booster or reforging, do you want to keep it or sell it for a very high price and buy another copy a few weeks later for a fraction of the price? Reforging If you like to gamble with some dead inventory then Reforging can be very profitable, especially when new cards are released. Check out the rarity of the new cards and their orb colors. Then use your excess cards to get that orb color and rarity output in reforging. Let's say I am aiming to get a specific Frost UC card. So I am narrowing down the pool to 100% blue color output, which means Frost, Stonekin or Lost Souls cards are possible. I put in three identical Cs and boost the rarity output with an UC that shares a lot of similarities with the Cs. Another approach. The Lost Launchers have different affinities but close enough. In order to get 100% blue again, I put in a Stonekin card so all four cards share that color. Because I am mixing building and a unit (less similarities) my rarity output suffers a bit and I might get unlucky with a C as the result. But it's good enough and I am even saving some gold by mixing like that. Similar story if you aim for an R. Match three identical UCs with one R that has as many similarities with the UCs as possible. Or use more expensive material in two identical UCs with two identical Rs to remove the chance for an UC output. URs are the easiest to target as it simply requires four identical Rs to achieve a guaranteed UR output. With enough volume of material you can easily brute force several newly released cards on patch day. Sell them while they are hot and buy copies for your own collection later once prices dropped. For example, a newly released UCs, which will probably trade for 100 BFP a month later, can easily be sold for over 3000 BFP on day one. So if you have large volumes of excess cards that are too numerous to sell, just burn them all up on new releases. You can also keep an eye on which color pool has the most expensive URs and then shred some Rs to roll the dice. But also keep some gold stocked up, as reforging requires it as a fee. Gold is earned over time in-match. The rate at which you earn gold depends on the difficulty. Higher difficulties reward more gold. That is true for both cPvE and rPvE. There is no need to rush maps or artificially drag them out as the rate at which gold is generated is a bit slower very early and very late into a match. So if you just play normally you should always fall somewhere within the sweet spot of gold-over-time. At the end of each win you have the choice to either pick an upgrade (which would otherwise cost more gold to unlock, so upgrades are basically gold in a different form) or a plain gold/XP reward if you don't want or need any of the presented upgrades. Keep in mind that the price for purchasing upgrades with gold depends on the rarity of the card, Cs being the cheapest and URs being the most expensive. So while taking upgrades as map rewards is never a bad idea, R and UR upgrades are especially gold efficient. As previously mentioned, when you win the MotD you get to pick an additional reward!


-
Since my last pure fire campain replay collection is complety outdated I took the new patch (wich I really love) as an ocasion to do it again! This will be an always repeating quest with every big update that destroys replays 🙂 Some runs have actually improved a lot, some were just terrible but i didnt want to repeat them... Don't take it to serious, these are still casual runs! 😇 1-Player-Maps: 2-Player-Maps: 4-Player-Maps:


-
Hello fellow skylords! I often see people hating on pure decks for the expert maps, with this post I wanna share my love for fire Soon I will upload at least one replay for every expert map with pure fire, some solo and some duo versions. This replays contain casual gameplay, no optimized runs so there will be some fails, please dont hate me Special thanks to Keksmonsta and Kendrikson who will be my mates in most of the duo runs. Have fun with the replays, Anske Edit: 1 and 2 player maps are completed! 1-Player-Maps: 2-Player-Maps: 4-Player-Maps:
-
I thought I would collect all my replays (so far) in one forum post to have everything collected and visible in one place. Encounters with Twilight - https://youtu.be/wGkuvar4rcE Siege of Hope (Rank 1) - https://youtu.be/I3zuwFnYI8U Defending Hope - https://youtu.be/p3xdZXi38oM The Soultree (Pure Nature) - https://youtu.be/7SfPK1x5kTE Behind Enemy Lines - [TO DO] The Treasure Fleet - https://youtu.be/qQaF2yjwJV8 Mo - https://youtu.be/Jf-yePbapjI Ocean - [TO DO] Oracle (Pure Fire) - https://youtu.be/uV1PSVBMknQ Crusade - https://youtu.be/r-zU8iGXRFI Sunbridge - https://youtu.be/j9dyxV1raso Nightmare Shard - [TO DO] Nightmare's End - [TO DO] The Insane God (Solo, Pure Nature) - https://youtu.be/aTxxv1j7v7I Slave Master Pure Nature - https://youtu.be/PIy94UF4Pmc Convoy - [TO DO] Bad Harvest - [TO DO] King of the Giants - [TO DO] Titans - [TO DO] Ascension - [TO DO] Passage to Darkness - [TO DO] The Dwarven Riddle - [TO DO] The Guns of Lyr - [TO DO] Blight - [TO DO] Raven's End - [TO DO] Empire - [TO DO] If you have any questions or suggestions for future video's, feel free to post it below.
-
- 7
-
-
- Youtube Tutorials
- guide
- (and 1 more)
-
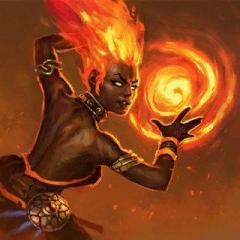
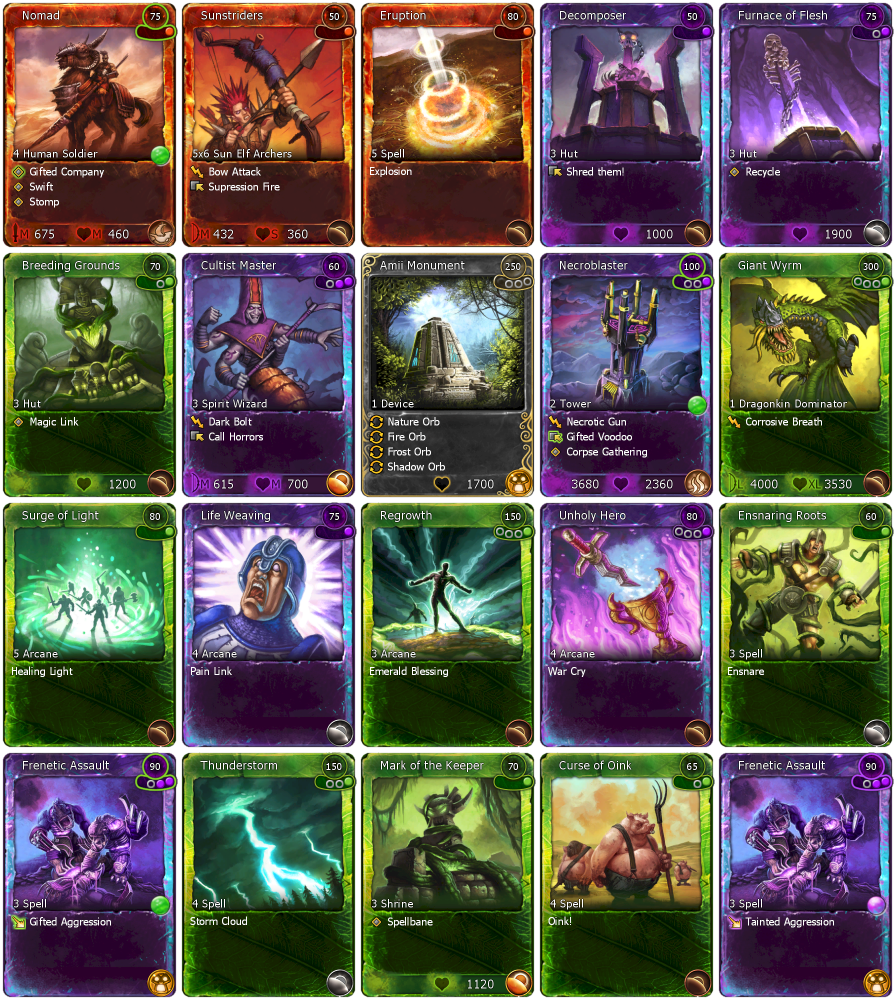
------------------Disclaimer------------------ I wrote this guide without access to the game and do not intend to update it anytime soon. I apologize for all inaccuracies due to my limited memory. The vast majority of things should be actually correct, but I might've missed a few smaller things that i probably wouldn't now. Also note that the metagame in some areas has evolved since the game has been accessable again. This mostly manifests in the fact that Lost Spirit Ships became a lot more situational and Batariel is often the way to go instead, even against Lost Souls maps. This happened because Batariel is a lot better understood in its limitations and players got better at playing around those limitations which are especially relevant to Lost Souls maps. If you want to see the theories described here in practice you might want to check out following thread where I upload solo speedruns of 1, 2 & 4 Player maps pretty much whenever I play them: https://forum.skylords.eu/index.php?/topic/6281-treims-motm-solo-speedrun-archive/ Apparently images originally attached and referenced in the explanations just ceased to exist for some reason. For the full guide please go to the END of this post and use the dropbox link attached there to get access to the full guide. 2. General Information 2.1. Spawn Mechanics First of all: Spawn mechanics in rPVE are very simple, they are following only 4 rules: Whenever you attack a unit from an enemy base (except the spawns), every camp that has a direct path to that attacked camp will start spawning units. A camp has a direct path to another camp when you can go there without facing any other camp on the way, its direct. You can go from camp A to camp C without the need to go through Camp B. When such a unit is spawned, it will always directly attack your monument, that was the last one you have built at the time the enemies spawned, monuments that weren't built up, but were in progress, when they spawned count as a 'full' monument. Any monument you build after they spawned are not relevant for that specific spawn. Whenever a camp started spawning units, it will not stop until you kill the spawn building. A camp can only spawn new units if the complete previous spawn gets killed. Example: In the picture I have named camps: '1','2','3','4','5' The arrow symbolizes your attack, so the following will happen: When you hit the first units from '1', '2' and '3' will start spawning as their is a direct path from '1' to them. Nothing will happen to '4' and '5' as they do not have such a linkage to '1'. After '1' is cleared you could go to '2' or '3'. In this scenario we will go to '2'. When you attack '2', '4' will start spawning units as they have a direct linkage.'3' will still spawn units, as it can't stop; '5' will still do nothing; '1' doesn't exist anymore. Next step would be to clear '4'. As soon as you attack '4', '5' will start spawning units due to their direct linkage. '3' still spawns units, '1' and '2' doesn't exist anymore. 2.2. Base structure & how to find the 'right' spawnbuilding So a base is always built up like this (with more or less paths to it): First of all you need to know that in every base there is always only 1 spawn building, if there is a 2nd one that could potentially be a spawn building as well (just from the way it looks), one of those is fake and will never spawn any units. There's a way to identify the correct and the fake spawn building with 100% security. In order to do so you need to know following things: You will have several entries and one of them is the 'main entry', you can always recognize the 'main' entry on how the base is aligned. In this case the 'main' entry is 'entry 1'. You can recognize it as 2 towers are directly oriented to that entry (they are always on the left and the right of that entry), even though you might get into the base from entry 2, 3 or 4, '1' will always be the main one. With that knowledge the spawn building that spawns units is not random at all anymore, its 100% predictable which of them will be the 'right' one. When you would run into the base from the 'main' entry, it is ALWAYS the spawn building on the right side of the base. If you ever think it's not, well better check if you have the main entry identified correctly. 2.3. The issue of close camps and trapping spawns. I bet most of you (if not any), already had this: you're into a battleground game and you pull the aggro of the t3 when trying to take t2. This often happens (95% of the time), the spawn of the t3 will somewhat pull the whole t3 base to your t2 base. In very rare cases, the aggro range of the t3 includes the t2. In all the other cases the spawn will just 'ask for ally help'. That actually means that you can avoid those attacks from close camps by 'trapping' the spawn in-between t1 and t2. Every fraction (fire/nature/frost/shadow) can do that, some easier some harder: Fire: Get 3 nomads (green), kill the melee part of the spawn and kill the most part of the archers, you want of the squad of 6 archers that maximal 4 are alive, so your nomads always stay healthy. For the last few hp you need to take away from them, you can just through them. It is very necessary to hold position (press 's'), so that the nomads don't attack the archer squad. Demonstration: http://listenonrepeat.com/watch/?v=g52hV...ade_Expert Frost: Kill the melee units, take aggro of the archers with one unit and run to t2 with another one, you can take a well when the archers are NOT in range of it, otherwise its a gamble, if they switch their focus. After that spam some ice barriers and kill the squad you held aggro with. (if you are confident in your skill, you can try to do the same as with nomads, but its much harder as you can not run through them to do damage. You need to use master archers and stop the attack of them at the exact correct time, so that the bolts doesn't finish off the whole squad, but only parts( that works because every unit of the squad needs to get killed by a single bolt) Shadow: Basically same game as with frost, kill the melees, pull the aggro of the archer squad with one unit and take a well at t2 with another unit, kill that one after. Build Soul Splicer in-between t1 and t2 and kill some units next to it to, to fill it up. Then just press 's' with the squad you have aggro. By the time the soul splicer is empty, your aggro unit is dead and the soul splicer is destroyed, you should have enough energy collected to clear t3 easily. (You can try the same as mentioned in Frost, as it will lower the damage of the squad you gain more time) Nature: Kill the melees or the archers, take aggro of the other one with a shaman and build t2.. done. Extra tip: When you face lost souls and the spawn includes a lost dancer you are the luckiest guy in the world. Use any squad unit (windweavers/forsaken/northguards/master archers, etc.,etc.), kill all other stuff but the lost dancer, and press 's' with your squad unit. When the lost dancer attacks it, the squad will split up and stay like that, any following attack of the lost dancer on that squad will do no damage anymore. This also works for close camps at from t3 to t4. 3. rPVE/Battleground 1 Player 3.1. Map structure and general principles First of all I would like to show you the general structure of a lvl 10 1 player Battleground map, you will need to understand this in order to follow some of my thought process. In this case we start at the bottom of the map. That is because it easier to explain it that way, but it doesn't matter if the map is twisted 90°, 180°, or 270°. The principle stays the same. You see that the way will split up right in front of your t1. The t2 will always be at the end of the way that goes to the edge of the mini map. Notice that the way to the camp that is closer to the centre of the map will always be way shorter and you might get problems with pulling the whole camp and or shamans if any exist in that camp. That is important as you want to avoid attacking anything from that base, because it will force another camp to spawn units as well, it makes it way harder to defend. You always want to rush to t2 with the smallest possible amount of energy being used - in other words as soon as possible. At that rank on the map you will always have 2 camps next to your t2, while t3 is always above on the next rank of the map. You always want to clear that as soon as possible as well, without using to much power in defence for the units that will attack your t2. Next to your t3 you will always find 2 other camps and the t4 on the exact opposite of the map. From that point on you will have 2 more ranks on the map with each 3, rarely 4 camps. That means in general you have to clear 6-7 bases after you cleared the 'real' t4 base. Whenever you reach a base you basically want to destroy the 'right' spawn building before it can spawn any units, as those can respawn the whole base. Which would cost a lot of time. 3.2. Common t1- t4 strategies T1: Enemy - Bandits: Fire: Get 3 nomads (green), kill the melee part of the spawn and kill the most part of the archers, you want of the squad of 6 archers that maximal 4 are alive, so your nomads always stay healthy. For the last few hp you need to take away from them, you can just through them. It is very necessary to hold position (press 's'), so that the nomads don't attack the archer squad. Demonstration: There's some additional information I want to mention: This only works when your monuments can NOT attack the spawn, it will kill them slowly but not for sure. That makes it very important to be careful with the positioning of the spawn. Shadow: Almost always your first choice to go. You will need forsaken or Nox Trooper (I personally prefer forsaken because- of their passive and because Nox Trooper aren't very good against squad units, which you will mainly face at t2). Key cards are forsaken, soul splicer and motivate. You basically want to build up the soul splicer at the exact range, where you don't aggro the t2 and then build just enough forsaken to clear the camp. You want to use 3 frenzied forsaken (in some cases with very bad spawns and unit positioning you might need more) to clear the spawn building, while you focus on taking down towers and those annoying mana wings with the other forsakens first. As soon as the first forsaken (not frenzied) hits a point where he has half of his hp left, motivate them. So the soul splicer can heal the rest up in time. Sometimes its worth/necessary to get a skeleton warrior in front of them to tank up a lot of damage. That is the case when you have a t2 base with bunch of units. Defend with 2 forsaken. Spawn behind the monument and don't worry about enemies focussing on the monument. Frost: If shadow isn't working great against the enemy try frost. Key cards are frost mage, ice barrier and homesoil. If you face those annoying spearmen that can't get knock backed summon 2-3 master archers in order to kill the spawn building, as frost mages aren't really good against those due that they cant attack the spawn building properly. Defend with 1-2 frost mages, if the spawn includes spearmen use 1 frost mage and 1 master archer. Spawn behind the monument and don't worry about enemies focussing on the monument. Fire: Only good in very rare cases. Mostly when you have these windhunter thingies AND you're having a close camp. What you want to do is: Spawn 3 nomads (green) set 1-2 mines and use 4 eruptions to kill the spawn building. You can defend with makeshift tower or 1 mine. Key cards: Nomad (green), mine, eruption. If necessary you can add sunstriders against those mana wings. After that you want to set up 3 blaster cannons (red) and build another nomad. So you have 4 nomads. Then set 2-3 mines in front of the t3 base and pull the whole base into your mines and blaster cannons. You run in the t3 base and clear the spawn building with eruptions. Mission accomplished. I got an example video for you: http://listenonrepeat.com/?v=8EkqkzbuLw0..._von_Treim Nature: Never viable, units and spells are just to expensive and following orb order is not better than frost. Basic information: in 95% of the maps you should be fine with spawning 6-8 units to clear the t2. T1: Enemy - Stonekin: Shadow: Same as Bandits, but you will almost always need to have skeleton warriors on top of the soul splicer. If there are those crystal fiends at t2 you should prefer nox troopers over forsaken as well, just to avoid the knock back, as well as being able to kill them very fast with the 'overload' ability. You will need immediate motivate in order to clear the spawn building with nox troopers though. In general 4 should be enough for that. Frost: You will often need some master archers on top of the frost mages, as they're not very good against the crystal fiends with their non targeted damage. You need to focus on them before killing the spawn building as they do so much damage. It's very likely that they respawn if you only use frostmages as well. I recommend using at least 3-4 master archers to kill the spawn building. Fire: not viable Nature: not viable T2: Enemy - Bandits: Your second orb is always shadow. You always want shadow phoenixes to clear the t3. If you started shadow t1 you can even build up resource boosters already. Those are a must in every deck. If you have those windhunters at t3 use spawn 3 shadow phoenixes use the embalmer shrine (you want to build up 2, so you can have the effect up all the time) and clear the base next to your t2, kill the spawn building in 100% of the cases and find the right target to get all 3 phoenixes back. That way you made those 3 phoenixes 'voidless'. That means they're not binding any more energy in them. You get all the energy back (into the void pool) when they attack. That way you can spawn 2-3 more phoenixes relatively fast and attack. You need 5-6 of them as 2 will get paralysed and might get focussed down before they are able to attack. If there are no windhunters just use 3 shadow phoenixes and enjoy to clear your t3 very fast. T2: Enemy - Stonekin: Basically the same as for against Bandits just with some special cases. You will most likely face constructs and tortuguns and t3 that means you need 11-13 phoenixes. In order to get 13 phoenixes very fast, you need to modify the way you get the phoenixes voidless by a little bit. You want to basically get 3-4 (depending on how many you can get back when attacking) and attack the base next to t2 again. But this time use a unit in the base that is far enough away from the spawn building, that the spawn building will NOT die. You will just fly away with your 3-4 phoenixes and let whole base respawn just to spawn 3-4 more phoenixes and now kill the base entirely (don't kill towers or anything if phoenixes wouldn't revive from it). that way you will have 6-8 phoenixes already and can almost instantly build 4 new and your good 2 go. Pro tip: Some of those tortuguns have a ranged anti air attack (just as the normal tortuguns have). Those will destroy a lot of phoenixes if it hits and your attack will most likely fail. In order to prevent that 'stack' the phoenixes on top of each other. If you tell 12 phoenixes at the same time to go to a certain map point they will automatically get in the formation you can see on the left side of the picture. However you can pick small groups or even single phoenixes and all let them go through a certain point and press 's' to stop them from moving right when they're in that point where you want to stack the phoenixes. If you stacked them correctly there should maximally die 1 or 2 of them to the tortugun, as they will fly in basically the same point all the time. If there are windhunters in that base you might want to consider to send 2-3 units in front of the phoenixes to tank their paralyse and damage. If you started frost you can use coldsnap to just freeze them. In some cases you will face something that is even more annoying: you might have to deal with deepgorge towers that will attack your t2 when you try to build it up. Those bases will get pulled when the spawn hits the t2 definetly. You have to trap the spawn in-between your t1 and t2 as mentioned in 2.3.. In those cases you need to get a bit creatively. You do not want to take the wells and only take the monument. You can either defend it with skyelf templar and trap the spawn with ice barrier spam, what is really expensive though (if you are not able to kill the most part of the archer squad and only leave parts of it alive) as you will need some time to get enough power in order to be able to attack t3 OR you use warden's sigil and just shield the t2 over and over with 2 of those and trap the spam with 2 warden's sigil that give each other a shield. I prefer the green one over the blue affinity due to the healing that helps much against the trapped spawn. T3: Enemy - Bandit: Get 3 cultist masters and a Furnace of flesh (if you didnt build one yet, I recommend building one already at t2) + amii monument. Latest point you get your resource boosters is when you hit t3. T3: Enemy - Stonekin: Should be a nature orb. Get amii-monument with nature aswell. Switch the frost orb into shadow if you started frost t1. Do not build t3 shadow just to get the resource boosters, but rather get it for frenetic assault. Its not worth it if you just build them now as you don't need a whole bunch of power anymore until you're totally fine. Enlight Batariel (red). T4: Enemy - Bandit: Spawn Lost Spirit Ship and clear the map. Use heals and buffs to keep them alive. I recommend to only use Lost Spirit Ship (red) so you can use flame crystal and motivate to buff them up. Use rifle cultists and offering (green) to get enough charges. I recommend to send 1 rifle cultist right behind your frontline so you get ground presence close to your main army and you're able to spawn them without them having to run a very long way to your troops. Extra information: If there is a boss with a lot of hit points you can use a fallen skyelf and his 'tainted disease' to kill those faster . You need to be very careful with the timing though at it gets completely reset if you are not able to kill the boss in the time 'tainted disease' is active. I only recommend using this if you have a free slot in your deck that you don't really need. T4: Enemy- Stonekin: Get 2 shrine of war to permanently have the void manipulation active and just buff it with spells. You can get those by switching the amii-nature orb into a fire orb. You also need that to get disenchant against the windhunter paralyse. Extra information: if there is a boss with a lot of hit points on the map, such as command walker (not sure if he was called like that, I mean that super construct thingy): You can use Bloodhorn(s)(purple) with his 'tainted enrage' and unholy hero to basically kill those in few seconds as batariel is very slow against bosses. So your end orbs would be like that: shadow, nature, nature, fire. This being said I would like to present you some very standard decks for a Lost Spirit Ship and a Batariel deck. I did not explain every card in detail but the one I didn't mention pretty much are explaining themselves. One last shot on this topic: Most of the time you will need to learn how much units you minimally need in order to clear t1-t3 just by trial and error. This is especially true for the fight for t2. You will probably need several tries until you find the correct units to focus and when to change the aggro. Just don't get frustrated if it doesn't work in the first few tries ^^ 3.3. Pathing Okay so at this point it starts to get a bit more complicated. In order to find the optimal path to run you need to always keep in mind these 3 basic variables: The strength of each camp The strength and way spawns will try to run down your base Most importantly the general map structure, that includes the ways you are allowed to run (the ways from base to base) as well as the position of certain camps on the map. To 1.: It doesn't really matter to much for Batariel decks, you can steamroll them anyway and you should always have enough power due to shrine of war. You just need to take care that you don't get to the very high damage bosses to fast as you don't have enough power to support 1 or 2 bloodhorns and a batariel early on the t4 phase. Crucial point for Lost Spirit Ship, you really want to kill the easier camps at first, as some camps are just to strong for few Lost Spirit Ship. Either it takes forever or you will just get wiped out. In order to use that time correctly try to kill easy bases at first. You really want to avoid bosses with high hit points until the very end. I'm talking mostly about the command walker as those literally take forever without at least 7 ships and a fallen skyelf. To 2.: As you want to clear bases with your Batariel and only send your bloodhorns in after the base is dead (except the boss) just try and let them sit back on ways where spawns will pass by. This requires you to study the ways certain spawns will go. Basically you want to avoid spawning too many units at your base to defend as that binds power that might be necessary for buffing and healing. Sometimes you can use Lost Spirit Ship that you would use for motivating in your base anyways to defend, but you need a bit of luck to have the power for that at the exact right time. That means you basically want to defend most, if possible spawn the rifle cultist and spawn a Lost Spirit Ship next to him that can then be added to your troops straight away. Sometimes you need to kite a bit in order to have enough power. In both cases you want to prevent that very strong spawns hit at your t3 as you will often times just loose the game by that. To 3.: With both decks you want to avoid going unnecessary ways. That means you need to find the way with the shortest distance to run by clearing all camps. Often times there is not a perfect solution that would include you running every way exactly 1 time and never run out of a base in order to reach the next one. If you remember the picture of 3.1. (or just scroll up to it again) you have exactly that case given. You need to run backwards from at least camp 7 or 10 depending on which one you want to do first. I played exactly that map in this video https://www.youtube.com/watch?v=8EkqkzbuLw0 (you might remember it 30x15file:///C:\Users\Niklas\AppData\Local\Temp\OICE_BB1A28E5-6F75-4C7E-BE57-31B96B37F208.0\msohtmlclip1\01\clip_image001.png). Even though I didn't use amii-monument in that game due to a challenge I had with a friend you can see the path I took after I had t4. This ones doesn't really give you a big task of finding the best path just because of the limited amount of Lost Spirit Ship I had and the fact that bases on top (8,9,10)of the map wouldn't be possible for me to clear due to their insane strengths. As well as the point that the chance of pulling the whole base 9 while mainly attacking cap 8 is kind of high due to the fact the whole camp is built up in a very small place and Lost Spirit Ship sometimes move weirdly through that. Even if I made it through that one it is likely that if I attack camp 9 I would pull camp 6. Those risks just shut down the only other efficient route in terms of point 3. To sum this one up: Its very necessary to know a map very good in order to be able to combine the 3 above listed variables well enough to find the optimal path. Often times you will need to gain that knowledge just with trial and error even though it will get much better the more experience you have with combining the variables and overall speed run experience. 4. rPVE/Battleground 2 Players 4.1. Map strucutre and general principles So obviously you have 2 starting bases on a 2 player map. These are basically identical in structure. Both have 2 direct ways away from their t1 to 2 outer camps. In-between those you will face a third camp. A nice little fact to take note of: If the t2 is at the left/right side of his t1, it will be on the same side for player 2 as well. This is always the case. There is no separate bases for t3 and t4, but both monuments are in the same base. The T3/4 bases are always directly linked. On the way you will face 2-3 camps (most of the time 3). Rest of the map is split in 2 rows with each 5 bases. The basic concepts of 1 player rpve and what you want to do and avoid are similar: Destroy the correct spawn buildings as soon as possible and try to not use to many resources in defence. 4.2. Common t1-t4 strategies T1 - Enemy Bandits Basically you are doing the same like in 1 Player rPVE, for both players. T1 - Enemy Stonekin Basically you are doing the same like in 1 Player rPVE, for both players. T1 - Enemy Twilight Shadow: Standard t1 with forsaken, soul splicer and motivate. Attack the spawn with 3 frenzied forsaken and kill the units with the rest of your forsaken. If have got Twilight hags at t2 you can use skeleton warriors to absorb the damage and use knock back with them, 1 should be enough though. If you face those annoying parasite swarms, either take them down very quickly or just start with frost. Frost: Standard t1 with frost mages, ice barrier and home soil. If you face twilight hags I recommend some master archers to have an easier time on focusing on them and the spawn building. Parasite swarms are no problem due to the knock back of frost mages. Fire: super situational. I don't recommend it 99% of the time. Nature: Not viable Extra information: This is the case for both players. I recommend one of them to start shadow, so you get some early embalmer shrines for t2 shadow phoenix. T1 - Enemy Lost Souls Shadow: Only viable for 1 player and only if the t2 doesn't include lost vigils. The other player will need to support the shadow player with massive fire spell spam. Use skeleton warriors only. Frost: Not viable Fire: If one player starts shadow support him massively with 2 mines and 4 eruptions on the spawn building at least. That's 440 energy minimum. You can add a defensive mine to defend the spawn near t1 to that if you wish. Notice that this will slow down the fire player massively but will speed up the other player massively. If there are lost vigils though you are forced to play fire with both players. The concept stays the same though. One player will support the other one with spells. You want to support the other player with at least 2 mines and 2 eruptions on the spawn building. Blaster Cannons are a must have. You want to start off with 3-4 nomads (depending on how good you can pull and how fast you can erupt). Start of with 2-3 blaster cannons (when you build 2 you will most likely need to erupt 1-2 times unless you're a bit lucky with the focus). You want to set up 2-3 mines at the place the ground units will attack your blaster cannons. Placement of those can get tricky, depending on which enemies (trees, manabeasts, lost dancers, etc) you will face. After you set up yourself or your team-mate, pull out the whole base into your blaster cannons and let them switch focus, until you run into the base again and kill the spawn building. In optimal case you want to kill the spawn with the eruptions as well. Set a defensive mine to defend t1. You want to basically support the other player with basically ~60% of the total energy costs for spells that is necessary to clear the base. The supporter should NOT build any units or buildings until the t2 of the other player is cleared. The supported player will go t2 afterwards. The supporter will try to clear his base mostly alone, most of the time he will get only 1 mine and 2 eruptions. Notice that you need sun striders to trap those annoying lost dancer spawns. Nature: Not viable T2 - Enemy Bandits/Stonekin Bandits and Stonekin T3/4 is built up identical, so I'll just sum them up. You will face either 2 constructs, 2 tortuguns or 1 construct and 1 tortugun. Sometimes you will face Windhunter's in addition to that. Most of the time you will have at least 1 guy starting frost t1 so you will have coldsnap most of the time for those annoying dragons. You need again ~12 phoenixes to clear the base 100% calculating that you might 1 or 2 before you can attack the spawn. In order to get them fast you will need to make them voidless again, just as described in 3.2 T2- Enemy Stonekin. When you face that long range attacks from tortuguns just stack them as described in there as well. You will most likely have to defend against a bunch of spawns, you can leave some of them alive to defend against that. The rest you can kill near a furnace of flesh to get some void power back. Clear the dragons with frost mages/ master archers/ forsakens. T2 - Twilight Most twilight t3's aren't really strong, you will most likely need 5-6 phoenixes for an easy clear. Just care about those parasite swarms. If they are able to make your unit beyond control you might screw up. Just make sure you give them right target to attack before you lose control. T2 - Lost Souls So this one can get kind of tricky. You will most likely face a lot of units at t3 and I recommend using around 10 phoenixes. In order to do that you will need to make phoenixes voidless. But you need to take care that they don't die when you fly into a base or leave it. Lost vigils kill phoenixes really fast. In order to do that you probably have to fly from weird angle into them or have to attack units that you wouldn't focus on other wise. For example little squad units. Those die basically from 1 phoenix, you need to make sure that all phoenixes you send in attack that unit. Do that by stacking them, so they all reach that unit at the same time. Those weird angles and unit focuses are sometimes even necessary for t3/4 attack. Especially if you use less phoenixes as possible. Try to clear any air units with either a nomad spear, sun striders or blaster cannons. Use your phoenixes to defend the spawns. T4 - Enemy Bandits In 2 player maps you will often face a major amount of bosses. I recommend at least 1 player uses bloodhorns to kill the big bosses. You will probably need to split that one up from the rest of the troops, so that the bloodhorn can take care of bosses that are alone in their base while Lost Spirit Ship clears the rest of the base and just run from boss to boss. Batariel can be an option here as well. You need to decide individually, what is better --> trial and error. T4 - Stonekin Most of the time Batariels will be faster than Lost Spirit Ship against Stonekin maps. But Lost Spirit Ship can be an option for some maps --> trial and error I recommend Bloodhorns as well. T4 - Twilight Hardest T4 in the whole game. There is basically only shit available and you can get wiped out with everything quite easily. You need tons of crowd control. Both players need to have oink and at least 1 freeze (such as coldsnap or maelstrom) to cc those wrathgazers. In some bases you will face 4-5 of them+ spawns. Personally I play bloodhorn and Lost Spirit Ship against that, you can add 2-3 green gemeyes for the extra crowd control. Earthshaker is a must to get rid of the willzapper buildings. I do not recommend to split up at the last rank of bases. You will need every single unit you can get. Sometimes you can't even clear those easier t4 bases alone. Batariel is not an option. Path finding becomes very important at this map, because you can not defend your base with a single t4 unit, due to wrathgazer spawns. You need to kill every spawn on its way to your base with your main troops or it might get messy. If you want even wheel of gifts can be an option. Shrine of war is a must. T4 - Lost Souls Lost Spirit Ship - Spam. Incredible Mo with yellow ability is a must. It prevents the lost dragon debuff and so you got a pretty easy time with your Lost Spirit Ship. You can add a Bloodhorn and send them behind your ships to clear the bosses. Do not run into bases with it though or it will get just get killed instantly. Shrine of war is not a must, but I highly recommend it. Batariel is not an option as you have the anti-spell aura buildings and any spell you use in advance of entering the base will get deleted by those nasty lost dancers (that's true for wheel of gift, incredible mo, spells, etc --> never build those buildings against Lost Souls unless you have a lot of air units). That will cause your batariel to just get destroyed in later bases. 4.3. Pathing This one gets a bit harder than for the 1 Player maps. So what you basically want is both players to clear their last bases at the exact same time. Then you did everything correct. However in order to find both paths that are optimal you always have to keep the 3 variables in mind: The strength of each camp The strength and spawns that will try to run down your base Most importantly the general map structure, that includes the ways you are allowed to run (the ways from base to base) as well as the position of certain camps on the map. However you need to now keep in mind for yourself and your team-mate that it might be an easier or harder to get to t4 due to probably stronger spawns, bases, etc.. So there might be camps that you can clear at a certain time. The map structure will most likely not be mirrored exactly so that one of you will have longer ways to certain key points of the map. Might be easiest if I just explain with the help of the graphic above in 4.1.. I assume that that map is a bandit map and you both decided for Lost Spirit Ship. The camps in-between got cleared by you with 3 Lost Spirit Ship and you both are back at your t4 with 5 Lost Spirit Ship in total.(That's a typical scenario. You clear the easy bases between the t4's while your waiting for enough power to spawn enough Lost Spirit Ships to start fighting the bigger bases). You have similar power and start at the same time running from t4. Notice that this is just a model. So this is basically the perfect situation to plan routes. In this case Player 1 wants to go clear camp 10 --> camp 9 --> camp 11 --> camp 16 and camp 17. Player 2 wants to clear camp 13 --> camp 12 --> camp 16 --> camp 15 --> camp 14. That is because Player 1 has a sub optimal way to go as they have to run a certain amount backwards (out of camp 9) and has an extra camp before reaching the very hard camps. In order to compensate for having a longer way than player 2, player 1 gets 3 easy camps and 2 hard camps to clear while player 2 gets 2 easy and 3 hard camps to clear. This gets even more complicated if you assume that in certain camps are bosses of different strength or only 1 player has a bloodhorn. I hope that the base concept of this got clear with this easy example though. 5.rPVE/Battleground 4 Players 5.1. Map structure and general principles So as you can see in the image above, you will face again the split way at t1 meaning that as soon as you attack you will get attacked at your T1. Notice that the T2 is for all players on the same side of their T1 (in this case right side). T3 and T4 is pretty standard as 2 players share those bases with each other. In-between the T4's of the 2 sides you will face 1-2 bases, and in the 2 ranks after T4 you will have each 4-5 bases. The spawns that will come from T3 always attacks the outer players (1 & 4). Therefore they will have more of a supportive role in the game as they aren't able to build up their t2 army as soon as the inner players (2 & 3). The basic principles pretty much stay the same: Kill the 'right' spawnbuilding as soon as possible and do not use any more power than necessary for defence. 5.2. Common t1-t4 strategies T1 - Enemy Bandits/ Stonekin/ Twilight Player 1 will support Player 2 and Player 4 will support player 3. Therefore the outer positions will start with fire while inner positions start shadow for early access to resource booster. Depending on the strength of the camp player 2 and 3 will get 1-2 mines & 3-4 eruptions on the spawnbuilding. Depending on the map Dreadchargers might be a thing to destroy the spawnbuilding if you 'only' get 3 eruptions. No need for skeleton warriors. After that outer positions can try and clear their t2 by themselves or wait for the inner players to help clearing them. T1 - Enemy Lost Souls This one can get really tricky. If you only get 1-2 manabeasts or treespirits + only squad units, your good to go and just do the same as against Bandits, Stonekin and Twilight. But most of the time you wont be that lucky and face lost vigils in addition. If that's the case you will have to choose one guy who starts shadow, so either position 2 or 3. Who starts shadow depends on how easy the T3 will be and how well he can reach other parts of the map from his side of the map as this guy will have quite significantly more power than everyone else. The other 3 will start fire and just support the hell out of him. Erupt the spawnbuilding (each vigil needs 5-6 eruptions when buffed up, depending on how fast you can erupt). I recommend 2-3 mines and as many eruptions as necessary while the shadow player will tank the damage with 2-3 skeleton warriors (unholy armour obviously active). After that the other inner player will get supported by the 2 outer players and himself. He can take care of the vigils with help of Blaster cannons. I recommend 3-4 nomads for that + 2-3 blaster cannons. Outer players are just defending themselves against the T3 spawn and gather power. T2 - Enemy Bandits/ Twilight Most likely very easy camps. 5-6 shadow phoenixes should be enough to clear T3 and T4, unless you face a boss at t4 or have those nasty windhunters against you. T2- Enemy Stonekin You will most likely face constructs and/ or tortuguns again. Means you need to summon 12 phoenixes again by making some of them voidless in the first place. Pretty much same as in 4.2. T2 - Enemy Stonekin. I recommend not to clear T4 unless you are 100% sure you can do it as some of the spawns can get really nasty, especially if they are coming from the after T4 camps (bunch of shields and those bandit snipers) and you really want to have some shadow phoenixes to defend against that. T2 - Enemy Lost Souls You will most likely need 10-12 phoenixes to clear t3 and help your team mates on the outer positions to clear their t2. Outer positions will spawn a bunch of sunstriders for lost vigils while shadow phoenixes take care of the big ground units (treespirits & manabeasts). I recommend using 4-6 shadow phoenixes for that depending on if those ground units get shielded or not. (Man beasts die from 3 phoenixes and 5 if shielded, treespirits from 4 phoenixes and 6 if shielded). You will most likely get massive spawns from the camps after T4, those can include 2-3 treespirits/manabeasts, 2 lost vigils, several squad units and those shield lost wanderers. That means you will need several phoenixes to defend against that and something anti air. Sometimes a mark of the keeper is worth thinking about. T3 - Enemy Bandit/ Twilight Basically skipped as T4 is already cleared. Outer players building shrine of war. Against twilight healing gardens and wheel of gifts CAN be built. If you want so outer players will do it. T3 - Enemy Stonekin/ Lost Souls One of the inner players will go amii-monument and clear the t4 of his mate (against Lost Souls most of the time the shadow player). The other side can try ashbone pyros with frenetic assault/ infect/ soulshatter. Shrine of war is build by outer players again. Against Lost Souls incredible Mo with 'benevolent Mo' effect is a must, also build by outer players. T4 - Enemy Bandit Lost Spirit Ship Spam supported by bloodhorns(red) for the outer players (they might have some lost spirit ships in the end as well). I highly recommend using red Lost Spirit Ships only as you can use motivate + flame crystal to increase their damage significantly. Use Bloodhorns for the bosses. T4 - Enemy Twilight Mix of bloodhorn and Lost Spirit Ships. You will need a lot of crowd control to be able to deal with the wrathgazers. I highly recommend earthshaker for destroying willzappers. Always run with 2 people (I recommend 1 inner and 1 outer player) or its very very likely that you get wiped out. Batariel CAN be an option for 1 or 2 players (I recommend 1 maximum). You need the ground presence of the bloodhorns but be careful to keep them alive. Same deal with Lost Spirit Ships and flame crystal. T4- Enemy Stonekin I recommend a mix of Batariel and Bloodhorns as Lost Spirit Ships have huge problems with the high hp buildings and units of stonekin. T4 - Enemy Lost Souls Lost Spirit Ships are the only way to go here. Incredible Mo prevents Lost Dragon debuff from them. Have bloodhorns always 1 base behind them and send them in after the base is cleared to kill bosses (be careful at the hellhound as he can 'eat' your bloodhorns) otherwise your bloodhorns will just get killed by necrofurys and even your ships have a harder time as necrofurys can deal damage to them when they focus a ground unit right under them. Batariel is not an option in here as lost dancers will deny all the buffs you want to send at him and necrofurys killing him super fast then. 5.3. Pathing Basically the same as for 2 player maps but now you have to also coordinate 2 more players, which can lead to some weird routes especially for the outer players. Expect to have a power deficit on one side of the map making that side a bit slower by clearing camps and overall starting to clear camps. It becomes very situational in 4 player maps even though basic concept stays the same. Most of the time you will need to change up your original route to go by quite a bit as its hard to calculate strength of each player at every time in the game correctly and you will most likely have mistakes in there which is changing viable routes completely. Learning by doing is the only way to find correct routes in 4 player maps. 6. Cards that can be very useful but are very situational (mostly for 4 player maps) Netherwarp - Porting over walls. Portal Nexus - Viable with ground units only, makes ways shorter to the next base and avoids long ways back out of bases / dead ends - mostly use for stonekin maps Tunnel + Burrowing Ritual - Having few units that are mostly air and in a dead end? use this - mostly useful on twilight maps Mark of the Keeper - Defending against heavy Lost Souls spawn on your T3 Witchclaws (red) - Sometimes good in 2 player maps to clear out the spawnbuilding when its very far back. Stone of Torment - Avoiding to pull out shamans from bases. Matter Mastery (green) - Some Bandit Maps having this nasty Rioter's Retreat towers, matter mastery can be an option if the rest of the base is very weak and you are getting strong spawns. Frost Bite(purple) - Alternative to Fallen Skyelf when not using 2 shadow orbs and having a free deck slot. Used against bosses to increase the damage they take( mostly used in 2 and 4 player). Mumbo Jumbo (red) - Alternative to Fallen Skyelf when not using 2 shadow orbs and having a free deck slot. Used against bosses to increase the damage they take( mostly used in 2 and 4 player) Constructive critics and comments and improvement suggestions are very appreciated. Feel free to ask any kind of questions as well. Leave a reputation if this was helpful At this point a special thank-you goes to @Kiwi, that helped me with my english for this guide and @ladadoos who made the graphics, you are awesome Thanks for reading. P.s. as the attachment upload doesn't work for me i will add a dropbox link where you can find a pdf with the whole guide: https://www.dropbox.com/s/6kgyobccr9u03hd/Treim's Battleforge rPVE Speedrun Guide.pdf?dl=0
- 67 replies
-
- 12
-
-
 Also available in pdf! Choose the format that suits you best. Disclaimer: The work does not cover all possibilities and is not the highest quality. I am a recognisable Frost player, but certainly not the best one. I do not expect to make any major updates. I am not responsible for any malicious software contained within enclosed files and do not promise that all provided links are safe. Use at your own risk. https://drive.google.com/file/d/1iScntKo6SOFooLC2OO-Qtu3MGf_TcnYu/view?usp=sharing Pure Frost PvE Guide – How to hit hard as hail @Dallarian – author @Weak1ings – substantive support @boots - editor Europe, February 2021 When you enter the cavern, overwhelming noise disappears, leaving only howling wind, allowing you to thought over your situation. You are shivering. You expected Frost part of Forge to be cold, but having to go through Maelstrom to get there was a bit too much. What they were thinking off? Anyway, the cave. It is completely frozen, yet floor is not slippery. As you walk down the corridor, you notice that walls are gently shining, giving just enough blue light to continue the journey. After a while you reach large chamber. There are two people facing formation of crystals under one of walls, something what you think could be a table, and many passages deeper into the cave. Walls are covered by numerous maps, banners and crystals. As you approach, one person turns around and you recognise him as your friend Wazhai, who told you about this place. He comes to greet you, while the other person stays still. Wazhai: Ah, you made it. It wasn’t that bad, was it? I hope you enjoyed your journey. Now officially, welcome to Order of the Battleships. You: It’s a pleasure. I see this place isn’t too crowded. Wazhai: It’s not that bad. We’re mostly active at nights, when Sun is gone. Your friend turns to the person in blue robe. Wazhai: He is the person I told you about. Dallarian: A new disciple? Excellent. Wazhai, please show him Moonlight Chamber. Prepare Skylord, there are many challenges awaiting. The person you suspect to be The Old God of Battleships himself, does not turn toward you until you leave the room. Table of content Dallarian: Your knowledge is questionable. If you are to represent us, you must do so in a professional way. Therefore, your wisdom must be reviewed and unified. You shall practice over and over, until you become confident in those aspects. Basics on chosen topics If you do not understand a word, it may be explained in Glossary of Terms. If you require more beginner advice, check Beginner section in "Guide Navigation" or suggested Beginner guides at the end of document. Gameplay related resources Micromanagement Macromanagement Wazhai: Good. Now you know which way sword should be pointing at. Become familiar with those basic creatures, structures and magic. They are weak yet important, since they are base for your missions. Do not underestimate their importance. We closely cooperate with humans of Lyr and they help us out of their free will, so at least appear to be respecting them. You will need this Frost Shard, take it. It helps manifest Frost Magic outside the Forge, should be useful to you. The moment you touched the shard, you felt connection formed between you and it. Now, you feel pathway to Frost energies deep within your body. Chosen cards and strategies overview Tier 1 cards Wazhai: You know enough. Now it’s time to organise it all together. Did you know you can secure most T2s with Master Archers only? T1 chosen strategies Weakl1ngs: It’s time to introduce you into more advanced options Frost has. There are many interesting creatures and spells you could use at your advantage. And I will teach you to use Coldsnap. For some reason many Skylords like this part the most. Tier 2 cards[2] Weakl1ngs: While War Eagle is a great option, it is not the only valid one. Personally I prefer Mountaineer and White Rangers. Review closely creatures I’ve shown you, there are a few interesting you may use. T2 chosen strategies: Uro: Now you are allowed to use very powerful creatures, blah blah blah. This is the boring part. The only thing you actually need to know, is if your Avatars are facing enemy. That’s it. But I have to explain you in details anyway… ehh… Tier 3 cards Uro: Do you remember when I told you to use Avatars? There isn’t a lot of philosophy in it. Try Core Dredges if you want some fun. T3 chosen strategies Yshia: You have grown stronger and stronger in past months. Finally, you are worthy to see our most powerful magic and best creatures, including the famous Battleship. Learn carefully, and you will have suitable tools to change fate of the world. Tier 4 cards Yshia: After this part you will know everything you need to proceed as a true Frost Skylord. Brace yourself, for today your training is coming to the end. I am proud I could guide you on your last steps. It was a pleasure. T4 chosen strategies Dallarian: You have completed your training. There is one last aspect. You must now choose your path as a Skylord. Which one will you follow? Path of Wind You are like arctic wind, frosty and piercing through your foes. If you are a Skylord in the very meaning of the word. If your armies are free and up in sky, including War Eagles, Northland Drakes and Battleship, the path is for you to take. Path of Shield No troops under your command fear death, for you are their angel, protecting them from all harm. Whether it’s Ice Guardian, Area Ice Shield, Ward of the North or Dreadnought, your armies are always safe while crushing your opponents. Path of Crystal The only who will need protection, is your foe, for your creatures are most durable beings in the whole Nyn. If your army consist of high durable units, like Lightblades, Tremors and Ironclads, none shall shatter your armor. Path of Aurora Both your past and future are a mystery to me. I will observe your career with a great interest. Choose this path if you cannot decide on none of the above. Please answer in provided poll with relevant path, it allows me to keep track of how useful the thread is and encourages more content in the future. It is purely Roleplay choice and does not influence the gameplay, choose what is closest to your heart, not what you actually play. Dallarian: I see. Interesting choice. Anah’shar laje’ura. Accept may blessing and good luck on your new path of life. As Dallarian tells his weird words, you feel chills going through your body. When they end, you are even stronger, and feel like the whole world was on your doorstep. Decks and approaches rPvE Offence rPvE Defence Custom maps / unknown map PvE Campaign Uro: Ssssh. Come with me. You follow Uro into one of less used corridors. Uro: Good, here nobody will hear us. Did you know Togob is hiding many things from you? There is a whole range of possibilities within our grasp, but he will never admit it! Let me show you. Heresy – non pure decks Supporting materials Additional notes on game mechanics Glossary of terms See also: “Expert Campaign – Missions Briefing – Among the Old Gods Achievement” by @Dallarian for Expert maps guidance and almost complete library of pure Frost PvE decks. "Guide Navigation" by @Eirias . If there is any relevant guide on topic you are looking for, you will find it here. Frost T1 PvP Guide by RadicalX by @RadicalX . Awesome source of knowledge for T1 Frost opening, by currently best PvP player. Battleforge undocumented details by @Emmaerzeh. Information about buffs, stacking and more. card attributes & main card types by @Ilsyde. Beginner guide. interface and game mechanics guide by @Ilsyde. Beginner guide. References: RadicalX. Frost T1 PvP Guide by RadicalX. 2017; Available at: https://forum.skylords.eu/index.php?/topic/2823-frost-t1-pvp-guide-by-radicalx/ (Accessed 10 January 2021) PvP changes are considered, that may influence abilities, counter types and statistics. The thread is up to date on patch #400025. {GM} Emmaerzeh, Battleforge undocumented details, 2020. Available at: https://forum.skylords.eu/index.php?/topic/6669-battleforge-undocumented-details/ (Accessed 15 February 2021)


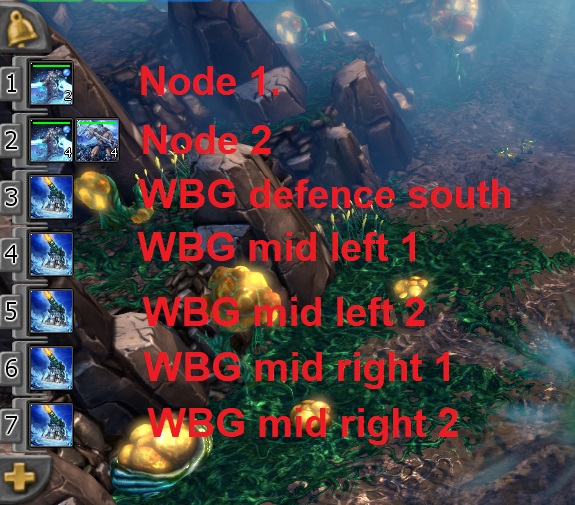
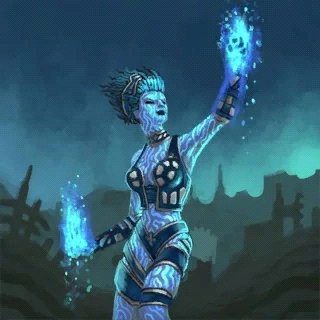


- 5 replies
-
- 12
-
-
- guide
- pure frost
- (and 14 more)
-
Hello fellow skylords and skyladies, Im made a short video about dwarven riddle. This map is really easy to play and a good way to farm some gold for the card upgrades. Here is the deck i recommend:
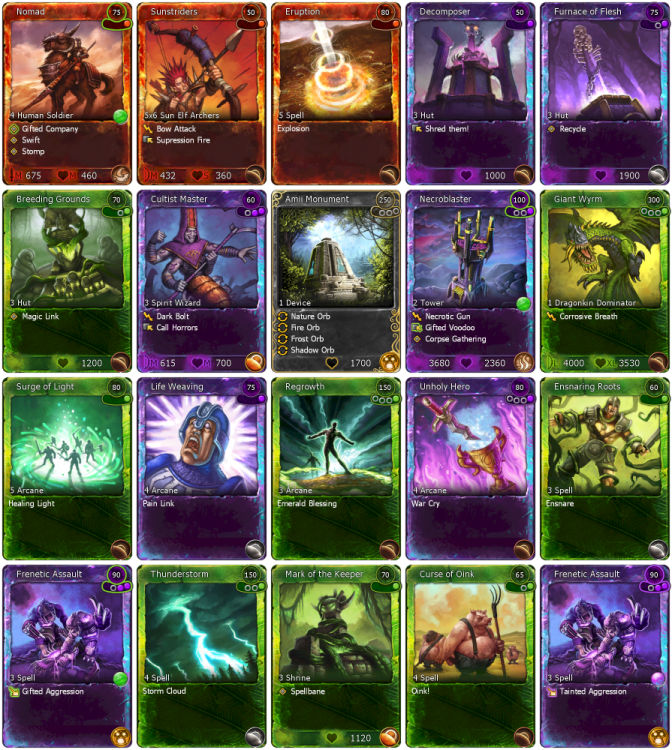
- 2 replies
-
- 5
-
-
- Dwarven Riddle
- expert
- (and 1 more)
-
How to Build a (PvP) Deck A Battleforge Guide by Eirias Last update: 6/3/16 This guide is primarily for players new to Player vs Player (PvP) matches. Perhaps an experienced player could gain some information playing an unfamiliar faction, although I would assume he knows the basics already. I will attempt to explain the reasons behind why certain cards are included and why certain cards are not included. In addition, I will provide examples from my own deck illustrating my rise from noobdom to pro (perhaps that was an exaggeration. I was roughly in the top 30 at my best and my PvP rank was usually around Hero. I could complain about my handicaps, but that is neither here nor there). I am totally new to this game. Should I start PvP or will I get stomped and ragequit? Most people will advise you to start PvE (these are the storyline maps, or the random maps that generate enemies). I will do no such thing! Although people love this game for a myriad of reasons, I think it’s the PvP aspect that is the best. Yes, you will get stomped immediately. I’d recommend reading Circadia’s guide before you start, as that is the most prominent one up at the time of writing. Of course, if I write my own, I’ll direct you there instead. J If you don’t know any of the following terms, go read a guide explaining basic gameplay: orb, well, void pool, unit size, unit counters, power pool, bound power, siege, PPD (permanent power disadvantage), t1, t2, t3, BFP, cc. Elendil and Kaldra wrote a pretty good one explaining the basic mechanics of Battleforge. Now answer the following question: What wins matches? If your answer is “skill,” keep reading. If you think cards win matches, correct your misconception and read this anyway. Cards do not win matches—they are the medium from which matches are won, but they don’t do it themselves. Many players hold that one can make Legend with only the tutorial deck. I think that’s hogwash, but you can certainly get somewhere between destroyer and annihilator (14 and 20) with it. Also, you will almost definitely get stomped your first few matches. I shall do my best to prevent that, but if you have a tendency to ragequit, start in the sparring grounds or start with PvE. Why do you keep mentioning these really technical aspects of cards like I’m not a beginner who has no idea what half the cards are? Simply put, I’m lazy and this guide is long enough. I’m doing my best to be beginner-friendly and I’m barely using any abbreviations (and when I do, I make sure they’re clear), but this is a guide to explain the usefulness and synergy of each card in a particular deck, not an explanation of the card itself. I’d highly recommend using this site as your companion: http://allcards.bfreborn.com/. If you don’t know a card, look it up there. This is much better than having to sit through another 50 pages of me explaining that a particular card cost 70 power and requires 1 nature and 1 neutral orb and has swift and can do an acid spit that attacks walls. Just look it up. If there’s still something that’s not clear, comment on it and I’ll add a clarification note on the guide. I’m playing with the F2P deck (starter cards) and Nomads/Frost mage/ Firesworn/other lame card is an insta-win. If I save up to get that card, will I make it to the top 20? Not a chance. You will jump a bunch of ranks, but then you will get shut down. When I was a noob I always got stomped by nomads (get it J). Nomads were the first card I bought when I had money. I just rushed everyone and won a bunch of games. Then I was paired with someone half-decent (maybe rank 11 or so) and I got shut down hard. I’ll discuss lamer counters later in the guide. Suffice it to say for now that no cards are broken, especially in t1. T1 is very well balanced. As long as you do the balancing yourself. So sit tight and pay careful attention to my section on t1. I have no BFP. Does that mean your advice doesn’t apply to me? Actually, no. My advice should be especially helpful to you. Unlike other guides, I won’t just hand you a grocery list of cards you need (I’ll actually do my best to avoid that). I’ll be illustrating guiding principles. Obviously some techniques will be better than others, and better techniques usually arise from better cards, but most decks work just fine with about 15 “free” cards. I’m also a particularly good person to be writing a guide for those with little BFP, because I was completely P4F in the old game. I got no handouts from other players and spent no money in the game. In BFReborn, there will never be another player as destitute as I was. However, I can imagine that many of you will not have earned enough BFP for a list of “ideal” cards yet, so I’ll provide what advice I can so you can keep playing until you can come back and revise your deck with the more expensive, optimal options. So I heard that nobody plays t4 in PvP. T4 is awesome and I’m going to play it anyway! Power to you! Just please don’t rage when you lose. I’m all for people ignoring my advice and doing whatever the really want to do! I’m not here to force you to do anything, only to offer my advice and experience so you can accelerate your learning process. Not using t4 is probably something you would have figured out at some point (even I figured that one out on my own), because it’s really, really obvious when it comes down to it. T4 requires 300 power, and a waiting period. Do you have any idea how fast I can murder someone with 300 power laying around in t3? Your monument that’s about to get built won’t stand a chance if we’re even, and if you’re winning so much that you can safely go t4, why don’t you just finish the game already? Even worse, that 300 power is not eco-friendly. It’s bound, which means it doesn’t get recycled. If it drops that’s a huge chunk of power gone, although it’s still permanently gone even if it doesn’t drop. Additionally, many maps don’t have enough orbs to allow you to t4 safely. Spending 300 power just invites such a massive counterattack that you have no hope of defending it—even if you bring Amii Ritual. And somehow have the power to play it. In fact, you’ll probably lose merely because you’re holding on to 300 power in your pool. Imagine you are building up power for t4 and I cast 2 soulshatters, or a sandstorm, or I just summon a Grigori and nasty it. If that doesn’t kill you (which it totally will, but maybe I was being dumb), I will still get more power than you. That sudden loss of 300 power will bring back somewhere between 100 and 200 by the time your monument gets up. Even then, I’ll be getting power faster than you because my void will have 300 power more than yours. So if you think you have what it takes to play t4 in PvP, go for it. Just don’t hold me responsible for sending you out into the world uneducated. About now I scrolled down to see when the actual guide starts. Then I realized this thing is borderline superlatively HUGE! What’s up with this? Fear not! An actual guide does exist in here, I’m just trying to get the preliminary questions that I anticipate noobs asking out of the way. This guide is so long because I am trying to be thorough and show you guys how to build a deck. I want to give you tools to do it yourself so you can custom-make your own decks and be original. Please don’t take anything I say as absolute law (although you will probably come around eventually, if you disagree with me). I also include a lot of personal comments and stories, because I’d like you guys to learn from my mistakes. I also feel they illustrate points better. If you don’t have time to read this whole thing, here is what I suggest: Take a look at my section on the metagame and figure out which deck fits your play style. Read my fire-nature section for an in-depth analysis of how to build a deck from scratch, then go to the section you want to actually play. You will learn more about all the decks—and especially get a better idea of what to expect when you play against them—if you read the entire thing, but I understand that is too large of a time commitment for some people. Do you have any biases? Absolutely! Due to only being a P4F player, I only played one deck seriously: Fire-Nature. That said, I did have some other “fun” decks that I messed around in the sparring grounds. I played t1 fire almost exclusively, although I also tried my hand at frost. I never bothered to acquire the necessary t1 for nature or shadow, although I’ve played with lots of players who had. So my comments regarding other factions will be from my perspective as a fire-nature player. I also played 2v2 extensively with several very good shadow-frost players, so all together I have strong personal experience with all of the factions. That said, if any other veterans want to chime in with advice or things I missed in this guide, I’ll happily add them in and credit you. Now, on to the meat of the guide. How does the metagame work? · Pure Fire o Your biggest advantage is fire dancers. You are the most aggressive faction, and your primary goal is to set up fire dancer camps; even better if you can do so from behind a wall or cliff. Your strategy is very simple and one dimensional, but highly effective. Rally banner to fire dancers. Enforcers and skyfire drake to defend the dancers. This faction is the most map-dependent faction. Additionally pure fire has an excellent t3 in juggernaut, which is probably the best t3 unit in the game. You will typically struggle more in t2 than t1 or t3 because of your inability to defend: you have no heals, repairs, or cc’s. You live by the adage that the best defense is a good offense, but that is the extent of your defense. If your attack fails, it is often not recoverable. Pure fire is notably bad at preventing its opponent from converting temporary advantages into permanent ones—although it is quite good at the conversion itself. Fire is often fun to play because of its simplicity and sheer power, but many players feel the “cliffdancing” is lame and avoid pure fire because of it. Pure fire has very good matchups against pure nature and pure shadow, but very poor matchups against pure frost and stonekin. · Fire-Nature o Your biggest advantage is the synergy of fire spells and nature spells. Another quite popular deck, fire-nature is known for its hard hitters. This deck has slightly worse offense than pure fire, but better defense. This deck is the best at “brute force” attacks. With enough power, you can spam heals and cc tank through to the well. A massed fire-nature army is particularly dangerous, although it only occurs rarely because of how much power the units cost. Cc can be used for defense as well as offense, and while most player prefer to use it offensively, you need to be careful about expending too much power in an attack. It is often possible to spend an immense amount of power to guarantee a well drops, but the backlash from the defending army will often overwhelm you completely. This deck is fairly good at preventing temporary advantages from converting to permanent ones through judicious use of cc and mortar camping. This deck is too volatile to try accumulating small advantages—just rush. Defending requires a good deal of proactivity, and the most successful defense is usually to counterattack instead of defending. This deck is probably the best deck to have a lot of power at t2, but it is one of the worst to have lots of power at t3. Since the nerf of sun reaver, fire-nature has easily the worst t3 of any faction. Because of the nature of fire-nature t3, it’s often impossible to prevent an orb from dropping in t3. For this reason, it is highly recommended to play the t3 orb the same color as your starting orb. Often the best outcome of a t3 fight is for both of you to lose your orb—if your t3 and t1 are the same color, you will only drop to t2 when this happens, instead of t0. This deck has perfected the strategy of attacking multiple places at once, but is ironically highly susceptible to the same tactic: with equal power, fire nature can defend any t2 attack in one place, but it often requires just a little more power to defend than the attacker needs to attack. The deficit piles up very quickly when many small attacks are initiated. Fire nature is especially good for you if you like long, creative, perilous t2 battles. There are no t2 matchups that are particularly terrible for fire-nature, but the drawback is that it has no particular advantages over any other faction. Stonekin, and fire-frost will probably give you the most trouble, especially stonekin. · Fire-Shadow o You are aggressive and depend on buffs. You’re particularly good at turning an insignificant threat into a serious one. Cc’s are the bane of your existence, but you also possess the tools to strike in many areas at once, mitigating the effect of cc. You can just as easily spam 4 nightcrawlers to 4 different bases buffed 4 different ways as you can put all your energy into one attack with a rallying banner and darkelf assasins, nightcrawlers, rageclaws, or shadow phoenixes. Matches tend to be one-sided: either you dominate, or you get dominated. T1 control is often critical to play a good bandits deck. Your t3 is one of the best, with nigh unstoppable options such as giant slayers, ashbone pyros, sandstorm, soulhunter, and cultist master. Having lots of power in t3 benefits you more than almost any faction. Most players consider bandits to be the weakest faction, but you ignore the opinions of the unenlightened because they don’t understand the meaning of “style.” · Fire-Frost o You are the deck of contradictions. You have the high attack of fire combined with the defense of frost. You abuse ice shields even more than pure frost, because your normally squishy fire units can do absurd damage when they’re not worried about dying. You are the deck of building shenanigans—if anyone is going to pull some mischief with termite hill, it will be you, with your building repairs, cc, and warden sigil. There are quite a lot of interesting building combos at your disposal, but most are just too impractical. Nonetheless, you consider yourself to be the most creative faction, testing ideas that everyone else has written off. You need to be attentive and demonstrate excellent micro to play this deck. Additionally, your t3 is not the strongest because you must pick between giant slayers and tremors. Fire-frost has no particularly good or weak matchups, and is a good deck for preventing random losses. It is probably the most difficult deck to master, as well as being extremely expensive—mountaineer is fairly essential for fire-frost. @Hirrooo disagrees with me here; he states that fire-frost can get almost as much mileage out of rageclaws and that fire-frost is quite viable on a budget. He’s better than me, so you should believe himJ. @YaBro0 mentions that this deck can be played very creatively, or not at all (mountaineer and stormsinger spam). · Pure Shadow o Oh, the combos! You love being needlessly complicated. You have an interesting dichotomy—on one hand you have sheer shadow mage aggression; on the other, you have the tactic of building up power for a harvester. You can choose to take the initiative with cheap units, or you can play passively, conserving power for a harvester. This deck is very good at punishing mistakes, and if you like slowly accruing a power advantage, the harvester allows an easily convertible reward for having all that power. This is the ultimate risk/reward deck, and has many options for combos based on corpse collecting. Your t3 is phenomenal, especially if you go frost t3. Pure shadow is very strong against non-frost splashes, but struggles against frost splashes and pure fire. · Shadow-Frost o You want to win at any cost. Let them call you a lamer! At the end of the day you’ll have the higher ELO. This deck is notorious for its laming ability, but it’s a strong deck even when played like a gentleman. Frost and shadow combo well together, with the high health of frost boosting sacrificial damage from shadow. You have all the bases covered with cc and building repairs. Lost souls has the largest variety of viable t2 units—there are so many good options, it’s hard to choose! You have one of the best t3, and it’s definitely possible to get away with a light t2 to carry a large t3 army. This is the deck that can spare slots for curse well or church of negation. This deck is the best for camping t3, but you can just as viably go aggressive t2 instead of saving those spots for the long t3. Lost souls has the best average matchups of any deck. It has a slight edge against many decks, and a large edge over a few. Stonekin or pure nature is probably its hardest matchup, but this deck has so many strong options that you can easily change it to accommodate if you have trouble against a particular deck. Pure fire is also pretty good against shadow-frost (one of the reasons many top players played pure fire). · Shadow-Nature o This deck is all about those M units. Burrower and nightcrawler are your right and left hands. You are the evil twin to fire-nature, lagging slightly in defense but making up for it in offense. You must rely on a multitude of units because you have no strong solo unit. You excel at keeping your units alive during an attack because of your buffs, heals, and cc. You are great at getting a unit advantage and then keeping it. This is one of the most balanced decks. Stonekin is your worst nightmare because your 2 main attack units (nightcrawler and burrower) get countered by stoneshards and knockback, while hurricane takes out your darkelf assassins. Pure fire will also give you a lot of trouble because you lean heavily on burrowers and nightcrawlers, which are both M units that die to enforcers. You also don’t have building defense. @Hirrooo considers shadow-nature to be the strongest against frost because ghostspears and nightguard are difficult for the frost player to deal with. · Pure Frost o Your biggest advantage is war eagle. Arguably the best t2 unit in the game, your entire strategy hinges on it. This deck epitomizes the “one-hit wonder.” Your goal is to keep your war eagles alive and support it while it kills everything else. The deck is very defensive, but doesn’t launch quick attacks very well. While the war eagle can solo, especially against t1, it moves slowly. You can defend one attack very well because war eagle kills everything and your building repairs take care of the rest, but multiple attacks are hard to fend off because of the cost of war eagle. Often the pure frost battles are determined by who controls the sky. As such you have very good matchups against pure fire and very poor ones against pure nature. Overall it’s a fairly balanced deck with no outstanding weaknesses. · Frost-Nature o This deck is all about standing army control. Attacks are slow, but you definitely have the option to do some t2 rushing with burrowers. They probably won’t succeed because you don’t have offensive spells to assist, but you definitely have the means to add pressure. In general though, you will win by passively accumulating a standing army and then strangling your opponent to death. You have both heals and building repairs, your units take less damage, and many of your units are knockback based. These factors combine to make you the ultimate survivor. Add in the fact that you have OP S/M beast counters and razorshards, and it’s easy to see why nobody likes to play against this deck. Many feel that it takes the fun out of Battleforge because of how long stonekin matches take. Andre Philidor revolutionized chess to show that slow, positional play beats fast-paced tactical aggression, and stonekin player seek to do the same in Battleforge. As far as I’m aware, this deck has no bad matchups (although it does have some unfavorable ones that depend on individual decks—for instance, some players pack mauler explicitly for stonekin matchups), and it does have some very good ones against pure fire, pure shadow, and bandits. Pure nature is probably stonekin’s hardest matchup. · Pure Nature o This deck is all about power manipulation. You have energy parasites and shrine of memory. Deep ones are also quite powerful, but the truth is that you just use them as a distraction to set up your power manipulation. You have Deep Ones and Burrowers to go strong on the offensive, but with no attack spells you are unlikely to make a successful offensive without a power advantage. Your parasite swarms are also a tad overpowered, but they’re difficult to use because they cost a lot (this is a theme with pure nature). Pure nature is unique in that it can be played in two completely different ways—it’s almost as if root decks are a separate faction. Root decks rely on cards comboing with a root nexus to build a large standing army and maintain it. This style of playing is most similar to stonekin. Pure nature has a particularly easy time against pure frost because of energy parasite, but a very hard time against pure fire because of its lack of building repairs or unit damaging options. What do I need for t1? The t1 metagame is pretty advanced, but it’s very balanced. Note that it’s only balanced when the optimal cards are employed. If you need a cheap deck, shadow and frost have the cheapest t1. (For those interested, shadow used to be crazy expensive because dreadcharger was very pricy. Then witchclaws were introduced as a common and now shadow t1 can theoretically be played with only commons). For every t1, you need a SWIFT unit to get as much map control as possible. Note that frost has no swift units in t1—it compensates for this with just being generally OP J. You also need a RANGED unit. Kiting is important, and ranged units spam easier than melee units because melee units sometimes get in each other’s way. Ranged units can also be spread out to minimize the danger of an eruption or nasty surprise. Additionally, you must use each faction’s core spell. That would be surge of light, eruption, glacier shell, and nasty surprise. These are the most important four cards in the game. The entire metagame is based off of them. Furthermore, you must have S and M counters, and units which are not countered by S or M counters. Fire t1: Your essential cards are: Eruption, Scavenger, and Sun Strider. For fun, I’ve played matches only carrying those 3 cards. It’s really not optimal, however, and it forces t2 rushing (which is a terrible habit). With one notable exception, all the pros I am aware of play an extended t1. They try to build a t1 power advantage, and it’s simply not possible to do so with only these cards. Nonetheless, if you play defensively and concede to a map-control disadvantage, you can play with only this. Note that sometimes you will lose to a t1 rush that you just can’t handle. I’m looking at you, MA spam with homesoil and wintertide. The next most important card is Thugs. It’s really hard to fight shadow forsaken spam without thugs. Following these, the usefulness of t1 cards are as follows: Firesworn = Mortar > Sunderer > Mine > Scorched Earth > Wrecker > Nomad. Please don’t use nomads. See below for why. As a general rule of thumb, take the cards in this order. Decide which cards you want in t2 and figure out how much space you need. Allot your t1 cards according to your empty deck slots. For instance, in my most successful deck, I had five spots for t1. I brought eruption, scavenger, sun strider, thugs, and mortar. I think mortar is more essential than firesworn, but I think most players disagree with me. Regardless, I played without firesworn for most of my matches, and I never used sunderer except in some 2v2s and 1v1s when I messed around with pure fire. Commentary on the pros and cons of each card: Eruption: This card. It does 300 damage (U3—assume everything I say is U3) to 3 targets, including air. This card is a primary anti-air defense, as well as generator nuke. If a nature player has an expensive unit <300 health, instantly erupt it. If a frost player has a well <300 health, instantly erupt it. If there are multiple units clumped together, erupt them and finish off with sunstriders. Scavenger: This is a great swift card. It’s cheap, a great S counter, and has crippling bite. Scavengers work great with sunstriders because between the two, you have both S and M counters, and you can slow enemies with the scav and kite with sunstriders. Sunstriders: Not a particularly great t1 ranged unit, but ranged units are essential, and the sunstriders have to be weak because scavenger pairs so well with ranged attack. Despite their low health, they have great attack. If you face a Fire Drake with ravage, make two sunstriders and erupt the drake as soon as it’s HP <300. Other factions have a much harder time defending Fire Drakes in t1. Thugs are a terrific card. They are S/S, so forsaken don’t eat them—this tends to be a problem with scavengers: although scavenger are M/S and forsaken are S/M, the forsaken are cheaper, have longer range, and can frenzy or motivate. Spamming scavengers and spamming forsaken will lead to an easy shadow win. If you don’t have thugs, forsaken spams are very hard to deal with. They also help vs windweavers, but the real reason you need them in your deck is to combat forsaken. Thugs also have a looter ability, which gives you power for attacking units (proportional to the unit’s power, I believe). I don’t really know how it works, but sometimes I send thugs out against grigoris or juggernauts just in case. Firesworn have multiple uses. They knock back small units, which really helps against frost Master Archer and windweaver spam. Unfortunately they cost a lot and have low health, so I generally don’t recommend their use for knockback. They die very quickly to frostbite, and a roots with well-placed windweavers can kill Firesworn without them getting a shot off. If you use them versus forsaken, you need to be able to make one for every forsaken, which is quite difficult. It has more use if you can make it so your firesworn is not dazed while the forsaken are, which makes them good for defending forsaken spams at wells as long as the forsaken have not been pre-summoned. Of course, if you see your opponent making 3-4 forsaken at once, that’s a good cue to make a mortar tower. Generally the red affinity is better. Some prefer the blue (especially fire-nature, to knock back a large unit and root it), but most like red better. Mortar Tower has saved me so many times. It works well in my deck, because I play a defensive t1 with the goal of saving card spots. It’s also useful for punishing laziness. Some maps have areas with wells that really shouldn’t be taken because of mortar tower pressure, but if your opponent takes them anyway, punish. The #1 reason I play this card is to stop frost rushes. I also like welling up more than my opponent, and when he builds a bunch of units to rush me, I build a mortar. The relatively quick build time on this card also helps saves. I even use it in t3 (!) to defend against things like juggernauts. I have a few more secrets with my precious mortar, but I won’t share them because as far as I know, I’m the only one who does this. Sunderer: The only t1 L unit, this card really helps against shadow. Against nature’s amazons or roots + windweaver it’s pretty pointless, and the combination of lightblade and glacier shell makes it practically useless against frost. Fire can generally deal with sunderers easily through eruptions and scavenger bites with kiting sunstriders, or a simple firesworn. It’s still more useful against fire than frost or nature, however. Shadow struggles the most with Sunderers because of its lack of t1 L counters. Simply put, nightguard does very little damage, and the shadow player has usually lost the well by the time nightguard’s swapping ability is ready. For this reason, many shadow players don’t even carry nightguard. For shadow to defend a sunderer, it must usually nasty a dreadcharger while the sunderer is dazed. Alternatively, you can walk the dreadcharger into the sunderer to slow it and kite with frenzied forsaken. In general, the shadow response to a sunderer is to let it get the well down, kill it, and then launch a responding offensive with all the defending units. Mine: Honestly, I think this has more use in t2. The mine does such a ridiculous amount of damage that it basically one-shots anything in t1. The downside is that the opponent must walk into it, and it has a smallish blast range. It’s basically a shot from a mortar tower except you don’t need to wait for the tower to build. It combos nicely with fire-nature’s hurricane or ensnaring roots, and it can be a semi-useful cc (crowd control) for pure fire or bandits. Scorched Earth: It has its uses. I saw it used quite effectively in a match between SchokoPeace and xAragornx linked here: https://www.youtube.com/watch?v=XcFRUgSda7A. Nonetheless, it is a nicety and is useful only situationally. Pure fire is pretty much the only deck that can spend a slot on this card. If you use this, make sure to use the red affinity. Wreckers: I have a deep love for wreckers. They were my go-to unit as a noob. They’re great cards. But they’re not that useful. Not with fire. The thing is just that melee non-swift units are very vulnerable, and wreckers have it even worse because of their low health. They can be quite useful vs frost mages and dryads, but roots or ice guardians usually beats them. Their rally skill is useful, especially for surprise sunderers, but they’re hardly worth the deck slot. I used to carry them instead of thugs to deal with frost rushes, but I learned to just get better at using mortar and scavenger micro. Nomads: The green ones are better, and these cards are notorious for noob-stomping. I remember when I was new, all I wanted was a nomad (or frost mage) because they are great against small units. Right? Wrong. Nomads are M/M units, same as wreckers, and have the same utility. Except worse. Nomads reward spamming the same unit, but spamming is punished harder than Nomads reward it. Eruption takes out a group of Nomads because they are grouped. 6 sunstriders can be made with the same power as 4 nomads (which is pretty much the minimum number needed to rush), and the nomads will drop to 2 sunstriders. Additionally, you can erupt every spawned nomad because they cost the same as an eruption, and the eruption will also hurt the nearby units. If I see someone make a bunch of nomads, I just take a well with the knowledge that my defense will be very easy. Nature can simply root all the nomads and shoot them with windweavers. Shadow can nasty surprise, or just spam forsaken back (forsaken win). Frost probably has the hardest time, but ice guardians are good against them, as well as lightblade and frostbite. Remember that as soon as the number of nomads drops below three, they lose their buff. The switch from nomads to scavenger is the best decision you can make in a fire deck. Two days after I did that, I jumped several rankings (something like 10). Nomads are just not very good as swift units. They cost too much, and they are M/M so they are useless with sunstriders (If fire had Master Archers instead of sunstriders, nomads would be much more useful. But that’s not the case). Makeshift Tower: This can be useful for noobs against noobs, but it’s not useful otherwise. It helps against windweaver or master archer spam, but the tower really isn’t worth the deck slot. Although the tower does great knockback, it does very little damage. Basically thugs and scavengers are better at doing damage to small units than makeshift tower is at knocking them back. If you need the knockback super badly, there is always firesworn, which has utility elsewhere as well. Banner of Glory: I never see this played, but it does have its uses. I once won a bunch of tome matches with this card, but that’s because neither player had the optimal t1. It’s about as useful as makeshift tower. Strikers: Nope. They have the same issue as nomads, but they’re even worse. I have nothing more to say except a warning not to bring them. Suppression, Blaster Cannon, and Other Nonsense: Completely useless. There are no other fire t1 cards even worth considering. Additional thoughts: The order I listed above is actually pretty strict, comparatively. Fire cards don’t have a ton of redundancy or options. Pretty much each card is better than all the cards listed after it. However, there are cases when it is better to bring one card over another. For instance, fire-nature players may take mine instead of firesworn, sunderer, or mortar tower because the card combos really well with roots in t2. You’re more likely to see mortar tower in a fire-nature deck than a fire-shadow deck for the same reason. In theory, you could take all of these cards with you (except nomad, please) and have basically no t2 or t3. I have seen good players take that route—they straight up rush t1 every time. Of course, if your t1 rush fails you don’t stand a chance, so I don’t think these players ever made it into the top 20 this way. Despite my animosity towards nomads, if you ABSOLUTELY cannot afford a scavenger, there are ways to make it work. See one of my noob decks below for an example, but you need thugs 100% (and probably makeshift tower) if you don’t take scavenger. And your best bet is to avoid t1 confrontation as much as possible. @SunWu II commented that he’d rather leave out eruption than sunderer or firesworn. If he has a full t1 I can see where he is coming from. Eruption is sort of the jack-of-all trades; it does a lot of things pretty well (like helping against L counters, knocking back small units, or helping drop a well). If you can do all the other things without eruption, then perhaps I wouldn’t list it as completely essential. But if you’re trying to skimp on t1 slots, eruption is the most versatile for replacing the other options (mortar as well). Eruption also punishes beginner mistakes. It’s not that essential when playing high-ranked players because they rarely allow great eruptions, but it can end games very quickly against noobs. Like my target audience. @Dexirian commented that he played without thugs all the time. I suspect he used firesworn and sunderer though, and would respond to forsaken with a sunderer rush to drop a well. @Hirooo, in response to Dexirian, said, “Thugs give a huge edge vs fire and are even stronger against shadow since both were pretty much 1 swift s counter + s unit m counter spam. Also made welldefense way easier and enabled you to take one well up earlier than without. Not a must have no but I would strongly advise using them at least in every firesplash that isnt fire/nature since that one stretches the cardlimit a bit harder.” All of these are respectable players (otherwise I wouldn’t be quoting them), but Hirooo is especially high ranked. Take what you will from the discussion. Shadow t1: I can’t speak for lower level play, but this faction is the most-played t1 in the upper ranks. FarRock once claimed that 60% of top players played it—I’m pretty sure he just made that number up, but it seems about right. This might also be due to the prominence of shad-frost players, which I’d estimate to make up about 2/5 to 3/5 of the top 200 players (like FarRock, I’m making this up). Shadow t1 rewards good micro, while at the same time it’s a relatively easy faction to play well, even if your micro isn’t that good. You can play with a variety of t1 luxuries, most notably: lifeweaving > motivate > phase tower. @YaBro0 notes that lifeweaving is essential for bandits or pure shadow, while motivate is essential for shadow nature. Your essential cards are Dreadcharger/Witchclaws, Forsaken, Nasty Surprise, and Nox Trooper. I suppose in theory you could get by without nox trooper, but I really don’t recommend it. Lifeweaving and Motivate are also a staple in most decks, but you can manage without them. In general, the only other unit you should consider t1 is Nightguard. Dreadcharger: The most common t1 starting card. It has a smidgen less health than witchclaws, but it has a better ability, tramples small units, and cost 5 less power. Witchclaws: Playable as your 1st unit, but the general consensus is that dreadcharger is better. The reason to take witchclaws over dreadcharger is that it has more health for a better nasty (witchclaws can kill a skyfire drake, but dreadcharger can’t), but it’s not that much of a difference. Witchclaws are much cheaper by rarity, and TBPeti feels they are an acceptable substitute if you can’t afford dreadchargers. @Hiroo feels witchclaws are a “really bad idea” if you can afford the dreadcharger. Windweavers can do double damage to them, their attack halves when one dies (squad probs), they have a longer spawn animation and they cost 5 more power. In return, they get a mere 30 hp bonus and a terrible ability. @YaBro0 said that witchclaws are better in shadow mirrors because when they nasty, they exactly kill a full health squad of forsaken. Nightguard: Although I’ve seen some people play this as their starter unit, I don’t recommend it. They are very weak, and you’ll almost definitely lose a t1 fight without witchclaws or dreadcharger. And if you have those, why would you start with nightguard? Nightguard does have use against L units though. The swap is very nice, but not so useful in t1 because sunderer is the only card worth swapping, and the nightguard’s ability has a large cooldown. Your well will probably be gone if you’re waiting to swap. This card is much more useful in t2 against cards like Deep One, Lost Reaver, War eagle, etc. The choice of affinities is personal preference—swift helps you catch the unit you want to swap with, but it also helps your swapped nightguard get away. I’d recommend the green affinity, but TBPeti preferred the blue in his shadow-nature deck—he would cc the unit he wanted to swap with, and then catch the normal speed nightguard. Forsaken: These guys are amazing, and a necessary addition to every shadow deck. Their frenzy does great damage, and forsaken spams are reliable ways of dropping wells against fire. They have a harder time against frost and nature because of S knockback, but if you drop a well in t1 it will be by spamming these guys or nox troopers. Nox Trooper: I would consider these to be essential for t1. When playing against nature, you will probably need to spam these. (@TBPeti feels spamming isn’t the best idea because S units have better stats, but they’re still needed in judicious quantities.) Nox helps against hit-and-run tactics. They are essential to stay t1 against things like burrower rush. You’ll also need them to take out frost mages so your forsaken can do work. Nasty Surprise: An absolute must. Many of the shadow threats hinge upon a well-placed nasty. Although it is definitely the least used core spell (eruption, surge of light, glacier shell, and nasty), it is completely necessary for t1. Lifeweaving: I thought this card was essential for shadow, but @Hirooo reminded me that its usefulness actually increases as tiers increase. It’s often not used much in t1, but becomes more prominent in t2. As such, if you don’t plan to use it much in t2, it’s often a wasted deck slot for t1. It’s almost always bad to use lifeweaving in t1. The only exceptions I can think of are when a well is about to drop or you need to maintain ground presence. Motivate: This, nightguard, lifeweaving, and phase towers are the four cards that change between shadow players. Almost everyone uses dreadcharger, forsaken, nasty, and nox; these 4 cards switch around, and it’s very rare to see anything else. Most players value motivate more than phase tower, and phase tower more than nightguard. Lifeweaving is different; you’ll do best to treat it like a t2 card when deciding whether to bring it. Phase Tower: This leads to very campy t1 fights, and there are some places where it gets quite lame (certain cliffing maps, for instance). It’s especially strong against nature and frost. Fire tends to do better against it because of eruption. If you struggle against frost or nature t1, this is a good addition to your deck. Skeleton Warriors: I, like most people, thought these guys were trash, but Matos once used them against me when he was ranked #2. They’re basically forsaken, except worse because they don’t have range. On the plus side, they’re super hard to kill with their ability and have great health for nasty surprise, so they can be good at getting wells down, especially against fire. @TBPeti and @RadicalX feel these are the most underrated t1 cards. They can tank 1650 damage over 30 seconds with their ability—TBPeti attributed making it into the top 5 to his use of them. With their ability, they even beat wrathblades. TBPeti suggests using them instead of phase tower. Wrathblades: These can be an answer to fire’s thugs, and can help you in shadow matchups. However, S units are notoriously weak against frost and nature. I don’t recommend them. However, there was player in the top 20 who used them once upon a time, so they’re not useless. Executor: This is shadow’s equivalent of a wrecker, except it doesn’t even have the rally. Don’t bother with him. If you know you’re going to play someone with a frost t1, they add some nice aggressive options (credit @Hirooo) but they are useless otherwise. Decomposer: This can have some use, but not in any sort of classical t1 fight. Don’t bother with it. Embalmer’s Shrine: This has more uses than the decomposer. It works well with some pure shadow techniques, but doesn’t combo well with anything t1 except soul splicer. Rumor has it there’s an interesting combo with this card, soul splicer, and furnace of flesh, but I wouldn’t trust everything you hear. . . . Soul Splicer: The green is much better. It heals quite a bit, and can make a good offensive post to attack from. It’s rare that your opponent lets you get one of these up away from a well though. A more common technique is to pull it up near your well when you and your opponent have wells in close proximity. Then you can attack and constantly pull back for the building’s healing. It’s still an unusual card, although most pure shadow players use it (OP with shadow mages). Snapjaws: I’ve seen good players take these. They’re interesting, and much more useful in higher tiers. The problem is that they’re expensive, and do little to nothing in t1. @Hirooo said they have some use in defending sunderer in high power t1 fights. @TBPeti feels the damage-decreasing ones can have some use against L/XL units, but the defense-decreasing ones are just a worse frostbite. Neither affinity is worth the power or deck slot, however. Offering: It’s rare to lose all of your charges in PvP. This card is not worth wasting a slot on for the rare occurrence. If you have low upgrades, however, this might be useful. Still, it seems like a lot of power to get your charges back. Lifestealer: Don’t bother. If you want a building, take phase tower. Shadow is one of the most common t1s for a reason: it’s good. It’s also easy to play, and doesn’t require a ton of cards. Taking less than 5 cards for t1 is possible with every faction (except frost), but you will really have to avoid t1 encounters away from wells. Shadow can go light and still be fully competitive without phase tower or lifeweaving (motivate is pretty essential if you want to go toe-to-toe with fire or nature, however). The three optional cards are luxuries that give you more options, but good micro can get you through without them. Nature t1: Arguably, this is the “best” t1, although it requires insane micro and a lot of cards. It’s the most efficient faction at high power levels, but it becomes quite difficult to play when you’re desperate for power. I’d generally recommend starting t1 fire or shadow if you’re using those splashes, because you’ll probably save deck space that way. Alternatively, you can join the minimalist movement pioneered by xAragornx. Nature has a lot more options than other decks: there is no unit that you can’t play without. I won’t go into too much detail but rather list the pros and cons of each card. You’ll need a swift unit, a ranged unit, and a medium unit that can stand against hurricane or frost mages. If you really wanted to, you can accomplish that with just 2 units: treespirit and amazon. Your spells are not optional. You must have surge of light and ensnaring roots. I’ve heard of decks that neglected hurricane, but that’s like neglecting thugs for fire. Theoretically possible, but you should really keep it in. Since I can’t really list nature cards by order of usefulness like I can fire, I’ll just give an overview of each card and let you decide what you need. Dyrad: The blue affinity is much better than the green. The primary use of this card is doing damage prevention against eruptions. If this card is not in your deck, you cannot get in an aggressive t1 fight with fire, except in certain specific situations. The dryad is nice because it also puts units to sleep, but my suggestion is not even to bother with the green affinity if you don’t have the blue. Some players have commented that they bring both affinities for fun, because the green has certain highly situational uses in t2. Shaman: Very useful, but not as much as the dryad. I’ve seen good players that prefer not to take him, but he’s a mainstay in an extended t1 fight. If he’s not dazed, he can be very annoying to deal with. Amazon: A swift unit. Blue affinity is better. She is better than a swiftclaw alone, but if you have a large army, the swiftclaw is more useful. She’s a great counter to sunderer, and as a fire player, I like to see swiftclaws more than amazons. Actually, the t1 swift unit that strikes the most fear into my heart is werebeast. Amazons are annoying to deal with as fire because you can’t spam sun striders against her, otherwise your scavenger will kill them. I think the other factions have an easier time with amazon than swiftclaw, however. Swiftclaw: Another swift unit. This one does insane damage (almost 1500), especially against M. The animation to deal extra damage takes a bit of time. 1 scavenger and 1 sun strider typically beat 1 swiftclaw and 1 windweaver because the fire player can also erupt, ending it all. Same with nasty surprise and shadow. Swiftclaws are also fairly susceptible to kiting because of the time it takes to animate. @RadicalX pointed out that swiftclaws are fairly essential to combat nature doubles or frost mage spam. @YaBro0 said that swiftclaw should be the main damage dealer in a nature deck. Werebeast: These cards are often perceived as underpowered, although they can be quite useful in the hands of a good player. They require good micro to use, so that’s probably not you. Maybe in the futureJ. Don’t use them unless they are U3. Their heal ability becomes quite handy then, and you can annoy your opponent with all sorts of hit-and-run tactics. If you use this card, you need to be taking a very large t1. @YaBro0 said that if you have a deck slot for werebeasts, you should probably use spearmen instead. Windweavers: Probably the most important t1 unit for nature, although xAragornx has shown that you can get by on treespirits instead. Their multishot is very powerful, and they combo well with roots. You will probably spam them, especially against shadow. Mana Wing: In short, it’s super cool but not worth it. Spearmen: This is a very nice luxury, but not necessary. They are particularly good against shadow, and it’s not uncommon to start with them (instead of a swift) against shadow on a small map. Recommended if you’re having trouble against shadow. @RadicalX also lists them as quasi-essential against nature. Treespirits: Most people argue that these guys are overpowered. I do too. Spamming them works, which is just wrong. The green ones do especially high damage, but the purple ones are quite good to stay t1 and defend against frost. @RadicalX noted that the purple are also good against Nature dittos because it ignores the dryad damage reduction. You can also kill an Avatar of Frost with one purple treespirit and a root. Purple treespirit also goes through glacier shell. xAragornx plays this card and Amazon as the only two units in his t1. If you play a large t1, this card is probably not necessary. Envenom: I don’t see it much, but I hear that some of the great pure nature players used this to use this to help stay t1 vs t2. There is probably not room in your deck for it, otherwise a good option. I sometimes used it in my fire-nature deck as a counter to L units and especially war eagle or skyfire drake. Fountain of Rebirth is not actually as good as it seems. The reason is because you rarely have large standing armies that would benefit from a slow mass heal, and it’s pretty slow. Your opponent will not give you much opportunity to benefit from this. Mark of the Keeper: I hate this card. It’s not common, but it really helps in defending against factions that use a lot of spells (like fire-nature). I suspect it also shuts down pure frost, because pure frost doesn’t really have good melee units. But this is more of a t2 defense card, and it’s a luxury with a high price. It works really well against noobs, but if you want to get better you’re better off just learning how to defend properly. Mumbo Jumbo seems useful in theory, but it’s not so good. Very rarely do enemies only spawn one unit for a t1 encounter. It’s also 40 power, which is a lot. That said, I have seen it used on occasion. I don’t think I’ve ever lost to someone who employed it against me, though. Primal Defender is actually not bad. It’s a hard counter to phase tower. I don’t think it has much besides that, but phase towers can be very annoying for nature to deal with. If you can’t handle them (especially difficult on Wazhai), put this card in your deck. I don’t play nature much, but my opinion is that you want to avoid needing hard counters to certain cards. But ultimately do what helps you win, and if this card prevents you from being rushed, go for it. Stranglehold: Nah, you probably shouldn’t use this. It can help defend in t2, but if you’re permanently on the defensive, you’re going to have problems. Tunnel: Tunnel is the only nature card I’ve never seen used at some point in PvP (and I have seen it, but only from complete noobs—don’t be like them!). While they are probably the least useful nature t1 card, @RadicalX pointed out that some players like Kyllbuster did use them in t2 to whisk his units away from dying or avoiding coldsnaps. In summary, nature has great spells in t1. If you want to follow in xAragornx’s minimalist footsteps, you can get away with just Amazon, Treespirit, and spells. If you don’t want to avoid t1 conflict, go for a medium-sized t1 (I would recommend this). If you absolutely want to rush t1, I think Nature is the best option because it has so many good cards with many options. The problem is that all those cards are often useful only in certain situations, and the slots are often better used for t2. You can watch any of beijinguy’s replays for full-on nature t1 assault (I don’t even know if he played t2 in some decks). Against frost t1, hurricane is going to be very important against MA. Roots and windweavers can do a good job against ice guardians or frost mages, and treespirits are good as well. Against fire, micro is important, as well as judicious use of roots and hurricane. As long as you keep scavengers or thugs at a distance, you should be fine. Mortar tower makes this matchup much harder for you. Shadow fights often boil down to you spamming windweavers and him spamming nox troopers. Spearmen can help tip the tide in your favor. Frost t1: You have no swift units. Waa, waa. To make up for this, your units generally have the best stats/power cost ratio of any faction. Frost spams are nothing to laugh at because of the sheer power—even if they do arrive late to the fight. Frost is not an especially popular t1 choice, however, because most players dislike the lack of a swift unit. You need to play frost differently than fire and shadow, and most players that are accustomed to the more popular t1’s don’t want to put in the effort to learn frost. As far as I know, MaranV is the best frost t1 player. Because of frost’s great stats, it should win against any faction in an even power situation where both players have a well. For instance, a common frost tactic on Haladur is to try to take a well right next to their opponent’s (if fire or shadow) and then spam units. Frost also has a problem with harassment. Scavengers in particular can hit and run faster than frost can defend. This is defendable, but you really need to be on your toes. You’ll need to use a combination of lightblade and frostbite to make sure the swift units don’t get away, and it requires precise power balancing that you don’t spend too much power in one defense, just for the swift unit to run away to attack somewhere else. To play frost, you must take Master Archers, Ice Guardians, and Lightblade. In theory lightblade is optional, but frost’s lack of swift unit hampers some options and lightblade is really necessary to prevent lameness from your opponent. Ice barrier is an incredibly useful card especially with Homesoil. Glacier Shell is your core spell, but homesoil is probably more useful in practice. Usually it’s the threat of glacier shell that you need, so you would theoretically be fine as long people only assumed you have it. Frost mage is an incredibly useful card, as the second-best S counter in t1. Unfortunately, Master Archers are the best S counters in t1, so frost mages are slightly redundant. Imperials, Frost Sorceress, and Ice Shield Tower are your most-likely-to-use nonessential cards. Master Archers: Stat for power, I’ve heard it claimed that these guys are the best t1 units. That doesn’t mean everything, but MA are certainly good. They have 600 health and they’re a squad, so you can’t be erupted when they’re dazed (each unit survives with about 1 health, runs away, and gets the health back after daze). They’re incredible S/S, combining the best qualities of a spammer—high health, ranged attack, and low cost. Their attack is a bit low, but they still pack a punch when paired with homesoil. Being S units has its pros and cons. They are knocked back quite a bit, but they also do very well against the other spammed units (windweavers, sunstriders, thugs, and forsaken). Most player will start the match with master archers because they are cheap and don’t lose effectiveness over time like ice guardians do. Ice Guardians: These are your melee units. Their attack isn’t so good, but they still do well against M units. With their ice shields, they have over 1000 health—for only 50 power. This health isn’t overpowered (although it certainly is good) because ice guardians are rarely attacked. Typically they are used to defend, when the enemy is trying to drop a well. They do have some use in an offensive, although transporting them without losing their ice shield is a pain. Although they only cost 50 power and have even better stats than the master archers because of the shield, they are a poor choice to start a match with because they will lose their shield by the time they arrive anywhere. Lightblade: One of the best t1 units. He is essential to dealing with sunderer, but he’s so overpowered that he’s still a very viable t2 L counter. His ability is also necessary for making sure units don’t get away and combos well with frostbite. There are just so many terrible things lightblade can do. Both affinities are good, and it depends on your use for which one is better in your deck. The red one is better when you are using the lightblade to kill t1swift units. The purple is better when you are using it as a cc on L or XL units in t2 or t3. MaranV often starts with a lightblade because it has good stats and wins any 1v1 fight. Frost Mage: This is the frost equivalent to thugs. Very useful, but you can get by without it. Frost mages are amazing against unspreaded archers, or things like thugs or skeleton warriors. They are very strong against fire because they take away fire’s M counter. They are good against frost dittos to take out MA, and they are strong against nature because nature’s hurricane takes out MA. They are not necessary against any of these, however, because Master Archers are better—they just don’t have the knockback. MaranV didn’t use them in his deck because the FM’s redundancy as an S counter. Glacier Shell: Similarly to nasty surprise, this card isn’t spammed. It’s more the threat that you can defend a well that manipulates your opponent’s playstyle around it. Still, I’d say it’s fairly essential since the main reason you are playing frost is for your ability to defend your structures, and having this in addition to kobold trick (the spammed spell) increases your defensive options. That said, it is probably the core spell which you can most get away with not using, as it has a better version in t2. You have to know exactly what you’re doing to get away with not using this card, however, so I’m going to consider it essential for you. Frostbite: This card is pretty essential to play frost t1. A lot of players use it for t2 as well, because it makes it much easier to kill strong enemies (especially fliers). The purple is much better than the red. This card and lightblade are all that stand between your wells and a scavenger guerrilla attack. Ice Barrier: For 20 power you get ground presence. If it sounds underpowered, that’s only because you haven’t played enough yet. This card is great for preventing walls from going up, for gaining and maintaining map control (difficult with slow frost units), for giving structure bonuses (homesoil, lyrish knight, ice guardians), and for absorbing splash damage. An essential card, not because it defends against anything in particular but because it is so useful—to skip this card would be like skipping eruption. Homesoil is pretty necessary for frost because frost does such little base damage. Pairing it with splashes such as lost souls (or, heaven forbid, fire dancers in 2v2) greatly increases its effectiveness. You would be remiss in skipping this card—while it is an “optional” card, it’s so much more useful than any other optional card that it may as well be mandatory. Imperials help in certain matchups, but they are not the most useful in t1. S/M units w/o range just don’t have a ton of use because most of the t1 M units are swift. Nonetheless they do have great stats and can be quite useful in a rush because they take so little damage. They also perform well in a scenario where you stay t1 against t2, because of the prominence of M/M t2 units. This is not an uncommon frost t1 card, but not a particularly common one either. Northguards are literally the most useless t1 units in the game. Not because they are especially bad—because their stats are okay—but because they are so redundant it hurts. Frost already has the best S/S and M/S t1 in the game. Why on earth would you need a mediocre melee S/S? Frost Sorceress: This unit is more useful in t2, and is a staple for fire-frost decks. It can still be good in t1, especially with frost mage or lightblade, but the real reason to use her is to get those ice shields onto hard hitters. Ice Shield Tower: This card is better than the frost sorceress for giving out shields, but the problem is that you need to get a tower up. I see this in fire-frost or pure frost decks occasionally, but you will probably not use it for t1, but rather t2. Only use this if you derive sick pleasure from lame camping J. Warden’s Sigil: Another t1 card that is really more useful in t2. You’ll want to use the blue affinity so you can shield buildings under construction. This pairs well with ice shield tower or termite hill in fire-frost decks, and is useful for protecting power wells should the need arise. Again, it’s really only a specialty card. Wintertide is one of the lamest cards. It allows you to get away with MA spams much easier, since they take less damage and can’t be knocked back. It’s really only useful if you’re trying to rush, and that only works against some decks on some maps, so it’s a fairly situational card. Most good players dislike risking a wasted deck slot to get a potentially cheap win, so it isn’t the most common card. Both affinities are good, but the red one works well with lightblade for killing L or XL units quickly (it also insta-kills dreadchargers). All in all though, I think this card just builds bad habits that won’t work on good players that are expecting the rush. Glyph of Frost: I’ve seen some good players take this, but not very many. It’s hard to use against a very good opponent, because perfect micro can trigger the glyph and get out without any units being frozen. I would not recommend spending a deck slot on it, but @Morathyls mentioned that he considered it a core frost card to deal with scavenger spams. @YaBro0 mentioned that Freemka and DragonDave used glyph of frost often because it can catch an unsuspecting opponent off-guard. You can use something like a lightblade to activate it as well (and this combo is even useful against t3 XL units). It can also be used as a way to prevent your opponent from retreating, if you lay the glyph behind them. Glaciation: Pretty much useless. If your opponent makes a mistake and you get a wall up, 1) Do you really want to win like that? 2) Do you really want to make it even more impossible for him to recover? Construction Hut, Defense Tower, Northern Keep: Nope. If you want a building, you can take Warden’s Sigil or Ice Shield Tower. Buildings are inherently suspect because they bind void power, take a while to go up, and your opponent can maneuver around them, so it’s rarely a good idea to make a building without a specific purpose. Frost t1 has some really great cards, and it’s quite tempting to want to take them all. You need to conserve room for your t2 and t3, however, so restrain yourself in your t1. Frost is very strong and has cards that continue to be useful in t2 (frost sorceress, lightblade, frostbite, ice barrier, homesoil…), but most player still dislike the lack of swift t1. Frost t1 is most dependent on the map for what kind of advantage is possible to get. T1 on a Budget: This should not be a large concern in BFReborn, because bfp should be easier to get, but I’d still like to explain some economical considerations for which t1 is the cheapest. Note that approximate bfp values I give are when I was searching for a picky deal, and they may no longer be accurate in BFR. Bfp values I give are also for a single unit, and you’ll need to consider charges. If I don’t list a price, that means it was common (aka: free). Price should really not be your primary concern, but here are the cheapest options. Fire: When I started playing, this was by far the cheapest t1 to play. You can get by with scavenger (~15 bfp), eruption, sunstrider, thugs, and supplementary cards to deal with frost or nature. Mortar tower (~50 bfp) is the best single card to add, although a combination of makeshift tower (~15 bfp) and wrecker does a fair job as well. If you’re really strapped for bfp, you can take nomad, but makeshift tower becomes essential, and it’s really a subpar setup. The only reason I even mention it is because you need a minimum of 2 charges of scavenger to survive, but only one makeshift tower. Verdict: 45 (playable)-100 (slightly more playable)-200 (fully playable) Shadow: Since witchclaws are available, this faction is probably the cheapest to play. You’ll need witchclaws, forsaken, and nasty surprise. Nox trooper is also pretty essential, although I suppose it’s possible to play without them, maybe if you use skeleton warriors. I’m not super sure about the prices, but I believe nox trooper was about 20-50 bfp, and lifeweaving and motivate were in the 50-75 bfp range. It’s quite possible to play without lifeweaving and motivate, although it will limit your aggressive options. Nox trooper needs a minimum of 2-3 charges. Verdict: 0 (barely playable)-100 (mostly playable)-200 (highly playable) Nature: You’ll have to go minimalist for sure. Amazon (~50 bfp), treespirit, hurricane (~50 bfp), surge of light, and ensnaring roots (~40 bfp). No choice. Verdict: 180 (playable)-260 (playable with more charges) Frost: There are ways to play this for cheap, but more than any other faction, it really suffers. Ice guardians are much better than imperials because frost struggles with knockback. You can’t really use wintertide to make up for it because that’s also a few hundred bfp. You might be able to get by with Master Archers, Imperials, Lightblade, Frost Sorceress (~10 bfp), ice barrier, and frostbite. There’s not really any other alternative if you want to keep a pretense of being economical: frost mage, ice guardians, and homesoil are all quite expensive. Verdict: 20 bfp (barely playable)-600 (almost fully playable) What about t2 cards? I’m glad I asked myself this. If I wasn’t, I’d edit it. With t2, it’s important to keep in mind other things. There are more options in t2, so you need to be able to defend more things. For instance, t1 L counters are not essential because you don’t have to deal with all L units, only sunderer (which has low health). In t2, there are many great L units: Lost Reaver, Deep One, Vileblood, Stone Tempest, Mountaineer; as well as flying ones like Fire Drake, War Eagle, and Windhunter. In general, you want to fulfil 3 large categories—a way to drop wells, a way to prevent wells from dropping, and a way to clear enemy units. For some factions (lookin’ at you, pure fire), the way to prevent wells from dropping really turns into “drop more wells faster than my opponent can.” In t2, you need to following: · Counters for S, M, L, and XL units (XL counters are important because of harvester and people that get to t3 earlier than you.) · A way to slow your opponent. Usually cc, but this can also include things like mine or wildfire which force your opponent to leave your wells alone. · Siege units. They don’t actually have to be siege, but you need something whose primary purpose is dropping wells. War Eagle is a good example of this. · Cheap, spammable units · Defensive units · Anti-air. Self-explanatory; War Eagles and Skyfire drakes are common and powerful. · (Optional nicety): Sick combos · Additionally, each faction has inherent advantages that it should take advantage of. I’ll spend the most detail outlining fire-nature and the cards that fit these categories and possible ways of comboing them. I’ll be briefer in the other factions that I don’t know as well, trusting you to take the tools I’ve given you to sort out the basics for yourself. Fire-Nature: T2 Cards Overview: Let’s go through the deck building process. First, I’ll look for the basics—counters and ways to kill units. Note that I’ll only be mentioning cards which are still useful in t2. So thugs aren’t very useful S/S because ghostspears are just better. Also keep in mind that M units are generally worse in t2. That’s because there are a lot of cards that do great damage to M units (like skyfire drake, enforcer, ghostspears, war eagle, and nightcrawler), and those great M/M units are typically spammable. · Small o Deathglider—only the blue affinity is worth anything. They’re flying units that deal extra damage to small and they knock them back as a nice bonus. Plus they’re cheap. Looks good! The immediate downside I see is the low health, but I have cc’s and heals to mitigate that. o Firestalker—listed here because of the knockback. The knockback is not bad actually. o Ghostspears—they have great stats, and they can change to deal extra damage to S or M units. The downside is that they cost a lot (80 power to deal extra vs small) and 90% of the small units you encounter will be Darkelf Assassins, which tear through small units. o Scythe fiends—tremendous stats, and swift to boot! They are a bit expensive for M units though, and stonekin will destroy them for a variety of reasons. o Viridya—she seems good. She definitely has her uses. Pretty low attack, so not that useful as a S counter, but maybe her special powers will help? Except one of them is a slow healing, which is sort of redundant because of surge of light. Also a bit pricy, and has low health. She does knock back small units, but something like a fire drake or a nightcrawler would destroy her. · Medium o Ghostspears—see above. The extra advantage here is that they only cost 70 power to fight M units, and there are few M/S units to counter them. Scythe fiends are really the only M units that ghostspears won’t do well against. o Rageclaws—similar to ghostspears, except they are sturdier and do more damage. Unfortunately they take a long time to build up rage and are extremely susceptible to knockback or cc. They also don’t have the option to counter S. o Rogan Kayle—these are great stats! Much better than Moon or Viridya. Unfortunately, most M/M units have great stats. He will lose to nightcrawler or enforcer in a heartbeat, and he cost much more than them. On the upside, he makes units deal more damage (a plus with an aggressive faction like fire-nat). He also has a cc, although it’s not that good. Fire-nat doesn’t benefit as much from the cc as something like pure shadow or pure frost, because we already have roots and oink, which are quite useful. o Skyfire drake—a flying unit! Wonderful! This will help against things like enforcer or nightcrawler which tend to go berserk and deal tons of damage. Also look at the damage on that thing! Note that it doesn’t have much health though. o Twilight Brute—good stats, like Rogan Kayle but much cheaper. Unfortunately, as we’ve discussed, it loses to other M/M’s like nightcrawler and enforcer. o Twilight Minions—these are ghostspears that cost 10 power less and don’t have the option to counter S units. If you pack hurricane, that should help tip the tide in favor of twilight minions. Commandos will be the only S units you can’t deal with easily, but they aren’t that good and they aren’t used much. You can also oink them if they get buffed too much. Mauler also shuts down commandos, if you’re super worried. · Large o Fire Stalker—they do extra damage vs. large units. They have mediocre-to-poor stats, but they can work. o Firesworn—even though it’s a t1 card, it still does great damage vs L units. Especially with the ability. Note that they can’t hit air though. Also, they die easily and can be cc’ed without much difficulty. They are t1, after all. o Gladiatrix—a ranged L counter that does tons of damage. The green one is swift, which is nice also. The purple has a better disenchant, but both work. It’s not efficient to use the gladiatrix for its disenchant (cost 150 power) but it’s very nice to have if you have a gladiatrix already out. Which you should, because most of the buffed cards will be L anyway. As a general rule of thumb I prefer the green because you’ll usually have 2 gladiatrix to counter a L unit anyway, so if he buffs twice you can disenchant twice. If you pack the purple disenchant, the green gladiatrix is definitely the way to go. o Mauler—very good stats, although the gladiatrix is a better L counter because she can attack from range; it’s even better if you get a root off. If the mauler is attacking a melee L unit, he will probably die because L units just have good stats. HOWEVER, the mauler has a great ability that shuts down ranged attacks and prevents special abilities from being used. This makes him a great counter to ashbone pyros and mountaineers. He’s pretty great all around vs stonekin, because stonekin thrives on ranged attacks with knockback. I make this comment because fire-nature usually has a very hard time with stonekin. He’s also good against defenders or commandos (remember the problem with twilight minions?) because they can camp all they want, but he will prevent them from shooting. There’s nothing better than a frost player who saves up power for a defender spam and then camps outside your base, knowing you can’t do anything about it, until you send one mauler to each defender and waste it all. o Moon—terrible stats. Well, actually, they’re not bad. But she costs a lot and dies pretty easily to M counters. Her necroshade can be good, especially if you paired with a ranged attack like gladiatrix or spirit hunters. Her dark arts can be a situationally useful heal, but fire-nature doesn’t really need it because of surge of light. o Slaver—very expensive, its stats aren’t that good, and because it’s a medium unit, it’s extra squishy. Its ability isn’t useful. While I’m on the subject, none of the twilight transformations are very useful. This card might be in the running for the worst t2 L counter in the game. o Skyfire drake—it has high dps and can’t be hit by most L units. If you’re using it to counter L units it’s basically a glady, but more useful after the L unit has died. · X-Large o Gladiatrix—actually, fire-nat has 0 (!) XL counters at t2. That makes us especially susceptible to harvester or t3 rushes. Gladiatrix is the best thing we have. It’s useful because it can attack at range, and so stay out of the XL’s amazing damage. You need to pair this with cc, preferably roots, so the glady can still attack. o Mortar Tower—Believe it or not, this building has the highest dps of any card at your disposal. Build a mortar tower and try to send a scavenger to slow down the harvester while the building comes up. Then root the XL, bombard it, and hit it with gladies. o Skyfire drake—has good dps and can fly away. Use it for similar reasons as the glady o Rogan Kayle—great because of his cc. It doesn’t prevent the XL from stomping on people, but that doesn’t do near as much damage as the alternative. Credit to @RadicalX for pointing out that his cc is particularly useful because it stacks with cc spells. Your defensive gladies will also benefit from Rogan’s buff because of their high dps, but they will probably be spread too far to do much benefit. · Siege o Burrower—these guys are fairly cheap (read: spammable) and have good stats. They die quickly to M counters. They also have an ability to knock units off walls. This is useful if you don’t have hurricane, not so much if you do. The swift is also nice. o Fire Stalker—Wow! This is the third time he has appeared. He’s been mediocre the other two times, and he is here as well. He just doesn’t do much damage. The upshot is that he stays far enough from your other units that a lavafield or cc won’t do too much to him. The shots are also delayed, so it continues to do about 200-300 (I think?) damage to wells after it has died. This is particularly useful against non-frost factions, but even worse than if it did all the damage upfront when the frost player has time to kobold or glacier shell. Also, in regards to it being good at everything, did I mention it has swift? o Vileblood—a good card, but expensive. It’s not spammable, but it does do a great amount of damage. But if you look at the stats, it seems much better to just make 2 burrowers than a vileblood. That’s not necessarily the case, however. For one, heals work better on VB. If the enemy focuses your burrowers one at a time, you have to heal roughly every 700 health. With a vileblood, you can get away with every 1300 health. Also, ravage is nice on him because it’s one unit vs 2. AoE spells don’t spread to do double damage. Furthermore, if you have a VB already up, it basically takes 80 power to summon each new one (surge of light), which is practically the cost of a burrower. Additionally, L counters are typically much worse than M counters. The downside of VB is that he’s completely useless vs frost (Lightblade). Also, if you were to make 2 burrowers it’s often a good idea to send them different places (unless the opponent has nightcrawlers). VBs can’t go to 2 places. So in short VB is better against non-frost factions and burrower is better against frost factions. o Rageclaws—they don’t technically have siege, but the thing about wells is that you attack them for a long time. This means rageclaws will have rage built up, in which case they’ll deal as much damage as burrowers (I think?) while being hardier and useful M counters. The downside is that you can’t rush wells with them because they take so long to rage up, and they’re very susceptible to cc or knockback. o Termite hill—does great damage against wells and orbs, but the card is hard to use. Fire-nat has an easier time than bandits or pure fire because of cc, but it’s still tough and situational. · Specialty o Spirit hunters—these guys are great at doing damage to many places at once. They’re like a slower lavafield. Take the green ones. The purple do much less damage, but you can use them if you don’t have a disenchant. The problem is that they attack so slowly, and they only do 5 damage per second more than green spirit hunters on a creature with lifeweaving, while doing 10 damage per second less on normal creatures—which will be the majority of what you use spirit hunters for. o Skyfire drake—it’s very useful because it flies. I’ll not go into specific tactics here, but flying counts as a random plus. o Deathgliders—also flies, same as skyfire drake. Note that having 2 fliers can have aspects of redundancy. o Mauler—slam ability. Check out its usefulness above. o Rogan Kayle and Viridya—also useful for more than their ability to deal and take damage. For this deck, Rogan’s abilities are more useful. Check out usefulness above. Now let’s take a look at buildings. In general, buildings are bad because they bind power and are immobile. · Rallying banner—a building, extremely necessary in bandits and pure fire. However, it’s not so necessary for fire-nat because we can usually spawn dazed units without repercussions. A lot of our units have high health, and we can support them until they get out of daze with cc or heals. The card is nice to have, but even if it was in my deck, I wouldn’t use it much. · Breeding grounds—this card is probably more useful than rallying banner, but not a ton. The building binds power and it’s most useful for spamming large amounts of units at once. Usually if you have enough power to make a breeding grounds and spam burrowers, it’s better just to spam them immediately. · Willzapper—sounds great in theory, but I have never successfully used it, nor seen anyone use it. · Mortar Tower—Yep, still useful here. I listed it more above. And most importantly, spells. Unlike units, spells rarely decline in usefulness as you go up tiers. Each spell is different, so it’s rare to see a t2 spell that is just a better version of a t1 spell. · Curse of Oink—a cc, and a great one. It’s more useful for offense than defense, because units will transform back if they are attacked after 5 seconds. It’s still a good way to counteract spam, because you can attack each unit individually while the others are incapacitated. Note that oink combos very poorly with spirit hunters, because the poison wakes the units up. · Disenchant—removes buffs. Generally the buffs you want to remove will be on enemies, so the purple one is better. Note that oink can serve like a disenchant in a pinch by incapacitating the buffed unit. Occasionally this card has use on your own units to get out of cc, but that is only useful in rare occasions and usually on giant slayer. Typically it’s better to make another giant slayer than to disenchant the one you have. It can also be used to get VB out of cc, although it’s generally a better idea to just heal it and wait for the cc to run out. · Ensnaring roots—a great cc. It doesn’t work on ranged units, but it does a great job on melee units. There is no damage reduction and the units will not come out of it when attacked. Combos well with mine, mortar, skyfire drake, spirit hunters, and gladiatrix. This spell is critical for defense, but it’s also useful for offense if your opponent has spammed melee units that haven’t encountered your offense yet. · Envenom—does a lot of damage, but pricy. It’s also easy to ward off. This is the rare case of a t1 spell just being a worse t2 spell (parasite) · Eruption—great for taking down anything that has less than 300 health. Can be used for defense to kill a unit before it does more damage, as anti-air, as a preventative measure against a heal, and as offense to take down a well. It takes 7 eruptions to drop a well, and 10 to drop a monument. · Hurricane—very useful against small units. Sometimes it can be used to prevent a well from healing, although if that’s a concern it’s generally better to simply erupt it. · Lavafield—good AoE damage, especially against spammed units. This is more defensive than anything. It has a few nice combos, however, because of its knockback. This tends to be a card I either find really useful or not at all, depending on the match. · Mine—believe it or not, this does more damage than lavafield. But it’s less useful because it has a smaller AoE and requires the enemy to make a mistake to trigger it. On one hand it’s less useful for fire-nat than other factions because we don’t need its meager cc abilities, but we can also combo it very well with hurricane or roots. · Parasite—does damage to lots of targets. Useless when facing nature splashes. Pretty much spirit hunters in spell form. · Ravage—I’ve heard this claimed as the best healing spell in the game. It’s especially useful because it heals gradually, allowing for heals greater than the max HP of the unit. It’s also super cheap to cast. · Scorched earth—same use as in t1. It helps prevent t3. · Surge of light—a fantastic spell. You are playing fire-nature for this single card. Maybe oink and roots as well, but pretty much for this single card. I’m not going to explain why it’s so useful, because if it’s not in your deck switch factions. I have literally seen people t3 nature for this 1 card. · Ray of Light—when I first started playing, I assumed that Ray of Light was better than Surge of Light because Ray is t2. That’s not true. Surge is instant, while Ray takes a long time, which makes it almost useless in PvP. · Twilight Curse—this can be used like an L counter or anti-air. The only use I can think of for it would be war eagles or windhunters. But fire-nat tends to do a fairly good job at those anyway. The problem is that twilight bugs are actually pretty good. It might actually be better to use on one of your own units, but it’s pricy—just make a vileblood if you want one unit with good stats. It is quite good against mountaineer, which fire-nat can struggle with. So if you want a counter to one specific card, this is the deal. You could use it on harvester as well. (allbfcards claims this does not have a unit with max power cost that it can be used on, but I recall it couldn’t be used on anything that cost more than 150?) · Wallbreaker, Girl Power, and other Shenanigans—Please no. Please. T3 Cards Overview: I’m going to lump t3 with the t2 section, since you shouldn’t have many t3 cards. In t3, your goals are simple: End your opponent without being ended yourself. Cards are chosen which have high offense, especially for fire-nature. In general, you can use your t2 cc for defense. My rule of thumb for t3 is as follows: 3 cards—one for killing wells, one for killing enemy units, and one to be swift and spawn well-killers all over the place. Typically fire-nature takes a light t3, in favor of larger t2. I knew a great player who only carried giant slayers in his deck, and another that doesn’t take t3 at all! · Offensive cards o Backlash—deals a lot of damage, but it’s rarely used because it only does half damage against structures. o Brannoc—extremely powerful. The best XL unit this faction can support. The biggest problem with him is what happens when you rely on him but your opponent pulls him first. Most people think he’s lame. o Curse well—very slow. If you use this card, you need to play a mostly defensive t3 and bleed your opponent dry. Using this card immediately awards you the title “lamer.” Additionally, get out of fire-nature because we don’t have time for that nonsense. o Deepcoil worm—an XL unit, but a bit weak. Fire-nature thrives on its aggressiveness, and it has more options that do faster damage. That said, you have six XL units to choose from as fire-nature, and I’m not going to bother explaining why Santa, Mo, Lordy Cyrian, and Razorleaf aren’t worth playing. o Drones—great stats, and swift to boot! A bit pricy though. o Enlightenment—wreaks havoc with earthshaker. Very pricey though. Fire-nat generally has a more efficient way to dish out the damage, and one 50 power card (shield building) can completely negate all 370 power spent on this combo. This especially stings because the only scenario where you need such massive overkill as earthshaker is against campy lost souls Church of Negation spammers, and they typically pack shield building. o Giantslayer—when raged up, they deal a ton of damage (1000 per charge). They are especially susceptible to cc’s though. In one of the great ironies of the game, it is better to defend giantslayers with t2 cards than t3 cards. Don’t use this card if you rush t3 while your opponent stays t2, unless you also have a power advantage. The biggest plus of this card is that it’s difficult to cost-effectively defend against, making it very spammable. o Inferno—sure, it does a lot of damage. But you’re probably better off just using enlightenment and earthshaker for that much power. o Mutating Maniac—a worse Fathom Lord, that costs more and can’t paralyze. The upshot is that you can use them with giant slayers. Unfortunately, that isn’t such a big plus because both are XL counters. o Shrine of War—a great card, but I doubt you’ll be able to make much use of it. That’s a lot of power to bind and the cooldown is long. The match will probably be over before it’s ready. o Sun Reaver—used to be the fire equivalent of the ashbone pyro. Then it got nerfed to oblivion. It’s hardly worth using now. It takes so long to build up its flame that a giant slayer will kill the well faster. I would like to see this card get buffed so it deals regular damage against structures and slower damage against units. But until this happens, you have a large, slow giant slayer that can’t charge or hamstring. I’d also put the unnerfed one as defensive, but this is useless at killing units. o Swamp drake—useful for attacking, not because it has good stats, but because it’s an air unit. Many people don’t bring anti-air to t3, and this card is difficult to counter. It can also do hit-and-runs, and general annoyance. However, such techniques require a lot of micro, and are generally too slow to be worth it. The cc sleep is also much better for offense than defense. o Twilight warfare—I don’t even know what this does. o Virtuoso—fairly good stats. The ability does a lot of damage to structures. Also a good L/L, although it can’t take advantage of roots. o Vulcan—great attack, but low health. It can be supported with heals, but I’ve generally found there to be better attack options. I would have brought him anyway for shooting air, except he can’t. · Defensive cards o Backlash, to kill attacking enemies. The problem is that backlash is expensive and has a large cooldown, making it inefficient against spammy t3 units. o Fathom Lord—great stats for the price. And their paralyze is good. They’re also great at defending vs XL units. They’re slow though, which limits their offensive capabilities. o Giantslayer—I told you these cards were ironic, right? Despite their name, they’re not the best XL counters. They can do a good job, but you’d think that 240 power of giantslayers would beat 220 worth of a juggernaut, right? Especially since giantslayers counter XL, and juggers don’t? But giantslayers suffer from very low health, so most XL’s 2-shot them before they can get rage built up. If the gs is raged, a single one can take out an XL unit (if you support it with cc and heals and get the 1500 damage charge). But if they aren’t raged, they don’t do so well. I believe it takes 4 giant slayers to kill 1 juggernaut if they start from rest. Nasty surprises, lifeweaving, or wildfires defeat them easily. However, giantslayers are still very useful because of their hamstring effect. It slows enemies down to give you more time to prepare your defenses. It’s also good for defending spammy units, because giantslayers are just as cheap as them. o Magma Hurler—not great stats, but it’s ranged and knocks back M units. They’re pretty good at defending if you play roots. They’re also nice anti-air. Air units are typically bad in t3, but every now and then you have that one guy who uses them and if you don’t have an answer, you start to rage and call him a lamer in the chatbox. Pointed out by @RadicalX: their biggest downside is that they take 4 seconds between shots, allowing your opponent to micro around them and kill the magma hurler without taking any damage. This isn’t that bad an issue, however, because nobody has time to micro one unit obsessively in t3 and 2 de-synced magma hurlers or a cc can prevent the dodging. Also, a magma hurler does not want to attack anything that also wants to attack it. o Magma Spore—good anti-air defenders. Not good at defending much else (actually, they can do a lot of damage to L units with their ability). Also good at spamming. o Swamp Drake—probably the quintessential defensive card for fire-nature. XL counter, especially good with root. It’s ranged, so it can brute force as anti-air with heals and cc. It can also cc sleep, which isn’t that useful for defense unless you’re proactive. o Thornbark—M counter, which has its uses in a large t3, but generally not that useful if you’re going light on t3. Hits air, so good defense there. Gets stronger with root network. Unfortunately, they have very little health and can only really go offensive en masse. Which is not good in t3, because mass concentration in one spot is a good way to lose your entire army. o Thunderstorm—Does lots of damage to units, none to structures. Works well with roots, but really only useful if your opponent spams a lot to one place. He should be smarter than that. o Treefiend—honestly, I’ve never used this or seen it used. Its stats are terrible and they cost an arm and a leg. 150 power for 1200 health? I don’t even know what its upgraded health is, but I wouldn’t pay 150 power for something with twice that health. o Twilight creeper—allbfcards doesn’t have the difference between their affinities. Nonetheless, they have bad stats, and don’t have any real knockback. Just take magma hurler if you want an L/L ranged. o Twilight Hag—also never seen her used, so I can’t comment on her usefulness. Doesn’t seem very useful though, with low attack and health. Her ability seems more like a joke from the developers than anything. o Vulcan—can do massive damage with his ability and roots. Unfortunately, he cost a lot, so it doesn’t defend against cheap spammy cards well. · Spammy cards o Drones—good stats, and swift, but a bit expensive to spam. o Giantslayer—cheap, does a TON of damage, and swift. Also can’t be knocked back. They are very susceptible to cc, however. And they lost to most t3 units 1on1. However, giantslayers should primarily be used to spam 1 to every base, forcing the enemy to waste at least 120 power at each one. This gives you a power advantage, and you push harder at the weakest one with your offensive unit. Spamming 1 to each base also negates the efficiency of cc. o Magma Spore—cheap, and their ability is good. They’re also air units, which makes them especially good against any non-shadow faction (that has no ashbone pyro). The biggest problem with them is trying to micro them. They’re easy to forget about. If memory serves me, it takes 6 to drop a base of 2 wells and 1 orb. And obviously you can branch out even more with t3 than this. The first deck I played, I went t3 shadow for ashbone pyro. That solved problems of anti-air and siege. xAragornx still uses that strategy. However, going three different orbs is very risky because you can’t let your t2 or t1 drop. If you play t3 the same color as one of your first two orbs (far and away the most common choice), you have added tactical options. For instance, I am willing to trade my first orb against xAragornx (fire-nat-fire vs nat-frost-shad) because I’ll be t2 and he’ll be t0. So he can’t attack with reckless abandon for his orb, while I can. Building the Deck: So now let’s build this deck! Let’s start with the easy choices, in t2. Take a look at which cards show up under a lot of categories. We have: Rogan, deathglider, Skyfire drake, rageclaws, mauler, mortar tower, gladiatrix, firestalker, and ghostspears. Notably, 2 cards are weaker than the rest. Deathglider and Fire Stalker serve so many roles that they don’t do a great job at any of them. Rogan Kayle also suffers from a similar problem. The others are good, but some are redundant. Ghostspears and Rageclaws serve the same main purpose. Skyfire drake is also an M counter, but it’s good to have 2 M counters that have different sizes, because M units are the most common in t2. Skyfire is unique in that it can’t be hit by melee, and gladiatrix is similarly unique in our list of multi-functioners. I will add Skyfire Drake and Gladiatrix to my deck as the first 2 cards. Eh, let’s throw in Rogan Kayle, Fire Stalker, and Deathglider as well. I may take them out later. Using Mortar Tower will probably depend on what I do t1, as well as how comfortable I feel my t2 defenses are. Let’s hold on that one. But what about rageclaws and ghostspears? We already have 1 M counter (Skyfire Drake), so 1 more should suffice. It should be cheap, and primarily used for defense. I want to be able to defend against someone spamming 1 nightcrawler/burrower to every base, and I can’t do that with skyfire drake because I won’t be able to sustain it. The cheaper the M counter, the better. So as my M counter, I want to pick one from rageclaws, ghostspears, twilight minions, and twilight brute. I want to shy away from M/Ms, so let’s get rid of twilight brute. Remember, M units are typically the squishiest in t2, and if we keep rogan it will make the M/M redundant. So we have the choice of three S/M units. Which to take? Rageclaws and ghostspears are about equal, except rageclaws do worse at defending and much better at attacking. If we take good siege units (I plan to), this will make the rageclaws ability to drop well unnecessary. So ghostspears or twilight minions? They’re basically the same card except twilight minions cost 10 power less and can’t hurt S units. So my choice of whether to take ghostspears or twilight minion depends on how good the rest of my deck is against S units. For now I’ll take ghostspears and substitute twilight minions in if I feel my S counters are a bit overkill. The deck is now: Skyfire Drake, gladiatrix, (Rogan Kayle, Fire Stalker, Deathglider), and ghostspears. Let’s choose our well-droppers next. We can choose from fire stalker, burrower, vileblood, and rageclaws. Actually, let’s not consider rageclaws. They work in a tight spot, but burrower and vileblood do such massive siege damage that rageclaws won’t be very useful for it. I also didn’t consider termite hill, because it’s a real pain to set up. If I have extra deck slots after I’ve hit the essentials, I might stick it in. So which siege unit is the best? We already have fire stalker tentatively in. If we’re only taking 1 siege unit, burrowers is definitely the way to go. I like vileblood better, but certain cards like lightblade make him useless. There’s no way I’ll have room for all three. If I take 2, however, it’s a bit of a tossup between vileblood and firestalker or vileblood and burrower (note that I’m not considering firestalker and burrower, because then my offense will be particularly weak against decks with good M counters, which is every deck). I decided to take Vileblood and Fire stalker, and if I need more deck slots I can replace both of them with burrower. Also, I decided to make Rogan Kayle a more permanent addition because he works well with vileblood (it forces the enemy to make a L counter and M counter, and the cc is great for attacking). Deck: Skyfire Drake, Gladiatrix, Rogan Kayle, Fire Stalker, (Deathglider), Ghostspears, and Vileblood. Let’s get to S counters. The only card (besides Viridya) we don’t have in our deck is Scythe Fiends. Deathgliders and Fires Stalker do good knockback, but our deck currently depends on ghostspears for doing actual damage to S. If we have Scythe Fiends, we should probably pare down our “semi-S” counters. Or we could leave them . . . I think I’ll leave out scythe fiends for now because I don’t have enough charges (the card is expensive!). In the future, the combination of Scythe Fiends, hurricane, and twilight minions can probably replace fire stalker, deathglider, and ghostspears. If we drop fire stalker, we may as well get rid of Vileblood and/or Rogan Kayle and replace them with burrowers. So much of this is interdependent! But for now, nothing changes except making Deathgliders a more permanent fixture. Our last group of counters are the L counters. We’ve already included 2 L counters, the gladiatrix and fire stalker. We probably don’t need another, especially if we take firesworn in t1. Mauler catches my eye, but he’s so much more useful for his slam ability than for his L counter. If we decide to bring him later it will be because of that, completely ignoring the fact that he is an L counter. Now let’s talk about spells and special cards! Surge of Light goes in, no questions asked. Curse of Oink should be another easy choice. Ensnaring Roots is another great card, but let’s not use it by default yet. If I had 50 slots in my deck, which cards would I take and which wouldn’t I bother with? Then we can sort through the useful ones to fit our 20-slot deck. Reality Check: Let’s rate how good our t2 deck is against certain common enemy tactics! This will help us see if we need to change anything, and maybe influence our t1 or t3. 1. Defending walls 2. Defending t3 rushes (or harvester) 3. Defending cheap spams for spread-out agro 4. Performing cheap spams for spread-out agro 5. Defending a full-on attack at one place 6. Performing a full-on attack at one place 7. Preventing a large standing army 8. Building a large standing army Currently our deck has Skyfire Drake, Gladiatrix, Rogan Kayle, Fire Stalker, (Deathglider), Ghostspears, Vileblood, Surge of Light, and Curse of Oink. 1. We can’t defend walling at all. Hurricane or burrower can solve this, but we’ve already decided not to use the burrower. This may be a large selling point for hurricane, but the truth is that walls are easy to prevent. We already have enough ways for S knockback, and it’s not worth spending a deck slot to bail you out when your opponent builds a wall. Just get better so you don’t give him those opportunities. 2. How about defending t3 rushes? This can be when the enemy builds t3 just a bit faster than you, or when he does it too early hoping that one ashbone will wipe you out. In the second case, you will probably see an ashbone pyro or tremor. Maybe a giant slayer. Giant slayers are easy to deal with. Oink stops their rage, and ghostspears or skyfire drake do a lot of damage. Even in t3, the best way to defend against giant slayer spams is to root + skyfire drake. Tremors are harder, but roots and 2-3 gladiatrix does the job. If he buffs it, the gladiatrix has a ready disenchant. Ashbone pyros are the hardest to deal with. They do so much damage, and they’re ranged so you can’t get them with gladiatrix. Mauler would be a great way to stop it. Otherwise you just have to spam gladiatrix and fire stalkers. Mortar Tower is also a good way to defend against early ashbones, because the opponent doesn’t have enough power for more than one. (That’s why it’s a t3 rush. If he can go t3 and has the same power as you, that’s when it’s time to YOLO it and spam random stuff. You’ve already lost, but sometimes you can save it if you just ignore defending and go full offensive). In response to a t3 rush, this deck also has the ability to send 2 Vilebloods out, which will generally end the game, especially if one is paired with Rogan for that damage buff. VB spam is not as effective as burrower spam, however, because you are limited on the number of bases you can hit at once. What can this deck do about harvesters, or what happens if you’re both going t3 and that pure fire player gets it first and pulls out a juggernaut? Both should be defended with gladiatrix, skyfire drake, and roots. Mortar towers are necessary if you want to kill a juggernaut, but you should really be stalling it. Either way, I’m giving points to mortar tower, and I’m going to say Ensnaring Roots probably just needs to get in here already. 3. A common tactic for attack is so send cheap units to every base, forcing you to spend a bit of power at each one. Then, when you’re out of power, the enemy puts larger pressure on one area. How well does this deck defend that? Typically, the spammed unit will be a nightcrawler or burrower. Skyfire drake will eat both of those units, but if you have 5 different bases, 5 nightcrawlers are much more affordable than 5 skyfire drakes. Their even more affordable than ghostspears, which means that we don’t do too well against multiple small attacks. Even twilight minions, which cost the same as a nightcrawler, is not effective because the nightcrawler can run away. We can, however, be proactive. A roots allows us to bottleneck the road and kill the nighcrawler or burrower before they spawn more. Aren’t you glad we added roots? Nonetheless, I’m going to say this deck scores below average for defending spammed units. On a 1-10, let’s go with 3.5. There’s really not a way to improve it, though. For an additional way to defend this with this deck, see point (6). 4. Can we do the annoying tactic back? Eh, not really. Most of our units cost too much. We could improve our ability to do so with rageclaws (which would involve rebalancing to improve our S counters), as well as burrowers. We can, however, attack TWO places at once very reliably. When facing frost splashes (or shadow, actually, because of Aura of Corruption—actually, this is a fairly valid technique against any faction), it is critical to attack multiple places. Sometimes it’s better to spam lightly everywhere at once, but usually it will suffice to attack in just 2 places. This can be done with Rogan + ghostspears +fire stalker at one front, and VB at another front. You can also vary combinations. If you assist with cc and heals, and support them evenly until you decide which one is more likely to fall and put extra pressure there, you will probably down a well. The added benefit of the cards is that rogan and firestalker, in particular, are very underestimated. I did this type of attack against MaranV (a candidate for the best Battleforge player) when I was a noob, and the attack succeeded! I obviously didn’t win the game, but I did win his respect and he provided me with advice that helped bring me out of noobdom. I’d say this gets a 7.5. If we used burrowers, however, it’s a solid 10 for hitting everywhere at once. There is no deck that can do this more than burrowers assisted with fire and nature. Sometimes that’s not the best tactic though, so it’s a tossup between many weak attacks and 2 fairly strong attacks. For this deck, I’ve gone with the 2 medium attacks, but it’s more a matter of preference (and cost). 5. So we have a bit of trouble defending multiple places at once. Do we do better defending one place? Oh yeah! Err, maybe. If we bring mortar tower, that will improve our score here a lot. That tower keeps getting so many pluses… Seriously though, with roots a mortar tower does fantastic damage. If you play fire t1, but this in. If you go nature t1, it’s a little iffy one whether you want to spend the deck slot on mortar tower, because you can usually get by without it. All that said, I probably used mortar more in t2 than t1. All of our defense comes from having good attack and good cc and killing the enemy before it reaches our wells. Once the enemy is at the wells, we have a much harder time, especially with buffs. We can always cc a buff, but that’s often a waste of a cc. Gladiatrix works will for the disenchant ability, although we will always have trouble with things like lifeweaved nightcrawler. In t3, the threat of buffs are even worse, so Disenchant may be useful to combat that. However, I think we can get along with just the gladiatrix sobering for this deck. We have all the counters except XL, and that can be fairly easily dealt with through roots and ranged attack. How do we do against a massive amount of units, like pure fire or stonekin attacks? That one’s harder, because we don’t have great AoE damage. Although there is a particular spell that helps with that. To improve our defenses, let’s add Lavafield. We could also add spirit hunters, but they’re much slower than lavafield. I’ll say our defense at one place is a 6, or a 7 with mortar tower. 6. Now we get to our true method of defense: attack! As far as dps goes, I think fire-nat is 2nd, right after pure fire. But we have cc and heals. If you realize you can’t defend an attack, compensate for your loss of wells by taking some of your opponent’s! Along with Rogan (not counting his damage), a vileblood can drop a well in 16 seconds (!). If you see cards that are good counters to the VB, use a cc. Additionally, any fire stalkers in the back can do splash damage to different wells, making frost repairs more difficult. Along with surge of light and ravage, makes the vileblood very hard to kill. Let’s add ravage because of its usefulness. Furthermore, eruptions are GREAT for offense. When a unit spawns near a well, you can erupt it dealing 300 damage to the well, and the unit will die faster. If there are a lot of units attacking your offensive, cc or lavafield them. 7. Preventing a large standing army is only a concern versus a few decks. Stonekin, most notably. This is one of the best decks for doing so, because eruption or lavafield can finsh off enemies before they escape or heal. Standing armies are also very important for establishing air dominance. Eruptions are especially good for this since air creature have comparatively low health. An essential combo against fire drakes is to get one shot from a gladiatrix and erupt. Instead of a gladiatrix, you can also do it with your own skyfire drake, but be aware that he will be erupted as well. Time for Eruption to enter the deck. 8. Actually, you can build a large standing army with this deck. It’s more often a bad thing than a good thing, but you have heals and cc to save your units. With good saves, you can field multiple VBs, which gets very hard to defend. Now that we’ve fleshed out the deck, we have: Skyfire Drake, Gladiatrix, Rogan Kayle, Fire Stalker, Deathglider, Ghostspears, Vileblood, Surge of Light, Curse of Oink, Eruption, Ravage, Lavafield, and Ensnaring Roots. I’d like to add Mauler, Hurricane, and Disenchant, but none of them seem necessary. Mauler is probably the most useful of the three, but let’s see. It’s looking like we’ll be low on deck slots. For t3, I’m going to be a bit brief because there are so many possibilities. As long as you have hit all the bases, you should be fine. Let’s bring Giantslayer for all the nice reasons I listed above. I will take Swamp Drake for an additional benefit against XLs, and its anti-air possibilities. Lastly, let’s round it out with Virtuoso for its L counter and good damage against structures. If I have only room for 2 units (like if I put that mauler in), I’d go with giant slayer and magma hurler—magma hurler serving as a sort of compromise between virtuosos and swamp drake. Matchups Check: Now a quick rundown of how we can use this deck against all other factions. · Pure fire o Necessitates defending against one spot. The oink will do you good. Skyfire drakes and ghostspears will also be spammed. To attack, VB is the best option because gladies or firesworn can be cc’d or lavafielded. Pure fire has trouble defending against L units, especially with heal and cc support. Bringing VB tips this match in your favor—if you have burrowers, not so much. · Fire-frost o This is a fairly weird deck. You’ll need to deal with mountaineer, as well as good defenses and fire drakes. Mountaineers are very troublesome without mauler or a large power advantage. Shielded fire drakes and scythe fiends are another huge nuisance. Your best bet is to go offensive on exactly 2 fronts. This is probably one of the worst matchups for the deck we picked, although if it’s a big worry, we can tip the scales in our favor. Mauler makes this matchup much easier. Some top players have also included twilight curse solely for mountaineer. · Fire-shadow o This deck is fairly rare because it has a hard time against frost splashes. We don’t have a frost splash. They will rely on a lot of buffs and single strong units to take you down. Lavafield is essential for dealing with darkelf spams. Gladiatrix is also needed for disenchants, and save your oinks to use on buffed fire drakes. They are surprisingly hard to deal with if your cc is in cooldown. Luckily, if push comes to shove, you can spawn Rogan and use his cc in a pinch. A normal fire-nat deck will have difficulty attacking because nightcrawler will destroy burrowers, but we have vileblood and fire stalker which do much better. This matchup is pretty fair, although in my experience one side tends to demolish the other. Twilight vs bandits don’t tend to have long trench-warfare. · Fire-nature o This deck actually has an advantage against the standard fire-nature deck. You may have figured out by now that I’m using some fairly interesting cards. This deck has a harder time against frost splashes (especially shadow-frost) than the typical fire-nature deck, with some advantages in that it does better against non-frost splashes. VB is a double edged sword, because you both have roots and cc and damaging spells. Generally speaking, however, fire-nature has an easier time countering burrower spams than VB, especially when Rogan gets involved. Fire-nat also has an infuriating time trying to deal with fire stalkers: a well-placed oink or roots will ensure that a well drops. You have all the tools you need to stop a burrower spam. · Pure Shadow o Shadow tends to have difficulty with L units like VB. You need to be careful about spending too much power in one place, because Aura of Corruption kills everything. Shadow mages shred M units. Cc works marvels on shadow mages, and fire-drake is your best friend in this matchup. Ravage is a must. Lava field punishes any large offensives. Try to apply so much pressure that the harvester can’t come. If it does appear, make 2 gladiatrix and a skyfire drake. Mortar as well, if you have it, but make sure the mortar is in a place that the harvy must go through—you’ve wasted 50 power if he just walks around to attack another base. Green gladiatrix is better here, because you can harass the harvy all the way to your base without your unit dying. As long as you keep 2 gladies, you don’t need to worry about lifeweaving + unholy power because you have 2 disenchants. For offensives, fire stalkers work much better than burrowers (!). Shadow mages murder burrowers, but have a much harder time with fire stalkers. Once a very good player (Warchief or Patriarch, I think) who played pure shadow tried to convince me that fire stalkers aren’t as good as burrowers. He made this comment after I beat him with my firestalkers, so we did another match and I still won. (In the end I switched to burrowers because I didn’t need any more advantages against pure shadow, preferring to have them against shadow-frost.) · Shadow-Nature o This is another deck you’ll struggle with. Buffed nightcrawlers or burrowers are a nightmare, and the cost to spawn a glady and unbuff is rarely worth it. This deck is supreme at spamming a little bit to every base. Try to be proactive and use roots often to be on the safe side. Fire drake and ghostspears are immensely useful. Note that shad-nat struggles against Vileblood because their L counter is mauler, which has low range. You can root him. Also be aware that you will be getting cc’d and the enemy units can heal, so apply lavafield and erupt judiciously to take out the last bit of health. Shadow-nature probably has a slight edge, but VB helps. Disenchant might also help. · Shadow-Frost o Most people would argue that this is the best deck in the game. I’m not sure if I agree, but it is very strong. There are also a lot of different tactics shad-frost players can use, making it one of the hardest decks to prepare against. At the very least, be prepared for nightcrawler spams and Reaver-runs. Both of these need to be rooted and sniped with glady/skyfire. Ghostspears are good vs nightcrawlers, but terrible against reavers. If he decides to attack hard at one place, expect darkelf assassins and homesoil. Lavafield works well, and you can use deathgliders against darkelf assasins. VB has a 50/50 chance of working. Lightblades tend to render them useless. However, if you can oink one and get him to spawn 2, he’s wasted a lot of power. If you really want to push, bring a drake to deal with lightblades, but fire drakes die easily to nightcrawler nasty or darkelf assasins. Spamming to multiple places doesn’t really work because nightcrawlers with frenzy are a cheaper counter to whatever you spam. Hitting one well doesn’t work so well because of frost repairs. If you invest too much power in one place, you’ll get an aura of corruption. Also be wary of the cc, although yours are better. This will be a tough fight. In t3, Lost Souls has the advantage against every deck, with the possible exception of pure fire. Giant slayers are a must to combat silverwind lancers. · Pure Frost o Frost splashes are hard. They have great defense, and your deck is built around offense. Pure frost relies almost entirely on war eagles. Whoever controls the skies wins. Glady is good against them, but war eagles are even better against gladies. Cc is critical, as well as eruptions. Lava field has less use. If you can prevent frost mages with rogan or skyfire drake, frost doesn’t really have an answer to small units. · Frost-Nature o Stonekin, the bane of our existence. This will be a slow strangulation to death. You can deal with burrower spams, but a true stonekin player will slowly make engagements with you and keep his units alive until he has a huge army that he can rush you with. Neither of your offensives are likely to be successful unless one of you makes a large mistake. Your best bet is weather out the storm in t2 and go t3 when you have enough power to avoid being burrower spammed to death. Skyfire and ghostspears are a must. Mauler is the easiest way to make this matchup better for you. Scythe fiends and burrowers die very quickly to razorshards, but while you might think this is good for you because of VB, lightblades or aggressors will nullify the VB without an assisting mauler. · Pure Nature o Skyfire drakes are essential to combat burrowers and energy parasite. You have to be super careful of your VB because of parasite swarm. Fire stalker works especially well against pure nature. If the pure nature player goes for a roots-themed deck, mauler secures an easy advantage. If not, deep ones are hard to deal with but spamming gladiatrix and skyfire drakes usually works. Roots are nice, and mortar is a good way to kill them. Side note: When building t2, it’s generally a bad idea to think “Look at this sick combo!” Often that combo will work really well against some factions, but it will be a wasted 2-3 slots against other factions. Look at all the factors I’ve laid out to see if your “sick combo” is worth it. Final Touches: Finally, a note about t1. Ultimately, you should play the t1 you’re best at. That said, let’s try to figure out if a particular t1 works best with this deck. So far we have 16 cards: Skyfire Drake, Gladiatrix, Rogan Kayle, Fire Stalker, Deathglider, Ghostspears, Vileblood, Surge of Light, Curse of Oink, Eruption, Ravage, Lavafield, Ensnaring Roots, Giant Slayer, Swamp Drake, and Virtuoso. If you notice, 1 of the fire cards you use in t2 (2 if you count mortar), is actually a t1. 2 of the nature cards (3 if you have hurricane) are t1. This means we have room to add 4 more t1 cards. If you want more, you can pare back the t2 and rebalance it. Experienced players usually value t1 more than t2. However, most of the fighting happens in t2. So my philosophy is to go bigger t2, and just try to stay alive for t1. For beginners, t2 is much more important, although it is good to learn how to fight t1. T1 is much more technical, however. At any rate, you can do what you want with your deck. In my experience teaching chess, I’ve found that beginners often get hung up trying to memorize openings and miss out on the middlegame experience—where most of the game is played. My advice to them is to stay away from technical openings; learn general principles enough to survive the opening and reach an even middlegame. From there, the better player will win. I think the same advice holds true in Battleforge. Yes, at top play the slightest inaccuracy in t1 can make you suffer all game—if you don’t outright lose (this is also applicable to grandmasters in chess). But if you’re anywhere in the middle ranks, a t1 inaccuracy will not cost you the game. Yes you should know general ideas, but knowing that whether to spawn 2 sunstriders and 2 thugs or 3 sunstriders and 1 thugs when you meet shadow in the center of Simai is not relevant yet: your time is better spent elsewhere. Things like winning a skyfire drake ditto with one shot and erupting are much more useful. Basically, don’t overextend yourself trying for a t1 advantage; just try to “survive” it and learn to play t2. You’ll pick up t1 along the way. I’ve run into countless Legend/Supreme ranked players that play a better t1 than me. Sure they get that small advantage, but they count on winning all their games from that t1 advantage and they just fumble it in t2. Learn your basics first—I’ll improve every game I play with getting slightly better at t1, but these guys need to rework their fundamentals. Here is an excellent example of MaranV being outplayed in t1 but coming back to win in t2: https://www.youtube.com/watch?v=MLvl_hWIvns For the purposes of making this guide easier to follow, I’m going to be stubborn and say that this is all the room I have for t1. If I play fire, the choice is easy: Scavenger, Sun Striders, Thugs, and Mortar. If I play nature, the choice is more difficult. If I wanted to be truly minimalist, I could play just Treespirit and Amazon. You would also need to add Hurricane, and maybe adjust the t2 balancing around S counters. And I could still add mortar tower. However, I would not recommend trying to work with such minimalism as a beginner. If you play nature and want to actually engage in a t1 fight, you need a swift unit (probably swiftclaw), hurricane, dryad, windweavers, and shaman. Treespirits are also nice. Unfortunately, that’s a lot of cards. For this reason, most fire-nat will start fire t1, especially because it gives them an excuse to use the mortar tower. My final demo deck is: T1: Scavenger, Eruption, Sun Strider, Thugs, Mortar Tower, T2: Surge of Light, Ravage, Ensnaring Roots, Curse of Oink, Lavafield, Rogan Kayle, Ghostspears, Skyfire Drake, Deathgliders, Fire Stalker, Vileblood, Gladiatrix, T3: Giant Slayer, Virtuoso, and Swamp Drake. @SilenceKiller99 asked: Could you say some more about nature-fire (with a nature T1) and how it is different from fire-nature? Yes, of course I can! . . . Oh, I suppose you wanted me to actually make those comments. Very well. Fire-nature and nature-fire really don’t have any fundamental differences past t1. There are some t2 strategies that are more likely because of t1 cards, but overall the gameplay is the same. In general, nature has t1 cards that are more useful in t2, but is easier to play and slightly more flexible. I’ve also found that people who start nature t1 (GreatKudi is a good example of this) tend to play more unconventional t2 choices, such as spirit hunters. The biggest concrete difference past t1 is that having dryad can be very useful for t2 offense, while having mortar can be very useful in t2 defense. Also, I prefer the safety of having my 3rd and 1st orbs be the same color, and nature-fire-nature is probably a stronger t3 than fire-nature-fire, so that is another consideration. Evolution of the Deck: This next section of the tutorial will outline how my decks evolved, and why that was better. This section will not be present in my discussion of the 9 other factions, or it will be written by someone else. Despite the negativity that I rain down on nomads, my first complete deck had them. That deck was: Nomad_nature,Sunstriders,Eruption,Wrecker,Makeshift-Tower,Surge-of-Light,Ravage,Lava-Field,Curse-of-Oink,Spirit-Hunters_nature,Twilight-Minions_fire,Deathglider_frost,Rogan-Kayle,Vileblood_nature,Skyfire-Drake,Fire-Stalker,Mauler,Sun-Reaver_nature,Drones,Ashbone-Pyro T1: Nomad, Sun Strider, Eruption, Wrecker, Makeshift Tower, T2: Surge of light, Ravage, Lavafield, Curse of Oink, Spirit Hunters, Twilight Minions, Deathglider, Rogan Kayle, Vileblood, Skyfire Drake, Fire Stalker, Mauler, T3: Sun Reaver, Drones, Ashbone Pryo It’s interesting to note that, while this deck cannot be considered competitive at top play, it’s still remarkably balanced. I could probably achieve Ruler level with it. As it was, I was an archfiend because I didn’t even understand what counters were. @TBPeti told me about that and void power and it changed my life. I jumped to Grandmaster the next day, after changing my t1. As I’m sure you’ve noticed, I have no S counters in there. This is why nomads are bad. I generally avoided large t1 confrontations, and if I needed to defend S, the makeshift tower worked pretty well. Not the best, but it halfway worked. The second thing you should notice, after my ranting about the wonders of gladiatrix, is that she’s missing. That’s because I was completely P4F, and they hadn’t even started giving out daily rewards. I could afford maybe 2 gladies, but I wanted to have the BFP in my pocket so I could continue to make more BFP. My anti-air was fairly coordinated as well. Not ideal, but it worked. Spirit hunters were good. They couldn’t even damage a ravaged drake though, so I would use the nomad spear for that. If I had known better, I would have spawned a drake and shot+erupted, or just double erupted. Admittedly, the nomad spear was pretty good against war eagles and windhunters. I’m not condoning them, I’m just saying that they did a bit to fill in the gladiatrix void. I used deathgliders and fire stalkers against S units. As soon as I learned about unit counters, I subbed in ghostspears for twilight minions. I was using the minions because I thought having stricter orb requirements (1 fire 1 nature, rather than 1 nature 1 neutral) would mean a better unit. That’s not the case. For t3, I went shadow for ashbone pyro. That’s just a great card, and it solved problems of siege and anti-air. I played around with my t3 a lot (staying shadow the whole time), sometimes doing things like soulshatter or sandstorm or unholy power. I didn’t like my drones very much. It’s pretty risky to take a different t3 orb just for one card, even a card as great as ashbone pyro. I had that conversation with TBPeti, and wizened up. I changed my nomad to scavenger immediately, which sort of forced me to get a gladiatrix and drop spirit hunters, but I held off the rest of the changes until I could do them more gradually. The next time I thought my deck was finished, it had Scavenger,Sunstriders,Eruption,Thugs,Mortar-Tower,Surge-of-Light,Ensnaring-Roots,Ravage,Lava-Field,Curse-of-Oink,Rogan-Kayle,Ghostspears,Skyfire-Drake,Fire-Stalker,Vileblood_nature,Gladiatrix_nature,Mauler,Giant-Slayer,Magma-Hurler,Sun-Reaver_nature T1: Scavenger, Eruption, Sun Strider, Thugs, Mortar Tower, T2: Surge of Light, Ensnaring Roots, Ravage, Lavafield, Curse of Oink, Rogan Kayle, Ghostspears, Skyfire Drake, Fire Stalker, Vileblood, Gladiatrix, Mauler, T3: Giant Slayer, Magma Hurler, Sun Reaver Much improved! Pro fire-nature players will disagree with this a lot, but I prided myself on the deck’s A). Originality, and B). Low price. I was ranked about Legend with this deck, and I kept it until I heard the announcement that Battleforge was shutting down. The comments for VB vs burrowers are still valid. I dropped deathgliders, and I relied on ghostspears and fire stalker for my S counter. I did get in the occasional trouble with darkelf spamming or stone shard spamming, but overall it was okay. If the enemy spammed too much S units, lavafield was generally okay. It was a fine line to tread to overwhelm me, but at around Legend level people could do it fairly reliably. I also realized that most of the time I wasn’t using the VB, but rather just charging in with Rogan and a Ghostspear, with Fire Stalker in the back. I used the mauler because I had a lot of trouble dealing with ashbone pyros and stonekin. Sun Reavers were also not nerfed yet. When I heard the game was shutting down, I finally gave up my pride and decided to just try to improve my rank. My deck was: Scavenger,Sunstriders,Eruption,Thugs,Mortar-Tower,Surge-of-Light,Ensnaring-Roots,Ravage,Lava-Field,Curse-of-Oink,Rogan-Kayle-promo,Ghostspears,Skyfire-Drake,Scythe-Fiends,Gladiatrix_nature,Burrower,Mauler,Giant-Slayer,Magma-Hurler,Sun-Reaver_nature T1: Scavenger, Eruption, Sun Strider, Thugs, Mortar Tower, T2: Surge of Light, Ensnaring Roots, Ravage, Lavafield, Curse of Oink, Rogan Kayle, Ghostspears, Skyfire Drake, Burrower, Scythe Fiends, Gladiatrix, Mauler, T3: Giant Slayer, Magma Hurler, Sun Reaver You’ll notice there are only 2 changes. Burrowers and Scythe fiends. The harmony of the rest of the deck still holds, with a bit better of an S counter. Occasionally I would remove Rogan and use an extra t1 card. My deck was becoming more and more the standard fire-nature deck. Ultimately, at the very top levels, it always comes down to the same cards. I will now present to you the “Pro-Player’s Fire-Nature Deck.” I don’t agree with everything in them, but I do know that my results tended to get better the more I conformed to them. Don’t just take this list and copy it, because the reasons for why cards are in your deck are more important than the cards themselves. The following deck differs from the deck I just presented for very small, tactical reasons. It’s not guided by principles, so explaining those reasons will not be of much use to you. I mostly include it so I don’t have pro players pulling out their hair and saying “firestalker? Rogan Kayle? How could you??” If you wanted just the grocery list below, you can ask any player and he could give you one. Really, the only reason I have this is to establish my credibility. Pro decks: T1: Scavenger, Eruption, Sun Striders, Thugs, Firesworn, Sunderer, Mortar, T2: Surge of Light, Ensnaring Roots, Hurricane, Ravage, Lavafield, Curse of Oink, Ghostspears, Skyfire Drake, Burrower, Scythe Fiends, Gladiatrix, T3: Giantslayers, Brannoc Mine also works well, although a lot of players don’t have room for it. Similarly with disenchant. I’ve known some players to even forgo t3 entirely to make room for those cards. Some also drop Mortar/Sunderer.
-
Since i did see quiet a lot of new players and the question "What should i play??". I did a little chart for the 4 Core Faktions. Shoutout to: Ultrakool, Limuts, Shred and kikispas for helping
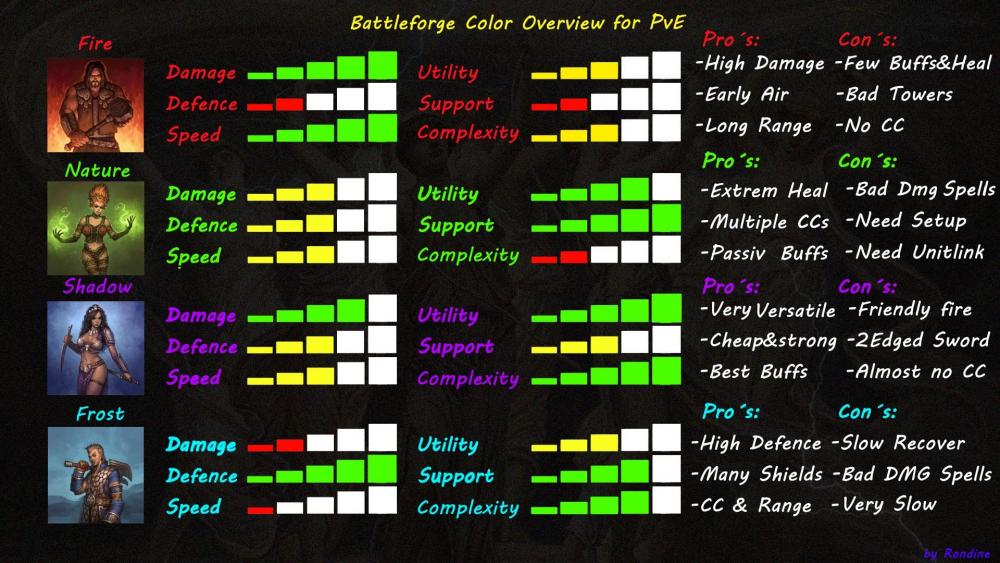
-
Elemantary PvP Knowledge This Guide is mainly for beginners and less experienced players of PvP. I want to share basic knowledge more experienced players have over starters, so that they can try to have fun playing PvP even if they get stomped. Then they can look at this, helping them to analyze their games. So obviously, this is not a guide beginners just read and suddenly be strong, it just should give them ways to think how to get better. There are a lot of guides out there already, written down or recorded as videos. This guide here will be my personal opinion on what is basic, and if one wants to improve further I recommend watching game commentaries of top players or guides like from Cicada etc. Anyone who likes to add thoughts or critics to this, I would like to encourage to do so! So what do experienced players usually know? It is knowledge about: 0) How do I get started and better? 1) Energy 2) Summoned cards do different special damage. 3) Do I summon units dazed or better not? 4) Moving and placing units more efficiently 5) Focus Fire 6) When do I focus my damage on a well, when on an orb and when on a unit? 7) Split attacks 8) Don’t forget about your units 9) Watching the animations caused by the opponent player 10) Keep an eye on the mini map. 11) Estimation of a fights outcome 12) How powerful are additional orbs, when should I grab one? 13) Wide knowledge of existing cards, often played in PvP 0) How do I get started and better? Honestly speaking: Put some cards into a deck and play. Be brave to lose a LOT! But you’ll definitely need: Ground units (I use the plural here and mean it. It’s possible to play with only 1 T1 unit, but you want to learn how to play right?) in T1 of ONE color (better T2, too) Everything else is optional, you will find out quickly enough what works well and what not so. Lose your first 100 games as quickly as possible and try to understand your mistakes and maybe those of your opponents. 1) Energy So, I would like to spare you from the very details. But what is important to know right away? There are generally 2 ways of energy income. a) from wells from void When you start a map you get 2 wells, and a base of 400 void energy. Beside that you get 100 energy for free at the start of a game. Every second you constantly gain about half of the amount of what the 2 arrows show you in the top right into the power you can actually use. The top arrow shows income from void, the second one the number of wells you have up. Whenever a unit dies, a spell is casted or an activated ability is used 90% of the used energy will recycle into the void power. So you only lose 10% of its energy in the long run completely (mainly over about 2:30 minutes, I know this is very gross: there are much more detailed lectures about this topic), but be careful that you have a temporary loss of power. However! If you lose a well or an orb you won’t get your energy back. So try to not lose those without getting clear compensation (getting a temporary advantage that you can use to counter attack: e.g. a larger army on the field and or more temporary energy available to use). Repairing is refunded 100%, but is temporary very costly. When to repair a well etc. or not is not an easy decision even for very good players, so I recommend to get your own experience (it’s very situational). Being able to grab wells earlier is a big deal because you will also be able to take the 2nd earlier if nothing happens. But does that mean you should take one as quickly as possible? If you think you can do so without losing it to a rush being 100 (decreasing on time) down, yes. Here also: Get experience! Usually being bold and greedy might look dumb at first, but that’s a way to learn. At last if you cannot figure out how to hold, it was probably unreasonable to be greedy. This is then valuable information you can use when your opponent goes well first in the same situation next time. Lot of times you can keep fighting, even if you lose a well before you gained its 100 power, there are a lot of things important other than just being ahead or behind in energy. Also: Be careful not to cast anything not clearly helping you to win or stall a battle, your opponent might be able to ignore or run from (e.g.: a Life Weaving-75 energy-, spells and buffs are good but you need to get its value played out) and put you into a temporary power disadvantage, so your opponent could take a well etc. for same or similar cost. And of course if you kill a unit with more costs then your own unit or spell, you get a power advantage. Whenever you end up with having less energy, that’s mainly due to decisions in game. You can always improve with any new knowledge. 2) Summoned cards do different special damage. Units casted have 4 different sizes: Small, Medium, Large and Extra large referred to as S, M, L, XL Units. If on the bottom left of a card there is a sword (melee attacker) or a bow (ranged attacker) then right of that symbol is S, M, L or XL written. That means that it does an additional 50%! damage against that size of unit. For example: We call a unit that does 50% more damage against S-Units an S-Counter (M-Counter etc. likewise). Obviously often (of course you have to find out the exceptions by experience) it is efficient to attack an S-Unit with an S-Counter etc. If the symbol is a star the text on the card will explain what special damage it does (e.g. multishot, siege damage etc.) Letting the right units fight the opponents ones is one part of what is called micromanagement (like unit movements such as spreading, kiting, body blocking or focus fire, explained later on) 3) Do I summon units dazed or better not? Dazed units do less damage and have only half health. But when you are attacking far away from a spawning point, where your units are cast undazed you don’t have much of an option. But be careful with low health units which might die before they even get out of daze (especially against fire or shadow). So if you run an offense spawn some units before you reach the opponents units. Often in higher level play you see a T1 fight with some units “pre”spawned, so that they are able to fight with full force. 4) Moving and placing units more efficiently Micromanagement is fairly important, and because movements are quite slow in this game it is in my opinion not as hard to get ok-ish at as in faster games like starcraft etc. Let me explain some techniques you should be aware of and maybe try for yourself. Spread your units! That avoids splash damage to hit all your units at once. But try to spread them only as far as needed (yes you need to gain experience here again: vs. nasty surprise, lava field etc.), so that they still fight efficiently. Often it is good to spread units in a circle or to attack from different angles. When you cast new units also try to place them so they are spread efficiently. Kite! Hit and run if you have faster against slower units. (scavenger, frost bite and so on are also very helpful) If you have a slower unit or your attack is “muted” by some special abilities. You can run with that unit and attack the attacker with another unit. Block! Many units get slowed down when enemy units are in the way. You might use that to your advantage! Stampede! Some units can trample others down and hinder their attack. 5) Focus Fire Especially with ranged units focus fire is important. Means: Attacking the same target with a bunch of your attackers or with all of your attackers. Let’s explain it with an overly simplified model(the units are not as simple, but it still applies often enough): Two armies A and B are fighting each others. All of A’s and B’s units do one damage per attack and have 4 hitpoints. Round 0: A(4) B(4) A(4) B(4) A(4) B(4) A(4) B(4) A uses focus fire and B not. Round 1: A(3) A(3) B(4) A(3) B(4) A(3) B(4) Round 2: A(3) A(2) A(2) B(4) A(2) B(4) Round 3: A(3) A(2) A(1) A(1) B(4) Round 3: A(3) A(2) A(1) Well, I hope you got the point. Similar models you can make for pincer attacks (sandwiching) etc. 6) When do I focus my damage on a well, when on an orb and when on a unit? You do want to get down something which is not getting recycled into the void (wells, orbs), but we aware! When you shoot on a building you are not doing damage to something which may attack you back. Wells and orbs can serve as static tanks. So I cannot answer this question in a simple fashion. But the higher your DPS (damage output per second) is the likelier is an lesser punished focus on a well or orb. Also with siege units you might prefer targeting structures. As for targeting wells and orbs: Wells have more function in the earlier stages of the game (in later stages why would you want to invest 100 energy when the game almost ends and the void income is huge) and lesser health than orbs. So you usually you want to target down wells over orbs early and the other way round in the late game. 7) Split attacks Often it is easier to defend one place than two. For example: Try sending 2 siege units to attack a well on one point of the map and if possible at the same time with the rest of your army somewhere else, your opponent will have a tough time trying to handle this problem. 8) Don’t forget about your units Use your units you have cast. Try not to forget about any of them. They are bound power (not even void income) if they do nothing. If they are too far away to do anything helpful, consider sacrificing them. Same goes for towers if they have lost their strategic value. 9) Watching the animations caused by the opponent player There is no fog of war. You need to collect all information you can get. So carefully observe what your opponent is casting. 10) Keep an eye on the mini map. Well same as point 9) 11) Estimation of a fights outcome That needs a lot of experience and/or good judgment, but… At least: Do not sentence your units to death walking into obviously lost battles. I have seen beginners run with one t1 unit into an army of t1/t2 units without a special idea to handle that (at least I couldn’t come up with one). You might do that if your one unit is much stronger and/or you have the energy and supporting spells prepared (e.g. nasty surprise, lava field, corpse explosion, life weaving) 12) How powerful are additional orbs, when should I grab one? I personally like to stay lower tier and grab a well or the map presence instead, if I think I can defend. But an additional orb, especially t3 is a huge power (not in the meaning of energy besides void manipulation cards) boost. Here also, I do not really have THE beginner tip. But the more defensive your deck is build the more you might want to stay lower tier and collect more energy etc. instead. 13) Wide knowledge of existing cards, often played in PvP The more cards you know in detail the better your judgment will become and the more likely you are to make the right decisions. Usually (also depending on buffs and nerfs of cards) there will be a so called meta game (cards you find in most top players decks). Work on knowing those cards and how their animations look like in the game. Ok, I hope I did tell as less nonsense as possible, and I know this is not even half of what one can learn and many of you might have diffrent opinions about what is important or basic. But I hope it will help especially those, who find themselves at a huge loss at what to do and think about in PvP, HiyaMC
-
 (Note: Not enough information is known yet to go more in-depth. More will be known in the future and I will update the post accordingly.) Hello everyone! Looking for the forums, I see that there is no real advice on how to effectively use your resources and time when trying to acquire cards and money in this game. This is one of the most basic and important aspects of a game like BF, and thus I'll take some time to explain how it's done. Table of contents IntroductionTradingMaking a profit by tradingUsing Auction HouseScouting/Hawking/Low-biddingSpeculatingFlippingOther ways to make a profit and what NOT to dorPvE GrindingBeggingSpammingConclusion1. Introduction Do you like making money? Do you enjoy making great deals? Need help gathering those bfps for that sweet new promo? Well look no further, as I walk you through some important aspects of trading and interacting with virtual economics. When trading in games, or even in general, the purpose is hopefully to have both parties leave the trade happy with what they got. This is what trading is all about, giving away something you don't need to receive something you need. There are several ways to accomplish this, and I will try to cover most of them in this guide. Let us begin, shall we? 2.Trading Regular exchanging of wares is the bread and butter of any seasoned trader. It's the most common and basic form of trading which involves two parties exchanging something they value to receive something they don't value; be it money, wares or services. It has existed for as long as we could communicate and has proven to be very effective. The good thing about it is that it's simple, fast and is (hopefully) consensual most of the time. This doesn't mean that the method is flawless though. Trading can sometimes result in one of the parties being tricked into making a trade that's profitable for the other party without their knowledge. This, of course, leads to some pretty harsh feel-bads when the poor guy finds out that trading his promo Swamp Drake for the sweet-looking Lost Grigori was a really bad idea. That feeling is something we should all work together to prevent. The key to preventing that is making sure to be able to differentiate a rip-off from a good deal. No matter how you look at it, trading a promo Swamp Drake for a Lost Grigori is a rip-off. Even if the person says that he REALLY wants that Lost Grigori. This is because 2 weeks later, when he decides that he doesn't want to play shadow-frost in PvE anymore, he'll really miss that Swamp Drake. One could argue that he would've learned a lesson and won't do it again, but why should that be necessary? If the person with the Grigori would've refused the trade and asked for him to something of equal value, everyone would be more happy in the end. Now that we have that out of the way, we can move on to the actual process of making good deals. A good deal is achieved when both parties walk away from the trade happy and stay that way. Now you may ask "But PorousBoat, how can I make a profit off of trading while still not ripping people off?". This is a very good question, to which I happen to have an answer. 2.1 Making a profit by trading If you've ever spent any considerable amount of time, or even any time at all in a game where trading is present, you will have seen people as well as bots (that's another disussion) spamming "WTT/S/B ITEM X FOR PRICE/ITEM X". These messages are often quite annoying, but they're there for a single reason; it's effective. These people often utilize the method of buying things in bulk and selling them of individually for a higer individual price. This method is perfectly viable and can make you a very good profit. The only problem with it is that it requires an immense amount of time. For instance, say that you find a person selling their collection of 150 commons and uncommons for 175 bfp as a bulk price. If you then sell each of those cards for 3 bfp individually, you will make a 400 - 175 = 225 bfp profit. This was a good deal as both parties were happy and both made a profit in some way. Selling those cards can be easier said than done though, as the demand is probably pretty low. That's why you see those people and bots spamming 8 hours a day. 3. Using the AH The other main way of making money and acquiring cards is by use of the in-game Auction House (AH for short). The AH lets a player put up a listing for a certain card for a certain price that they decide themselves. Other people can then either bid on the card, where the highest bid wins, or buyout the card, where a price is set prematurely. This price is regulated by the current value of the card based on supply and demand. You probably already know that though, so I won't explain it. Now that you understand the puprose of the AH, we can get into how we make a profit out of it. 3.1 Hawking/Scouting/Low-bidding The simplest way to make money off of the AH is to simply browse it through and bid on cards that are very cheap relative to what they're actually worth. Say that a card is worth 100 bfp, but someone put it up at an auction for 10 bfp. If no one else bids, you just made a 100 - 10 = 90 bfp profit. This method isn't what makes you the big bucks though, as it is very unreliable and takes a lot of time and effort. I only recommend doing this if you see an offer that's too good to pass up. 3.2 Speculating Another way to make a profit through the AH is to speculate. This method is a lot more unreliable than the others, but can make you amazing profits when pulled off correctly and takes little to no time to set up. It functions similar to flipping, which I'll get into later. Speculating involves buying a card that you speculate will rise in price for some reason in the foreseeable future. This may be due to increasing demand because of meta change or decreasing supply (a promo or such). Buying a larger amount of that card can possibly make you a massive profit, presuming you were correct. If you weren't, you're stuck with 50 copies of Global Warming that no one wants. This makes the method very much of a risk-reward thing, where you put yourself at a great risk for the chance of making a large profit. I only recommend this method if you really know what you're doing. 3.3 Flipping This right here is the most effective way of earning money when you know what you're doing, but takes a lot of practice to learn to do effectively. Flipping is a pretty advanced method involving abusing low supply by buying out large amounts of a card to resell them all at a slightly higher price, thus raising the value of the card artificially. For instance, say there are 50 Scavengers on the AH priced at 50 bfp with that being the lowest price. If you buy all of those and resell them for 51 bfp, you will have profited 51 x 51 - 50 x 50 = 50 bfp. This may not seem like a lot, but when done right with large amounts of cards you can net massive profits, with little to no effort. If you want to be really fancy, you can make sure the item you're flipping is on the rise in price, thus making your profit even larger by combining flipping and speculating. Note: All of these methods have no guarantee of netting you a profit. They require you to take some pretty great risks, and you WILL fail. Especially in the beginning. Don't let this scare you though! 4 Other ways to make a profit and what NOT to do "But PorousBoat, are those the only ways to make a profit?" I hear you cry! No! Those are not the only ways to earn money in BF. This guide was made to walk you through the best and most effective methods of turning a profit. That does not mean that there are not other ways to go about making a psrofit in BF. Let me tell you a little about some of the alternatives, along with things you should NOT do. 4.1 rPvE Grinding As silly as it may seem, unless there are major changes (which there very well may be), rPvE grinding was a somewhat viable way of making money through selling gold and tokens. This was extremely time consuming and ineffective though. Almost to the point where you were better off playing PvP for the gold. I highly recommend you to stay away from this method unless you have to do it for some reason. 4.2 Begging This should go without saying, but there will be people who think this is a good idea every now and then. Please stay away from these people and don't do it yourself. 4.3 Spamming This is also something that is very common, which is unfortunate because of how ineffective and annoying it is. People sending random trade requests/messages/offers should not be interacted with, and probably ignored as well. Don't do this, folks. 5. Conclusion In conclusion, the best ways to make a profit in BF is to utilize the methods I've gone into above. I appreciate any and all feedback you may have, as well as suggestions for points that I may have missed. I look forward to updating this thread with further content when more information is released. I thank you for taking the time to read this guide, and I hope to see some of these methods employed when the game is available! For further reading regarding these topics, please refer to the links below: Speculating: http://www.investopedia.com/articles/basics/12/art-of-speculation.asp Trading: https://www.reddit.com/r/Flipping/comments/1m5jsd/i_buy_and_sell_online_for_a_living_and_am_here_to/ Flipping: http://www.moneycrashers.com/thrift-store-flipping-items-resell/
 -
Circadia has created a fantastic guide back in 2009 encompassing basically everything that is to know about BattleForge and how to get better at the game. It was built around the concept of PvP, but all kinds of mechanics and strategies are explained within, in great detail. To prove that, here is a quote: I mean, c'mon! How cool is that? The actual guide is 44 pages long, and was only available in pdf format. Unfortunately, converting it to doc throws the formatting/tables and embedding 44 images isn't a healthy option either. You can download the original pdf file by clicking HERE. Here is the Table of Contents to give you guys an idea of what the guide entails: 1. Who this guide is intended for.................... 3 2. What to expect from Battleforge PvP.......... 4 1. MT:G meets Dawn of War................. 4 2. The Fog Lifts....................................... 4 3. Victory Objectives.............................. 5 3. Reading Cards............................................... 6 1. Unit Cards........................................... 6 2. Building Cards..................................... 8 3. Spell Cards......................................... 9 4. More Information................................ 10 4. Building a PvP Deck..................................... 11 1. The Four Elements............................. 11 2. The Tier System................................. 12 5. Deck Purity.................................................... 12 1. Deck Interface.................................... 13 5. The Power System........................................ 14 6. Why you need power.................................... 14 1. Mechanics of the Power System....... 14 2. Practical Power Usage....................... 17 3. Know your Income!............................ 18 6. The Counter System..................................... 19 1. What is it?........................................... 19 2. Attack Type and Unit Size.................. 19 3. Complex Counters.............................. 19 4. Counters and Power........................... 21 7. The Playing Field........................................... 23 1. Layout of a Map.................................. 23 2. Point Control....................................... 23 3. Playing your Cards............................. 24 4. Healing and Repair............................. 29 8. Basic Strategies............................................ 32 1. Rushing............................................... 32 2. Harassment........................................ 33 3. One Unit Wonders.............................. 33 4. Infiltration............................................ 34 5. Wall Offense....................................... 35 6. Map Domination................................. 35 7. Turtling................................................ 36 9. PvP Rewards.................................................. 37 1. ELO and Rank.................................... 37 2. Tokens and Gold................................ 38 3. Collection or Tome?........................... 38 4. Upgrade System................................. 38 10. Glossary of Terms........................................ 41 11. Acknowledgements...................................... 44 Suffice to say, all credits go to Circadia for his time and dedication.
-
So here I'd like to work out any math problems people may have about Battleforge! Send me your questions and I'll try to answer them. For starters, here is a mathematical model of your power pool and an explanation of why t4 is a terrible idea in PvP 1v1. time t is measured in 2 second increments (because that's how the game adds power)v(t) is the power in the void pool as a function of time t.p(t) is the power in the power pool as a function of time t.w is the number of power wells a player hasp0 is the power at the start (i.e. p(t0)=p0)Your void pool returns 1/50 of its power to the power pool. If we modeled a differential equation, dv/dt=-1/50v. Solving for v, v=v0e-t/50. This is perhaps a little complicated, so I'll show you another way that is more intuitive. Let's develop the model by inspection. v(t1)=(49/50)v(t0) because at 2 seconds [that's v(t1)], the void has lost 1/50 of the void at 0 seconds [that's v(t0), or v0]. v(t2)=(49/50)v(t1) for the same reason as above. Since v(t1)=(49/50)v0, v(t2)=(49/50)(49/50)v0. In other words, v(t2)=(49/50)2(v0). v(t3)=(49/50)v(t2) which equals (49/50)3(v0) and I think you can get the pattern. The void pool can then be calculated as v(t)=v0(49/50)t with t measured in 2 second increments (so t=4 means 8 seconds). This way is actually a bit more accurate (since the method with a first order linear homogeneous differential equation is compounded continuously and it's actually compounded every 2 seconds) so we will go from here. This model describes the void pool at any given time (assuming that nothing else is added to it). So to find the amount of power that the void pool injects into the power pool, it will be v0-v0(49/50)t. Or in other words: v0(1-(49/50)t). We furthermore know that the power in the power pool increases by 1 power every 2 seconds from every well. Thus, p(t)=wt +v0(1-(49/50)t) +p0 * @Hirooo commented that the portion v0(1-49/50)t maxes out at 20. So if your void goes above 1000, you will get a steady +20 from the void every 2 seconds until the pool goes below 1000, when you'll gain like normal. If you plug this into a graphing calculator, you can easily see what a difference in void power makes. For instance, type p=wt+v(1-(49/50)^t) +C into https://www.desmos.com/calculator and make sure to use sliders for w, v, and C (you can use any letters). This will model any power if you assume that nothing gets added to the void pool and no wells drop or get added. I'll illustrate how to use this model to explain why t4 is bad for power. Sometimes people ask "since enlightenment is 260 power, why isn't it just better to use t4 for an extra 40 power, and then you can play t4 cards whenever." Here is why. Suppose you've graphed that function in desmos. C&P so there's two and then change the variables w,v, and p for random constants (if you want a ballpark estimate, w=4, v=600, p=100). Those constants don't really matter for this though, so you can even make anything that doesn't change 0 if you want. That's what I will do for this comparison. Since we want to see what happens if I spend 260 power (234 void) for enlightenment vs 300 power (0 void) for a monument. The equation for using enlightenment looks like p=234(1-(49/50)^t) +40 because w=0 (it doesn't matter if we assume both players have the same wells) and C=40 because enlightenment is 40 power less than a monument. The other player has p=0 because w=0, v=0, and C=0. Note that you can put whatever numbers you want here as long as the first equation has C=40 higher than the second equation's C, v=234 higher than the second equation's v, and w is equal. The difference between these two functions tells us how much more power the player who used enlightenment has. After 10 seconds (t=5), the player who used enlightenment has 62 more power than the other. After 30 seconds (when the monument gets built) the player with enlightenment has 101 power more than the other. As time goes on, the player who used enlightenment will eventually get 273 power more than the other. Hope this model was useful! Feel free to ask any questions or propose more math subjects! I have also created a supplementary video: https://www.youtube.com/watch?v=zhqUuZMUb0Q
-
Hello skylords, I'm going to teach you a few usefull cards for a nature-deck for PvE, semi or full. These are just some usefull cards for Nature decks not full decks!!! But in my opinion if you would build a deck with these cards and adding some of your own you'll be okay !STONEKIN AND TWILIGHT COMING SOON! 1st part is about a few basic nature cards, usefull for beginners. 2nd part is about defensive nature, usefull for advanced players 3th part is about full nature decks, usefull for advanced players 4th part is about Stonekin decks, usefull for advanced players (coming soon) 5th part is about Twilight decks, useffull for advanced players (coming soon) P.S. this is my first guide so if you have tips or improvement, speak up In my opinion these cards are essential in any Nature deck at least if you start with a nature orb, if not skip 1st orb part Most of the cards I chose were rather cheap or free on the old Battleforge, as far I can remeber. PART 1: THE BASE OF YOUR NATURE DECK 1st orb card(s): -Shaman, usefull for his healing ability. required orbs: -Windweavers, great because or their multi shot damaging nearby enemies. required orbs: -Surge of Light, A rather usefull healing spell. required orbs: 2nd orb card(s): -Breeding grounds, this building will reduce the cost of units within it's effectiveness radius. required orbs: -Curse of oink, transforming a limited number of enemy units into pigs will come in use while fighting larger groups of enemies (warning if you attack the pigs they will take on their orignal form faster, so watch out with units that can harm multiple enemy units. required orbs: 3th orb card(s): -Swamp Drake, this flying rascal has good a good health and attack base and a great skill (sleep powder) which is very usefull if you are passing trough or just to take some of the heat off. required orbs: -Equilibrium, healing spells, usefull, duh... required orbs: 4th orb card(s): Giant wyrm, this dragon.... excuse me wyrm, has a Thu'um that damages enemies iin a large radius and it is a flying unit (like most airborne units it is fast) Fus Ro Dah! required orbs: Regrowth, powerfull healing spell with a large radius. required orbs: PART 2: DEFENSIVE NATURE: (warning: some of these cards weren't that cheap in the old Battleforge) Root is love, Root is life.... Some Nature unit have the ability too root giving them stronger attacks, especially when a larger number of units is rooted and they are connected in linked fire making the attacks stronger and/or faster. Btw I will be only discussing units that can root, not rootable defenced you can leave in the comments. 1st orb card(s): Treespirit, the only first orb card that can root making it usefull and pretty overpowerd in PvE (especially with Shaman) required orbs: 2nd orb card(s): Living Tower, is a strong tower making is root will speed up the firing rate. required orbs: Root Nexus(Blue), giving all unit connected 25% extra defence, score! required orbs: 3th orb card(s): Thornbark, while rooted in a group the attacking speed goes up. required orbs: Sylvan Gate(Red), this healing building/tunnel speeds up his rate of healing while connected to a root network, oh and almost forgot giving unit within 25m 25% extra attack. required orbs: Sylvan gate(blue), same as above but instead of 25% extra attack this one gives 30% extra defence (jeez these buildings are cool) required orbs: Razorleaf, is will become very strong while connected to a root network and the rate of fire speeds up while having a long range! (note the hits will take time to hit so units with swift will come close easy)(oh, and it was rather expensive) required orbs: 4th orb card(s): Just build two Ice orbs and place a Worldbreaker Gun! And yes if could have said Spore Launcher, but I hate that card and I don't want to discuss it. PART 3: FULL NATURE DECK: (warning: some of these cards weren't that cheap in the old Battleforge) 1st orb card(s): -Shaman, usefull for his healing ability. required orbs: -Windweavers, great because or their multi shot damaging nearby enemies. required orbs: -Surge of Light, A rather usefull healing spell. required orbs: -Dryad(Blue), this unit gives the surrounding units 20% extra defence. required orbs: -Mana Wing(optional), this one orb flying unit is very usefull is some maps. required orbs: -Treespirit, serves as a tank and because of his ability too root in larger numbers treespirits can deal a lot of damage. required orbs: -Ensnaring roots, this spell stop enemies is they try too pas trought the spell. Warning: they can't move but will attack. required orbs: 2nd orb card(s): -Breeding grounds, this building will reduce the cost of units within it's effectiveness radius. required orbs: -Curse of oink, transforming a limited number of enemy units into pigs will come in use while fighting larger groups of enemies (warning if you attack the pigs they will take on their orignal form faster, so watch out with units that can harm multiple enemy units. required orbs: -Deep One(Purple), a strong unit that can teleport a enemy unit and give it 25% less defence. required orbs: -Parasite Swarm, a weak unit with a great ability to take control of 2 orb <150 power units. required orbs: -Shrine of Memory, you'll regain your void power faster. required orbs: 3th orb card(s): -Abyssal Warder(Red or Blue), an on first sight not a great tier 3 unit but after it dies is falls apart in two weaker and smaller versions of himself. required orbs: -Deepcoil Worm, Strong, Fast, 2x Siege and a possible tunnel oh and will moving takes 50% less damage. Best. Card. Ever. (at least for tier 3) required orbs: -Wheel of gifts, (note: you will need the first upgrade for this card to be totally awesome) this building can grant you three gifts 20% extra strenght, 20% less damage taken and if upgraded gains the gift of juvenscence heals units 3% every 4 seconds. (all these gifts are for every friendly unit, cannot stack) required orbs: -Enlightement, this spell is one of the best spells in the game. It grants you the ability to play any card (in your deck) !any card! for example you could spawn a Jorne a four frost orb unit or Batariel a four orb fire unit. required orbs: 4th orb card(s): -Forest Elder(Green), gives surrounding unit 25% extra damage and besides that.... It looks awesome required orbs: -Giant Wyrm, Fast, Strong, and discussed in part 1, Mull Qah Diiv required orbs: -Regrowth, healing spell, cool! also part 1, required orbs: -Colossus, Strong unit (and the fastest ground unit in game) required orbs: I hope you find this usefull! Any other tips for nature post them in the comments! Yours truly, retront
-
Below is the recreation of my old guide on cards, drafted and finalised during the official beta phase. I filled in the blanks, rephrased and extended each paragraph. It contains plenty of basic, useful and important information for both beginners and more experiences players. factionsThe four main factions belong to the following elements:FIRE is all about offense, with its aggressive and damaging spells. Their units tend to have more damage and less health in general. FROST is the direct opposite to Fire with its defensive structures and high health, relatively low damage units. Their spells slow down or freeze groups of units. NATURE focuses on crowd control to dominate the battlefield. Their units excel at laying siege to enemy ranks and bases, supported by healing and neutralising spells. SHADOW favours corruption and sacrificing their own to gain the upper hand. Their units boast a wide range of powerful but counter-intuitive abilities that swiftly lay waste to enemies in skilled hands. card attributesMain attributes shown on each card: Cost: this is the number at the top right corner. Power Wells built on designated spots on the map provide power, which is then used to pay for the card’s cost. Furthermore, destroyed units and buildings – as well as spells cast – return 90% of their mana cost to the Void which acts a secondary income by essentially recycling power. Orbs: found at the top right corner and depicted by either filled-in or empty circles. Monuments built on designated spots on the map provide elemental orbs, which are then used to fulfil the orb requirement for each card. Filled-in orbs always refer to the element of their colour, while empty circles (neutral orbs) don’t require a specific element. Tier: is calculated by counting the number of orbs required for a particular card. Higher tiers become available as more Monuments are built and are generally more powerful. Charges: the first number below the card’s illustration. You may cast a card this many times, before it becomes dormant and enters a cooldown period. This recharge time is half the power cost of each creature, but otherwise may vary. Rarity: these are the various shapes at the bottom right corner, representing the likelihood of acquiring a card from booster packs, and their general in-game and trade value. Common cards have dark brown symbols, uncommons are grey, rares are orange and ultra-rares are turquoise. Edition: the shape of the rarity icon refers to the expansion corresponding cards have first appeared in. card typesThe three main types (or classes) of cards are units, buildings and spells. Each of these are then broken down into subclasses to further help in identifying a card’s role and purpose. This is a Tier 1 Sunstriders common UNIT Fire card that costs 50 power, requiring 1 fire orb to cast and has 5 charges before entering cooldown. The creature itself spawns in groups of 6, is considered small and has 360 health. It deals 450 ranged damage but receives a 50% bonus if attacking medium units. Attack type: melee units have a sword icon, ranged units a bow and creatures using special attacks have a star. Damage: done over 20 seconds. Units that are summoned away from a Power Well or Monument are dazed for 15 seconds and deal 50% less damage. Bonus damage: depicted by letters corresponding to seizes S, M, L, and XL. Units deal 50% additional damage to other creatures that match the attacking unit’s preference. However, units using special attacks don’t deal bonus damage. Creature size: small and medium units are sometimes summoned in groups of 4 to 6, shown by the second number below the portrait. If a member of the group dies, he or she can be revived but the squad’s total health and damage is temporarily reduced until then. Small and medium units are affected by knockback effects from large and extra-large units. Health: damaged units may be healed by some other creatures or spells. Alternatively, injured units can be returned to friendly buildings for healing. Units that are summoned away from a Power Well or Monument are dazed for 15 seconds and have 50% less health. Abilities: either active (must be triggered manually) or passive. Some cards have two versions (affinities) which manifests in different abilities but have otherwise the exact same attributes. Dazed units can’t use their special abilities for 15 seconds. This is a Tier 3 Armored Tower uncommon BUILDING Frost card that costs 80 power, requiring 1 frost orb in addition to two of any other colour to cast and has 3 charges before entering cooldown. Once built, it’ll have 2590 health and deal 1420 damage to enemies. Damage: while under construction, buildings take double damage from all sources, are unable to attack or use abilities. Constructing a building takes twice as long when not in the vicinity of a Power Well or Monument. Health: damaged buildings can be repaired using the hammer tool (found on the main interface to the right and above selected buildings) when out of combat or with spells. Buildings are also capable of healing nearby injured units. This is a Tier 3 Revenge rare SPELL Nature card that costs 100 power, 1 nature orb in addition to two of any other colour to cast and has 3 charges before entering cooldown. This is a Tier 4 Shadow Worm ultra-rare unit card that costs 250 power, requiring 4 shadow orbs to cast and only has 1 charge before entering cooldown. The creature is considered extra-large, has 3000 health and deals 4000 ranged damage but recieves a 50% bonus if attacking large units.
-
Credit goes to Michal "aRusher" Urbanek for creating this guide at gamepressure.com. After going over it a couple of times, I decided to fix mistakes and extend some paragraphs to provide even more information by including snippets from his Battleforge dictionary and tips section. I believe the below compilation should have a place on the BFR forums as a compendium of how mechanics and the main interface works. Also, to provide an easy to read but useful guide to newcomers, and as a general refresher course for when the game finally re-launches. Battle interfaceThe framed parts are described below: This panel allows us to group units. We can give orders to particular groups. 1 - selects all the units on the battlefield. You should be careful with this tool because if you order your troops to move, all of them will do so, including those left to guard some place; 2 - a click on a number selects a corresponding group; 3 - a click on a plus symbol creates a new group or joins already existing groups. 1 - Description of current mission objectives (in PvE). In PvP skirmishes the time remaining until the end of the match is displayed here; 2 - the number of unit points you have used (one unit is not equal to one point, the number of points depends on the unit's size) - when you reach the limit of 120 points, you can't summon any more troops, unless you kill some you already own; 3 - Power pool. The number shows how much Power you have which is needed to summon units, create buildings, cast spells or activate abilities. Power Wells supply you with Power but guard them well, because you don't get Power back when your adversary destroys them; 4 - The Void, where 90% of the cost of each card's usage is transferred, when a unit/building/spell is killed/destroyed/cast. From there, gradually, the Power spills to your pool. The number inside the skull indicates the amount of Power in the Void, and the arrow shows how much Power you receive every two seconds; 5 - the number inside the Power Well image tells you how much Power your Power Wells can produce, before they run dry. The arrow shows how much Power the Wells give you every two seconds (one such structure equals one point per two seconds); 6 - the mini-map with marked scenario objectives; 7 - the amount and kind of owned Orbs - in this case the player has two Fire Orbs. Every card requires a specified amount of Orbs of some color. Monuments give you one Orb of a chosen color and can only be built in designated spots on a map. You don't get Power back when your adversary destroys them; 8 - click on this button and on a building to begin its repair. It doesn't require any kind of "builder", but you have to have a unit near the structure to initiate its repair. The same can be achieved by clicking on a building and then on the appearing hammer icon; 9 - messages for other player. After clicking you can choose one of the messages ("Beware!", "Defend this place", "Attack here" etc.), than, you have to click on a place you want to indicate; 10 - takes you to a place indicate in the last message (see above); 11 - double-clicking it kills your selected units; 12 - a picture or portrait of a selected unit with the current attack value and number of hit points (considering all the auras). If the creature is under the effect of spells then it is indicated in the bottom - left corner above the attack value. After a unit is summoned it becomes dazed for 15 seconds: the unit has half of its life points, can't use its special abilities and deals 50% less damage. This only occurs when the unit is summoned far away from an Orb/Power Well. In the bottom left corner of every card or portrait, next to a sword or a bow you will find a letter, which tells the size of an enemy that will be hit for 150% of the base damage. S is for small, M medium, L large, a XL extra large. Also check the size of your own unit (the letter to the left of the Card Life) and try not to send it against enemies with such weapons. If the letter is replaced by a star, the unit doesn't receive a bonus to attack on any kind of unit. Some creatures are able to change their weapon type; 13 - stops the unit; 14 - orders the unit to remain in place (it doesn't attack an enemy if not ordered to); 15 - after clicking on this button and on an enemy you initiate attack. You can achieve the same by right-clicking on an enemy unit. 1 - a card you can play (all the requirements are fulfilled). Numbers in the bottom left corner are the Charges, telling you how many times you can use the card before it becomes unavailable and enters cooldown (the time it takes to charge up again); 2 - a card you can't play because you don't have enough Orbs; All cards, except spells, can have these four symbols in their descriptions: is a ranged attack, the unit can attack from a distance; means a clickable ability that you have to trigger on an ability symbol, which, most of the times, appears above the unit ; allows to change the card's mode. After the change, depending on the card, it can deal extra damage at the cost of speed, attack only ground/air targets and much more; tells us that the given ability is passive which means that it's active all the time. Some passive abilities work only in an appropriate card mode (look above)