WindHunter
-
Posts
390 -
Joined
-
Last visited
Everything posted by WindHunter
-
Thanks for the feedback, please see the most recent Community Update for our answers to some of these concerns. Given this is our first season, we are still learning and trying to adjust what we can both within this season but more specifically for next season. We just made adjustments to some of the repeatables based on current community progress.
-
Dwarfen Fortress exp fail upon winning the map
WindHunter replied to Redmark's topic in Report A Bug
One of your partners reported that he killed the Fire Shamans on accident when the game was ending, losing the map. -
The card still functions fine in singleplayer matches, where you cannot desync, but we are considering what to do in multiplayer matches while we try and develop a fix.
-
The 7zip and the updater need to be extracted in the same folder before starting the launcher.
-
Try going into Documents/BattleForge/Map and deleting any dwarfen stronghold files you see in there. It should redownload once you try again in-game and hopefully fix the issue.
-
The growing concern that "I" have with Skylords Reborn
WindHunter replied to Riviute's topic in General Talk
We did in fact remove standard difficulty for the 12p maps. Ascension standard was missing several key mechanics, like Viridya on map 2, so it did nothing to teach players how to beat the map on advanced and expert difficulty. On the other hand, Passage to Darkness on expert is equivalent to standard difficulty. The map has a less than 1% failure rate. In both cases, it was impossible to find standard matches, so we removed standard. We are doing a long term rework of the maps in line with community feedback though so changes will eventually be made again. As regards the other feedback: 1. Future campaign maps with both be simpler and come with standard difficulty. 2. We are examining the seasonal challenges and we will likely add standard versions for many of the one-time versions going forward. I do not know if we will be able to make this change for this season but we will discuss it. Per the Nightmare challenges, just as we need to make sure lower skilled players have content to engage with, we also need to challenge our most skilled players and these challenges exist for their sake. -
Dwarfen stronghold rework crashes the game
WindHunter replied to thedawn's topic in Technical Support
Try going into Documents/BattleForge/Map and deleting any dwarfen stronghold files you see in there. It should redownload once you try again in-game and hopefully fix the issue. -
Patch #400052 - Primordial Fire Welcome to our newest patch. This update contains our eighteenth balance patch for the game, the new season feature, 3 brand-new cards, Infected Map of the Week, quality of life changes, and much more! Patch Preview Face 32 new challenges and earn cosmetic and card rewards over four months as part of Season 1, Primordial Fire! Three new cards and one new promo are now available! Jump in-game to collect Fire Wormlings, Hellhound, Treasure Wagon, and promo Sunderer! Experience a twist on old maps with the Beta-release of our new Infected Map of the Week feature. Players can now purchase NPC enemies to use in the Forge with our new Relic currency. Minor rebalances to multiple cards and a system-wide change to entities which spawn ground units. Many new fixes and QoL changes based on community requests. Season 1 - Primordial Fire This patch introduces our first season. Our new seasons system is based around approximately 30 challenges that the player will complete over a 4-month time period (in this case June 1st to September 30th). Here are all the rewards you will be able to earn during our first season: Completing challenges rewards points and Relics which are used for unlocking card, booster, and cosmetic rewards. Most challenges can be completed on either advanced or expert difficulty, with expert providing more points. The goal is that this system allows players of all skill levels to participate and make real progress in unlocking seasonal rewards. There are 3 batches of challenges, releasing in June, July, and August. Here are the challenges players will face from June 1st to the end of the season. [ Repeatable Challenges ] These are repeatable challenges by which the player slowly accrues points while doing other challenges and simply playing the game. Available from June 1st. Challenge 1.1 Win official campaign scenarios that are the Map of the Day on different days on any difficulty. Challenge 1.2 Win official campaign scenarios that are the Infection of the Week on different weeks on advanced difficulty or higher, or random PvE scenarios that are the Infection of the Week on different weeks on advanced+ (5) difficulty or higher. Challenge 1.3 Win random PvE scenarios that are the Map of the Month on different months on advanced+ (5) difficulty or higher. Challenge 1.4 Play Fire, Bandits, or Twilight cards in any game mode. Challenge 1.5 Win random PvE scenarios with you using decks that contain 10 or more Fire, Twilight or Bandits cards. Completing maps on higher difficulties will reward more mission progress. Challenge 1.6 Win official campaign or featured community maps on advanced difficulty or higher using decks with at least 10 Fire, Twilight, or Bandits cards. Expert grants increased progress while repeating maps grant reduced progress. Challenge 1.7 Destroy enemy structures. Challenge 1.8 Spend power on spells [ One-time Challenges ] The first set of three one-time challenges available from June 1st. The next set unlocks in July and the last set in August, both of which contain 4 challenges each. Players will have until the season ends on September 30th to complete them. Challenge 2.1 Be among the players with the most points earned at the end of the season. Challenge 2.2 Win the 2-player scenarios Slave Master and Convoy on advanced difficulty or higher, with all team members playing only Fire cards. Challenge 2.3 Win the 1-player scenarios Encounters with Twilight, Defending Hope, and The Soultree on advanced difficulty or higher, with you playing only Fire cards. Challenge 2.4 Win each of the 2-player featured community maps An Expedition South and Lyrish Uprising on advanced difficulty in 40 / 30 / 25 / 15 minutes or less, with all team members playing only Fire cards. Challenge 2.5 Win the 4-player featured community maps Dwarfen Stronghold Rework and Twisted Legends on advanced difficulty or higher, with all team members using decks that contain 10 or more Fire, Twilight or Bandits cards. Challenge 2.6 Complete 10 different campaign scenarios or featured community maps on advanced difficulty or higher, with all team members playing only Fire cards, and without playing any Human or Elemental units. Challenge 2.7 Win the 4-player scenarios Titans and King of the Giants on advanced difficulty or higher, with all team members playing only Fire cards. Challenge 2.8 Complete 5 different campaign maps or featured community maps on advanced difficulty or higher, with all team members using decks that contain only Fire, Twilight or Bandits cards, none of which are from the Twilight edition. Challenge 2.9 Win a random PvE scenario in under 10 / 8 / 7 / 5 / 4 / 3 minutes on any difficulty, with all team members playing only Fire cards. Completing the challenge more quickly awards progressively more points. [ Nightmare Challenges ] The first set of two "Nightmare" challenges. The other set unlocks in August. These challenges are harder and meant for skilled veteran players, though most are still intended to be completable by the average player on lower difficulties, potentially with help from a guide. Challenge 5.1 Be among the 50 fastest times at the end of the season on the 1p random PvE scenario Map of the Month on Expert+ (8) difficulty, with you playing only Fire cards. Challenge 5.2 As a solo player, win the 2-player scenario Slave Master on advanced difficulty or higher, with you playing only Fire cards and no building cards. Challenge 5.3 As a solo player, win the 2-player scenario Into the Jungle on advanced difficulty or higher, with you playing only Fire cards. Challenge 5.4 Win a random PvE scenario on Std++ (3) difficulty or higher, with all team members playing only Fire cards of Tier 2 or below. Completing the challenge on higher difficulties awards progressively more points. To get started with Season 1, go to the new in-game icon shown at the top of this section which opens the Seasons window. General Changes & Fixes The map codex has been changed. It now contains information related to the current Map of the Day, Infected Map of the Week, and PvP Happy Hours. Added a new Random option to the Forge menu which will randomly rotate between the different Forge themes a player owns. Fixed an unintended interaction where players could accidentally destroy the Shard of the Forge on the maps Nightmare Shard and Nightmare's End, making it impossible to finish the map. The Shard of the Forge is no longer destructible. Into the Jungle and Unexpected Visitors now have 6 gold chests like other 2p campaign maps and fixed issues where chests were not possible to be openend in Into the Jungle. Updated card descriptions for improved clarity across dozens of cards in all four languages. Razorleaf no longer causes screen shake when the player's camera is 200m away. Rename "Battleground" to "Random PvE" on multiple places, for clarity. Infected Map of the Week - Map Modifiers (BETA RELEASE) Each week 1 campaign map and random PvE are infected by a set of map modifiers. These modifiers are the same for the course of the week creating an Infected Map of the Week. Infected maps always have one elemental modifier connected to one of the four primary factions (Fire, Frost, Nature, & Shadow) and one neutral modifier on standard / advanced difficulty and two neutral modifiers on expert difficulty. Completing the Infected Map of the Week on advanced difficulty or higher awards progress on the new Elemental Balance achievement which awards players 50 bfp and 2 Relics once a week. If the player completes the map on expert difficulty they earn an additional Relic for 3 in total. Infections are opt-in, so you do not have to interact with them if you do not wish to and you can play the chosen map for the week without modifiers. Additionally, bosses are immune to all map modifiers. [ Elemental Modifiers ] Fire Modifier 1 - Rage: Every enemy unit has Rage continuously dealing more damage over time. Fire Modifier 2 - Swiftness: All enemies move 30% faster. Frost Modifier 1 - Freezer: Every 20 seconds, every hostile building in the game freezes hostile units within a 20m radius for 20 seconds. Frost Modifier 2 - Payback: Every enemy is immune to slows from unit collision. Additionally, when an enemy unit is trampled it deals 150 damage to the attacker if it is S-sized and 450 damage if it is M-sized or larger. Nature Modifier 1 - Immunities: Every enemy unit in the game will be immune against all major debuffs but may still be affected by spells like Freeze or Paralyze. Nature Modifier 2 - Paralyzer: Every hostile melee unit in the current game paralyzes units with their melee attacks for 8 seconds. Shadow Modifier 1 - Incurable: Every friendly unit in the current game cannot be healed by spells or abilities. Shadow Modifier 2 - Second Chance: Every hostile unit in the current game will resurrect after 3 seconds if it dies before irrevocably dying after 15 seconds. [ Neutral Modifiers ] 1. Steadfast - Every hostile unit in the current game cannot be knocked back. 2. Engineer's Blessing - Every hostile building in the current game regenerates 3% of its maximum life points every 4 seconds. 3. Life Stealer - Every hostile unit and building in the current game will restore 15% of damage dealt as own life points. 4. Armored - Every enemy in the current game takes 15% less damage. 5. Rise of the Giants - Every hostile extra-large unit in the current game deals 50% more damage and takes 50% less damage. 6. Piercing - Every hostile building and unit in the current game will deal 50% of its damage as piercing damage able to circumvent every buff and protective shield. 7. Elusive - Every hostile unit in the current game will have the duration of the immobilizing effects Freeze and Paralyze reduced by 50%. 8. Irreparable - Every friendly structure in the current game cannot be manually repaired. 9. Rejuvenation - Every hostile unit in the current game regenerates 3% of its maximum life points every 4 seconds. 10. Magical Shields - Every hostile unit in the current game takes 30% less damage from ranged and magical attacks. 11. Artillery - Every hostile building in the current game has its attack range increased by 15m. 12. Poisonous - Every hostile unit in the current game leaves poisonous spores wherever it walks. Units with larger sizes leave more potent spores. Please note this is a Beta release! While we tried our best to test each modifier, we expect individual modifiers as well as certain modifier combinations to be unbalanced and we ask for your aid in helping us rebalance them! Additionally, we would love to hear your suggestions for future modifiers, positive and negative, that you think would be good additions to the system. New Currency - Relics & New Forge NPCs As part of our new Seasons and Infected map features we are introducing a new in-game currency called Relics. Relics can be earned from completing season challenges and beating the Infected Map of the Week. Once earned, Relics can be used in our new Relic Shop, which can be found in the Season's window. In the new Relic Shop players will be able to purchase exclusive cosmetics, NPC enemies, and cosmetic rewards from previous seasons - including the promo card from each season. For now the only thing available in the Relic Shop are NPC bosses and buildings. Once purchased, these enemies can be found under a new "Enemies" tab in the deckbuilding menu. From there players can summon them freely in the Forge, allowing players to create epic battles or test specific strategies against the game's classic enemies. Additionally, a new achievement Artifact Hunter has been added. For every 50 relics a player collects, they will earn a progressive border. Each border color has three levels marked by stars along the top and the colors directly correspond to the PvE and PvP rank progression in-game similar to our recent progressive banners which can be earned by speedrunning Unexpected Visitors. New Cards The following new cards have been added to the game. Please note they are timely-exclusive, meaning they are tied to the season rewards and will not drop from booster packs or reforging while Season 1 is active. After the season has concluded, the non-promo cards will drop as usual. Fire Wormlings - 140p T2 Fire Unit You will find the upgrades for this card on the maps Raven's End (U1) and Unexpected Visitors (U2/U3). A longtime problem with T2 Pure Fire is that the faction's cards have a strong PvP bent. Additionally, the faction lacks sustain while possessing exclusively squishy units. While the Fire Force rework gives the faction some more staying power, Pure Fire still relies on Skyfires, Gladiatrixes, and Blaster Cannons to deal with flying enemies in T2. Additionally, none of Fire's T2 units scale well in groups. Fire Wormlings attempt to address these problems by being bulky, scaling well as a group, and being capable anti-air units. Their burning spit also makes them strong damage dealers when combined with a team mate who has crowd control to lock enemies in place. Hellhound - 160p T3 Fire Unit You will find the upgrades for this card on the maps Bad Harvest (U1) and Into the Jungle (U2/U3). Hellhound was the overall winner of our first community card creation contest. It receives less damage from ranged and magical sources, with this armor scaling the longer Hellhound is in combat. When the Magma Armor reaches full strength, Hellhound can cause the armor to explode outwards, dealing heavy damage but resetting its armor. This mechanic gives players a choice between more durability or more damage; it also allows the L-sized Hellhounds a way to deal with flying enemies without having to bring along a Spitfire or a mob of Magma Hurlers. Treasure Wagon - 130p T2 Legendary Unit You will find the upgrades for this card on the maps Treasure Fleet (U1) and Into the Jungle (U2/U3). It is difficult to design new legendary cards because you need to find a niche which will not outcompete faction cards. In Treasure Wagon's case we decided to lean fully into its story identity of being a highly desirable gold transport. While Treasure Wagon cannot attack, it can taunt all enemies in a 20m radius to attack it. This makes the card a good support tool which can draw aggro away from the player's army. And if the Wagon happens to die, two Thugs spawn from the remains ready to fight. Sunderer - Promo Card You can get this special promo card by earning 850 seasonal points. After the season has concluded, promo sunderer will be purchasable in the new Relic shop, for those who did not get it during the season. Game Balance Changes [ System-Wide Changes ] Permanent ground entities summoned by other ground entities will now provide ground presence: - Affects: Bandit Hut, Nox Carrier (both affinities), Satanael (both affinities), Treasure Wagon (new card), Viridya (normal and promo versions). Permanent entities summoned by flying units or spells (i.e. Corsair) as well as non-permanent entities summoned in any way (i.e. Undead Army, Sunken Temple) will continue to not provide ground presence. [ Tier 1 Card Changes ] Altar of Nihil: 1. No longer works with Infected Tower’s Virus ability (units affected by Alter of Nihil are immune to the transformation revival) 2. Lifepoints: 670 ➜ 520 We are slightly nerfing Altar of Nihil by making it easier to destroy while also removing an unintended workaround to its no revival rule. Bandit Hut: 1. Add lifestealer Bandit passive to Vanguards and Skyrake Alphas 2. Summon Vanguards power cost: 50p ➜ 65p We have been mostly happy with Bandit Hut's release and as such as are only making some minor adjustments. Bandit Lancer: 1. Branding cooldown (both affinities): 30 seconds ➜ 20 seconds Burrow Ritual: 1. Power cost: 40p ➜ 35p 2. Unit cap: 5 own units ➜ 7 own units Slightly increasing the efficiency of Burrow Ritual and allowing it to scale better with larger player armies. Burrower: 1. Tunneling cooldown: 30 seconds ➜ 20 seconds Drones: 1. Tunneling cooldown: 30 seconds ➜ 20 seconds 2. Movement Speed: 8.0 m/s ➜ 9.6 m/s Drones will now move at the highest speed. This change is intended to help them as counter units in PvP. Icespike: 1. Damage: 1780 dp20 ➜ 1880 dp20 2. Brrrr!: Now affects buildings in addition to units We are generally happy with Icespike, but we think the frozen warrior could use some extra oomph as well as the ability to freeze buildings with its auto-attack. Juggernaut: 1. Power cost: 220p ➜ 240p 2. Damage: 4745 dp20 ➜ 5245 dp20 3. Life points: 3550 ➜ 3650 4. Stampede: A. Cooldown: 25 seconds ➜ 30 seconds B. Ability cost: 65p ➜ 80p We are weakening the most powerful PvP finisher while keeping its role as a stat efficient XL combat unit untouched. With several buffs to Fire cards across recent patches, there is enough room to incentivize different strategies than just rushing Juggernaut every game. Lost Disruptor: 1. Disruption duration 20 seconds ➜ 30 seconds 2. Disruption cost: 20p ➜ 10p Lost Disruptor is a good counter to global effects, especially in 2v2 PvP. This changes improves that. Lost Spirit Ship: 1. The Crystal ability is now targeted, with radius 0m. This is a long requested change which will allow players to fly to a specific location to cast the Crystal ability, and no longer cast all ships' abilities at once. Mauler: 1. Slam now also affects structures in addition to units. Improving Mauler's viability by allowing him to disable both buildings and units alike. Nox Carrier: 1. Necro Strike now prevents buildings from attacking or using their special abilities for the next 30 seconds. We are adding a new ability to Nox Carrier to continue expanding its usability to be more than an Orb-killing device in PvP. Rageflame: 1. Frostshower damage (U3): 80 dps (1600 dp20) ➜ 85 dps (1700 dp20) Scorched Earth: 1. New passive - Now also blocks special abilities from structures (ranged attacks still possible). This change will increase the deck slot efficiency of Scorched Earth in PvP. Scythe Fiends: 1. Life points: 1040 ➜ 1120 Simulacrum: 1. Damage: 70, up to 105 in total ➜ 76, up to 114 in total (1900 dp20) 2. Splash radius: 5m ➜ 8m 3. Relocation cooldown: 20 seconds ➜ 15 seconds Mild improvements to Simulacrum. It has been underpowered since its release so we are giving it some more mobility and a slight damage bump. Slaver: 1. Blowout damage against structures: 100% ➜ 50% Spirit Gate: 1. The unit with Spirit Gate no longer needs to turn to face the target direction before the spell's teleport will be cast. Viridya (normal & promo): 1. Viridya’s Blessing no longer stacks with itself. Several patches ago, we changed the way healing works so that all rejuvenation effects stack with each other. While this fixed some issues like Fountain of Rebirth overwriting Wheel of Gift's healing effect it caused other problems. It was never our intention that Viridya's blessing could stack with itself and this interaction allows the promo and normal versions to heal a staggering 6% of every allied units maximum life points every 2 seconds. This is clearly unbalanced and so we are fixing it. Virtuoso: 1. Power cost: 120p ➜ 110p [ Map Changes ] Into the Jungle: 1. Added two 600p Power Wells to the T3 location. Slightly adjusted the Monument positions to accommodate the new Power Wells without causing blocking problems. 2. Moved the wells at the camp with the caged Sunderers slightly to fix an issue where XL-units could get stuck between them. Oracle: 1. Added flying and ground blocking at the map borders to prevent units leaving the playable area. 2. Slightly moved the spawn point of bottom hostile ships inwards to allow the Bandit Ship to vanish after dropping of the enemies (otherwise the newly added flying blocking would prevent it from exiting).


-
I had a lot of fun testing this map out before release, I think people will really enjoy what Rabit was able to do here. Also be smarter than me and make sure you walk the Knight directly into the water barrels.
-
While yes the other void shrines all have a Rare rarity, Power Shrine is a lower tier and uses a more complex mechanic than simply returning void power that we think justifies it being an Ultra-rare. Per your other post, units affected by Altar of Nihil cannot be resurrected. That is what the "irrevocably die" portion of the description is meant to convey.
-
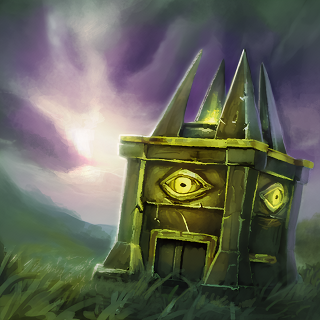
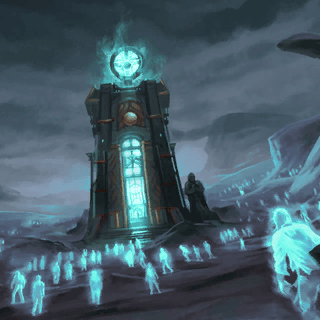
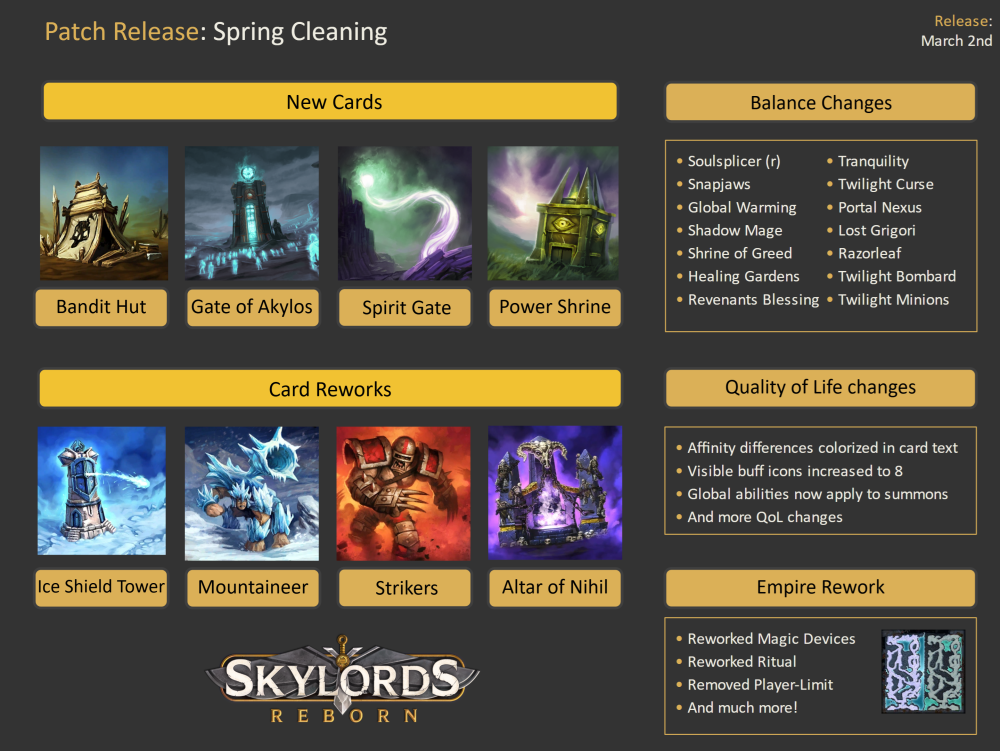
Patch #400051 - Spring Cleaning Welcome to our newest patch. This update contains our seventeenth balance patch for the game, 4 brand-new cards, quality of life changes, and much more! Patch Preview Four new cards are now available! Jump in-game to collect Gate of Akylos, Power Shrine, Spirit Gate, and Bandit Hut! Many long awaited quality of life changes have been added to the game. Major reworks to several underperforming cards such as Ice Shield Tower, Mountaineer, Strikers, and Altar of Nihil. Reworked Empire and fixed two other campaign maps to streamline the player experience. General Changes & Fixes When using Twilight Transformation, transformed units now inherit the original unit's group, selection, and commands. Increased the maximum number of visible buff icons on units and buildings to 8. Fixed global effects not applying to units spawned by abilities. For example, this fixes Ravenheart's Ravenships not being affected by Wheel of Gifts or The Incredible Mo. Fixed an issue with Bedrock's Sculptor ability that caused its ability tooltip to disappear when multiple Bedrocks were selected at the same time. Affinity differences are now highlighted in each card's description. Each affinity has colored text corresponding to the color of the affinity element which highlights only those words and abilities which are different than its alterative affinity. Players who hover over cards with affinities in-game will immediately notice the changes. This featue can be disabled by setting "enable_affinities_highlighting" to "false" on the section "gui" of the file "Documents\BattleForge\config.json". New maps script: - "MapAudio": Audio files (flac, mp3, wav, ogg) can now be played directly from the community map folder. Reference can be viewed on https://skylords-reborn.fandom.com/wiki/Script_Information_-_Full_Reference. New Updater - Version v0.15 Added support for game channels, you can select the channel on the top left, it will only check updates for the selected channel (main server, test server, etc.). Improved performance and added caching to update checking. Added config settings to `Documents\BattleForge\updater-config.json`. Added logging to `Documents\BattleForge\Diag\log_updater.log`. Updated Skylords Reborn logo on the top left. Improved error handling and messages. Small UI improvements. Modifiable parameter on`updater-config.json`: `fileIntegrityCheckMaxDegreeOfParallelism`: Users can set it to 1 on HDD or slower PCs, default is Processor Count / 2. If you are using Wine on Linux or MacOS, additional dependencies are required: `sudo apt-get install winbind` `WINEPREFIX=~/.wine32/ winetricks dotnet48 d3dcompiler_47 vkd3d` New Cards Bandit Hut - 120p T3 Bandit Building You will find the upgrades for this card on the maps Blight (U1) and Into the Jungle (U2/U3). The enemies of the Skylords have long made use of spawn buildings to reinforce their armies, and this power is now also available to Bandit loving Skylords. Bandit Hut can spawn the previously unavailable units Bandit Vanguards (Bandit Strikers) and Alpha Skyrakes (Bandit Mana Wings), up to a population cap of 150. This will allow the player to quickly spawn in an army of weaker Bandit units to supplement their main army. Now Skylords can give their enemies a taste of their own medicine with their own attack waves! Gate of Akylos - 200p T3 Lost Souls Building You will find the upgrades for this card on the maps Empire (U1) and Unexpected Visitors (U2/U3). Similar to Soulstone, Gate of Akylos was a card that got stuck in development hell as we faced substantially more implementation issues than initially expected. We are excited to finally share it with our players. Gate of Akylos is a global revenant support building. Its abilities focus around lengthening revenant duration and extracting revenants from existing Lost Souls units. We hope that Gate of Akylos, as well as the changes to other revenant support cards in this patch, help to make the revenant playstyle more accessible to the general playerbase. Power Shrine - 140p T2 Amii Building You will find the upgrades for this card on the maps Convoy (U1) and Into the Jungle (U2/U3). Ever since we nerfed Shrine of War to require 2 Fire orbs, similar to all other void shrines, rainbow decks have been without a source of consistent void return. Power Shrine fixes this issue. Power Shrine is a T2 global Amii void shrine that allows players to play cards directly out of their void power. With each activation, each member of the Amii player's team will be able to use void power to play their next 3 cards. This card-based approach means Power Shrine will scale well into the later game as player card costs increase in higher tiers. Spirit Gate - 70p T2 Amii Spell You will find the upgrades for this card on the maps Sunbridge (U1) and Unexpected Visitors (U2/U3). Nether Warp has long been the only source of teleportation that is both reliable and flexible. Spirit Gate adds a second strong teleportation option but with its own twist. Unlike Nether Warp, Spirit Gate is a unit-ability granting spell, similar to Tectonic Shift and Infernal Chain, which gives individual friendly units the ability to teleport to sources of own ground presence in a 75m range. Given the fact that it can be applied to friendly units and not just own units, a friendly Amii player can now grant every player on their team the ability to teleport their armies around the battlefield. Happy warping Skylords! Game Balance Changes [ Tier 1 Card Changes ] Ice Shield Tower: 1. Power cost: 50p ➜ 80p 2. Ice Bolt damage: 66, up to 100 in total ➜ 72, up to 108 in total 3. Ice Shield: A. Change from active to auto-cast (30m range). B. Ice Shield strength: 880 → 660 C. New Description: "Every 20 seconds, tower applies an Ice Shield to a friendly unit that absorbs up to 660 damage for 30 seconds. Has a range of 30m." 4. Ice Field (new passive ability): Ice Shields within a 25m radius of the tower do not run out. Cannot be disabled by spellblocking abilities. Frost T1 has a lot of building options and Ice Shield Tower has long struggled to find its place. We are reworking the card to make its Ice Shield ability into an auto-cast as well as adding a new passive ability that prevents Ice Shields from expiring in the area around the building. This should hopefully make it a compelling choice in defense situations where you have lots of time to build up shields for defending units. Soul Splicer (r): 1. Infused Necromancy (r) damage boost: 50% ➜ 70% Snapjaws: 1. Power cost: 75p ➜ 65p Strikers: 1. Power cost: 90p ➜ 75p 2. Damage: 780 dp20 ➜ 600 dp20 3. Life points: 600 ➜ 420 4. Unit counter: M-counter ➜ S-counter 5. Charge damage: 30 ➜ 20 damage per squad member 6. New passive ability “Bloodthirsty”: Unit regenerates 15 life points per second over the next 4 seconds per every 150 damage it deals. Ever since their looter nerf, Strikers have been languishing without much use in either PvP or PvE. We are therefore completely reworking them. On maps where hit-and-run tactics are favorable and where there is a lack of early flying enemies, our testing has shown the new Strikers to have a comparable or even superior performance compared to Nomads. The new Strikers will give Fire T1 players yet another starting unit option. [ Tier 2 Card Changes ] Altar of Nihil: 1. Orb cost: Shadow, Neutral, Neutral (T3) ➜ Shadow, Shadow (T2) 2. Power cost: 110p ➜ 50p 3. Life points: 990 ➜ 670 4. Complete Rework, Nihilation: A. Description: Activate to create a corrupted zone of 25m around the building where summoning friendly units requires 85% less of the usual power costs but causes all summoned units to irrevocably die after 20 seconds. Does not affect flying units. Lasts for 30 seconds. Reusable every 60 seconds. Altar of Nihil was originally designed to support cards like Wrathgazer or Cultist Master in PvP. It was a niche strategy in the past until Voidstorm got moved to T3. A global map reset paired with void removal created arguably the the most uncounterable and overpowered late game PvP combination the game has ever seen. As a result, we had to remove the strategy entirely by nerfing Altar of Nihil into the ground. Since then, the card has maintained a 0% play rate in every game mode. As the previous ability was not salvageable due to the interaction mentioned above, we redesigned Altar of Nihil entirely. The new ability is supposed to bring more strategic depth to Shadow's card arsenal by synergizing with its sacrificial elements. We also moved away from a purely harmful effect to open up PvE usage. We will keep a close eye on the card's balancing and adjust numbers in the future if necessary. Global Warming: 1. Both affinities now speed up own Fire units by 25% for 20 seconds. This change will give Global Warming more flexibility, making it better able to justify itself in taking up a deck slot. Mountaineer: 1. Life points: 1350 ➜ 1140 2. Bombard damage: 220, up to 330 in total ➜ 80, up to 120 in total 3. Glacier Shield now refreshes unconditionally every 12 seconds. 4. Icing Up Rework: A. Charges: 100, up to 800 in total ➜ 80, up to 400 in total B. Charge tick speed: 1000 ms (1 sec) ➜ 3500 ms (3.5 sec) - Aligns with the attack speed, so the unit gains 80 charges every 3.5 seconds. C. Charges are now converted into 200% damage. Mountaineer now generates charges overtime which are then converted into damage, similar to the way Death Ray's corpse mechanic works. This gives Mountaineer more damage at the beginning of combat, but his damage over time drops sharply if he remains in combat for a long period of time. The idea is that the unit should maintain its hit-and-run playstyle but without the buggy shield interaction which would stop the unit from attacking whenever the shield recharged. As regards the Ice Shield, it now recharges unconditionally similar to Avatar of Frost's shield which should help with Mountaineers overall survivability. Portal Nexus: 1. Explosive Death: Friendly entities ➜ Friendly units This change should make it easier to place and use Portal Nexus without negatively affected the strategies that use the card to kill own and friendly units. Shadow Mage: 1. Foul Play health damage percentage: 400% ➜ 500% Shrine of Greed: 1. Enemy void return percentage: 50% ➜ 25% Revenant's Blessing: 1. Charges: 12 ➜ 20 2. Cooldown: Reusable every 20 seconds ➜ Instantly reusable. As part of the release of Gate of Akylos, we are touching up a few revenant-based cards to help buff up the playstyle. This change is intended to make it easier to keep unbound revenants alive without bringing both affinities of Revenant's Blessing, saving the player an important deck slot. Tranquility: 1. Soothing Whispers: A. Damage buff: 30% more damage ➜ 35% more damage B. Healing: 50 life points every 2 seconds ➜ 7% max life points every 2 seconds 2. Foreboding Whispers: A. Damage debuff: 30% more damage received ➜ 35% more damage received With these changes, Tranquility should scale well as a single-target buff even into T3 and T4, giving the player a better reason to include it in Amii decks. Twilight Curse: 1. No longer blocked by mind control effects. Players can now mind control enemies, such as with Amazon, and use Twilight Curse to transform them. Twilight Minions: 1. Gifted Incentive (g) damage boost: 30% ➜ 50% more damage by friendly Fire, Nature, and Twilight units 2. Infused Incentive (r) damage boost: 65% ➜ 75% more damage by friendly small units Encourage use of Twilight Minion's transformation effect, especially alongside the new Twilight Archers card. [ Tier 3 Card Changes ] Healing Gardens: 1. Ritual of Recovery duration: 45 seconds ➜ 60 seconds Players can now keep Ritual of Recovery active 100% of the time with only one Healing Gardens. Lost Grigori: 1. Disintegrating Shock: A. Ability power cost: 100p ➜ 70p B. Cooldown: 30 seconds ➜ 20 seconds C. Can no longer disintegrate XL units D. Lost Grigori now regenerates 180 life points per sec while channeling disintegration. Lost Grigori presently struggles in both PvP and PvE. We are tweaking its disintegration ability in an attempt to breathe some life into the card, especially in PvE. We are removing the ability to target XL-units to prevent PvP abuses, while at the same time giving it a cost reduction and cooldown reduction. Most importantly, Lost Grigori now heals itself while disintegrating enemies, meaning it can self-sustain without a need for other support cards. Razorleaf: 1. Damage per leaf: 34, up to 51 in total ➜ 30, up to 45 in total Despite being a T3 unit, Razorleaf is stronger than most T4 defenses. The card has always been strong and it has received numerous indirect buffs as we have buffed other Nature cards around it. While we want the card to remain a strong endgame defensive option, even into T4, it currently stands too far above its competitors so we are chopping off 10% of its total damage. Twilight Bombard: 1. Damage: 420, up to 630 total (2100 dp20) ➜ 460, up to 690 in total (2300 dp20) 2. Life points: 2660 ➜ 2920 Despite previous buffs, Twilight Bombard is still struggling to find its place among Twilight's T3 defense options. We are giving it a 10% buff to both its damage and life points to make it more efficient for the power cost. [ Map Changes ] Ascension Map 3: 1. Map 3 of Ascension is now playable even when one side of the map has no players. This will allow players to play this map solo. 2. Map 3: Allow players from the respective other side to also take control of the portal devices with nearby ground entities. The Insane God: 1. Fixed a bug where a Seeker would instantly turn into a Guardian if it was killed while transforming. 2. Urzach's Seeker: Added an indicator to the visual effect of the transformation ritual and hide both if the ritual is interrupted. Empire: 1. Reworked Magic-Devices: One of the more annoying things in Empire was the clunky Device-logic. Before this patch, only one player (per side) could teleport the Red-King to his timeline. Now every player is able to teleport the Red King back and forth. 2. Reworked Ritual: We added a few visual indicators to hopefully make the ritual more understandable. 3. Removed Player-Limit: As soon as one side of the map had no more players, the game ended. This restriction caused games to end, which could have been successful even without the other side of the map present. 4. Minor changes: We also made a lot of miscellaneous changes. These range from small things such as incorrect map outcries to larger, more game-breaking issues like Jorne's allies blocking his path and thus blocking the game from advancing.


- 50 replies
-
- 16
-

-
This would require a retouching of all Twilight units with a substantially different gameplay philosophy. While we do think Twilight Transformation is too weak in many cases right now, we do not intend to scrap the mechanic but to fix it up and make it more worthwhile to use, similar to what we have been doing with the Lost Souls Revenant's Doom faction ability.
-
You earn BFP at the same rate regardless of if you win or lose. Additionally, campaign map gold rewards have the failure rate factored in. So as long as you do not fail significantly more than the average player, you will receive the same effective gold per minute as if you played rPvE 6 and won every round.
- 1 reply
-
- 2
-
-
There is a known issue with the Save Christmas achievement event. Map progress is currently not being tracked or awarded. We are looking into the issue and will fix it as soon as possible.
-
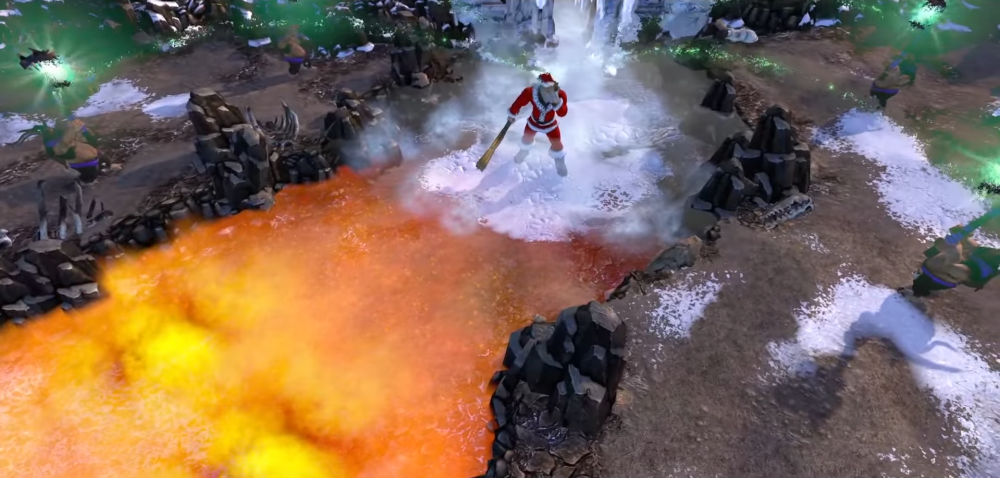
Patch #400050 - Save Christmas Welcome to our newest patch. This update contains our sixteenth balance patch for the game, 1 new promo card, one new achievement, and much more! Patch Preview Added three new featured community maps! Shadowy forces have mind controlled Santa and stolen his presents in these demonic re-imaginings of Bad Harvest, Treasure Fleet, and Slave Master! One new Christmas achievement; beat the new Christmas maps before February 2nd to receive the new promo Frost Mage! Reworked some T3 and T4 cards. General Changes & Fixes Fixed a large number of incorrect descriptions in all languages. Fixed storybook page order for Unexpected Visitors and Into the Jungle. Updated scratch code description on marketplace. New Christmas Event Maps While everyone was brewing hot cocoa and preparing cookies below the chimney, the forces of darkness have kidnapped the elves and mind controlled Santa! The Skylords must act quickly to recover the stolen presents, free the captured elves, and return Santa to sanity to save Christmas. Re-experience three classic campaign maps and earn yourself a new promo Frost Mage in the process! The event lasts until February 2nd and will reoccur yearly. You can find the maps in the Community Maps section of the World Map. Christmas Fleet, 1-player map Dark forces have stolen Santa's presents. The presents have been found, but you need to defend the sleighs full of presents until they can reach the North Pole. Elf Master, 2-player map Santa's elves have been kidnapped! Free the elves so they can make it home in time to spread Christmas cheer. Naughty Harvest, 4-player map Shadow units have invaded the north pole and mind controlled Santa! Defend Santa's sleigh while you help Santa return to normal. New Christmas Achievement Save Christmas [Card: Frost Mage (promo)] Win the featured community maps Naughty Harvest, Christmas Fleet, and Elf Master on Expert difficulty during Christmas. Game Balance Changes [ Card Changes ] Deepfang: 1. Icefire new effect: “If a building directly attacked by Deepfang is destroyed, a Stonekin Critter will spawn out of its ruins.” 2. Union general changes (both affinities): A. Radius: 20m ➜ 30m B. No longer requires a Stonekin Critter nearby to activate 3. Infused Union (r) buff: A. 50% ➜ 80% more damage B. Now buffs all friendly Stonekin, not just Deepfang and its Critters. 4. Gifted Union (g) poison: 50 ➜ 70 damage per second 5. Stonekin Critter’s Joyful Death: Now affects all Stonekin, not just Deepfang. Deepfang is one of the worst designed cards in T3. It is full of little annoyances. The Union ability can only be triggered if a Critter is nearby, but Critters are low health and non-respawning, with a suicide ability to top it off. The fire affinity gives a +50% damage buff, but it has a small radius, only affects Deepfang and its Critters, has a long animation leading to a 660 damage loss, and is outcompeted by a 40p T1 Frost spell. The nature affinity actually deals damage, but it is a self-cast ability with a 20m radius on a ranged unit. Deepfang also comes with 2 Stonekin Critters, but they cannot respawn and their healing only works on Deepfang. We are trying to fix everything in one fell swoop. Both Union affinities are being buffed by increased radius, increased effects, ability to work on friendly Stonekin units, and no longer requiring a Critter nearby. We are also adding a way to generate Critters by adding an Infect-esque effect to Deepfang's attack which only works against buildings. This should limit the number of Critters possible overall while making them feel like a real part of Deepfang's kit and identity. It also fits with our goal to add more building interactions to the Stonekin faction. Finally, we are expanding the Critter healing to all Stonekin. Deepgorge: 1. Orb cost: Frost, Frost, Nature, Nature (T4) ➜ Frost, Nature, Hybrid, Hybrid (T4) 2. Infused Cold Clutch (r): A. Aura now freezes instantly, not after 7 seconds. B. Fire affinity, remove current effect and replace with: “Additionally, the usual damage reduction of frozen targets will be removed from all frozen enemies within the aura.” 3. Blessed Cold Clutch ➜ Cold Clutch A. Add Frost affinity to auto-attack: Ether Eruption ➜ Blessed Ether Eruption B. New effect: "Additionally, the building deals 100% more damage against frozen enemies and is able to ignore the usual damage reduction of frozen targets." Improve splash-ability but still require all Nature or Frost orbs to keep it within Stonekin. Double hybrid will allow the card to be usable alongside Shatter Ice, so that players can do Shatter Ice + Deepgorge + Tectonic Shift combos. The goal is to make one affinity better on its own (Frost affinity) and the other affinity better as a support card (Fire affinity). While +100% damage increase against frozen targets might seem like a lot, please note that the last time we buffed Deepgorge we gave this card the largest stat increase in balancing history, and it is still barely viable. The frost affinity will have a 6k single-target dp20, which while decent, is still worse than both WBG and Volcano. Stone Warrior: 1. Blessed Shatter Lance (b) damage: 2600, up to 3900 in total ➜ 2600, up to 5200 in total 2. Gifted Shatter Lance (g): A. Now only works on paralyzed enemies B. Damage: 1040, up to 1560 in total ➜ 2600, up to 5200 in total (same as frost affinity) 3. Shatter Lance: Apply damage overflow fix We want to give Stone Warrior (b) a slight buff to continue improving on its synergy with Rageflame. At the same time, we are taking this opportunity to change how the nature affinity works. Right now, it is an unconditional damage ability and this fact prevents us from buffing its numbers. It is also odd because the nature affinity has a paralyze extension effect akin to the frost affinity's freeze extension effect, but the Shatter Lance has no paralyze synergy. We are therefore changing it to work on paralyze targets like the other affinity works on frozen targets and buffing its damage numbers to be equivalent. Lost Horror: 1. Life points: 3730 ➜ 3230 2. Multishot - Both affinities may shoot at 3 targets at once. 3. Move affinity effects into the attack itself. A. Infused Lost Goo (r) - Knocks back small and medium units. B. Gifted Lost Goo (g) - Additionally, the goo is extremely toxic, poisoning every enemy it touches for 20 damage every second for 10 seconds. Lost Horror(g) is one of the best beginner cards in the game. The same is not true for the fire affinity, which like many affinities is significantly worse. The damage difference between the cards is so high that it is difficult to ever imagine the player choosing the fire affinity. Therefore, we are buffing the fire affinity to also be able to target 3 enemies simultaneously and adding a minor poison effect to the green affinity. At the same time, we are chopping off 12% of the card's health as its life points are closer to a T3 melee XL-unit than a ranged unit. Ravenheart / Ravenheart Promo: 1. Passive ability Fleet Support: now works on any allied Raven unit, including the Raven Archwalker. 2. Updated status bar icon to be more consistent. [ NPC & Map Changes ] New NPC Entities: Added several new Shadow entities available for use by official and community mapmakers. Counter type fix: Fixed multiple NPC's to use the correct working armor type, so that they properly receive 50% more damage from attackers that have the matching counter type instead of 0% more damage regardless which counter attacked. Teststrike: Added two additional abilities to Teststrike for maptesting purposes; one to drain own wells to get more power, and one to kill friendly units.


-
I definitely think there is a real question to ask about what to do regarding the new maps and the old achievements. For now we just incorporated the new maps into them, but as we add more maps the question really needs to be asked if that is a good idea. I don't particularly like newer players, or just less active ones, needing to do more work for the same rewards, and in that sense it seems smart to limit the existing achievements to the original maps.
-
While the initial buff does not affect the champion, I am fairly certain the leveled up buff does.
-
It is based either on time, or passing the gate next to the player's T2, whichever comes first. The time limit before the reveal triggers is stricter on expert than on advanced.
-
Patch #400049 - Spooky Giants Welcome to our newest patch. This update contains our fifteenth balance patch for the game, 2 brand-new cards, 1 new promo card, one new achievement, and much more! Patch Preview Two new cards are now available! Jump in-game to collect Simulacrum and Twilight Archers! Added one new featured community map! The Lost Souls have reincarnated the fallen Jorne and he is after Rogan in this ghostly redo of King of the Giants! One new Halloween achievement; beat the new Spooky Giants map before November 10th to receive the new promo Jorne! Some minor buffs to underperforming cards. General Changes & Fixes Fixed locked maps showing no required maps. Added a "Pause Game" button to the ESC menu. The game will no longer be paused when simply pressing ESC. The setting "allow_pausing_solo_games" in the config file is now deprecated. Add ranking data from before patch #400035, when ranks were reset due Decomposer and Batariel changes. There is a now a new filter option "Since #400035". Add leaderboard refresh rate information when hovering on range filter question mark. Add voicelines to Jorne (and Promo) [English only]. New Halloween Event Map It is that time of year again, when ghastly ghouls and spooky skeletons arise from their ancient graves to once again haunt the living. As has now become a Skylords Reborn tradition, we are bringing you a major Halloween event with the addition of a reimagining of King of the Giants. Similar to our previous Halloween event map, Spooky Encounters, we have swapped all the existing enemies on the campaign map King of the Giants with Lost Souls equivalents. Re-experience this classic campaign map and earn yourself a new promo Jorne in the process! The event lasts until November 11th and will reoccur yearly. Spooky Giants, 4-player map Happy Halloween! Rogan Kayle is luring the giant king to the human realm, but something is wrong. The giant king has fallen and risen anew - more bloodthirsty than ever before! New Halloween Achievement Frankenstein's Monster [Card: Jorne (promo)] Win the 4-player featured community map Spooky Giants on Expert difficulty during Halloween. New Cards Simulacrum - 100p T3 Amii Unit You will find the upgrades for this card on the maps "Nightmare's End" (U1) and "Unexpected Visitors" (U2 and U3). Simulacrum, the missing unit from the Amii wallpaper, and our first T3 Amii unit, has finally arrived. The idea behind Simulacrum is to create a tempest-style unit, but with real mobility. Therefore, we added a teleport ability to the unit while rooted, so that it can be moved around similar to a unit-version of Phase Tower in T3. In addition to the teleportation ability, it has an on-hit slow, allowing it to engage in hit-and-run tactics, slowing an enemy's approach and dodging away when they finally get into range. Twilight Archers - 60p T2 Twilight Unit You will find the upgrades for this card on the maps "Nightmare Shard" (U1) and "Into the Jungle" (U2 and U3). We wanted to add a ground-based T2 archer to Twilight, but we ran into the issue that Fire/Nature in PvP would become oppressive with a cheap T2 archer unit due to being able to mass the unit into an archer army. To combat this issue, Twilight Archers deal more damage at the beginning, and less damage once they run out of ammo, similar to an unchargable Deathray would work. As part of our goal of adding more transformation effects, Twilight Archers create a small healing aura when transformed. Jorne (Promo) - 300p T4 Legendary Unit Obtainable via the new achievement Frankenstein's Monster. Can only be completed during Halloween! Game Balance Changes [ Global Balance Changes ] Twilight Transformation speed: All transformation are now as fast as Twilight Crawlers (0.6 seconds). [ Card Changes ] Amii Monument: 1. Removed Slow Construction. Eliminator: 1. Damage: 780 dp20 ➜ 840 dp20 Envenom (p): 1. Tainted Intoxication (p) duration: 15 seconds ➜ 25 seconds Fire Force(b): 1. Blessed Morale damage reduction: 25% initial, 50% at full strength ➜ 20% initial, 40% at full strength Slight nerf to the frost affinity of Fire Force which provided too much durability with Unity in the higher tiers. Frost Sorceress: 1. Ice Shield cost: 20p ➜ 10p Makeshift Tower: 1. Power cost: 60p ➜ 50p Twilight Crawlers: 1. Add "Adept Mutation" passive ability: Cost to transform unit is reduced by 13p. 2. Remove "Rapid Transformation" which is now standard across as Twilight units. Twilight Hag: 1. Gifted Enrapture (g) regeneration: 30 life points per second ➜ 60 life points per second 2. Infused Enrapture (r) buff: 20% more damage ➜ 60% more damage Twilight's Hag's crowd control effect has become an important part of Twilight's T3 since the changes to Amii Monument. While Enrapture's crowd control effect is powerful, especially in combination with Nature's other crowd control effects, the allied buff effects are relatively weak. We are buffing both allied effects to give Hag more slot efficiency as a support unit. [ NPC & Map Changes ] Bandit Skyrake Alpha Male: 1. Damage: 58, up to 86 in total (470 dp20) ➜ 84, up to 126 (700 dp20) 2. Life points: 1430 ➜ 1200 3. Size: M-size ➜ L-size 4. Texture has been slightly changed to make the difference between normal Skyrakes and Alpha Skyrakes more obvious. 5. Added new ability descriptions and noted that the unit deals 100% more damage to flying units. New NPC Entities: Available for use by official and community mapmakers. Lost Watchtower: 1. Added a new building (NPC entity): Lost Watchtower is a powerful T3 Lost Souls tower. Into the Jungle: Terra now spawns after either all three objective spawners have been destroyed, or if the final objective wave has been spawned. Unexpected Visitors: Destroying the Banestone objectives before the end of the second night now reduces the remaining portal charge time by 1% for each Banestone. This is in addition to the existing fall reduction in portal charge time. Several Lost Launchers near the Lost Souls portal have been swapped with Lost Watchtowers. [ Bugfixes & Miscellaneous Changes ] Fixed Into the Jungle teleported buildings not taking damage. Reduced the noise volume of portals in campaign maps, mostly notable on Ascension and Empire. Fixed some English descriptive issues on Forest Elder, such as the claim at Magic Link worked on itself.


-
Forest Elder's Magic Link ability not working on itself
WindHunter replied to Flawebako's topic in Resolved
It is not supposed to work on itself, it is a descriptive error and will be removed. -
We will think about how Mindweaver interacts with the new units and if any changes are needed. Per Mountaineer, the card is supposed to be a kind of mini-boss for the areas where it is found. Its shield is 660 strength and it can affect up to 4 friendly targets, both units and buildings, nearby. Perhaps it is a bit much, but again, we had a very constrained unit pool and we wanted something which could provide shields to multiple units in an area and it felt like the best option. Per the section to the left of the T2 before the city, that has proven to be very difficult to balance. When it was weaker, it was too easy to get 2 wells early and the player's power generation discouraged leaving the base to find more wells. For now, the area is mostly useful for advanced difficulty where the player has more time to clear it before the first Lost Souls waves hit the Amii city.
-
Two things: NPC and player units are not identical and never have been. They have not only different stats, but also different tiers and different abilities. When we were designing the Frost section of Unexpected Visitors we were extremely limited in what we could use, because we could not use Lyrish-Frost units as it made no sense lore-wise. If Mountaineer did not deal air-damage it would have been added to the map, its anti-air capacities are largely why we added it in the first place. And, if we are to complain about Mountaineer, why not about Icespike, Mountain Rowdy, or Ice Guardian? All 3 of these are major departures from their player versions. All NPC power costs were aligned when we did the other ones. NPC Vileblood is a T3 unit, Windhunter is a T4 unit, and Twilight Dragon is a mini-boss (immunity, not mind control). Their strength fits its internal orb/power costs. Stopping Vileblood swaps by Nightguard was a major the reason behind NPC orb/power fixes, and it would make no sense to keep Vileblood at T2 when it has the stats and ability effect of a T3 unit. As per the Lost Souls and Frost units, some of them might still have their player power costs. This is also true of the Fire rPvE enemies in cases where the stats and abilities were nearly identical.
-
If you want to share and see more card suggestions, you can join our balance discord, which as a dedicated section for this. As for this idea, we currently have no plans to add other XL-units to T2 beyond Harvester. Similar to how Sunderer is the only L-unit in T1, we think it is better in this case to preserve faction uniqueness but not overusing large and extra-large units in the lower tiers.
- 1 reply
-
- 2
-
-
We could easily redo the map, but I do not think it has much upside. Like I said, the mission location ultimately does not matter except in so far as it is connected to the other maps within the same storyline. Moving all the missions around would only confuse people, and I doubt it would make most people happy.
-
Hello, we did not make any changes to how frequently each faction appears since we added Nature rPvE to the pool of available factions. This is likely therefore a streak of bad luck.