

Dutchy
-
Posts
403 -
Joined
-
Last visited
Posts posted by Dutchy
-
-
Apologies for the confusion and thanks for pointing it out.
Volin and Bonobobobo like this -
Changed the date in the post to today, instead of July
Bonobobobo likes this -
12 minutes ago, NullSeed said:
Warchief
👀
Metagross31 likes this -

We do love ourselves some Latin 🙂
Maze likes this -
Yes, only moderators can change player's ingame name.
-
Please make a ticket via #contact-staff through our discord if you wish to get your ingame name changed.
-
You only have 45 min though, better hurry up!
-
We fired Rogan as he never listens, especially Encounters with Twilight.
Tiny Thor, Volin and Metagross31 like this -
Volin voicing a stonekin unit 🤣
-
As explained in Discord, AIS will tank almost 2k damage, which regenerates by 480 every second.
Unity works with shields, so any damage is spread over the 3 shields.
AIS does not bind power and is easy to reapply for just 80 power in a spell heavy deck.
AIS does not need as much micro as WW and does not have summoning sickness .
Hopefully these are enough reasons for my choice 😄
-
Hey, awesome to see you have interest in this deck! I've been talking about it on Discord and none believes me it is a good deck 😞
Anyways, here is my variation on it:
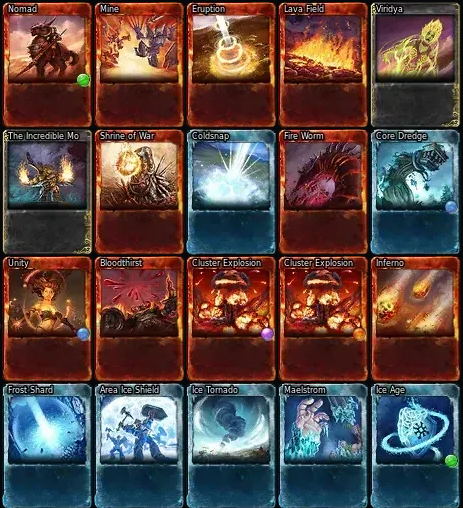
And the deck code: MEUCNiF0M7TqYdIYFFLgRMUGNwXxXjFqLoLqOrLYX -
Correct. But it was chosen this way. It could have been the other way too but then people will complain its no challenge 🤷♂️
Dran likes this -
The achievement is considered a veteran achievement.
By allowing Advanced, it wouldn't be considered veteran. Only allowing expert was a design choice mainly as some maps were only made on expert difficulty.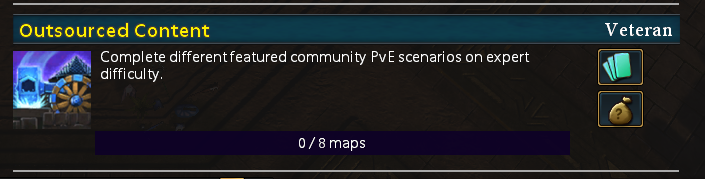 Metagross31 likes this
 -
Have you tried Mauler?
DefAnske and Metagross31 like this -
My solo runs are almost sub those times 👀
Hrdina_Imperia likes this -
We gave it to the AI so we have a chance to beat it 😛
Damo likes this -
Message from nukie:
"Apologies for the delay in getting rewards out, I currently have no internet since Sunday evening. I should have it back over the weekend and will get all rewards sent out as soon as possible"
Metagross31 likes this -
Since so many asked me, I might as well share the replay ^^
It was a fastest run, but by no means my cleanest as I lost way too many Shadow Phoenix and the egg pushing could be a bit smoother.
A small explanation on how I did it:
Spoiler
I made 3 Nomads and took out the tower and first group of units. When I got control of the Eggforcer, I let him heal at the wells. After that I placed 3 Mines and pulled the enemies into it. I made sure to avoid the explosions from the dead Twilight Slavers. When they are all killed, I start to kill the spawner. While doing so, I placed a Mine below the 2 defensive towers. This Mine kills the first wave that attacks the monument. After the spawner is destroyed by the Nomads, I ran down and placed a Mine between the Stonekin and Twilight enemies. I had to run real close to the Stonekin unit to get their attention. Not all Stonekin have to die. Afterwards, I ran a bit down and placed 2 Mines for the next camp and pulled them into it. I focused the Twilight Dancer, followed by the spawner and lastly the tower. With the paralyzed unit, I already took the Power Well when I have enough power. At tier 2, I placed 2 Embalmer Shrines for the Shadow Phoenix later. I spanwed 4 Shadow Phoenix when I had enough power and made sure to mine the next wave when they arrived. With those 4 Shadow Phoenix, I crash-dove into the Stonekin Warrior to the left. With Embalmer Shrine active, I got all 4 back unbound. During the same Embalmer Shrine activation, I crashed all 4 into the upper Stonekin camp, killing everything but the Stonekin Crystalfiend. All 4 came back and I flew them to my tier 2 location. There I spawned another 2 Shadow Phoenix. With 6 (4 unbound) I flew to the Fire Emitter camp. Here I crashed 5 Shadow Phoenix into the Healing building and 1 into the Fire Emitter, Destroying both buildings and killing enough units in the process for all 6 Shadow Phoenix to revive. I flew them back to safety and spawned 4 more (10 total). I used them to crash into the big wave. Unfortunately, it was too close to the Abomination camp. Normally, it is possible to fly below the camp and crash into the Abomination, and with little luck, kill/destroy most of the camp. I build my tier 3 and started pushing the egg at minute 7.47. I used my remaining Shadow Phoenix to crash into the Willzaper camp. Baiting its activation with 1, and crashing into it with the other 4. While this is happening, I spawned 3 Ashbone Pyro's to kill everything that remains till the Easter Tree. To get their, I used Nether Warp to dodge the Twilight Bombard attack, Frenetic Assault to kill the 2 Thornbarks and another Frenetic Assault to kill the 3 Spikeroots. All is happening while the Egg is pushed by the Eggforcer closer and closer to the Easter Tree. Arriving there in time to get a run of 10.25 minutes.Enjoy 🙂
2023-04-15_11-19-31_CommunityMap1P_pve_the_easter_tree_diff3_s65287_GMDutchy_time_0_10_25.6_v260.pmv
How to watch the replay?SpoilerTo watch the the replay, download above file and place it in Documents\BattleForge\replays. When successful, open the game and go to the Chronicals tab (left of the mini map) and go to replays. The first file is your autosave, and the second should be this run. Enjoy 🙂
Killbuster, nukie, DieToPlay and 4 others like this -
This event looks sooo cool, or hot, I cant decide 😞
Metagross31, Hrdina_Imperia, Damo and 1 other like this -
-
No, but Moderators can do it for you.
Please create a ticket via #Contact-Staff on our Discord server. -
1 hour ago, Raxaaa said:
who has a game boy still
Never had one, first game thing I had was a GameCube followed quickly by DS Lite
-
The people responsible are trying to do their best to make sure nothing is missing in the patch notes.
With that said, last patch there were no nerfs to root network units. ( @WindHunterPlease correct me if there were)
-

Why does X suck... I guess it can be called a series now. To read "Why does Wheel of Gift suck", please click here: https://forum.skylords.eu/index.php?/topic/9219-why-does-wheel-of-gifts-suck/
Juice Tank is a Tier 2 building (device). It costs 50 power and passive ability that does the following:
"Within a 25m radius the remaining capacity of own and friendly Power Wells takes 40 / 45 / 50 / 55% longer to deplete. Production per time increment remains the same."To explain in simple terms, if you build a Juice Tank near a Power Well, it will take longer for that Power Well to run out, resulting on more total power gained from that Power Well. Maps that take a long time to clear, or where your Power Wells have low capacity, Juice Tank is a card to consider. The only reason you want to put this card in your deck is if you run the risk of running out of power.
Running out of power on a map is extremely rare. There are only a handful of maps where this is realistically possible, Nightmare's End comes to mind. Because Juice Tank takes a while to get usage out of it, it is not recommended to use in maps where there is a strict time limit. Prime example of this is Random PvE maps. In none of the difficulties will the Power Wells run out before the timer does. This makes Juice Tanks completely useless in Random PvE. To make matter worse, if you build a Juice Tank on all your Power Well clusters, you bind 200 power. This is the equivalent of (almost) a Tier 4 unit.
Considering all of the aforementioned, I earnestly ask everyone to review their Random PvE decks and remove the Juice Tanks.
Thank you 🙂
--------------------
Juice Tank can be played in Lost Spirit decks to fuel their ability, destorying the Juice Tank in the process.Volin, Dallarian, You will win with me and 5 others like this
Old School Efficiency
in Events and Tournaments
Posted
Here: https://youtu.be/Gso5uD-EPGw